

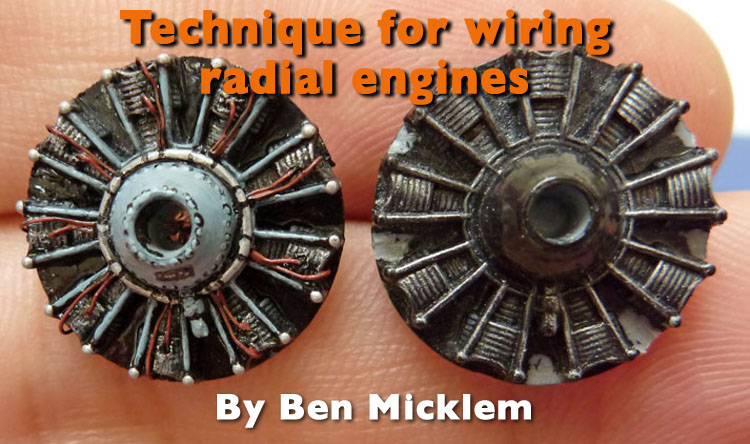
Radial engine wiring technique
2
Comments
Radial engine wiring technique
I just thought I would share a technique I invented today that seems to take some of the pain out of adding ignition wires to radial engines. This technique is a compromise, and is probably more suitable for 1/72 (where accuracy is limited by dexterity and eyesight anyway).This MPM engine is not particularly nice to look at, so I though I would try and make it look a bit more 'busy', and less like an obviously moulded piece of plastic.
The obvious way to attach wires would be to drill a fairly shallow holes at the start and end points, and try to glue one end of a piece of wire into a hole. This is quite tricky, as superglue doesn't like gripping thin wire, so you really have to wait until the glue is dry. Then it is hard to manipulate the short length of wire into a small hole, and to have the length right so it doesn't reach the bottom of the hole. As I have no suitable tweasers, this job was driving me crazy.
So I developed an easier way:
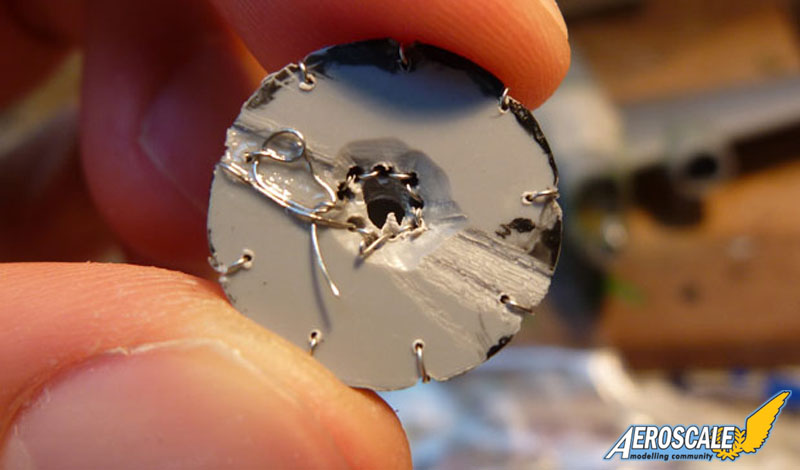
1) Drill right through each cylinder from the front to the back of the engine.
2) Drill through from the front into the hub, angling towards the back, using a slightly thicker drill bit.
3) Using a long piece of wire, make a knot, so it won't be pulled through, then start sewing!
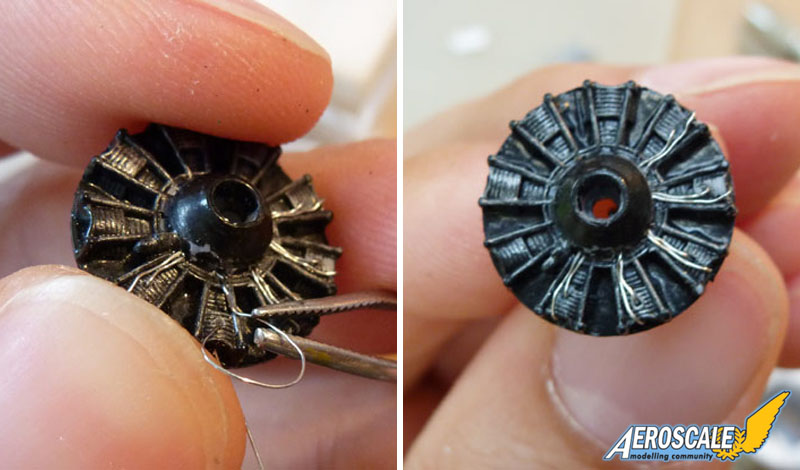
4) Arrange the wires in a realistic way (shortening them by pulling from the rear, lengthen them by levering somethind behind the wires on the front, which pulls some slack through from the back).
5) after all cylinders are wired, you can glue the wires (or not).
The advantages of this method
Quicker and much easier.No super glue so: no problems of it coming unstuck when you are threading the opposite end of the wire, no mess left on the fine detail of the cylinders.
Cutting the correct length of wire is no longer important.
On the finished engine I painted some details that weren't there like the junctions in the distribution ring (black lines on the silver ring) and tried to paint on some rivets (black dots with blue-grey dots on top). I also painted a black rectangle to represent the serial number plate, and painted some silver dots to represent the text.

About the Author


FROM: NO REGIONAL SELECTED, UNITED KINGDOM
I have an interest in photographic reconnaissance, in particular the Photographic Development Unit based at Heston at the beginning of WWII.
Comments

Thanks assembling it into a feature Jean-Luc.
This reminds me that I still haven't painted the second engine for this Hudson....
SEP 05, 2009 - 01:37 AM

Hi Ben
What a great idea! Like all the best ones, it's seems so obvious - once you've thought of it. Thanks for sharing it - I'll definitely try it on the next radial I wire up.
All the best
Rowan
SEP 05, 2009 - 02:53 AM
Copyright ©2021 by Ben Micklem. Images also by copyright holder unless otherwise noted. The views and opinions expressed herein are solely the views and opinions of the authors and/or contributors to this Web site and do not necessarily represent the views and/or opinions of AeroScale, KitMaker Network, or Silver Star Enterrpises. Images also by copyright holder unless otherwise noted. Opinions expressed are those of the author(s) and not necessarily those of AeroScale. All rights reserved. Originally published on: 2009-09-05 00:00:00. Unique Reads: 8707

WEB HOSTING BY


Copyright ©2021 AeroScale and Kitmaker Network, a subsidiary of Silver Star Enterprises
All Rights Reserved. Please read our Conditions of Use and Privacy Policy.
All Rights Reserved. Please read our Conditions of Use and Privacy Policy.