

SFOR was a NATO mission though. Not UN.
Andy that's looking sharp. Must have been masking for ages.
Air Campaigns
Want to start or join a group build? This is where to start.
Want to start or join a group build? This is where to start.
Hosted by Frederick Boucher, Michael Satin
OFFICIAL: The Lottery Campaign
raypalmer

Joined: March 29, 2010
KitMaker: 1,151 posts
AeroScale: 985 posts

Posted: Sunday, September 01, 2013 - 11:12 AM UTC

amegan

#243

Joined: March 21, 2008
KitMaker: 996 posts
AeroScale: 915 posts

Posted: Monday, September 02, 2013 - 12:07 AM UTC
Think the model is upstairs somewhere and ist was brush painted (had no airbrush at the time). The camo was the same but I'm not sure it was that mission, I'm sure the aircraft had a big UN on the nose. We did a couple of strange camo schemes at the time including a Chinook in night Special Operation scheme, looked great and the Italieri 1/72 Chinook went together really well.

Jessie_C

Joined: September 03, 2009
KitMaker: 6,965 posts
AeroScale: 6,247 posts

Posted: Monday, September 02, 2013 - 05:34 PM UTC
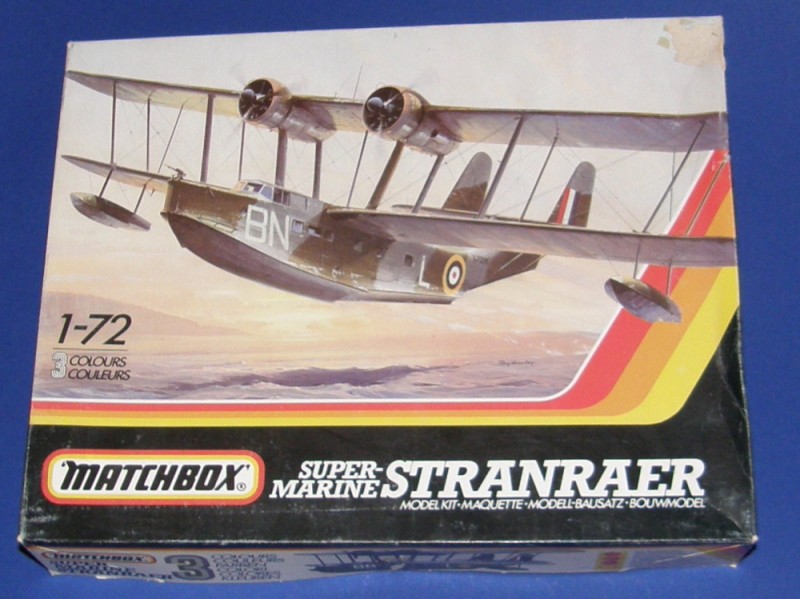
Work begins on the Stranraer.
First a little interior green.
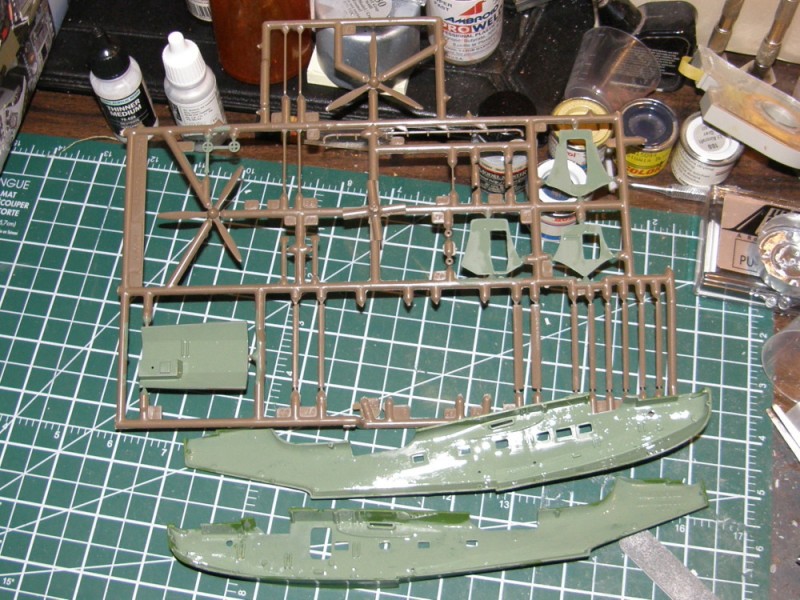
I found an instrument panel design in this thread which I convinced my printer to print at the proper size. I'm not going to bother going so nuts inside as this one given that nothing much can be seen with the wings and windows in place.
QCA re-engined CF-BXO with Wright 1820s equipped with Hamilton Standard propellers before putting it to work. I robbed a pair from the redundant ex-Frog parts of my Maquette Boeing 307 kit. The cooling gills are redundant, so off they come.

I'll need to add some air scoops on the cowling top and nacelle sides.
First a little interior green.
I found an instrument panel design in this thread which I convinced my printer to print at the proper size. I'm not going to bother going so nuts inside as this one given that nothing much can be seen with the wings and windows in place.
QCA re-engined CF-BXO with Wright 1820s equipped with Hamilton Standard propellers before putting it to work. I robbed a pair from the redundant ex-Frog parts of my Maquette Boeing 307 kit. The cooling gills are redundant, so off they come.
I'll need to add some air scoops on the cowling top and nacelle sides.

DaveMan

Joined: October 08, 2002
KitMaker: 137 posts
AeroScale: 9 posts
Posted: Tuesday, September 03, 2013 - 05:54 AM UTC
That Stranraer is going to be great when it's done.
I found a couple of kits in the stash that should work. I have an Airfix 727-200. *The UN plane is a 727-230, but the only visible difference I can see is two blocked off windows behind the front door. I can either add that on, or live with it. I will have to scratch the decals, but that should be fairly easy. I have always wanted to dive in and print some of my own decals, so now is the tiem to start.
I found an Esci F-27 400 which would have been the perfect kit for the campaign, as I really like the UN version, but when I opened the kit, the fuselage halves and wing parts were removed from the trees and taped together with masking tape. The parts haven't been fltted or cleaned up yet, but the kit isn't on the sprues either. (I think I did that about 15 years ago to show how the panel lines didn't quite line up) I wouldn't gain any time by using it, as the 30 seconds I save by not having to cut the parts off of the sprue would be lost trying to wash the ancient masking tape glue off of the parts!
I will probably jump in on the 727 Tomorrow evening after work.
As for the XC-8A Buffalo, (With the Hovercraft style air cushioned landing system)that is a really cool plane, and Amodel makes a kit of it. However, the UN didn't use one, so I would need to buy the kit and jump into the De Havilland campaign if I was going to build it. (Feel free to talk me into it, as it sure would look cool on my shelf.)
I can't wait to start sanding styrene. I've been away from building for far too long.
Dave
Jessie_C
Joined: September 03, 2009
KitMaker: 6,965 posts
AeroScale: 6,247 posts
Posted: Wednesday, September 04, 2013 - 01:04 PM UTC
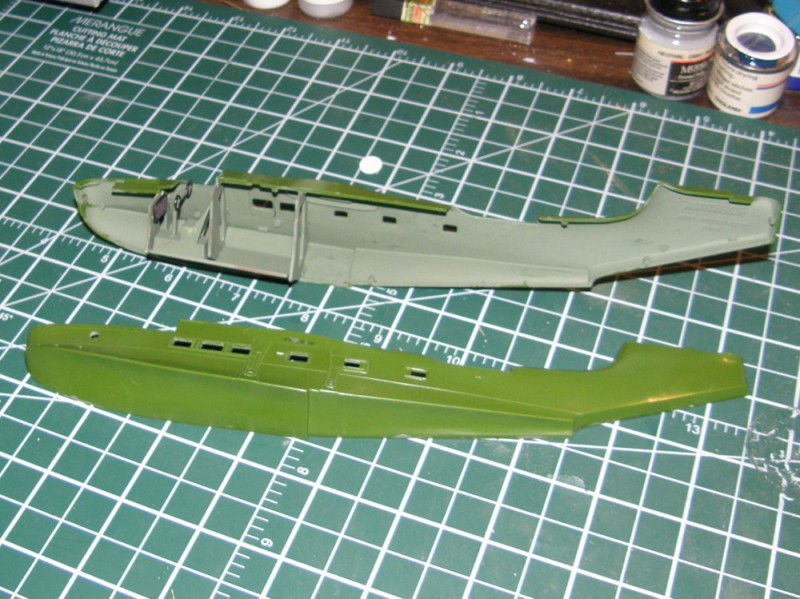
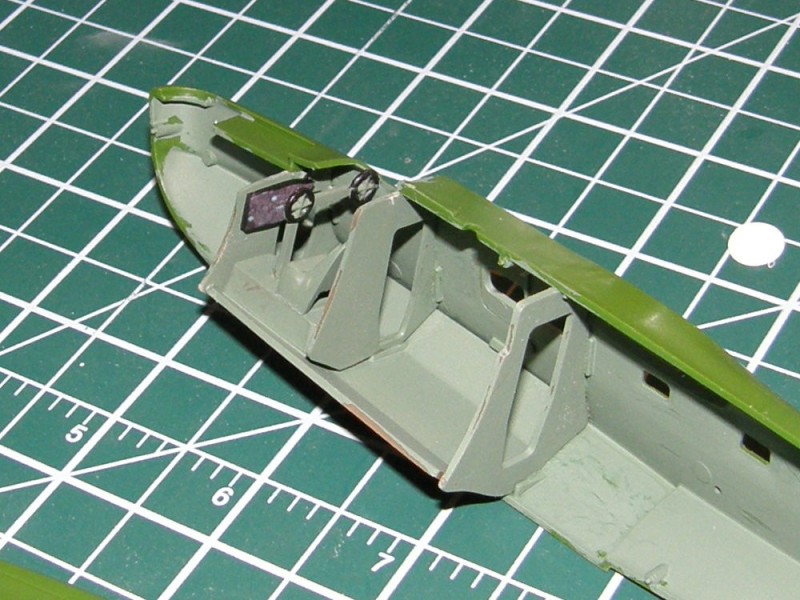
Some more Stranraer. Here I've got the interior about as finished as it's going to be.
A little peek into the cockpit
And now the wings and such test fitted together
A little peek into the cockpit
And now the wings and such test fitted together
DaveMan
Joined: October 08, 2002
KitMaker: 137 posts
AeroScale: 9 posts
Posted: Thursday, September 05, 2013 - 12:01 PM UTC
I know I said I would get started after work yesterday, but work lasted a bit longer than I expected. Here I go
Kit in box and shrink wrap

and opened

Kit in box and shrink wrap
and opened

ljames0874

Joined: August 15, 2012
KitMaker: 408 posts
AeroScale: 365 posts

Posted: Friday, September 06, 2013 - 05:59 AM UTC
Hey Everyone! We finally moved house on August 23rd (my birthday as it happens!), and have only just got our internet up and running again. Lack of internet has given me lots of time for modelling, and the good news is the Mirage is finished!


I hope everyone is well, and having as much fun with their projects as I had with this one. Cheers!
I hope everyone is well, and having as much fun with their projects as I had with this one. Cheers!

windysean
Joined: September 11, 2009
KitMaker: 1,917 posts
AeroScale: 563 posts
Posted: Friday, September 06, 2013 - 06:52 AM UTC
Lee, congratulations on your move and on a nicely done Mirage! Spectacular decalling.
-Sean H.
-Sean H.
Tailor

Joined: May 26, 2008
KitMaker: 1,168 posts
AeroScale: 199 posts

Posted: Friday, September 06, 2013 - 08:45 AM UTC
A belated Happy Birthday and timely Well Done Mirage. Spectacular paint and decal job!
Guido
Guido

c4willy
#305

Joined: February 01, 2006
KitMaker: 1,673 posts
AeroScale: 1,517 posts

Posted: Friday, September 06, 2013 - 01:18 PM UTC
Well the donor kit has finally arrived now it's time to start this build! I've created a build log for this kit as I think it would be good for others to see what problems may arise from building it. So lets see what happens! Wish me luck as this is so far outside my comfort zone it's going to be hilarious!


c4willy
#305
Joined: February 01, 2006
KitMaker: 1,673 posts
AeroScale: 1,517 posts
Posted: Friday, September 06, 2013 - 05:56 PM UTC
Well after several hours of work I've gotten this far. The large locating pins haven't proven to be a major problem providing good positive fit and reasonably good alignment of the two halves. I glued the wings together to make the cut through the nacelles easier, which actually worked out pretty well.
I glued the interior together and placed inside the right hand side of the fuselage to line everything up which again worked well and provides little trouble. Next I remove the resin cowls and engines from their respective backings and cleaned them up. Again no real dramas removing the resin parts although care is needed when removing the cowls and engine crankcase and backing.
I then proceeded to glue the cylinders to the crank case, I was worried as there was no positive locating pins for the cylinders even though there were on the crankcases. I toyed with the idea of drilling holes and using wire but realised that it would be fiddly and there would be little margin for error so I proceeded to glue them directly to the crankcase while the crankcase was stuck to some masking tape to eases handling them. with a little clean up the cylinders went straight on and were easy to line up with the crankcase everything went together well and when all were attached I sprayed kicker over them to set them in place. Bingo .... damn good looking engines way past any detail the original moulds had produced.
Here are some pics of the progress so fay you be the judge.

betheyn

#019
Joined: October 14, 2004
KitMaker: 4,560 posts
AeroScale: 2,225 posts

Posted: Sunday, September 08, 2013 - 08:05 AM UTC
That is one excellent looking Mirage Lee, fantatstic markings.
Yep did take a bit of time, then took more time still as the 2 tailfins had decals but they looked rubbish so they got painted as well.
Well here she is all finished.
There are a few fit issues, mainly with the windows, which just fit into the holes, except for the windscreen which is a little on the big side and overhangs a touch.
Quite pleased for my first finished aircraft model in over two years, and quite colourful .
.
A great idea for a campaign, which has to be repeated.
Andy
Quoted Text
Andy that's looking sharp. Must have been masking for ages.
Yep did take a bit of time, then took more time still as the 2 tailfins had decals but they looked rubbish so they got painted as well.
Well here she is all finished.
There are a few fit issues, mainly with the windows, which just fit into the holes, except for the windscreen which is a little on the big side and overhangs a touch.
Quite pleased for my first finished aircraft model in over two years, and quite colourful
.A great idea for a campaign, which has to be repeated.
Andy

Jessie_C
Joined: September 03, 2009
KitMaker: 6,965 posts
AeroScale: 6,247 posts
Posted: Sunday, September 08, 2013 - 08:25 AM UTC
Lee, c'est magnifique!
Andy, das ist wunderbar!
Now time for something with more pedestrian colour schemes, methinks?
Andy, das ist wunderbar!
Now time for something with more pedestrian colour schemes, methinks?
windysean
Joined: September 11, 2009
KitMaker: 1,917 posts
AeroScale: 563 posts
Posted: Monday, September 09, 2013 - 01:29 AM UTC
Andy, you've created a little masterpiece there! You can be proud of that one!
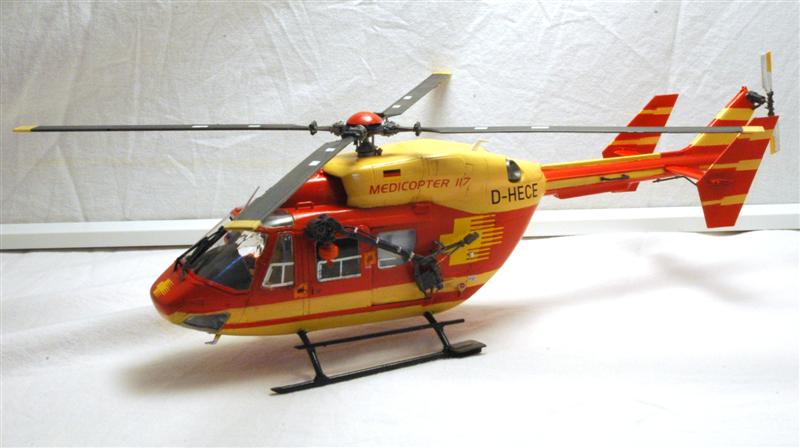
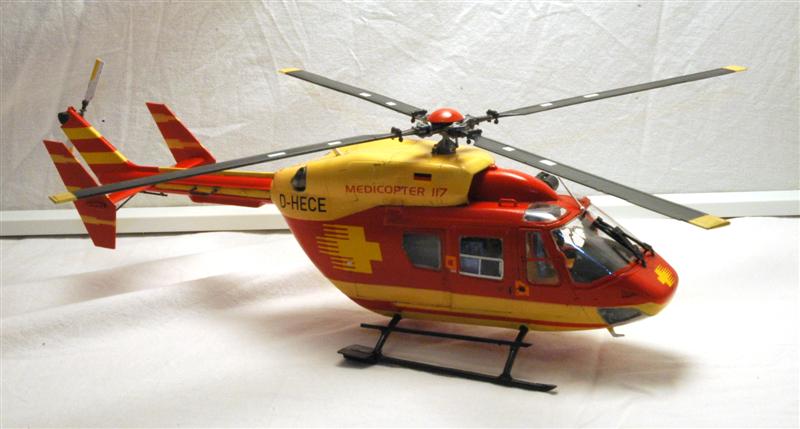
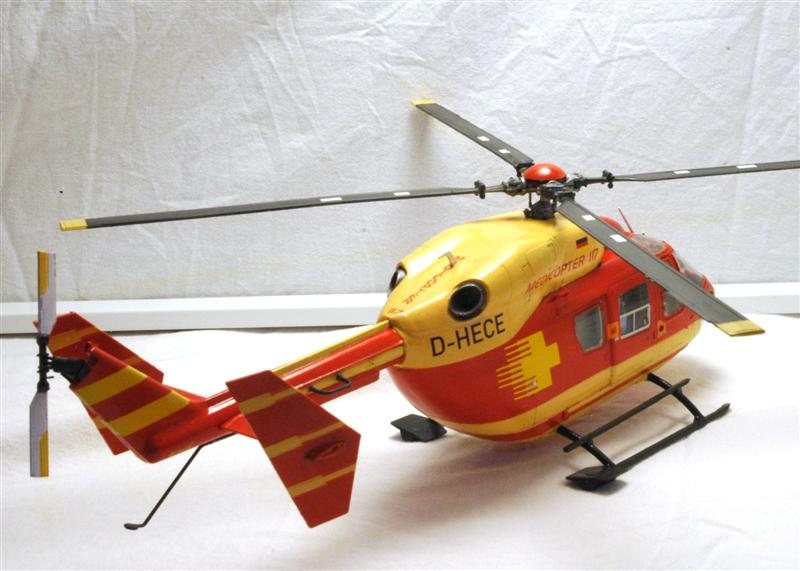
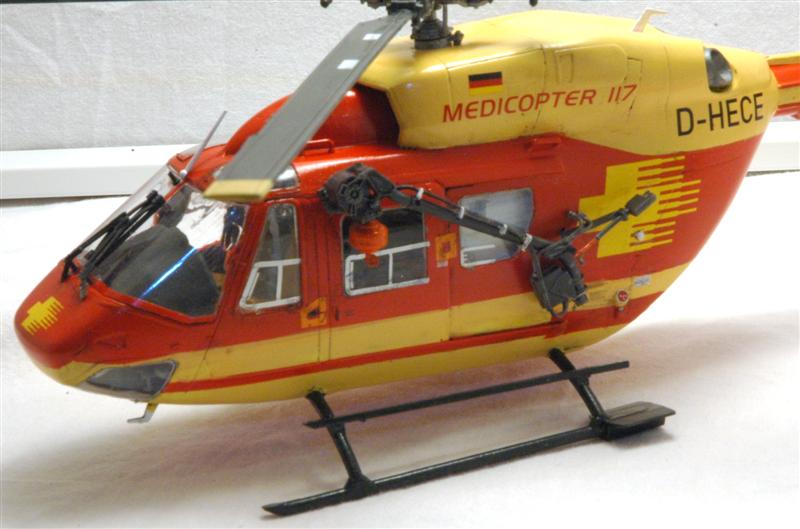
As for me, here's how I finished. Copies in the Gallery. The camo wasn't what I was aiming for, but at least it's very distinctive, ha ha! That's got to count for something in this lottery campaign.
Cheers!
-Sean H.


As for me, here's how I finished. Copies in the Gallery. The camo wasn't what I was aiming for, but at least it's very distinctive, ha ha! That's got to count for something in this lottery campaign.
Cheers!
-Sean H.
amegan
#243
Joined: March 21, 2008
KitMaker: 996 posts
AeroScale: 915 posts
Posted: Monday, September 09, 2013 - 11:57 PM UTC
Nice work Sean and Andy.
The Tempest has undergone repairs after the attack by the falling picture.
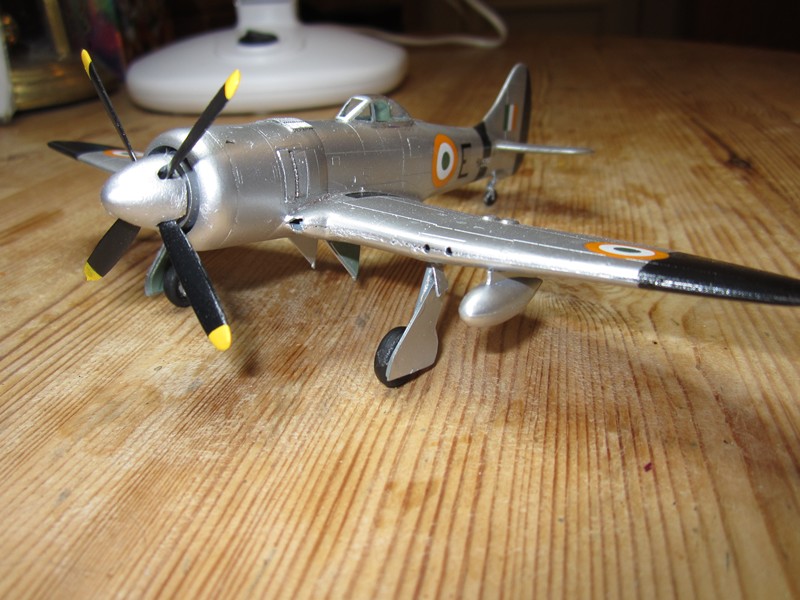
Large hole in the upper cowling repaired with Milliput, exhuasts replaced and grille replaced, engine cowling reattached. Propellor fortunately not damaged.
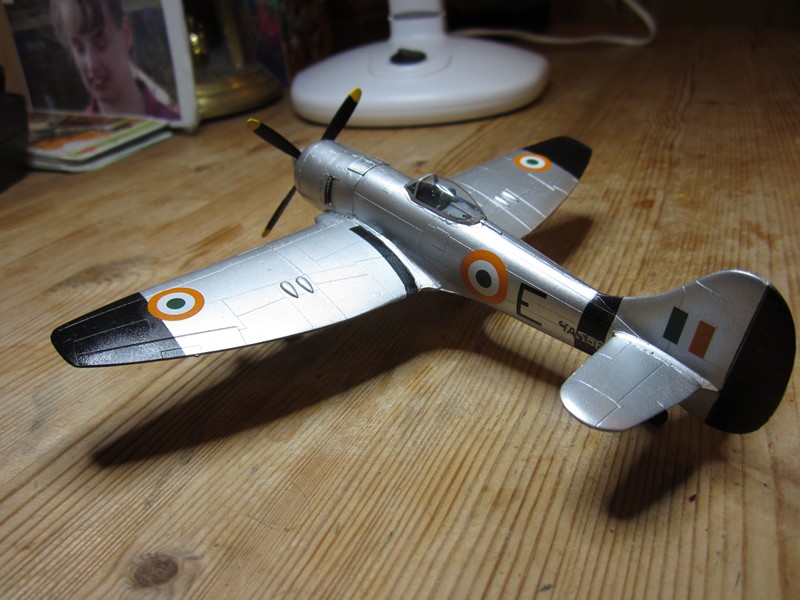
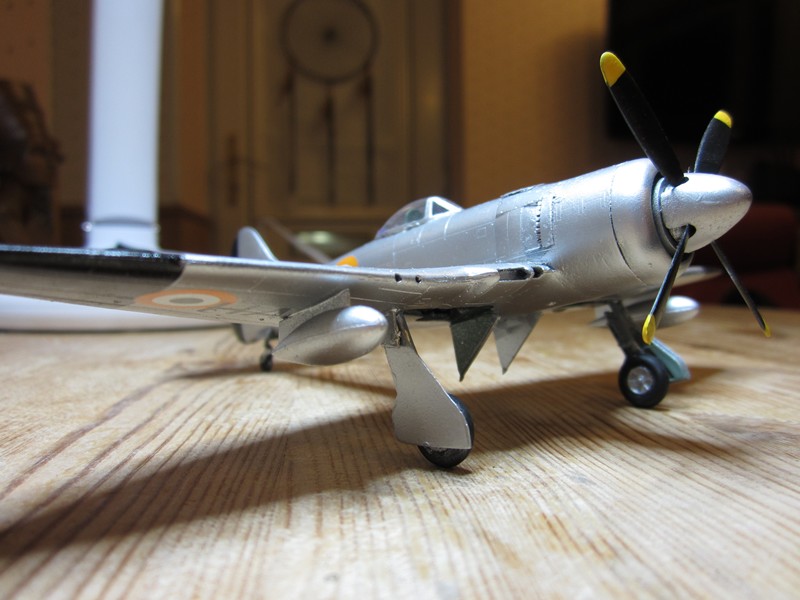
Undercarriage legs replaced with brass rod and tube and reattached. Undercarriage dors reattached.
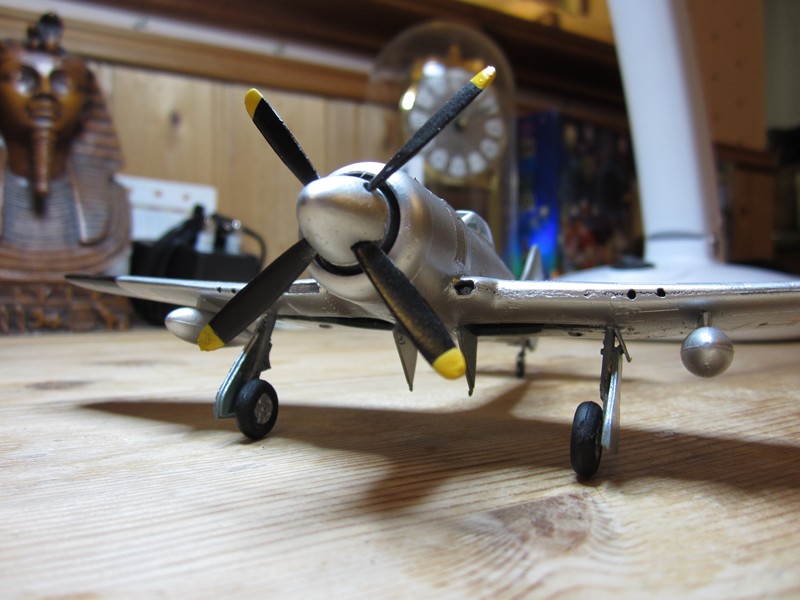
Decals and canopy masked with Maskol affected areas resprayed
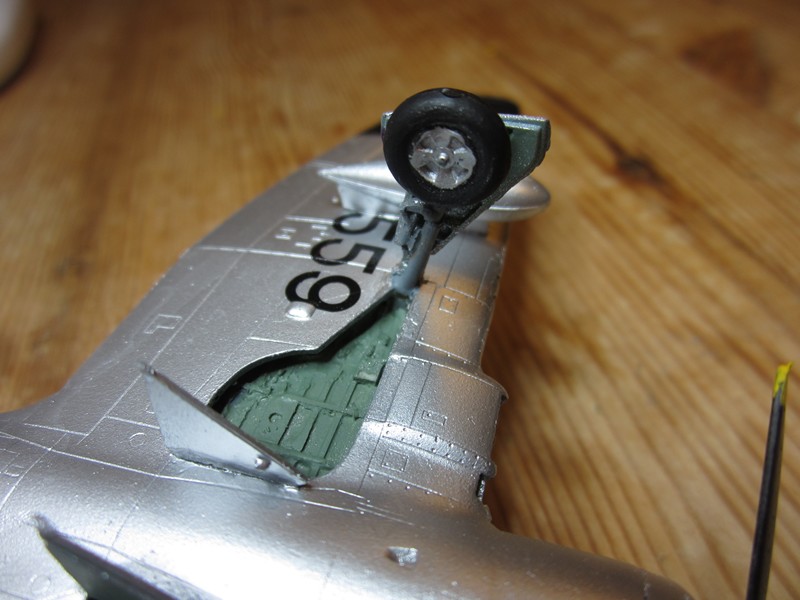
New undercarriage leg Couple more bit to fit and it is finished
The Tempest has undergone repairs after the attack by the falling picture.
Large hole in the upper cowling repaired with Milliput, exhuasts replaced and grille replaced, engine cowling reattached. Propellor fortunately not damaged.
Undercarriage legs replaced with brass rod and tube and reattached. Undercarriage dors reattached.
Decals and canopy masked with Maskol affected areas resprayed
New undercarriage leg Couple more bit to fit and it is finished

IronOwl
Joined: January 07, 2013
KitMaker: 572 posts
AeroScale: 130 posts

Posted: Tuesday, September 10, 2013 - 11:16 AM UTC
All those Builds are coming along nicely
I have yet to get started do to real world stuff so I plan on doing a different Chinese Aircraft one with not so many pieces the J8 will have to wait for a different day to get built. my other kit should arrive in a week or so and I will Post my starting pics when it does.
Cheers
Sascha(Ironowl)
I have yet to get started do to real world stuff so I plan on doing a different Chinese Aircraft one with not so many pieces the J8 will have to wait for a different day to get built. my other kit should arrive in a week or so and I will Post my starting pics when it does.
Cheers
Sascha(Ironowl)
Jessie_C
Joined: September 03, 2009
KitMaker: 6,965 posts
AeroScale: 6,247 posts
Posted: Friday, September 13, 2013 - 10:15 AM UTC
The Stranraer gets more love. I've had to fill the gaping trenches that happened around the mid-upper gun position (which of course was no longer a gun position in these peaceful times)
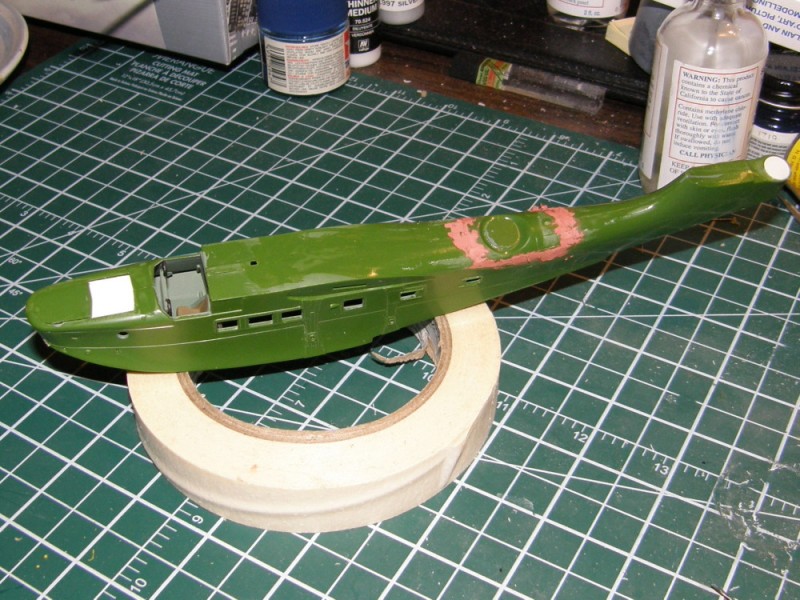
I drilled the pilot holes for the rigging, a tedious job at best, and one which cost me a drill bit
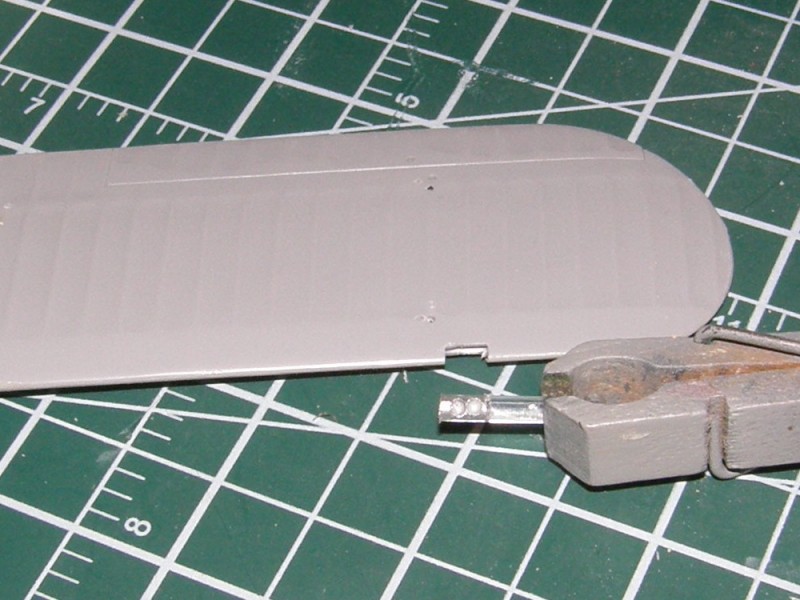
Canadian Stranraers had a pair of landing lights fitted in the leading edge of the port lower wing. I've chopped out the light position, and butchered a piece of clear sprue. Once the paint is dry I'll glue it in and file it into shape.
I drilled the pilot holes for the rigging, a tedious job at best, and one which cost me a drill bit
Canadian Stranraers had a pair of landing lights fitted in the leading edge of the port lower wing. I've chopped out the light position, and butchered a piece of clear sprue. Once the paint is dry I'll glue it in and file it into shape.
c4willy
#305
Joined: February 01, 2006
KitMaker: 1,673 posts
AeroScale: 1,517 posts
Posted: Friday, September 13, 2013 - 08:30 PM UTC
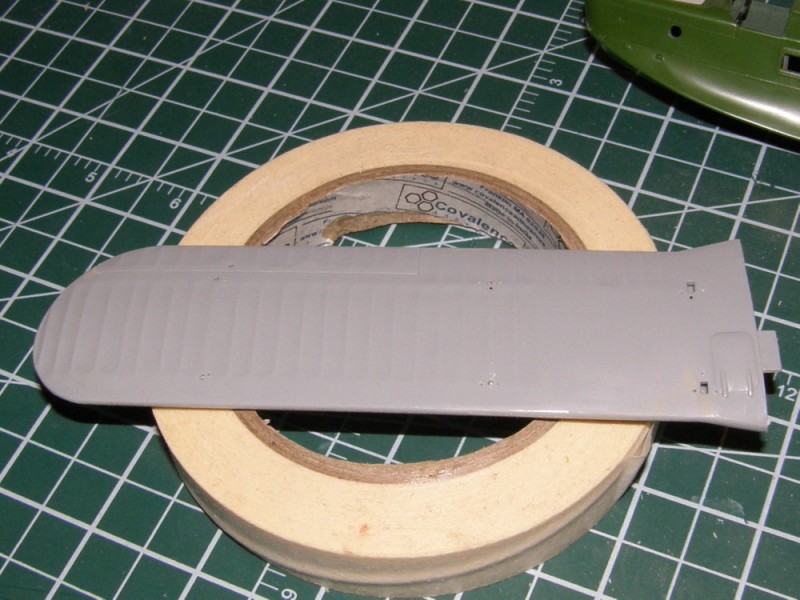
Well I'm a little further along now I'v got the floats attached and the resin control surfaces in. The tails were a bit more of a challenge than the wings but that's because of the of the way the tail control surfaces are contoured. But with careful use of a scribing tool the came off fairly easily. I've got the resin ones in place after removing them from their pour stubs and again it was another job that had to be done carefully. But they do improve the look of the model. I've got some remedial paint work to be done on the engines still to do and I'm still deciding whether to try and build the resin props as I don't have a means of accurately replicating the angle of the prop and getting them uniform. I may wimp out yet! So here are some more pics to be going on with! I removed the left engine and packed out the outer edge of the nacelle as the engine wasn't quite lined properly, probably not immediately visible to the casual observer but it was annoying me, so off it came and with a little addition of plastic back it went again!


Jessie_C
Joined: September 03, 2009
KitMaker: 6,965 posts
AeroScale: 6,247 posts
Posted: Saturday, September 14, 2013 - 01:44 AM UTC
I'm pretty sure that the Beech 18's ailerons don't droop like that. Are you going to do the extended wingtips?
c4willy
#305
Joined: February 01, 2006
KitMaker: 1,673 posts
AeroScale: 1,517 posts
Posted: Saturday, September 14, 2013 - 08:58 AM UTC
Hi Jessica, thanks for the info on the ailerons I'll get some more photos from Northwest and change as necessary. As to the wing tips I've seen them in photo's again I'll ask Northwest for some close ups as I'm not exactly sure of their profile.
Jessie_C
Joined: September 03, 2009
KitMaker: 6,965 posts
AeroScale: 6,247 posts
Posted: Saturday, September 14, 2013 - 09:55 AM UTC
They're parallel chord sections but the leading edges curl down similar to the wingtips of an F-102 or F-106. As far as I can see from photos, they start right outboard of the ailerons. The shape looks fairly complicated.
Meanwhile, back at the Left Coast...
Suddenly
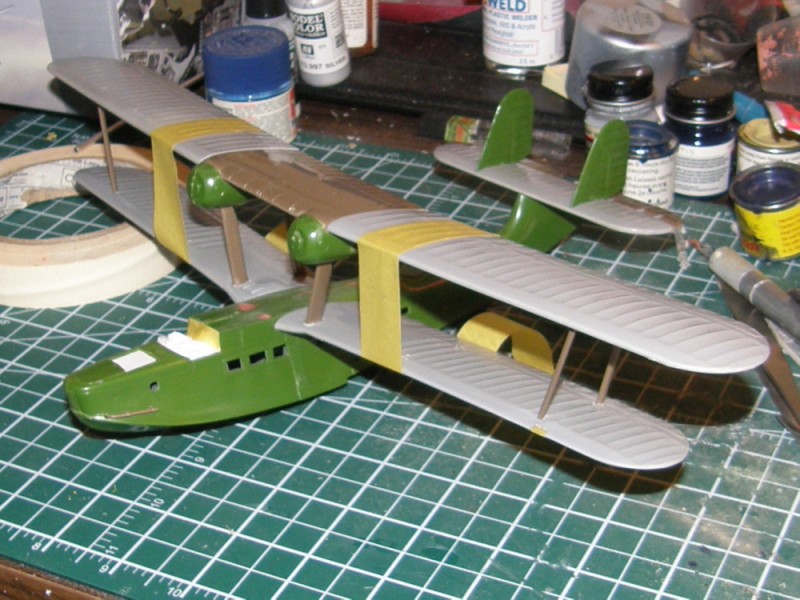
Stranraer!
Meanwhile, back at the Left Coast...
Suddenly
Stranraer!
c4willy
#305
Joined: February 01, 2006
KitMaker: 1,673 posts
AeroScale: 1,517 posts
Posted: Sunday, September 15, 2013 - 08:16 PM UTC
Hi jessica, great looking Stranraer Jess you seem to coping nicely with the biplane wings may you continue to do so.
As to the Beech's wing tips yes they do seem to be a complex set of curves at the end although Northwests appear to be simply aerofoil shaped gloves so far I've requested a few more detail shots from Shane at northwest so I can get a better idea of exactly how the extended wing tips end.


As to the Beech's wing tips yes they do seem to be a complex set of curves at the end although Northwests appear to be simply aerofoil shaped gloves so far I've requested a few more detail shots from Shane at northwest so I can get a better idea of exactly how the extended wing tips end.
Dangeroo
#023

Joined: March 13, 2009
KitMaker: 2,058 posts
AeroScale: 67 posts

Posted: Monday, September 16, 2013 - 06:38 AM UTC
Wow, these finished builds look great! Hope mine will turn out half as good... Chris, really like your floater conversion.
As for me, I've been on and off between other projects and RL but have actually managed to get the basic build done while keeping (some of) my sanity during the little rigging I had to do so far... Some putty and sanding was necessary to get the top engine/cockpit part on the fuselage but other than that (and the rigging) it was quite problem free. Here she is before priming:


And after priming (as you can see I'm also experimenting with a new white background for photos...):

The black "primer" (actually simple Tamiya XF-1) serves also as pre shade. Next will be white, Then some serious masking, including all the little stars. Printed on regular paper, this I will spray with sticky spray on the back, then I will cut out the stars and stick them individually in position and can remove them after the next layer of paint, which will be blue of course. So wish me luck, I don't know if this will work b]and[/b] allow me to keep my sanity...

Cheers!
Stefan [
As for me, I've been on and off between other projects and RL but have actually managed to get the basic build done while keeping (some of) my sanity during the little rigging I had to do so far... Some putty and sanding was necessary to get the top engine/cockpit part on the fuselage but other than that (and the rigging) it was quite problem free. Here she is before priming:
And after priming (as you can see I'm also experimenting with a new white background for photos...):
The black "primer" (actually simple Tamiya XF-1) serves also as pre shade. Next will be white, Then some serious masking, including all the little stars. Printed on regular paper, this I will spray with sticky spray on the back, then I will cut out the stars and stick them individually in position and can remove them after the next layer of paint, which will be blue of course. So wish me luck, I don't know if this will work b]and[/b] allow me to keep my sanity...
Cheers!
Stefan [
amegan
#243
Joined: March 21, 2008
KitMaker: 996 posts
AeroScale: 915 posts
Posted: Monday, September 16, 2013 - 11:36 AM UTC
Some nice builds, Stranraer is my kind of aircraft. The Beech 18 tip extensions have what is known as wash-out, a twist in the tip that delays the stall, which if it occurs at the tip first, usually makes the ailerons ineffective. Moving the stall off the tip also delays the stall and decreases the stalling speed. A prime example of wash-out can be seen on the Me-163.
It is rare for both ailerons to droop together and when it is done the flaps would usually droop as well. I don't know the Beech 18 well enough to know whether this is normally fitted to this aircraft. Love the look of it though.
It is rare for both ailerons to droop together and when it is done the flaps would usually droop as well. I don't know the Beech 18 well enough to know whether this is normally fitted to this aircraft. Love the look of it though.
Jessie_C
Joined: September 03, 2009
KitMaker: 6,965 posts
AeroScale: 6,247 posts
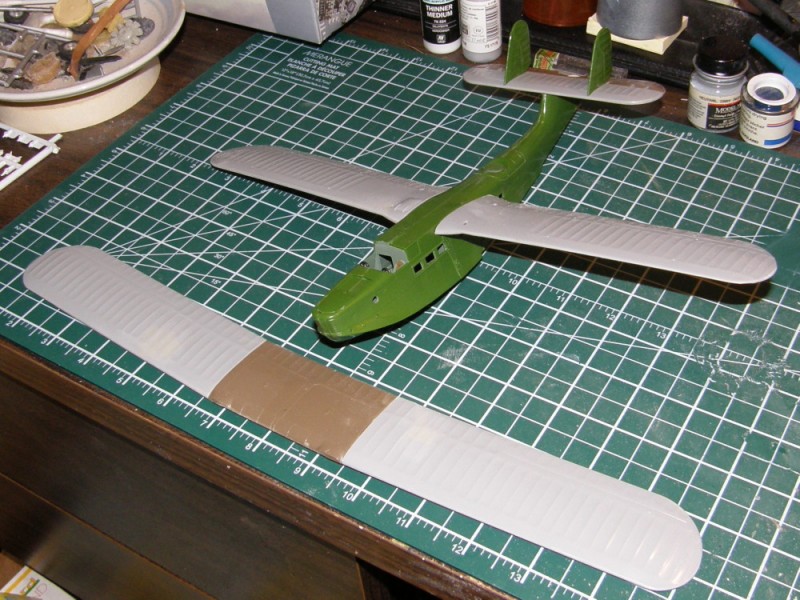
Posted: Wednesday, September 18, 2013 - 03:32 AM UTC
Basic paint
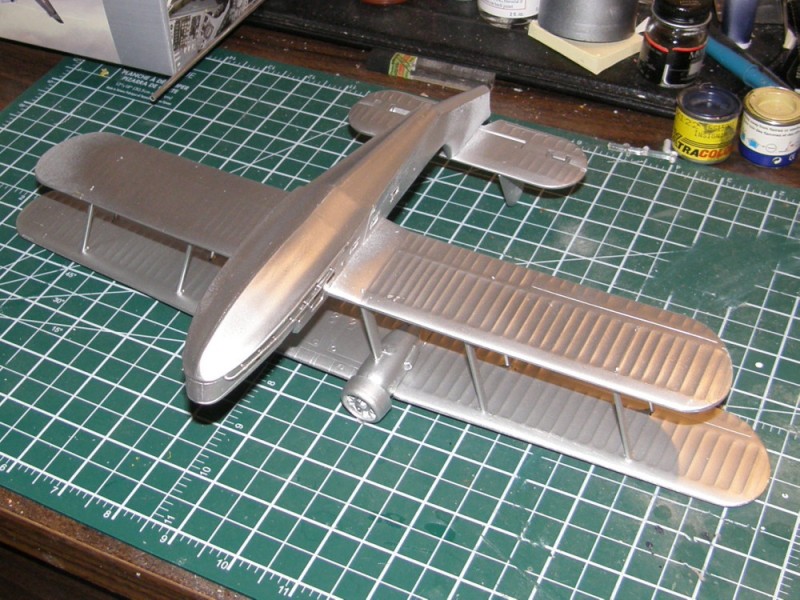
Now it's time to take care of the details.
Now it's time to take care of the details.
 |

WEB HOSTING BY


Copyright ©2021 AeroScale and Kitmaker Network, a subsidiary of Silver Star Enterprises
All Rights Reserved. Please read our Conditions of Use and Privacy Policy.
All Rights Reserved. Please read our Conditions of Use and Privacy Policy.