Air Campaigns
Want to start or join a group build? This is where to start.
OFFICIAL: Overshadowed Fighters of WWII
Merlin
Staff MemberSenior Editor
AEROSCALE
#017
_VISITCOMMUNITY
United Kingdom
Joined: June 11, 2003
KitMaker: 17,582 posts
AeroScale: 12,795 posts
Posted: Sunday, March 01, 2015 - 11:50 PM UTC
Hi again

I have to admit that I'd forgotten this campaign! I've made a start on the FineMolds Reppu today in a bid to make a late dash to beat the deadline...


All the best

Rowan
Merlin
Staff MemberSenior Editor
AEROSCALE
#017
_VISITCOMMUNITY
United Kingdom
Joined: June 11, 2003
KitMaker: 17,582 posts
AeroScale: 12,795 posts
Posted: Monday, March 02, 2015 - 03:20 AM UTC
Hi again

Total chaos has never looked so good!


Bits everywhere - no plan of attack - but I'm back at the workbench. After the troubles of the last few weeks, it feels bl**dy marvellous!

All the best

Rowan
Bink123
_VISITCOMMUNITY
Quebec, Canada
Joined: June 23, 2008
KitMaker: 414 posts
AeroScale: 364 posts
Posted: Monday, March 02, 2015 - 04:05 AM UTC
Four weeks to go, sleeves rolled up, on your mark, get set, GO!
PeeJay74
#363
_VISITCOMMUNITY
Pennsylvania, United States
Joined: January 08, 2014
KitMaker: 425 posts
AeroScale: 401 posts
Posted: Monday, March 02, 2015 - 08:27 AM UTC
Eduard 1/48 P-400 Limited Edition

Welcome aboard, Rowan. You are making much faster progress than I would.

I addressed my wings today by rescribing all of the detail that overlaps between the upper and lower wings parts. My upper starboard wing didn't line up at all with the lower section, the panel lines around the gun ports were off by about 1mm from each other. I basically obliterated the originals and rescribed them to line up. The port wing was not as bad but still off a bit, so it got the same treatment. I chose to line the outer tips of my wings up and this caused the panel lines to be off by an increasing amount as you go towards the fuselage. The outermost line up well, but the inner ones were unacceptable in every instance.

I'm wondering if it would have been better to mount the lower wing to the fuselage seperately, then fiddle with each upper wing half to minimize some of this mess. Too late now, but food for thought for my P-39Q boxing.

Anyway, wings are now joined to the fuselage, and all the gaps at the roots were addressed with first shims, then Tamiya putty, and finally some Mr. Surfacer which I am allowing to set up overnight. It was a pain but the wings look pretty decent now.


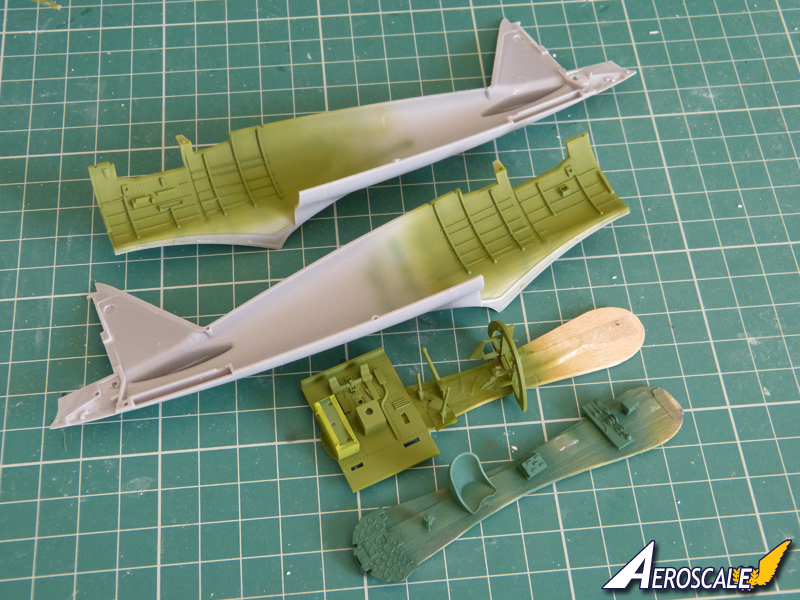
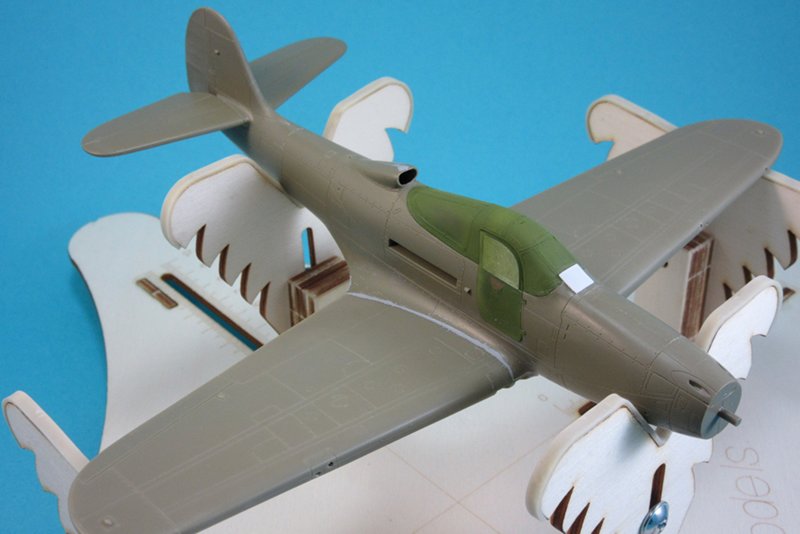
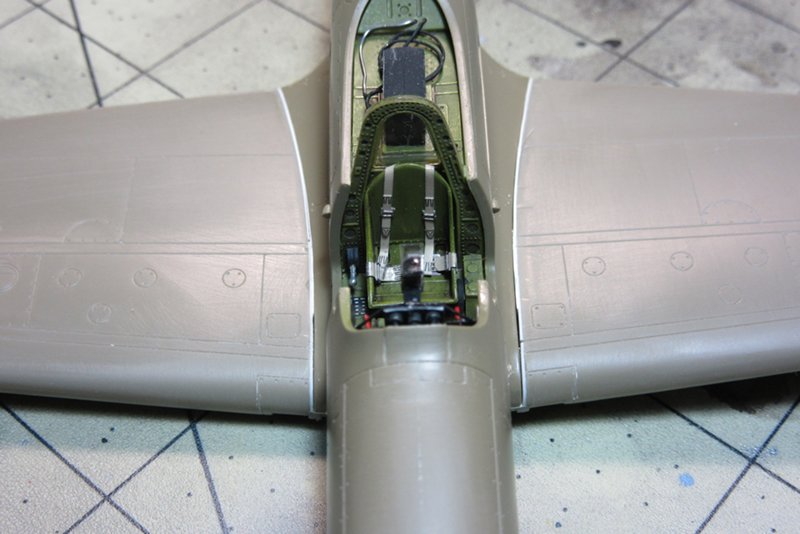
Fuselage press fit to the wings, no glue yet just the shims. This is a good pic to illustrate how bad the fit was. The remaining little gaps were almost completely closed when I glued the joins and set the dihedral.


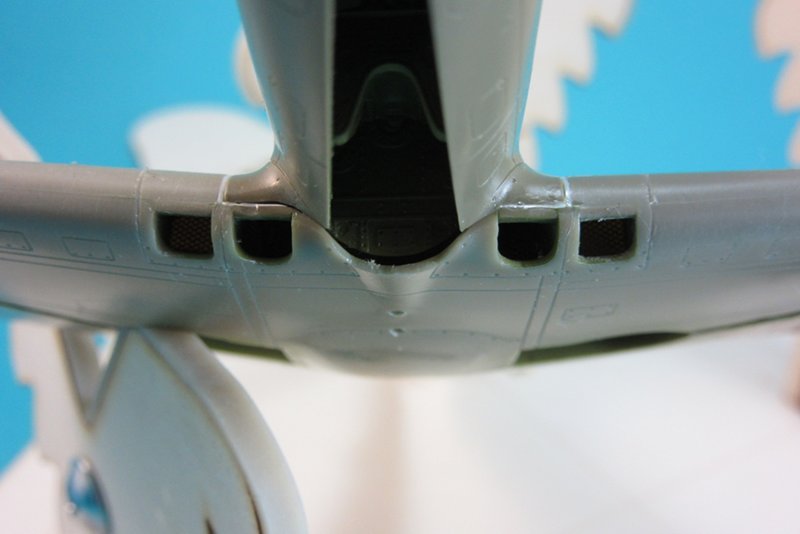
The front of the wing roots, illustrating how bad the fit was in every regard. The lower wing was originally square where it abuts the fuselage, which is curved down to meet it. It didn't fit together at all, there was at least a 3mm gap resulting from this debacle. Eduard really confused me with the engineering here, it was literally trying to put a square peg in a round hole. I carved significant plastic away from the lower wing at this joint to make them sit flush. That black area at the bottom of the wheel well? That is NOT a shadow...


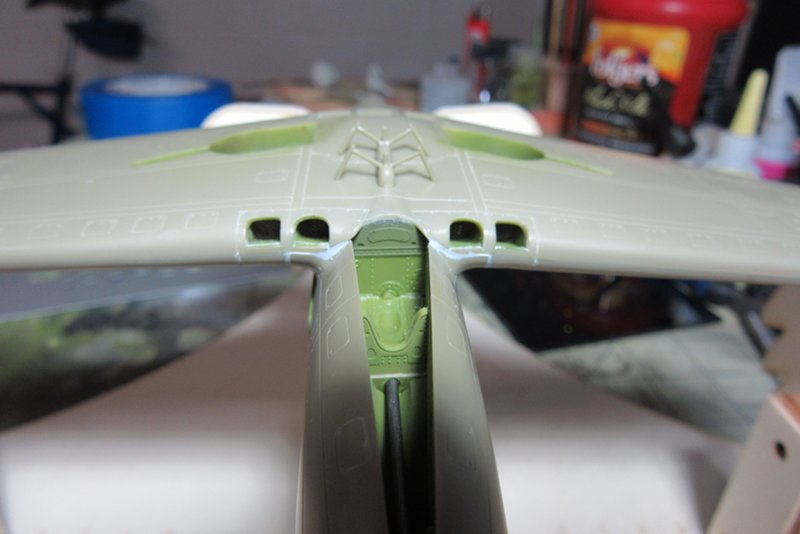
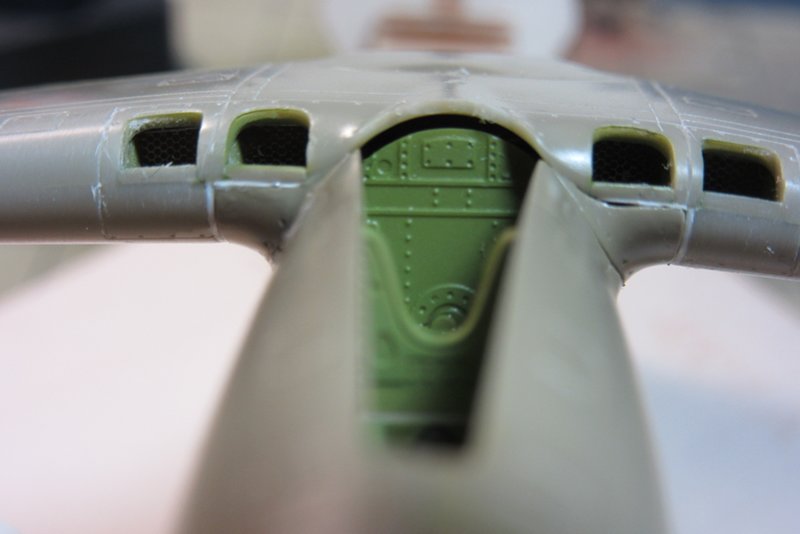
...it is in fact another area where the kit parts simply do not line up, leaving a very large hole to be filled. This one actually has its very own PE part to cover up though, replicating the detail perfectly but covering over that gaping hole. Go figure. I flooded the rear bulkhead with thick CA and popped the etch piece in place.


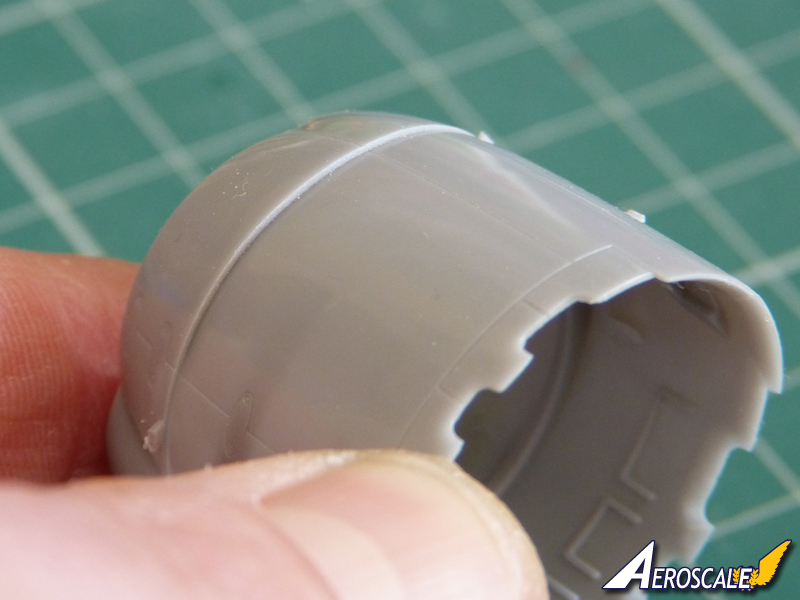
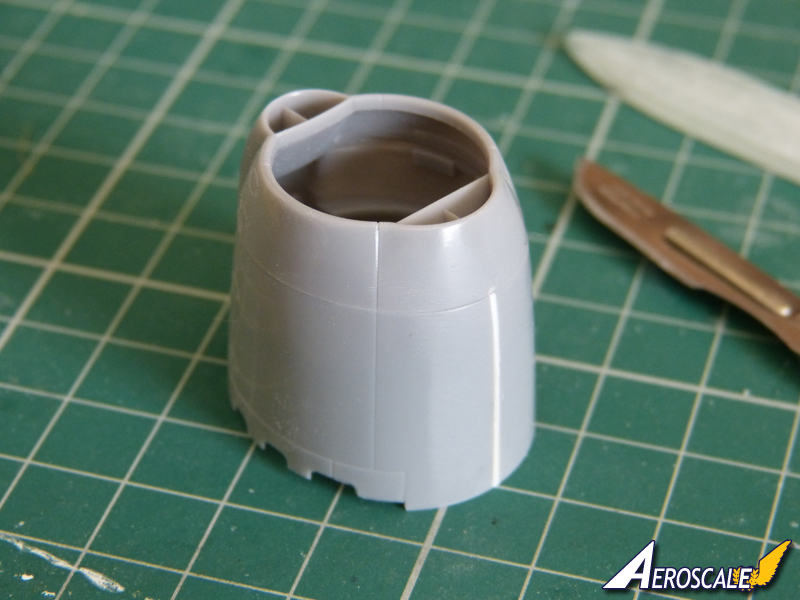
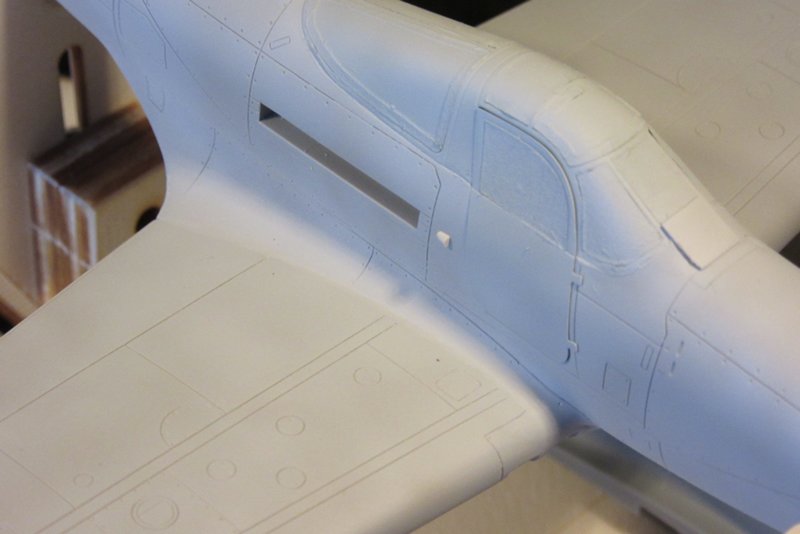
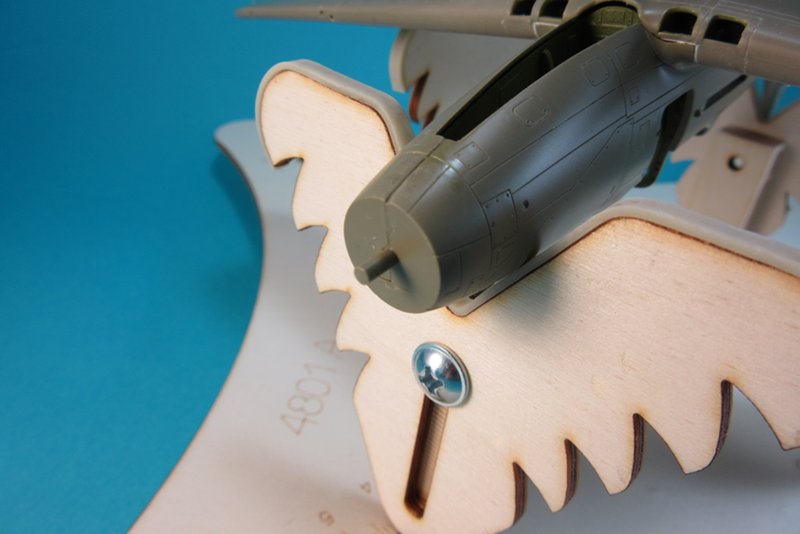
And finally, the last problem to address: this step. I had my choice of making the top of the cowl or the bottom line up perfectly, and the loser got the step. I chose to keep the top looking good and do the repair underneath. Its only at the front at least, the rear was a perfect fit top and bottom.

It makes me wonder if this LE boxing wasn't somehow a bad egg, or if I made some unknown major errors. Almost none of the major parts fit well together during dry fitting, and glue didn't improve things at all. Other people have raved about how well this kit goes together. I am hoping my Eduard P-39Q does not contain these issues, but it is an early boxing as well so my hopes are not high.
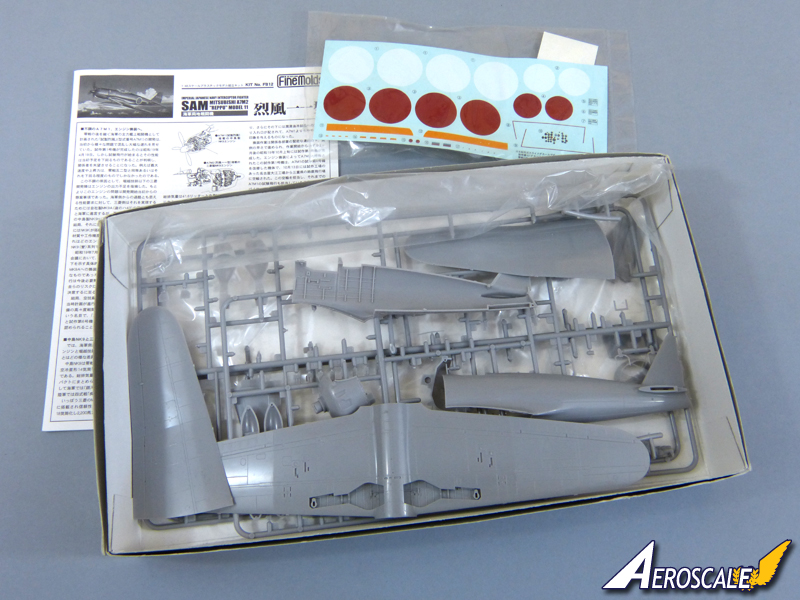
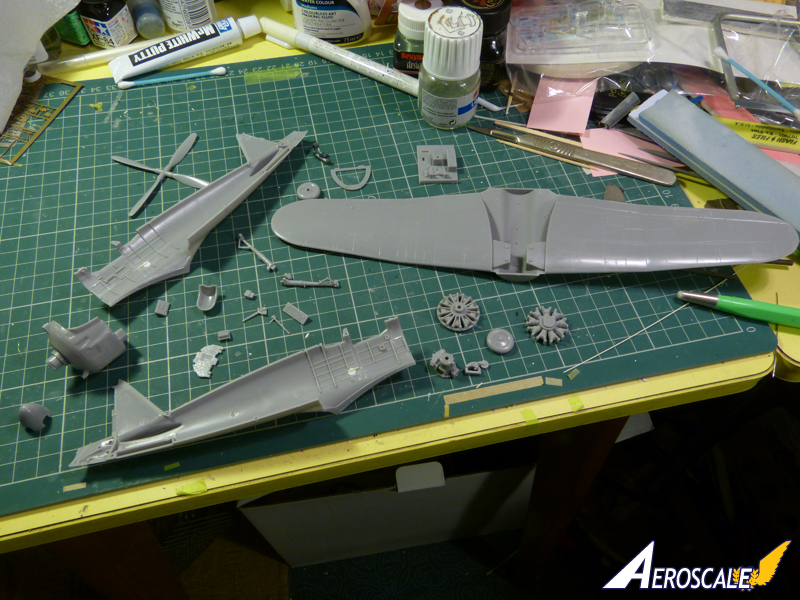
Merlin
Staff MemberSenior Editor
AEROSCALE
#017
_VISITCOMMUNITY
United Kingdom
Joined: June 11, 2003
KitMaker: 17,582 posts
AeroScale: 12,795 posts
Posted: Tuesday, March 03, 2015 - 12:41 AM UTC
Hi Richard and Paul

Thanks for the warm welcome. I've sprayed the basic interior colours with White Ensign enamels and will let parts "cook" overnight in my paint drier (a heated seed-tray from the local garden centre). I'll try to do some more tomorrow and will post progress pics.

@ Paul - your Airacobra is looking superb! Your work on the interior is really gorgeous.

It's a good many years since I've built Eduard's kit (probably when the first version was released about 15 years ago). I know at the time I was impressed by the improvement over their earlier short-run kits - this was probably the turning point at which they truly entered the mainstream market - but it certainly doesn't match the precision of their latest releases.

All the best

Rowan
PeeJay74
#363
_VISITCOMMUNITY
Pennsylvania, United States
Joined: January 08, 2014
KitMaker: 425 posts
AeroScale: 401 posts
Posted: Tuesday, March 03, 2015 - 01:42 AM UTC
Thanks for the compliment Rowan.

As for my fit frustrations...

Quoted Text

It's a good many years since I've built Eduard's kit (probably when the first version was released about 15 years ago). I know at the time I was impressed by the improvement over their earlier short-run kits - this was probably the turning point at which they truly entered the mainstream market - but it certainly doesn't match the precision of their latest releases.


..in all honesty I am probably not giving them a fair break. The only other Eduard kits I have built are their more recent F6F-5N and F6F-3, both of which went together smartly, and of course their superb Spitfire Mk.IX. So maybe its me expecting their earlier works like the P-39 to be as perfect as their latest gems.

It is a great kit and well detailed, its just a little more fiddlely than I was expecting.
Bushioka
_VISITCOMMUNITY
Oregon, United States
Joined: January 13, 2014
KitMaker: 107 posts
AeroScale: 105 posts
Posted: Tuesday, March 03, 2015 - 06:36 AM UTC
I spent part of my weekend working on the D-XXIII and have the fuselage/wing pod assembled and painted:


Merlin
Staff MemberSenior Editor
AEROSCALE
#017
_VISITCOMMUNITY
United Kingdom
Joined: June 11, 2003
KitMaker: 17,582 posts
AeroScale: 12,795 posts
Posted: Tuesday, March 03, 2015 - 01:04 PM UTC
Hi Martin

Great choice of subject! I nearly went for the 1:48 version, but feared I wouldn't finish in time. It looks like a prop blade has got bent, but it should straighten out OK. Here's looking forward to seeing how the tail goes on.

All the best

Rowan
Merlin
Staff MemberSenior Editor
AEROSCALE
#017
_VISITCOMMUNITY
United Kingdom
Joined: June 11, 2003
KitMaker: 17,582 posts
AeroScale: 12,795 posts
Posted: Tuesday, March 03, 2015 - 02:50 PM UTC
Hi again

As promised, the interior parts with their basic colours on, ready for weathering and highlighting:


Sadly, it's a classic case of "most haste - less speed" with the cowling; I cemented the sides together before checking the fit of the front... only to find a nasty step when I went to attach it:


So, I've cracked it open and added a spacer. We'll see later how much it helps...

All the best

Rowan
Merlin
Staff MemberSenior Editor
AEROSCALE
#017
_VISITCOMMUNITY
United Kingdom
Joined: June 11, 2003
KitMaker: 17,582 posts
AeroScale: 12,795 posts
Posted: Tuesday, March 03, 2015 - 03:44 PM UTC
Hi again

The spacer has made quite a major improvement:


I'll let it "cook" thoroughly before doing any more work to it.

All the best

Rowan
BoiseBlade
#523
_VISITCOMMUNITY
Idaho, United States
Joined: February 28, 2014
KitMaker: 342 posts
AeroScale: 250 posts
Posted: Wednesday, March 04, 2015 - 06:44 AM UTC
Been awhile since I posted anything for this build.
Finishing up other things and other responsibilities.

I did finish the Ambrosini 207 and here are 2 images of it.

I also sprayed the Macchi 205 and did the smoke rings.
I was not as pleased with the results as I would like to be. The airbrush did not work as well as for the Fiat BR.20 I did. Afterwards when cleaning I found out why. Then needle had a small bend in the tip. I ordered a new needle and it is on the way but I may just go with this as is.

Ambrosini
Merlin
Staff MemberSenior Editor
AEROSCALE
#017
_VISITCOMMUNITY
United Kingdom
Joined: June 11, 2003
KitMaker: 17,582 posts
AeroScale: 12,795 posts
Posted: Thursday, March 05, 2015 - 01:53 AM UTC
Hi Jeff

Very nice! You certainly managed a fine result considering your airbrush needle had a bent tip!

I know you've ordered a replacement, but you should be able to straighten the original by rolling it gently between two hard, smooth surfaces. A knife blade against a flat piece of metal sheet, for instance. Then finish off with a very fine nail file/polisher. I actually check the needles in my airbrushes that way periodically as part of general maintenance.

All the best

Rowan
BoiseBlade
#523
_VISITCOMMUNITY
Idaho, United States
Joined: February 28, 2014
KitMaker: 342 posts
AeroScale: 250 posts
Posted: Thursday, March 05, 2015 - 04:14 AM UTC
Thanks Rowan,

I heard you could straighten them out but have tried a few times with out very good luck. It might be because my OLD eyes are not that good. I have to see the bend under Mag.....

If you know of a place with a step by step I would be interested in trying again before I deep six this one.

Thanks again

Jeff D
c4willy
#305
_VISITCOMMUNITY
Christchurch, New Zealand
Joined: February 01, 2006
KitMaker: 1,673 posts
AeroScale: 1,517 posts
Posted: Thursday, March 05, 2015 - 12:52 PM UTC
I have on a number of occasions straightened out a bent needle and it is really very simple as Rowan suggests. I use a window pane though and place the needle against the window and then place my finger over it and turn the needle between my finger and the window pane See pics for an idea of what I mean, at lest I hope it gives you an idea.


c4willy
#305
_VISITCOMMUNITY
Christchurch, New Zealand
Joined: February 01, 2006
KitMaker: 1,673 posts
AeroScale: 1,517 posts
Posted: Thursday, March 05, 2015 - 01:19 PM UTC
Rowan I like the Reppu kit it looks nicely detailed. What's the part count like? And how's the fit? Fine Moulds don't usually make a bad kit.

Jeff I love the Macchi and the Ambrosini I have a soft spot for the Italian aircraft and camouflage.
dcandal
_VISITCOMMUNITY
Buenos Aires, Argentina
Joined: September 07, 2006
KitMaker: 918 posts
AeroScale: 688 posts
Posted: Thursday, March 05, 2015 - 06:49 PM UTC
I´m going in this campaign with a Classic Airframes 1/48 Heinkel 112

It´s a simple kit,


BoiseBlade
#523
_VISITCOMMUNITY
Idaho, United States
Joined: February 28, 2014
KitMaker: 342 posts
AeroScale: 250 posts
Posted: Thursday, March 05, 2015 - 08:51 PM UTC
Thanks Chris!

I will give this a try tonight previously I tried it against a ceramic tile.

I did get my new needle yesterday though.
Also more 1/72 Italian decals for the stash........

Like you I have a very BIG soft spot for Italian AC.
Heritage thing and Served in Sicily for 3 years.......
c4willy
#305
_VISITCOMMUNITY
Christchurch, New Zealand
Joined: February 01, 2006
KitMaker: 1,673 posts
AeroScale: 1,517 posts
Posted: Friday, March 06, 2015 - 04:37 AM UTC
Just keep turning it around till you've got it straight again if it's being stubborn a little more pressure may be required.

Awesome Jeff what time period did you serve in? LOL sorry that makes you sound like a time lord but the question is valid.
Merlin
Staff MemberSenior Editor
AEROSCALE
#017
_VISITCOMMUNITY
United Kingdom
Joined: June 11, 2003
KitMaker: 17,582 posts
AeroScale: 12,795 posts
Posted: Friday, March 06, 2015 - 12:22 PM UTC

Quoted Text

Rowan I like the Reppu kit it looks nicely detailed. What's the part count like? And how's the fit? Fine Moulds don't usually make a bad kit.


Hi Chris

I've got most of the parts off the sprues now, but there are around 70, plus transparencies. The fit of the main parts has been mostly pretty good - the only problems being the cowl leaving a step as you see above, and the tailplane roots needing building up to match the depth of the elevators.

I've got a bit of paperwork (if that's still the term in this digital age) that I must work on this weekend, but then I'll be able to get back to the build.

All the best

Rowan
oraora
_VISITCOMMUNITY
Kuching, Malaysia
Joined: June 19, 2002
KitMaker: 216 posts
AeroScale: 128 posts
Posted: Friday, March 06, 2015 - 10:05 PM UTC
Great Builds, guys.

I just finished my Whirlwind..I chose the early war RAF Scheme...

In progress pics..


Completed


Hope you like it..
tinbanger
_VISITCOMMUNITY
Ontario, Canada
Joined: February 04, 2008
KitMaker: 2,507 posts
AeroScale: 1,814 posts
Posted: Saturday, March 07, 2015 - 08:53 PM UTC
Ready to seal up the fuselage:-


Merlin
Staff MemberSenior Editor
AEROSCALE
#017
_VISITCOMMUNITY
United Kingdom
Joined: June 11, 2003
KitMaker: 17,582 posts
AeroScale: 12,795 posts
Posted: Saturday, March 07, 2015 - 11:20 PM UTC
Hi there

@ Ken - Lovely job on the Whirlwind! It's always been a favourite of mine. I remember my Dad telling me as kid how he sat in the cockpit of one once and spotted the "do not exceed" speed of 450mph (or thereabouts) - presumably that was in a dive... Awesome aircraft with so much missed potential.

@ Richard - Looking really good! It's a relief to see I'm not the only one with the fuselage still to close up!

All the best

Rowan
BoiseBlade
#523
_VISITCOMMUNITY
Idaho, United States
Joined: February 28, 2014
KitMaker: 342 posts
AeroScale: 250 posts
Posted: Sunday, March 08, 2015 - 12:10 AM UTC
Chris,

I served from 79-87.
I was at Sigonella in June 83 -Sept 85.

And BTW I could live with being a Time Lord!
BoiseBlade
#523
_VISITCOMMUNITY
Idaho, United States
Joined: February 28, 2014
KitMaker: 342 posts
AeroScale: 250 posts
Posted: Sunday, March 08, 2015 - 02:57 AM UTC
Chris,

I gave it another try with Glass to straighten the needle.
After doing it under a magnifying glass I then switched over to my 25X loop.

Under the Magnifier it looks real good.
Switching to the 25X it still showed some bend and curve.
I worked on it under that a bit and got it much better.
It still isn't perfect but will do as a back up.

Thanks again for the advice. I do appreciate it.

Regards

Jeff D

Here is the needle before straightening and a image of working under loop.

PeeJay74
#363
_VISITCOMMUNITY
Pennsylvania, United States
Joined: January 08, 2014
KitMaker: 425 posts
AeroScale: 401 posts
Posted: Sunday, March 08, 2015 - 05:09 AM UTC
Eduard 1/48 P-400 Limited Edition

I finished all of my seam work and am very happy with my work. It cleaned up nicely. Primer of course revealed a few new flaws to work out, but it's moving right along now. I am sure I'll make the deadline now.


Just to show the difference here after the PE part was added. No more gap!


All cleaned up and ready for primer. The canopy fit was terrible, I ended up sanding the armor at the front off and replacing the detail with sheet. There was a bad step and gap there, I feared I would ruin the canopy trying to fill it with traditional methods.


Primed! No more issues with the intakes at the root or the join at the fuselage. I do need to re-scribe the panel line along the roots, but this should be simple enough to accomplish.

The primer makes the canopy fit, or lack thereof, obvious. I hit it with thinned white glue before I primed but I fear it needs more work. The rest of the plane looks great now though, so a little work along the canopy isn't too bad.

I am really hoping I didn't get any overspray inside the cockpit to ruin all of that fabulous detail Eduard included.