

1⁄48Eduard Mirage 2000 D/N
8
Comments
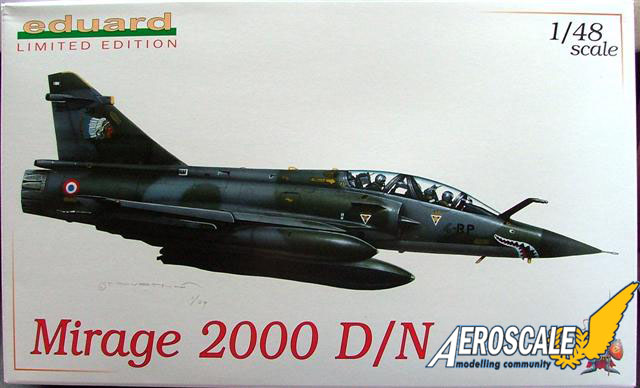
Eduard's love of the Mirage series of aircraft adds the Mirage 2000 to their stable in a limited edition 1/48th model kit. This kit sold out from the Eduard website in a matter of days with strangely enough the French market only getting about 300 kits. For those of you who missed out on this, Eduard are re-releasing it in about October or November.
The Eduard offering is an ex Heller mould with an added P.E fret for the cockpit, and some external details. The kit also replaces the ejection seats with a pair of nicely moulded resin seats. Paint masks for the clear parts and wheels are also included. A inbox review of the kit can be found HERE.
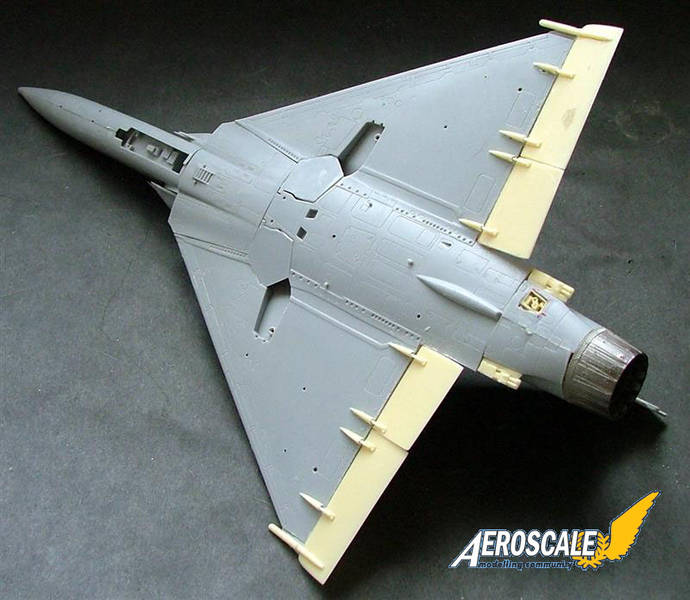
The kit has recessed panel lines, a little flash present, and pin marks are kept to a minimum but there are a few shallow marks to be found on the insides of the wheel bay doors and air intakes. Overall the detail is pretty good and the kit built up without any of the Eduard parts should still look pretty good. The one downside of this kit is the packaging, normally Eduard are top notch in this area, but I found a lot of the parts had come away from the sprues and the clear parts are not packaged in a separate bag.
Now to add to the fun of this kit Jean-Luc sent me 3 R-Flight resin update sets for the Mirage. The sets comprise of an external detail set, 2 under wing fuel tanks and a center line fuel tank. Reviews of these can be found HERE and HERE.
The external resin set is well crafted with parts of the kit replaced or added too. The set consists of -- 2 X exterior elevons (L&R)
- 2 X interior elevons (L&R)
- 8 X elevon hinges covers
- 2 X "Spiral" chaff launchers (L&R)
- 1 X "Sabre" jammer device
- 2 X "Serval" side antennas
- 2 X resin main landing gear tyres
- 2 X resin main landing gear rims
- 2 X vinyl main landing gear tyres
- 2 X resin forward landing gear wheels
- 2 X forward landing gear lights
- 1 X light support frame
- 1 X acetate sheet for light covers
- 1 X forward landing gear oleo
- 1 X air refueling probe
- 1 X 3 piece engine exhaust
- 1 X rear electrical connector
- 1 X rear electrical connector cover
- 2 X wing root air intakes
- 1 X top fuselage air intake
- 1 X brake line wire
The "instructions" are all in French but Jean-Luc has translated it for his review (thanks, saved me from Babel fish lol). The instructions are a bit simplified as the set comes with a sheet with a part listing and pictures of a model fitted with the resin parts. Most of it you can work out, but there are a couple of parts that take a little digging around to figure out where they go.
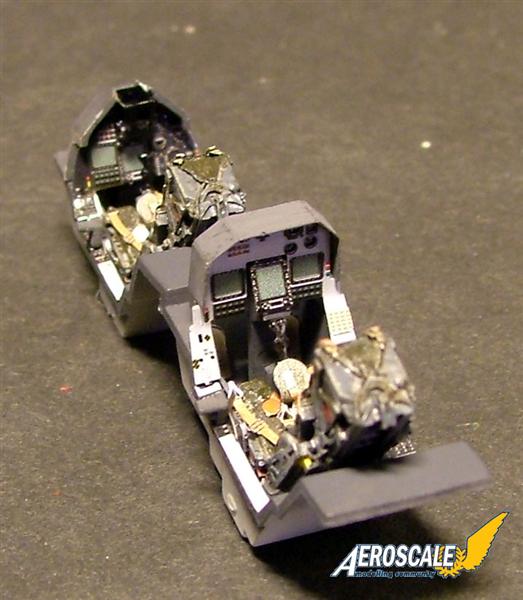
The cockpit tub needs the side consoles sanded down and the foot pedals cut away for the replacement P.E parts and was then sprayed with Tamiya XF 63 German Grey. The side consoles and foot pedals were then added and glued in place. A light wash of Burnt Umber was given to the floor of the tub.
The instrument panels are made up of several P.E parts, with the kit part being used as the base. The raised details on the kit instrument panel has to be sanded down and the hood for the rear cockpit instrument panel has to be cut away. It is at this stage you have to decide which designation you want to model as the cockpits have different parts for each version. I decided to build the D ( conventional attack variant ) rather than the N ( nuclear strike variant ) as most of the P.E parts are for the D. The cool wrap around camo scheme also had a deciding factor in my choice. The differences in the cockpit are the inclusion of a couple of center display screens. The instrument panels are multi-part pre-painted affair with the dials being sandwiched in the middle. The P.E hood needs to be bent around the top of the rear instrument panel, and is quite tricky to get to stay on as the gluing area is very small ( I knocked it off several times during the build lol).
Once the instrument panels are fitted into the cockpit the P.E HUD unit was added with the clear acetone "glass" left off until near enough the end of the build,.a little paint touch ups was done and the cockpit is finished. In total there are 23 P.E parts added to the cockpit area.
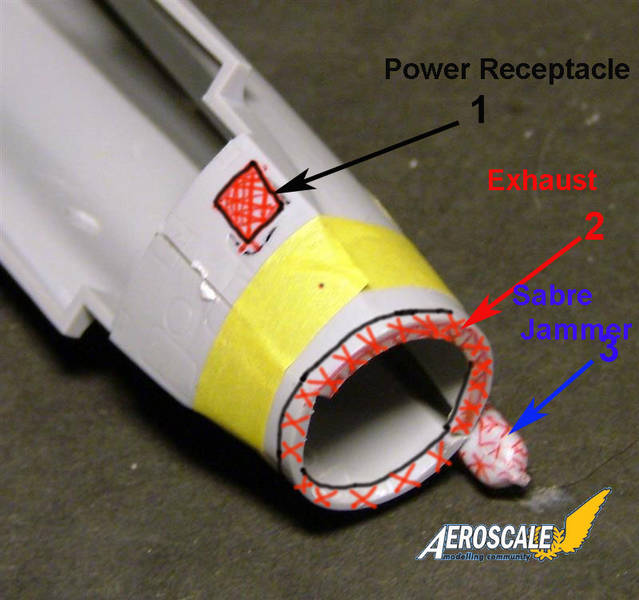
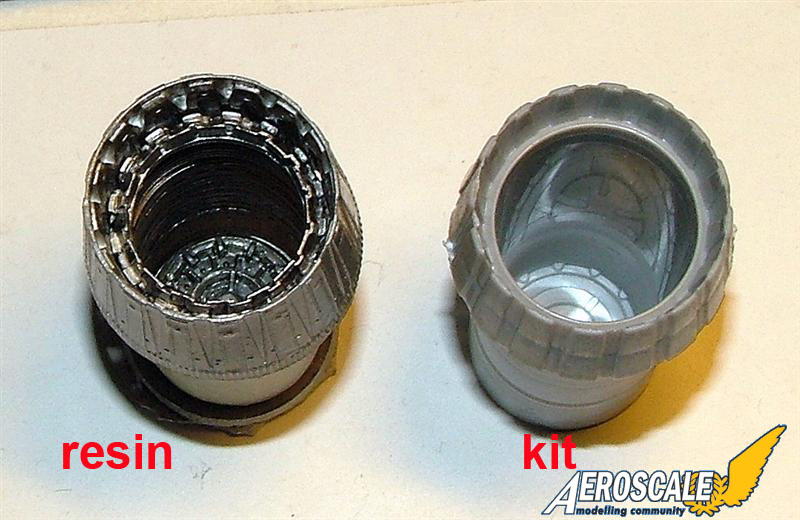
Now before the two fuselage halves are joined together the fun part begins, cutting and sanding the fuselage for the inclusion of the resin exhaust, Power Receptacle and the Sabre Jammer. The resin exhaust is so much better then the kit offering with some exquisite moulding and internal detail in the pipe. The rear of the fuselage needs to be cut down and sanded to the rear panel line. Dry fitting the exhaust is a must to get an even fit and to sit snugly. The exhaust needs to be glued into place before the fuselage halves go together, otherwise it won't fit through the hole in the back. The exhaust was first sprayed with Alclad II Steel then lightly over sprayed with Jet Exhaust before fitting. The Sabre Jammer is removed completely and replaced with the resin one, dry fitting as you go to get a good match. Now the power receptacle hole needs to be cut out of the fuselage, there are no panel lines to help you mark out where it goes, but by looking at the instructions the position is easily identifiable. Why are there no panel lines for this part, either Heller forgot to put them on, or it doesn't actually go there, but as I wanted to use as much of the resin set as I could in it went lol. Most of the cutting was done with my trusty Dremel and then sanded down by hand. With the hole, four holes were drilled in the corners and then I used my Olfa scribing tool with a ruler, to keep the line straight, to join up each hole. A few light passes with the scriber to get the lines straight is needed first, then heavier passes until the required hole is made. A bit of sanding round the inside and edges of the hole and the Power Receptacle was glued into place.
The fuselage was glued together, with the cockpit, nose gear bay installed and some weight added to the nose to stop any tail sitting. At no point in the instructions are you told to add any weight but to be on the safe side a couple of screws held in place with Blu-Tack was added. The side air intakes were glued into position but I left off the intake covers until I had painted the insides.
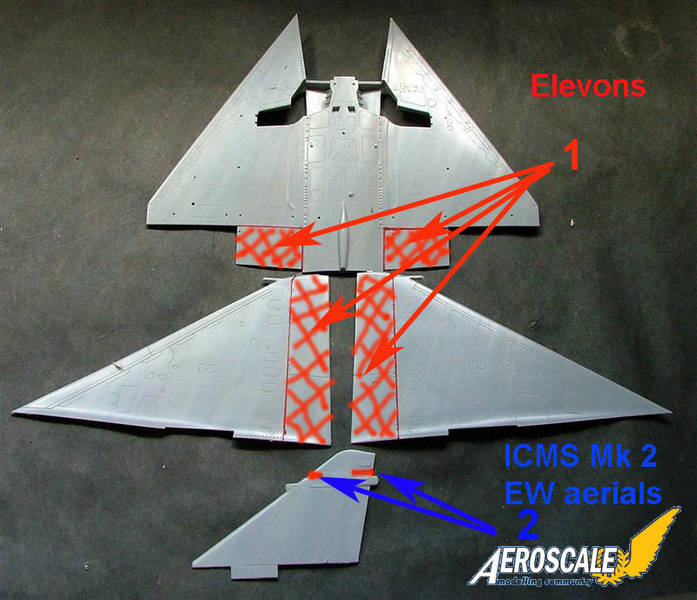
Whist waiting for the fuselage to set and dry it was time to cut off the moulded on Elevons from the wings ( Elevons are aircraft control surfaces that combines the functions of the elevator (used for pitch control) and the aileron (used for roll control), hence the name.). Very easy to do as you just scribe the existing lines until they fall off. The "Serval" side antennas at the ends of the wings need to be removed as well. The one piece lower wing and the two upper wings were glued together and set aside. The next part was tackling the tail for the inclusion off the ICMS Mk 2 EW aerials. Two slits at the top of the tail are needed, the front being 6mm long and the rear 8mm long. Using the scribing tool and ruler again the slits were made and I must admit to finding this part quite easy as the plastic is quite thin and soft.
Going back to the fuselage, when the D version is being modelled you need to cut out a section of the spine so the P.E dorsal Chaff / Flare dispensers can be fitted. This part I thought would be easy, but is in fact quite tricky as the P.E part needs to be bent into shape to fit over the spine. The problem is that the Chaff / Flare dispensers are squared off while the spine is more rounded. This isn't a problem with the back as in photos of a Mirage 2000 D there is clearly a gap, but the front should fit flush. Now not having a little Imp with a hammer to panel beat the part into shape I had to manage by bending it as much as I could then using filler to blend it all in.
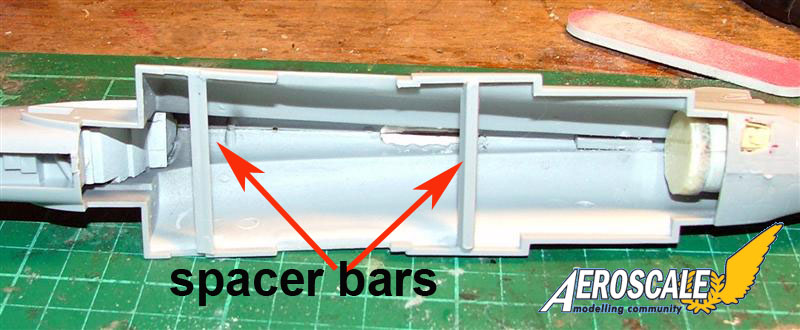
Whilst dry fitting the wings onto the fuselage I noticed there is a extremely large gap by the wing roots that needs to be taken care of. Inserting and gluing a couple of cut off sprues to the inside of the fuselage to act as spacers does the trick. The wings were then glued into position and left to dry.
The next stage is to add most of the resin parts to the wings and fuselage. The wings have four Elevons to attach, which can be positioned lowered. The eight elevon hinges covers are glued into position and the "Serval" side antennas are attached and glued. The "Spiral" chaff launchers are glued into place at the rear of the fuselage in line with the wings which replace the kits offering. The fuselage needs the air intakes added, two to the wing roots and one on top of the fuselage.
Once all the parts were securely glued the process of filling is dealt with. The parts that need a little touch ups are the lower rear wing/fuselage join, the wing roots and the main fuselage seams needed a little filler and sanding. Most of the resin parts needed a bit of filler to blend the parts into the kit.
The canopy was dipped into a tub of Future (Klear) and once dry was masked and white glued into place. The whole plane was primered and left to dry.
The undercarriage gets the resin and P.E treatment next. The front landing gear leg has the landing gear lights and frame replaced with a resin part and the oleo can be replaced by either the R/Flight resin part or Eduard's P.E part. I choose to use the P.E part as it keeps it in scale with the rear P.E oleo's. The rear legs have the oleo's replaced with the equivalent P.E parts. R/Flight include a length of wire for the brake lines and these were added to all three gear legs. You have a choice of three sets of wheels for this kit, you can either use the kits ones, or R/Flight's vinyl tyres with resin rims or the pure resin wheel/rims. Now usually I'm a sucker for vinyl tyres as weathering them is so easy (just run them over some concrete and they look worn) but the resin ones looked so good I had to use them. Now don't get me wrong, the vinyl ones are good, they even have a bulge moulded into the tyre for the weight of the aircraft, something that I have never seen before on vinyl tyres, but the resin ones just looked more detailed tread wise. The wheel bays and undercarriage legs were sprayed with Alclad II aluminium and any pipe work picked out with black. The whole thing was given a wash of Lamp black and then the wheel bays were masked off. An important thing to note is that the rear main undercarriage doors are in the closed position when the aircraft is on the ground. A little sanding is required on the doors, so they fit snugly in the wheel wells.
Now, I quite like building Modern jets, but what really puts me off them and my builds usually stalls for a couple of days at this stage is the sheer amount of stencils they have on them. The Mirage 2000 has about 100 of them, some no bigger then this "i". So I always do the same system on each jet, start at the bottom of the plane, and then decal the top, port then starboard sides over 3 days. The stencil decal placement sheet is on a separate piece of paper to the unit insignia sheet. I have found with Eduard decals that they need only a couple of seconds immersion time in water to be ready. I always have problems with any long/thin Eduard decals as they always seem to curl over/fold on themselves at the slightest glance, most of the time I can rectify this by re-immersing in water and getting it back on the backing paper for re-applying it. Day 4 is for adding the unit insignias which are on the paint scheme sheet. The decals respond well to Micro set/sol and fit nice and snug over any details.
Another coat of Future was applied and once dry the plane is ready for all the dangly bits to go on, antennas, pitot tubes, undercarriage legs and doors. The canopies was taken off and De-masked and the P.E handles and rear view mirrors were installed. The canopies were then glued in an open position and left to dry. A couple of things to point out with the kit is that the nose pitot tube shouldn't be added (Eduard got that wrong too ) to the D version and the D doesn't have a Sabre Jammer at the rear but a Chameleon Jammer instead. The differences between the two jammers that I can see are only cosmetic as the Sabre has rivet marks on it and the Chameleon doesn't.
The resin fuel tanks are very easy to work with, once the pouring lugs are cut off and the ends sanded down they fit perfectly together. They received the same paint scheme as the rest of the plane and were then glued into position. I thought I would have to drill locator holes for them to stay stuck on, but after the second attempt of using super glue they have stayed on. The pylons are a perfect fit for the profile of the wings so the contact point for the glue is very big. With the kit you get a pair of Magic missiles but they aren't on the instruction sheet to be added, but looking at photos of the Mirage 2000 they nearly always carry a pair on the outer wing pylons. So to break up the camo a bit and add some interest to the plane, they were added.
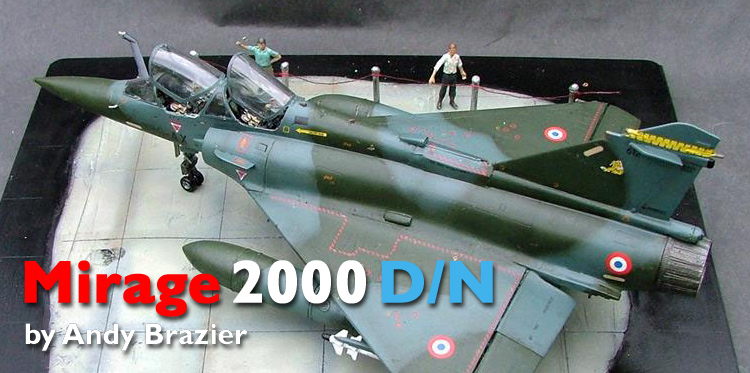
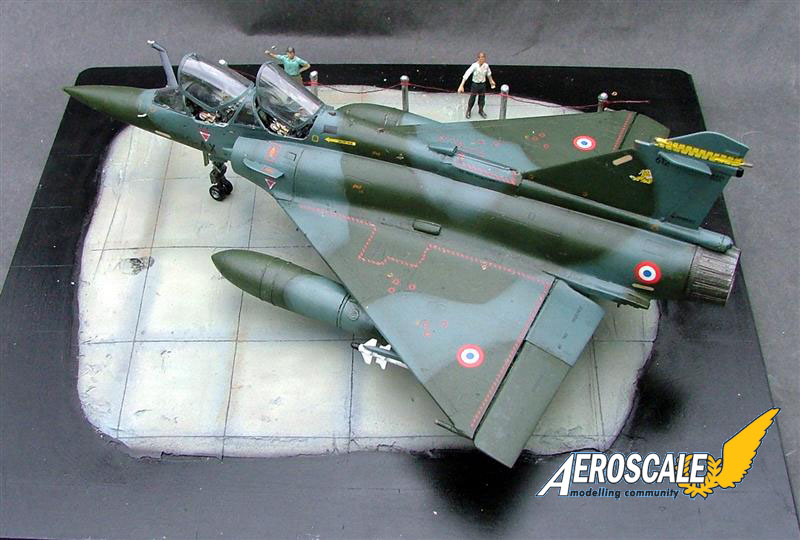
Once everything was attached and dry a very light wash of Payne's Gray was added to the panel lines. A dull coat was sprayed onto the model and viola one finished Mirage 2000 D in the markings of - 612, EC.05.330 Cote d'Argent, Mont-de-Marsan,1994.
Jean-Luc mentioned in the build thread about putting the Mirage on a concrete base and having a spare display base hanging around I decided to grant his request. I had already seen a pic of a Mirage as a static display at an airshow so I thought that would be a good, and easy to make, setting for it. First I made up some plaster of paris mix and spread that over the base in an uneven square and then levelled it out. Once it was dry I sanded it down a bit and scribed a few lines in it for the concrete blocks. I sprayed the plaster grey and added a wash of Burnt Umber to the lines. A couple of drops of black for oil spills and the base was complete. The rope cordon was made using left over sprue sections with Milliput balls stuck on the top. The base's were cut out of some plasti-card with a compass cutter and they were then sprayed with Alclad II polished aluminium. The rope section is red thread covered in white glue to get the drooped effect. The two figures are from the Tamiya A6M3 Zero kit. One figure had an arm repositioned and the other had a hat removed from his hand and replaced with a French flag. A simple yet I feel effective setting for this aircraft.
The Eduard offering is an ex Heller mould with an added P.E fret for the cockpit, and some external details. The kit also replaces the ejection seats with a pair of nicely moulded resin seats. Paint masks for the clear parts and wheels are also included. A inbox review of the kit can be found HERE.
The kit has recessed panel lines, a little flash present, and pin marks are kept to a minimum but there are a few shallow marks to be found on the insides of the wheel bay doors and air intakes. Overall the detail is pretty good and the kit built up without any of the Eduard parts should still look pretty good. The one downside of this kit is the packaging, normally Eduard are top notch in this area, but I found a lot of the parts had come away from the sprues and the clear parts are not packaged in a separate bag.
Now to add to the fun of this kit Jean-Luc sent me 3 R-Flight resin update sets for the Mirage. The sets comprise of an external detail set, 2 under wing fuel tanks and a center line fuel tank. Reviews of these can be found HERE and HERE.
The external resin set is well crafted with parts of the kit replaced or added too. The set consists of -- 2 X exterior elevons (L&R)
- 2 X interior elevons (L&R)
- 8 X elevon hinges covers
- 2 X "Spiral" chaff launchers (L&R)
- 1 X "Sabre" jammer device
- 2 X "Serval" side antennas
- 2 X resin main landing gear tyres
- 2 X resin main landing gear rims
- 2 X vinyl main landing gear tyres
- 2 X resin forward landing gear wheels
- 2 X forward landing gear lights
- 1 X light support frame
- 1 X acetate sheet for light covers
- 1 X forward landing gear oleo
- 1 X air refueling probe
- 1 X 3 piece engine exhaust
- 1 X rear electrical connector
- 1 X rear electrical connector cover
- 2 X wing root air intakes
- 1 X top fuselage air intake
- 1 X brake line wire
The "instructions" are all in French but Jean-Luc has translated it for his review (thanks, saved me from Babel fish lol). The instructions are a bit simplified as the set comes with a sheet with a part listing and pictures of a model fitted with the resin parts. Most of it you can work out, but there are a couple of parts that take a little digging around to figure out where they go.
Onto the build
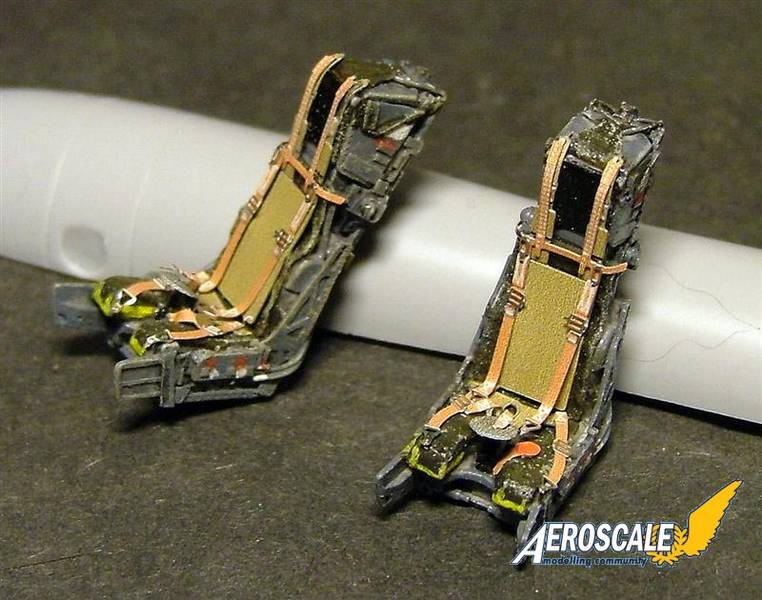
As normal with most aircraft kits the cockpit is the place to start, and the ejection seats have 7 P.E parts added to each resin seat. The seats were painted with Tamiya XF 53 Neutral Grey, with the seat cushions painted in Olive Drab. A wash of Lamp black and a little dry brushing of white to bring out the details was given to both seats before adding the P.E harnesses and back supports.The cockpit tub needs the side consoles sanded down and the foot pedals cut away for the replacement P.E parts and was then sprayed with Tamiya XF 63 German Grey. The side consoles and foot pedals were then added and glued in place. A light wash of Burnt Umber was given to the floor of the tub.
The instrument panels are made up of several P.E parts, with the kit part being used as the base. The raised details on the kit instrument panel has to be sanded down and the hood for the rear cockpit instrument panel has to be cut away. It is at this stage you have to decide which designation you want to model as the cockpits have different parts for each version. I decided to build the D ( conventional attack variant ) rather than the N ( nuclear strike variant ) as most of the P.E parts are for the D. The cool wrap around camo scheme also had a deciding factor in my choice. The differences in the cockpit are the inclusion of a couple of center display screens. The instrument panels are multi-part pre-painted affair with the dials being sandwiched in the middle. The P.E hood needs to be bent around the top of the rear instrument panel, and is quite tricky to get to stay on as the gluing area is very small ( I knocked it off several times during the build lol).
Once the instrument panels are fitted into the cockpit the P.E HUD unit was added with the clear acetone "glass" left off until near enough the end of the build,.a little paint touch ups was done and the cockpit is finished. In total there are 23 P.E parts added to the cockpit area.
Now before the two fuselage halves are joined together the fun part begins, cutting and sanding the fuselage for the inclusion of the resin exhaust, Power Receptacle and the Sabre Jammer. The resin exhaust is so much better then the kit offering with some exquisite moulding and internal detail in the pipe. The rear of the fuselage needs to be cut down and sanded to the rear panel line. Dry fitting the exhaust is a must to get an even fit and to sit snugly. The exhaust needs to be glued into place before the fuselage halves go together, otherwise it won't fit through the hole in the back. The exhaust was first sprayed with Alclad II Steel then lightly over sprayed with Jet Exhaust before fitting. The Sabre Jammer is removed completely and replaced with the resin one, dry fitting as you go to get a good match. Now the power receptacle hole needs to be cut out of the fuselage, there are no panel lines to help you mark out where it goes, but by looking at the instructions the position is easily identifiable. Why are there no panel lines for this part, either Heller forgot to put them on, or it doesn't actually go there, but as I wanted to use as much of the resin set as I could in it went lol. Most of the cutting was done with my trusty Dremel and then sanded down by hand. With the hole, four holes were drilled in the corners and then I used my Olfa scribing tool with a ruler, to keep the line straight, to join up each hole. A few light passes with the scriber to get the lines straight is needed first, then heavier passes until the required hole is made. A bit of sanding round the inside and edges of the hole and the Power Receptacle was glued into place.
The fuselage was glued together, with the cockpit, nose gear bay installed and some weight added to the nose to stop any tail sitting. At no point in the instructions are you told to add any weight but to be on the safe side a couple of screws held in place with Blu-Tack was added. The side air intakes were glued into position but I left off the intake covers until I had painted the insides.
Whist waiting for the fuselage to set and dry it was time to cut off the moulded on Elevons from the wings ( Elevons are aircraft control surfaces that combines the functions of the elevator (used for pitch control) and the aileron (used for roll control), hence the name.). Very easy to do as you just scribe the existing lines until they fall off. The "Serval" side antennas at the ends of the wings need to be removed as well. The one piece lower wing and the two upper wings were glued together and set aside. The next part was tackling the tail for the inclusion off the ICMS Mk 2 EW aerials. Two slits at the top of the tail are needed, the front being 6mm long and the rear 8mm long. Using the scribing tool and ruler again the slits were made and I must admit to finding this part quite easy as the plastic is quite thin and soft.
Going back to the fuselage, when the D version is being modelled you need to cut out a section of the spine so the P.E dorsal Chaff / Flare dispensers can be fitted. This part I thought would be easy, but is in fact quite tricky as the P.E part needs to be bent into shape to fit over the spine. The problem is that the Chaff / Flare dispensers are squared off while the spine is more rounded. This isn't a problem with the back as in photos of a Mirage 2000 D there is clearly a gap, but the front should fit flush. Now not having a little Imp with a hammer to panel beat the part into shape I had to manage by bending it as much as I could then using filler to blend it all in.
Whilst dry fitting the wings onto the fuselage I noticed there is a extremely large gap by the wing roots that needs to be taken care of. Inserting and gluing a couple of cut off sprues to the inside of the fuselage to act as spacers does the trick. The wings were then glued into position and left to dry.
The next stage is to add most of the resin parts to the wings and fuselage. The wings have four Elevons to attach, which can be positioned lowered. The eight elevon hinges covers are glued into position and the "Serval" side antennas are attached and glued. The "Spiral" chaff launchers are glued into place at the rear of the fuselage in line with the wings which replace the kits offering. The fuselage needs the air intakes added, two to the wing roots and one on top of the fuselage.
Once all the parts were securely glued the process of filling is dealt with. The parts that need a little touch ups are the lower rear wing/fuselage join, the wing roots and the main fuselage seams needed a little filler and sanding. Most of the resin parts needed a bit of filler to blend the parts into the kit.
The canopy was dipped into a tub of Future (Klear) and once dry was masked and white glued into place. The whole plane was primered and left to dry.
The undercarriage gets the resin and P.E treatment next. The front landing gear leg has the landing gear lights and frame replaced with a resin part and the oleo can be replaced by either the R/Flight resin part or Eduard's P.E part. I choose to use the P.E part as it keeps it in scale with the rear P.E oleo's. The rear legs have the oleo's replaced with the equivalent P.E parts. R/Flight include a length of wire for the brake lines and these were added to all three gear legs. You have a choice of three sets of wheels for this kit, you can either use the kits ones, or R/Flight's vinyl tyres with resin rims or the pure resin wheel/rims. Now usually I'm a sucker for vinyl tyres as weathering them is so easy (just run them over some concrete and they look worn) but the resin ones looked so good I had to use them. Now don't get me wrong, the vinyl ones are good, they even have a bulge moulded into the tyre for the weight of the aircraft, something that I have never seen before on vinyl tyres, but the resin ones just looked more detailed tread wise. The wheel bays and undercarriage legs were sprayed with Alclad II aluminium and any pipe work picked out with black. The whole thing was given a wash of Lamp black and then the wheel bays were masked off. An important thing to note is that the rear main undercarriage doors are in the closed position when the aircraft is on the ground. A little sanding is required on the doors, so they fit snugly in the wheel wells.
Painting and Decals
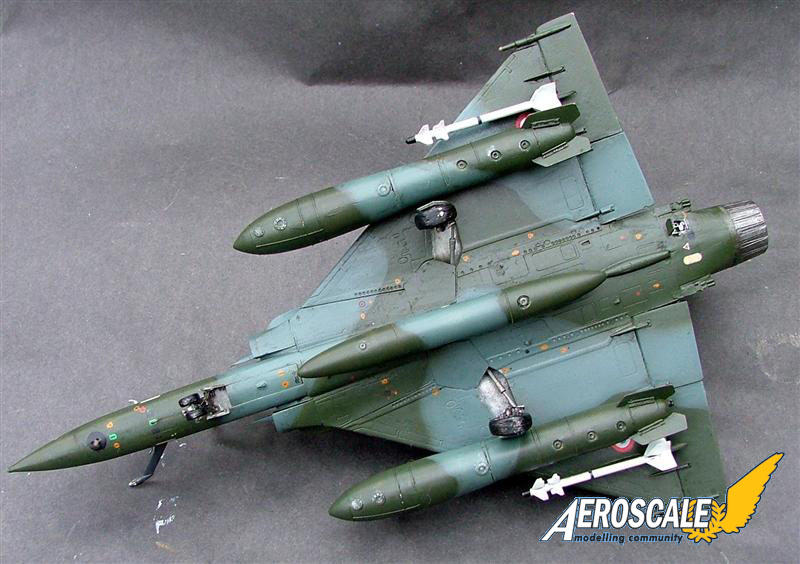
The aircraft now starts to get the wrap around camo scheme sprayed on. I sprayed White Ensign Models Soviet Dark Grey enamel as it has a hint of blue in it first in roughly the right position for the camo scheme. I then used the Blu-Tac method of masking and sprayed Tamiya XF-58 Olive Green in the gaps. This method gives the model a soft edge camo scheme. A 50/50 mix of Tamiya X-19 Smoke and thinners was used for a post shading effect. The model was then given two coats of hand brushed Future (Klear), ready for the application of the decals.Now, I quite like building Modern jets, but what really puts me off them and my builds usually stalls for a couple of days at this stage is the sheer amount of stencils they have on them. The Mirage 2000 has about 100 of them, some no bigger then this "i". So I always do the same system on each jet, start at the bottom of the plane, and then decal the top, port then starboard sides over 3 days. The stencil decal placement sheet is on a separate piece of paper to the unit insignia sheet. I have found with Eduard decals that they need only a couple of seconds immersion time in water to be ready. I always have problems with any long/thin Eduard decals as they always seem to curl over/fold on themselves at the slightest glance, most of the time I can rectify this by re-immersing in water and getting it back on the backing paper for re-applying it. Day 4 is for adding the unit insignias which are on the paint scheme sheet. The decals respond well to Micro set/sol and fit nice and snug over any details.
Another coat of Future was applied and once dry the plane is ready for all the dangly bits to go on, antennas, pitot tubes, undercarriage legs and doors. The canopies was taken off and De-masked and the P.E handles and rear view mirrors were installed. The canopies were then glued in an open position and left to dry. A couple of things to point out with the kit is that the nose pitot tube shouldn't be added (Eduard got that wrong too ) to the D version and the D doesn't have a Sabre Jammer at the rear but a Chameleon Jammer instead. The differences between the two jammers that I can see are only cosmetic as the Sabre has rivet marks on it and the Chameleon doesn't.
The resin fuel tanks are very easy to work with, once the pouring lugs are cut off and the ends sanded down they fit perfectly together. They received the same paint scheme as the rest of the plane and were then glued into position. I thought I would have to drill locator holes for them to stay stuck on, but after the second attempt of using super glue they have stayed on. The pylons are a perfect fit for the profile of the wings so the contact point for the glue is very big. With the kit you get a pair of Magic missiles but they aren't on the instruction sheet to be added, but looking at photos of the Mirage 2000 they nearly always carry a pair on the outer wing pylons. So to break up the camo a bit and add some interest to the plane, they were added.
Once everything was attached and dry a very light wash of Payne's Gray was added to the panel lines. A dull coat was sprayed onto the model and viola one finished Mirage 2000 D in the markings of - 612, EC.05.330 Cote d'Argent, Mont-de-Marsan,1994.
Jean-Luc mentioned in the build thread about putting the Mirage on a concrete base and having a spare display base hanging around I decided to grant his request. I had already seen a pic of a Mirage as a static display at an airshow so I thought that would be a good, and easy to make, setting for it. First I made up some plaster of paris mix and spread that over the base in an uneven square and then levelled it out. Once it was dry I sanded it down a bit and scribed a few lines in it for the concrete blocks. I sprayed the plaster grey and added a wash of Burnt Umber to the lines. A couple of drops of black for oil spills and the base was complete. The rope cordon was made using left over sprue sections with Milliput balls stuck on the top. The base's were cut out of some plasti-card with a compass cutter and they were then sprayed with Alclad II polished aluminium. The rope section is red thread covered in white glue to get the drooped effect. The two figures are from the Tamiya A6M3 Zero kit. One figure had an arm repositioned and the other had a hat removed from his hand and replaced with a French flag. A simple yet I feel effective setting for this aircraft.


About the Author


FROM: ENGLAND - SOUTH EAST, UNITED KINGDOM
I started modelling in the 70's with my Dad building Airfix aircraft kits. The memory of my Dad and I building and painting a Avro Lancaster on the kitchen table will always be with me. I then found a friend who enjoyed building models, and between us I think we built the entire range of 1/72 Airfi...
Comments

A very nice review and build feature Andy.
Having seen this "in the flesh" at the weekend Id just like to add that the photos dont do the model justice.
A job well done mate
Nige
SEP 03, 2007 - 01:23 AM

Hi Andy!
Very nice review!
I also like the base. Where are the figures from? Tamiya?
Jean-Luc
SEP 03, 2007 - 08:00 PM
Hi Andy!
I've just read the feature again and noticed you already answered that question in it. I should have paid more attention...
Jean-Luc
SEP 04, 2007 - 06:48 PM

Thanks guys.
Darren, It was great to finally put faces to names at the weekend.
Well spotted first time round Jean-Luc, you recognised the Tamiya figures. They are about the only 1/48th figures I could use for the dio from the stash, the rest are either pilots or U.S mechanics.
Must get some more figures really.
Andy
SEP 05, 2007 - 05:39 AM

Though I don't build Jets that often. . . I have to say this has impressed me.
SEP 09, 2007 - 11:51 AM
Copyright ©2021 by Andy Brazier. Images also by copyright holder unless otherwise noted. The views and opinions expressed herein are solely the views and opinions of the authors and/or contributors to this Web site and do not necessarily represent the views and/or opinions of AeroScale, KitMaker Network, or Silver Star Enterrpises. Images also by copyright holder unless otherwise noted. Opinions expressed are those of the author(s) and not necessarily those of AeroScale. All rights reserved. Originally published on: 2007-09-02 00:00:00. Unique Reads: 69360

WEB HOSTING BY


Copyright ©2021 AeroScale and Kitmaker Network, a subsidiary of Silver Star Enterprises
All Rights Reserved. Please read our Conditions of Use and Privacy Policy.
All Rights Reserved. Please read our Conditions of Use and Privacy Policy.