

1⁄24de Havilland Mosquito F.B.VI
13
Comments
Introduction
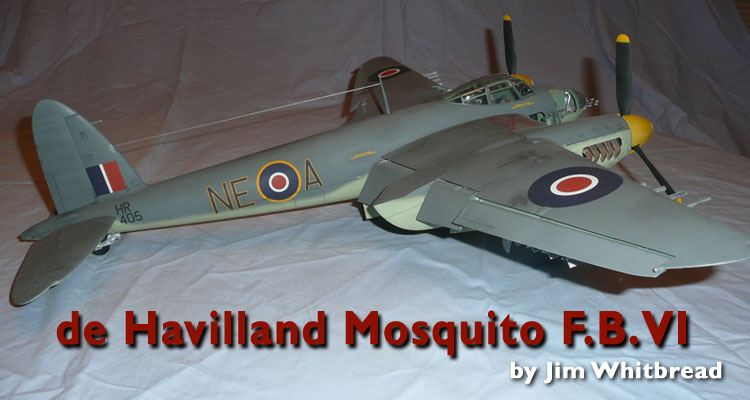
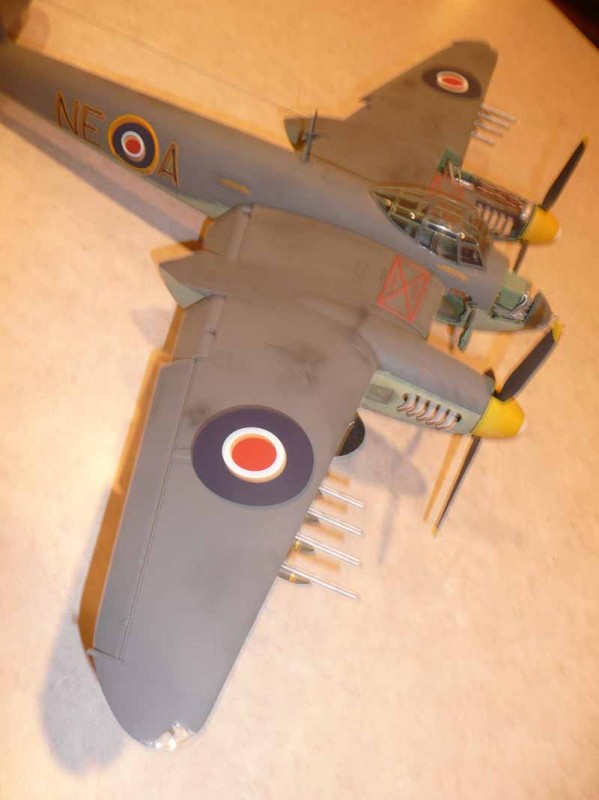
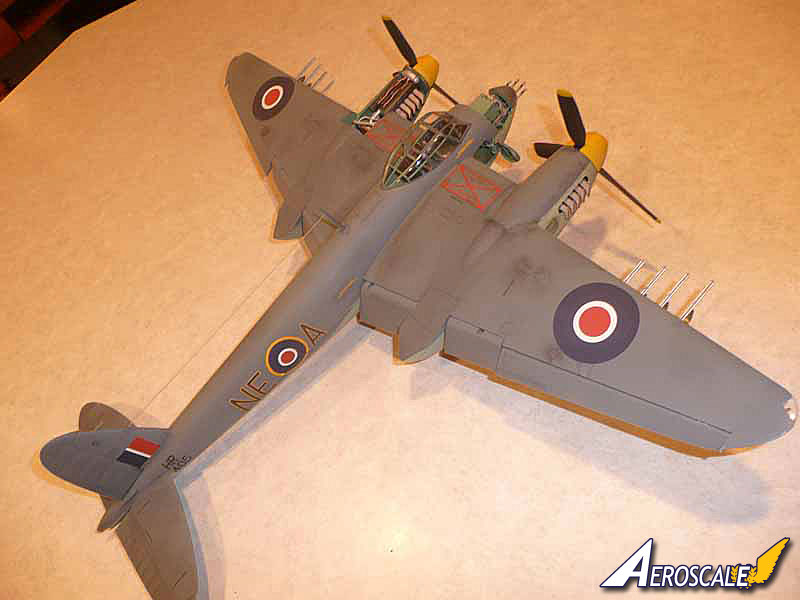
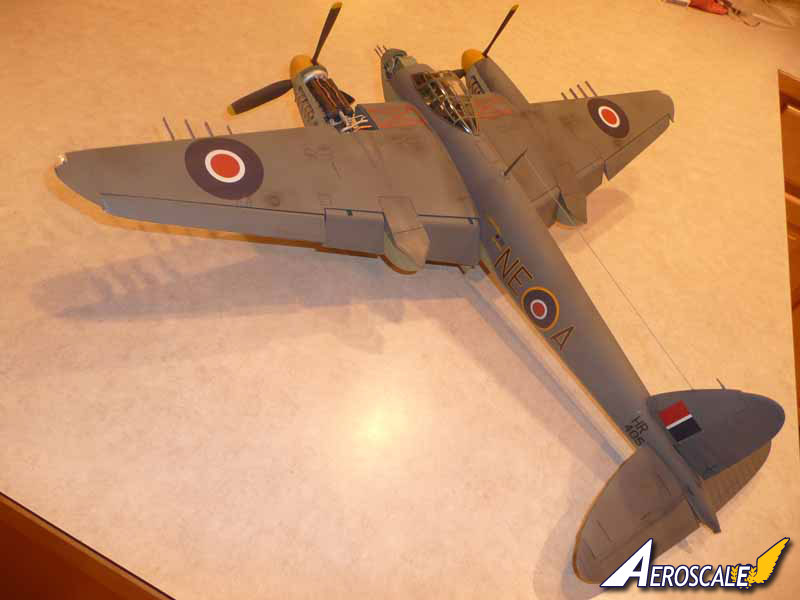
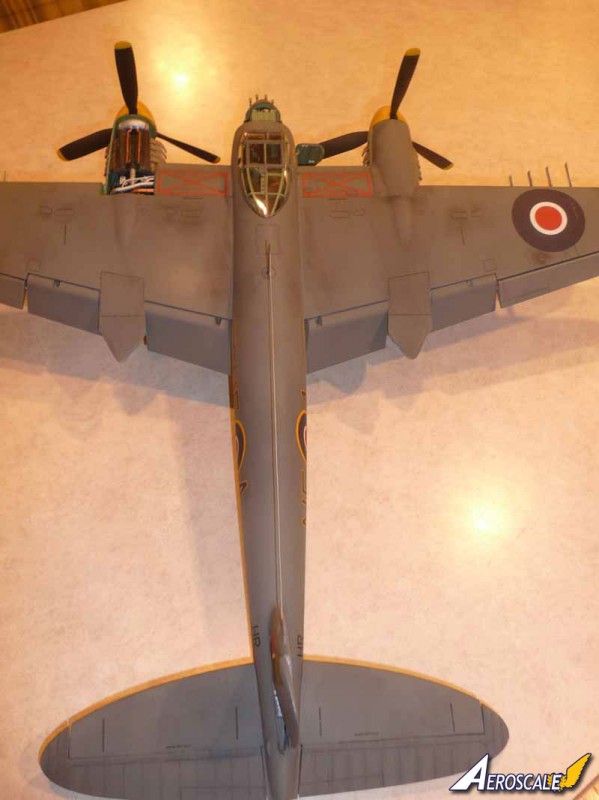
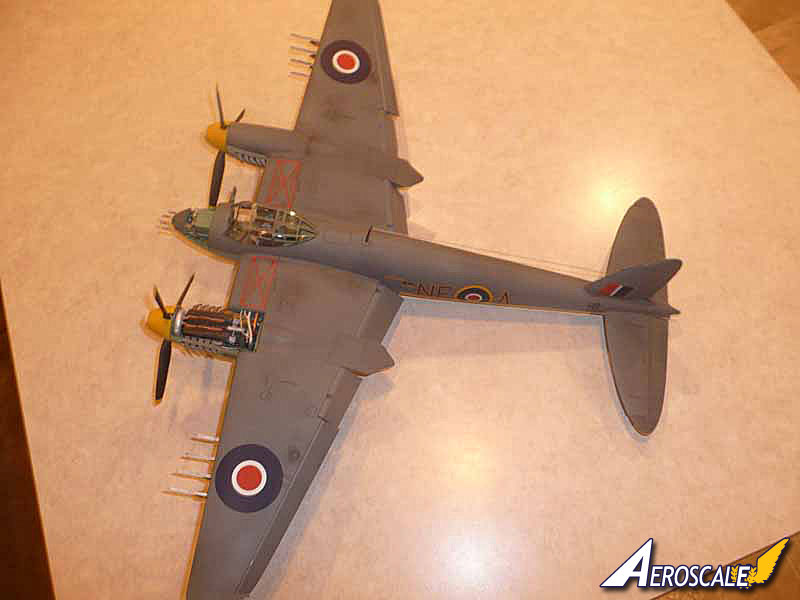
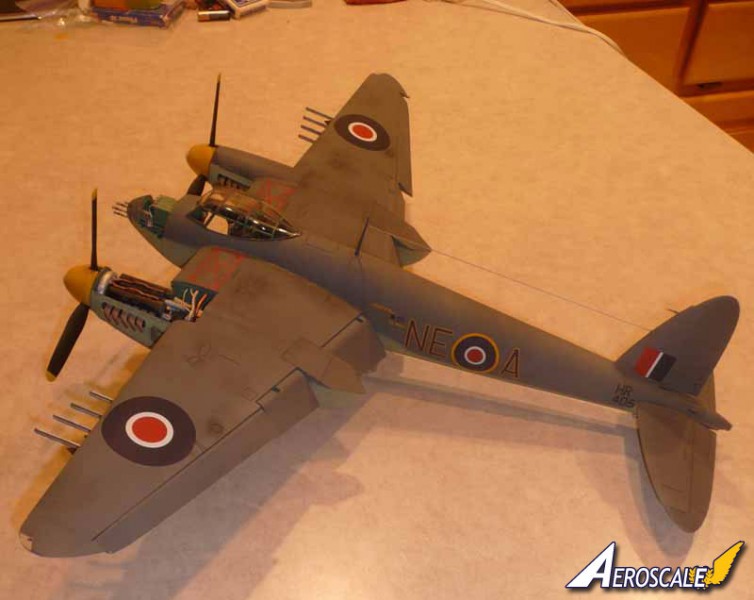
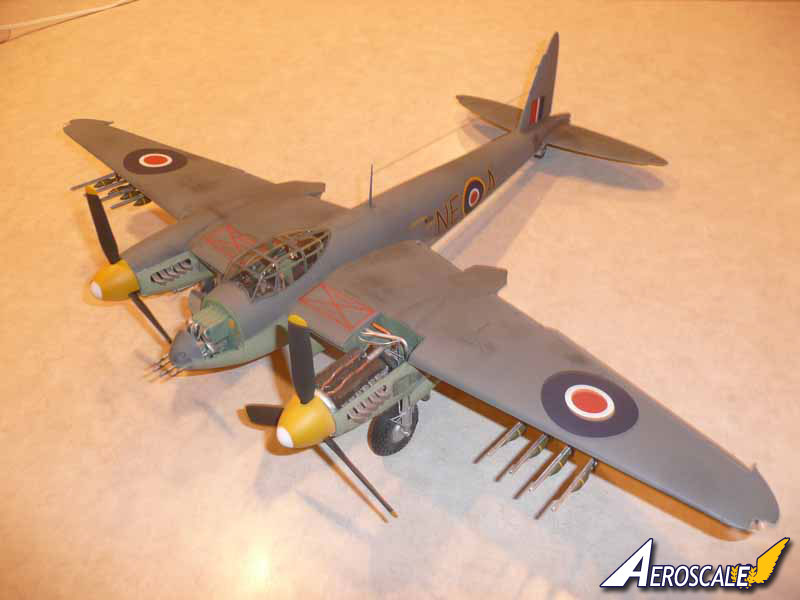
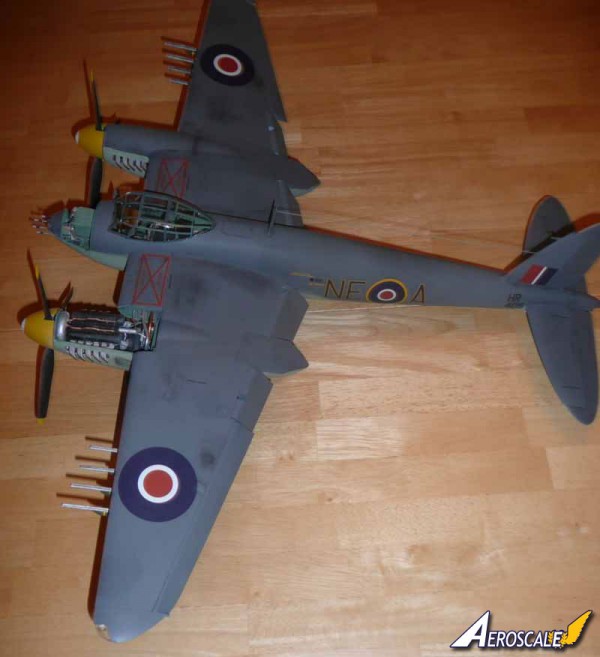
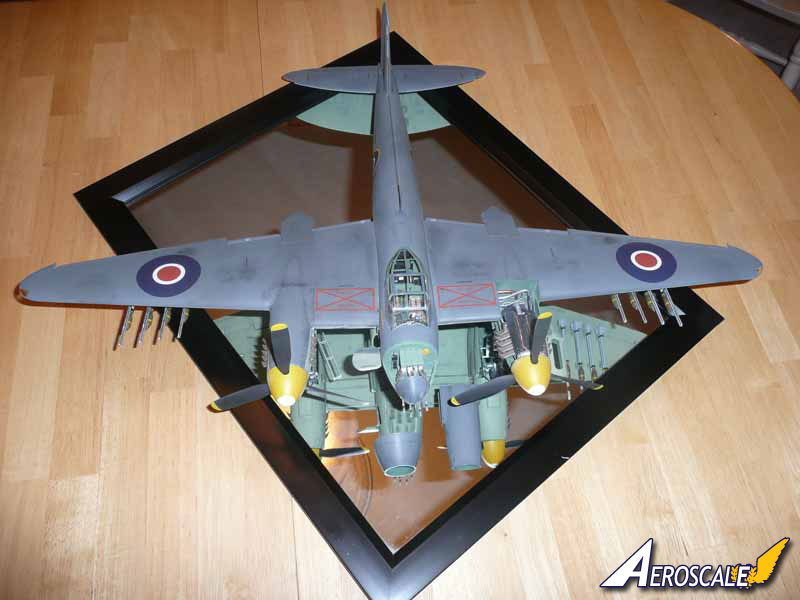
It is with great pleasure that I share my completed rendition of Britain's wooden wonder, the de Havilland Mosquito FB.VI. My kit, represented in 1/24 scale, is an excellent and long awaited offering from Airfix. The version I chose to build was aircraft NE-A from No. 143 Squadron based in Scotland. Their mission was to engage and destroy enemy shipping off the Norwegian coast. No. 143 Squadron, along with No. 235, No. 248, No. 333, No. 144 and Beaufighters of No. 404 Squadron formed the Banff Strike Wing. Their dark gray machines shot enemy shipping to pieces in the Norwegian fjords.Completing this kit took me about 80 hours of on-again/off-again modeling. It is essentially an out of the box project since the kit is repleat with detailed landing gear, Rolls Royce Merlin engines, bomb, 20 mm cannon and machine gun bays and handsome cockpit. It was a pleasure to construct. I hope you enjoy my project.
Construction
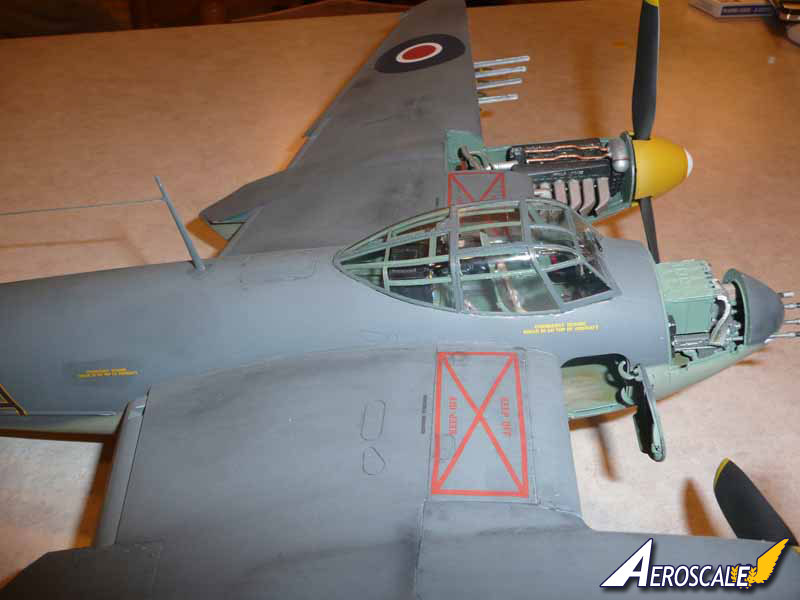
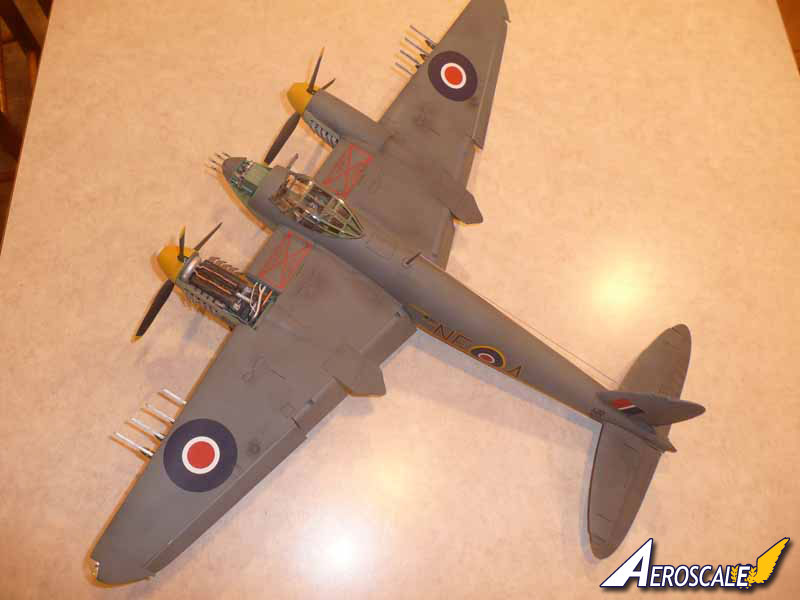
Construction was fairly straight forward. The instructions are fairly clear and printed in a large booklet. Drawings are large and clear. Parts trees are illustrated prior to the construction drawings and were very helpful. Construction starts with the cockpit, big surprise. It is fairly detailed but I was surprised no photoetched seat belts were included so mine were scratchbuilt. Because of the large canopy and open crew door, if you choose this option, a fair amount of your hard work can be seen.Once the cockpit is finished and fuselage halves mated, construction of the wing and elevator follows. The main wing fits well into an opening on the lower half of the fuselage and is quite sturdy. The radiators are inserted into the main wing section and look very nice in-place.
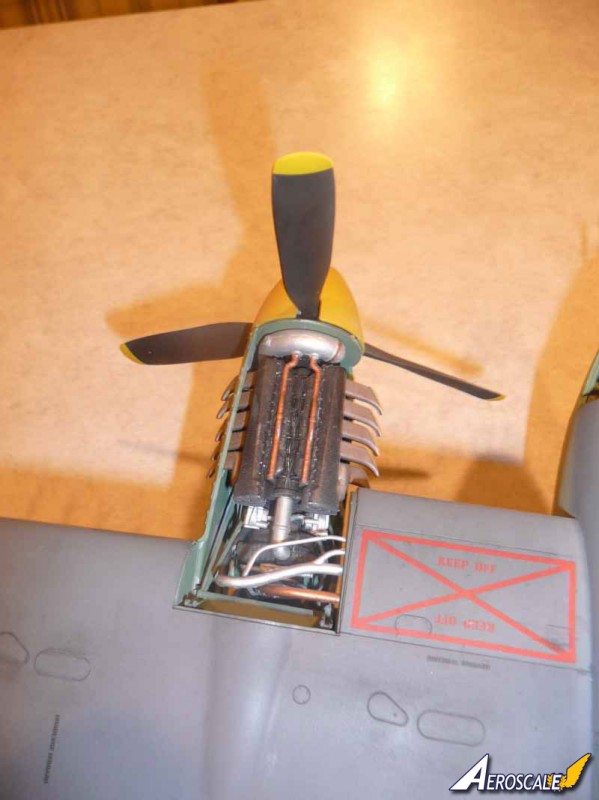
After this the fun really starts. Airfix has included parts for two complete Rolls Royce Merlin engines. I chose to complete one and save the second for the spare parts box. Nothing much out of the ordinary here unless you consider excellent out of the box detail unusual. I was very impressed with these engines.
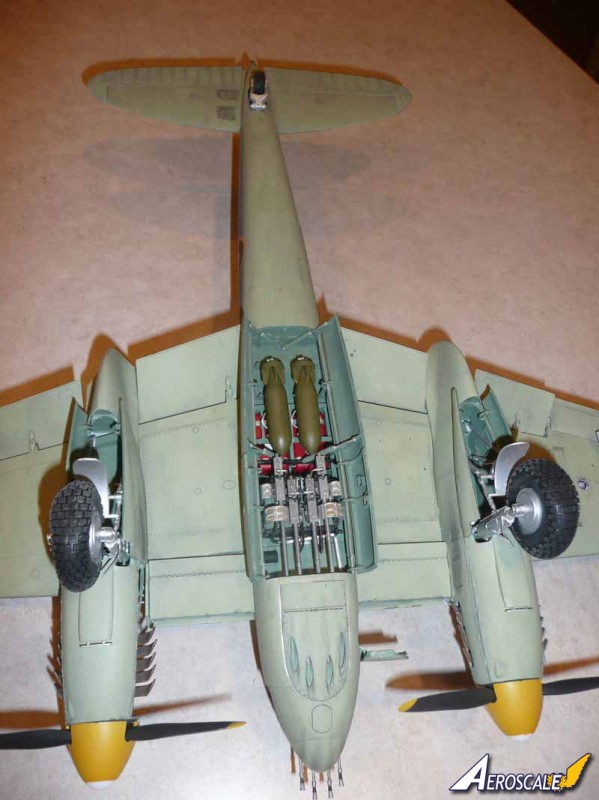
Landing gear assembly was next. Again a very nice and well detailed offering. I did add brake lines but that was about the extent here. Rubber tires were a nice touch. They are weighted. Just be careful moving this beast around. The landing gear can be a bit frail and with the "sticky" tires you could end up rebuilding your broken gear if you're not careful.
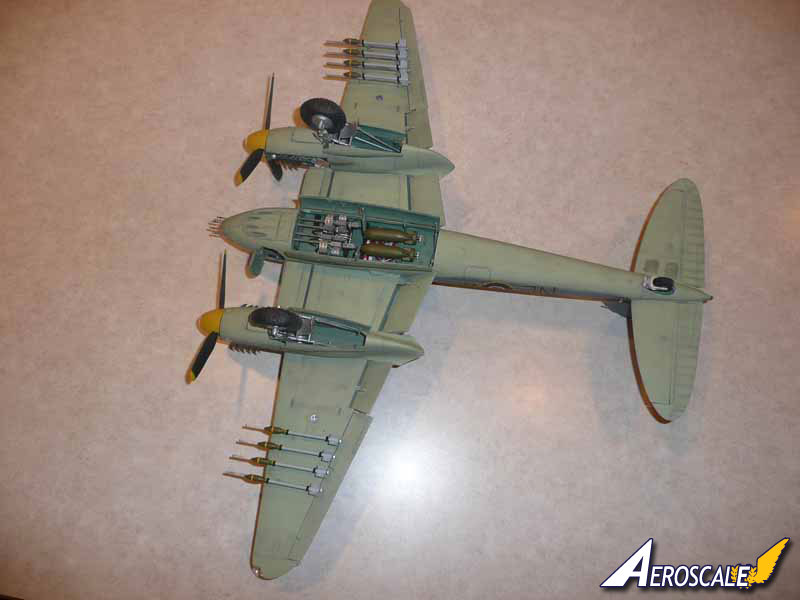
The 20 mm cannon/bomb bay is next and just a pleasure to build. Their detail is amazing and fit is perfect. Cannons have detailed belt feeds and ammo drums. Fuel tanks, bombs and a very nice bomb cradle assembly finish off this compartment.
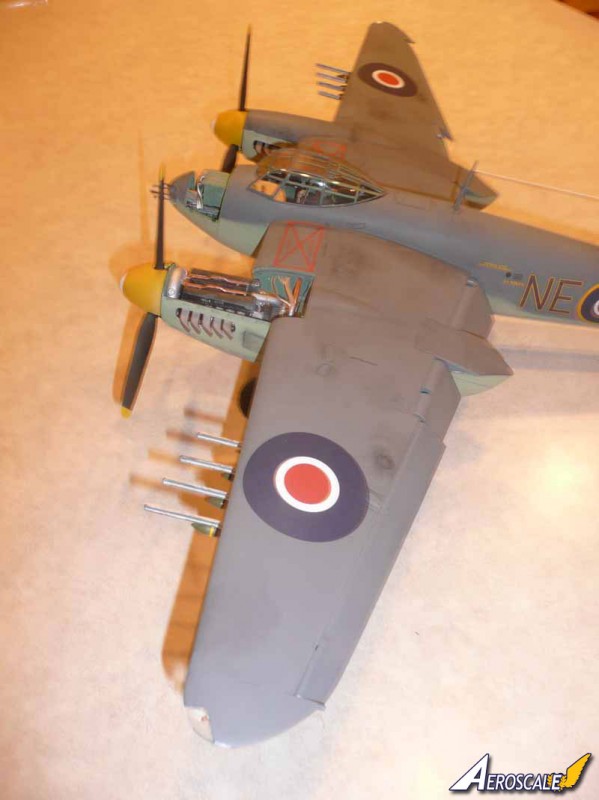
Finally are construction of the bomb bay, landing gear door, machine gun assemblies and external weapons. Landing gear and bomb bay door actuators are accurate and fit very well. The .303 caliber machine gun compartment is also very nice and well detailed. Rubber ammunition feed belts are included and although they fit well after wrestling them into place, the curved rubber is hard to keep painted. As I chose to represent a Costal Command Mosquito, my external weapons loadout was rockets with 60-lb semi-armor-piercing warheads.
Painting and Decals
Aircraft NE-A, HR405 of No. 143 squadron was finished with extra dark sea gray upper over sky undersides. I used Humbrol acrylic No.123 for topside and Humbrol enamel No. 90 sky undersides. Propeller spinners were painted with Model Master Insigna Yellow. All colors were matt finish.Kit decals were used. Prior to their application the entire kit was sprayed with Tamiya clear gloss. The kit decals were very good to work with and took well to Microsol treatment. They set down and conformed to surface shapes with little effort. After all decals were in-place I sprayed the airplane with Humbrol clear matte, No. 40. Weathering was accomplished by post shading panel lines and other significant features with a very dilute wash of Humbrol Matte black where wear and tear "dirties" up the airplane surface. Exhaust staining was accomplished using charcoal. Since the airplane is of wooden construction, there are very few rivets or other metal details to pick out.
Conclusion
Overall this was the largest kit I have ever made. It was also one of the most fun. Airfix should be complemented on their product. Although this kit is quite expensive, I can attesst to the fact that it is worth every penny. In fact, I am saving my pennies so I can buy another one to model No. 487 Squadron machine which participated in the Operation Jericho mission against the Gestapo Prison on February 18, 1944. Try one yourself, I highly recommend one!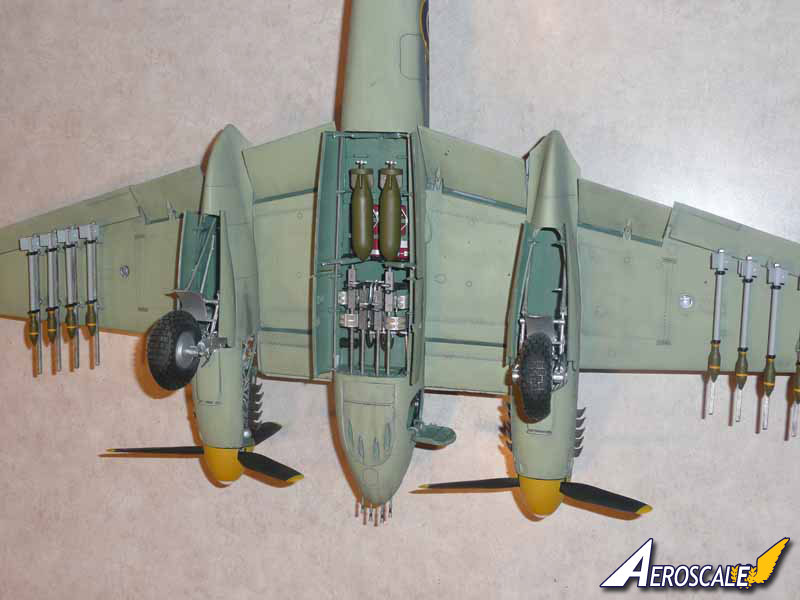
About the Author


FROM: WASHINGTON, UNITED STATES
I have been a modeler since I was about 10 years old. I aircraft almost exclusively but I am hopeful to start on those monster Trumpeter ships I have in my stash. Modeling provides me the opportunity to not only construct the model but also read, research and learn the history related to each and ...
Comments

Thanks for the kind words Bill! I think once you get past the enormity of this airplane you appreciate the quality of Airfix's kit. I had SO much fun on the detail builds (Merlins, landing gear, gun/bomb bay etc...) because they were almost kits in themselves. I think the worst part is finding somewhere to put the damn thing! I am very interested to see the new 1/32 B-17G coming out this summer. Now that will be neat! Thanks again :-)
JAN 23, 2011 - 07:03 AM

Mal, I am working on a 1:24 Spitfire VB and a 1:24 Huricane Mk 2. Do you offer masks for these? If so I would be interested.
Andy
JAN 23, 2011 - 08:14 AM
Hi Jim,
I have been working on "Big Beautiful Doll" for some time Now that I have a new professional plotter there's not much that I can't do. There is a limit but where before I couldn't cut RAF 8"serials (4.23mm) in 1/48 I recently cut Mosquito "No Walk" markings including the 3" (2.38mm) "Keep Off" script. The biggest hurdle for BBD is the checkers on the nose, they won't be difficult to cut but getting them the correct shape will be difficult as they won't be square on the compound curve of the cowling. I have the 1/32 scale kit on which I intend to use the masks and test fit the checks and I hope to start it soon to do so. I do however have a commitment to produce markings for LOU IV as I have several customers who are waiting for that. I hope to start the 2 P-51Ds, early and late, for both these schemes in the next couple of months.
Hi Bill,
At the Scale Modelworld show in Telford last year I filled in Airfix's questionnaire on what I would like them to produce. My 1st, 2nd and 3rd choices was a 1/32 scale Mosquito I would also like to see a 1/32 Westland Whirlwind I'm hoping that if Airfix don't do them then Wingscale will.
Hi Andrew,
Yes Andy I produce masks to order, just drop me a line at [email protected] and let me know the markings that you are planning on and we can take it from there. If I don't already have the markings that you require already drawn I simply draw the ones that you want. There's no charge for that service as it simply adds to what I have already done. Do remind me that you are a member of the Kitmaker group as you qualify for a discount.
Sorry for hijacking the thread, back to Jim's excellent Mossie
JAN 24, 2011 - 06:59 AM

Jim
I missed your pics when they were first posted because we were having a lovely summer holiday at the beach.
That is a fantastic model you have finished - I can only hope that my Airfix Mossie approaches the same standard when I complete it! Of course now I'm regretting that I didn't choose to do a Coastal Command scheme
You may find I keep coming to you with questions about the best way out of the numerous corners I just know I'm going to paint myself into
cheers Brad
JAN 28, 2011 - 08:55 AM
Thanks a bunch for the compliment Brad. Us northern hemisphere dwellers are coveting your summer right about now but we know our turn is comimg despite global warming. I'm always happy to commiserate about kit construction so don't hesitate to ask. I'll probably fumble through my answer. It was a hoot to build my Mossie and I'm sure you will love doing it too. I love the kit so much I almost bought a second one today at a local hobby shop but chickened out. Thanks again for the kind words and hopefully we can touch base later. Jim
JAN 28, 2011 - 02:42 PM
Thanks again for the compliment Grenadier, it is much appreciated.
JAN 31, 2011 - 02:04 PM
So I have been hoping that someone out there has completed this kit and is willing to share their photos. So far to no avail but I am still hopeful :-).
It is such an amazing offering from Airfix and one of my absolute favorite aircraft that is is nice to see it out there. I agree with a previous remark to this that a 1/32 kit would be great also. It would be a good companion to WingScale's upcoming B-25 (which I of course have already pre-ordered). So, all that being said, can anybody out there in cybermodelworld, please step up and share. Thanks all! Jim
FEB 21, 2011 - 02:57 PM

Beautiful workmanship, but, one small point; if one aileron is down, the other should be up. It is, in fact, rare to see displaced ailerons on a Mosquito.
Edgar
FEB 21, 2011 - 07:47 PM
Thanks Edgar, I didn't even realize that they were beyond neutral until I'd hit the send button on the e mail. Neither are glued in-place so I had been messing around with them before the "photo session". At that point I didn't want to point out what a dummy I was. Otherwise the dumb thing turned out OK, it was sure fun to build! Take care Jim
FEB 22, 2011 - 12:22 PM
Copyright ©2021 by John Whitbread. Images also by copyright holder unless otherwise noted. The views and opinions expressed herein are solely the views and opinions of the authors and/or contributors to this Web site and do not necessarily represent the views and/or opinions of AeroScale, KitMaker Network, or Silver Star Enterrpises. Images also by copyright holder unless otherwise noted. Opinions expressed are those of the author(s) and not necessarily those of AeroScale. All rights reserved. Originally published on: 2011-01-22 00:00:00. Unique Reads: 10635

WEB HOSTING BY


Copyright ©2021 AeroScale and Kitmaker Network, a subsidiary of Silver Star Enterprises
All Rights Reserved. Please read our Conditions of Use and Privacy Policy.
All Rights Reserved. Please read our Conditions of Use and Privacy Policy.