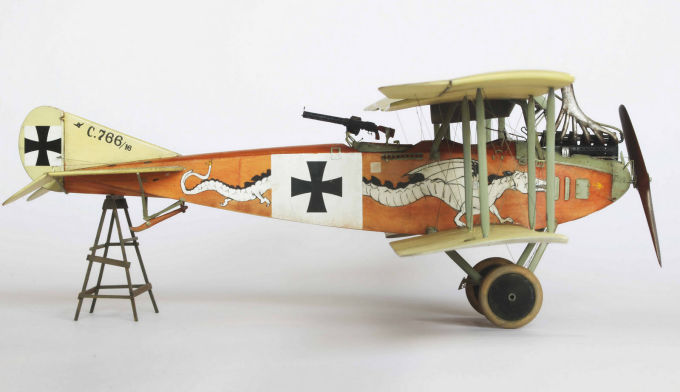
1⁄48Albatros CIII - Erwin Böhme
6
Comments
Kit
The kit used was by Special Hobby, it is a copy of the one made by Eduard, but more beautiful. The kit stll needs care in building.It should be noted that some of the Eduard photoetched parts are directly molded onto the parts of the Special Hobby Kit.Build Highlights
The chair is modified by gluing strips of plastic in and sanding.I used the plan of the Albatros BII (wingnutwings) to make my cockpit. I'm sure of nothing.
I replaced the black dials with white dials.
The turret is too simplified and exceeds too much of the fuselage. So I filed down to try to have flanks more "bent". I wanted a base like the picture, unfortunately the base of the turret is not circular so impossible to resize on a turn. I pasted a profile 0.5x0.5 underneath. The height of the turret is reduced to the scalpel.Not enough yet, the leather protection is in greenstuff.
Small "circles" with oil paint (always Sepia):and spread with a fine brush 3/0, draw the paint in the direction of the wood, here in only one direction. If we paint in the other direction, it is a trail where the beige paint of the background appears (why?). These beige trails allow to have grooves in the wood.
The crocodile in white is made with a stencil.It is then varnished and the fine lines are painted with oil paint. I have all varnish gloss with AK varnish to be able to correct errors more easily. Alas the varnish reacts badly to the solvent, and the white becomes ... gray. I had a layer of Klir that actually resists solvent better but is not indestructible. I repeated several times each stroke and the Klir was therefore damaged (at the level of the crest and scales of the belly) where the black drips.
It is much more difficult than expected. There is no landmark in the all-white crocodile to place the scales and all the folds. Some are therefore misplaced. Cracks have appeared in the varnish, we do not see them with the naked eye but the solvent takes the opportunity to get in and everything is gray. I think it's the thick-layer AK varnish that was not dry enough to support the Klir.
For the tail I more or less invented the area with the scales in circumflex accents, we distinguish them perhaps or vaguely in the photos. Ditto for the webbed leg at the back. Not sure it's there or even there is one. When I look at the mouth of the crocodile I do not understand why the commissure goes down so oddly.
For the exhaust it was very clear on all the pictures that the paint often paint flakes. Can it be a paint silver/alu as on the collectors of some engines auto or on the old stovepipes like at my grandmother? So I tried this:
- Steel painting.
- buffered liquid mask.
- aluminum mixed with white.
- matt varnish
- dark spots made with a gray "watercolor" pencil rubbed on sandpaper and applied with a wet brush.
- Rusty pigments.
The small planes at the front are painted on a piece of transparent decal. As a model for me, a DH2 side crocodile and a RE8 on the other. Note that the position of the air vents is not correct when compared with photos and decoration.
Extra Details
- The springs that close the hood are made with a bulb filament. It is not seen...
- The mechanism that synchronizes the propeller and the hood machine gun is redone.
- The hose connecting the tank to the engine is copper.
- The brake is equipped with cables, a front, a behind. The train rests on bungees, it is nylon 0.2mm. Normally they are packaged in a protective cook as on the B II.
- At the level of the articulation of the wing of the dragon, it is necessary to add the circular trapdoor.
- The wheels are sanded to be less thick.
The turret is arranged: two handles, a support for the machine gun. The one provided in the Eduard kit is too long. I cut it in half. I put two mirrors, one on each side.
The machine gun is resin and comes from Eduard. Very beautiful but a pity that it lacks the support. It is difficult to hold and fix in front of the ammunition drum.
The crutch is Eduard's. Very fragile, it must touch the fuselage, otherwise the fins touch the ground ... This is the case at home where the support of the aircraft. I do not see how to do without disassembling the fins, so it will remain perched like that.
The controller and the rod in front of the windshield are to be added too.
The support of the signal flares is made with a piece of plastic and aluminum food tray.
You can follow the full build here.
Comments
Hi Louis
Absolutely wonderful! It's great to see this gorgeous build on the Frontpage!
All the best
Rowan
JAN 17, 2019 - 09:31 AM
Only halfway reading your article did I noticed that the model is in 1/48 scale! You are a true artist, painting those dragon/crocs is not for the faint at heart. Bravo!
JAN 19, 2019 - 09:43 AM
Wonderful work! Truly amazing build and a benchmark for which I can strive to reach someday. Thank you for taking the time to create this post, it is definitely a work of art.
FEB 09, 2019 - 09:59 AM
Extraordinary work! I hope that someday I can achieve a fraction of your skill. I followed the blog and go back to it for "this is how it's done."
I encourage anyone who has not looked at the thread to do so.
FEB 26, 2019 - 11:54 AM
Copyright ©2021 by Louis Hubert. Images also by copyright holder unless otherwise noted. The views and opinions expressed herein are solely the views and opinions of the authors and/or contributors to this Web site and do not necessarily represent the views and/or opinions of AeroScale, KitMaker Network, or Silver Star Enterrpises. Images also by copyright holder unless otherwise noted. Opinions expressed are those of the author(s) and not necessarily those of AeroScale. All rights reserved. Originally published on: 2019-01-17 00:00:00. Unique Reads: 13668


.jpg)
.jpg)
.jpg)
.jpg)
.jpg)
.jpg)
.jpg)
.jpg)
.jpg)
.jpg)
.jpg)
.jpg)
.jpg)
.jpg)
.jpg)
.jpg)
.jpg)
.jpg)
.jpg)
.jpg)
.jpg)
.jpg)
.jpg)
.jpg)
.jpg)
.jpg)
.jpg)


