1⁄35
Weathering a Spitfire!a build story by Mike Still
 |
Introduction |
Painting and
weathering a Tamiya 1/48 Spitfire Mk. Vb, or How I Stopped Worrying and
Learned to Love Hard-edged Camouflage If you're reading this, the number of articles on
building, painting and otherwise reviewing the Tamiya Spitfire Mk. Vb and
its companion kits has not reached critical mass and irradiated a large
chunk of the planet.
Plenty has been written on the Web and in printed magazines on the Tamiya
Mk. I/Mk. V 1/48 kit series, and I can add little to what has been said
consistently -- they are great-fitting, well-detailed kits that kicked off a
long-overdue string of Spitfire kit releases from other manufacturers.
When my local IPMS club held its quarterly contest with a 1/48 aircraft
theme, I already had an 80-percent completed Spitfire Mk. Vb sitting on the
project shelf. Seizing on that as a chance to return from over a year of
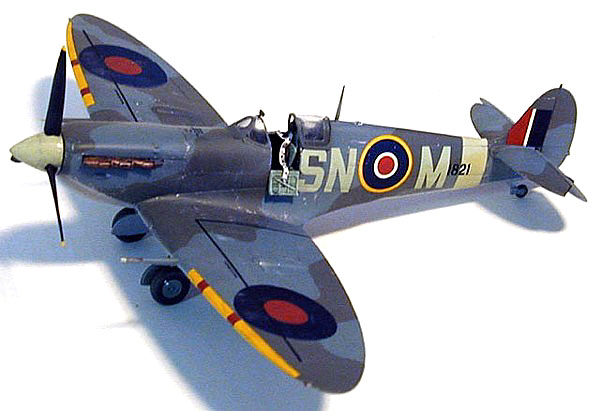
airbrush inactivity, I decided to go with a basic Temperate Land Scheme in
Dark Green/Ocean Grey/Medium Sea Grey using the kit's already adequate decal
option.
Aside from a scratchbuilt Sutton harness, I also cut the elevators from the
horizontal stabilizers and added rounded strips of plastic along the
elevator leading edges. After milling grooves in the rear of the
stabilizers, I test-fit and adjusted the elevators before setting them aside
for later masking and painting. I first primed the
whole model with Model Master flat Light Gull Gray from a spray can,
wet-sanding the dried paint with 800 and 1,000 grit sandpaper. I then
scraped paint from the areas where the canopy parts would attach (Fig. 1).
I already had a complete airframe sans canopy. Since I'm suffering from
aging eyesight, I wasn't pleased with the idea of masking and painting
canopy interior framing from the inside, so I decided to cheat with layered
external colors. Copyright ©2002 - Text and
Photos by Mike Still (modelcitizen62). All Rights Reserved. |
| Project Photos
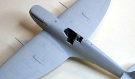
Figure 1
|
 |
Copyright ©2021 by Mike Still. Images also by copyright holder unless otherwise noted. The views and opinions expressed herein are solely the views and opinions of the authors and/or contributors to this Web site and do not necessarily represent the views and/or opinions of AeroScale, KitMaker Network, or Silver Star Enterrpises. Images also by copyright holder unless otherwise noted. Opinions expressed are those of the author(s) and not necessarily those of AeroScale. All rights reserved.


