_GOTOBOTTOM
Pre-Flight Check
Constructive critique of your finished or in-progress photos.
1:72 Airfix Tiger Moth
lampie
#029
_VISITCOMMUNITY
England - East Midlands, United Kingdom
Joined: December 23, 2005
KitMaker: 6,249 posts
AeroScale: 3,270 posts
Posted: Sunday, June 10, 2007 - 07:17 AM UTC
About a year ago I started to build my first biplane,and all was going quite well until I made a right royal ****up while attempting to rig it.
Time goes on and with a couple of biplane builds under my belt I felt it was time to have another go at the old Airfix Tiger Moth.
Ive saved the first attempt and its sitting on the bench to inspire me when I get fed up with working on the parts,which need a lot of work before assembly.Sink marks everywhere but perhaps the worst part is a large "bump" on the port wing which Ive had to sand away to level the wing out.
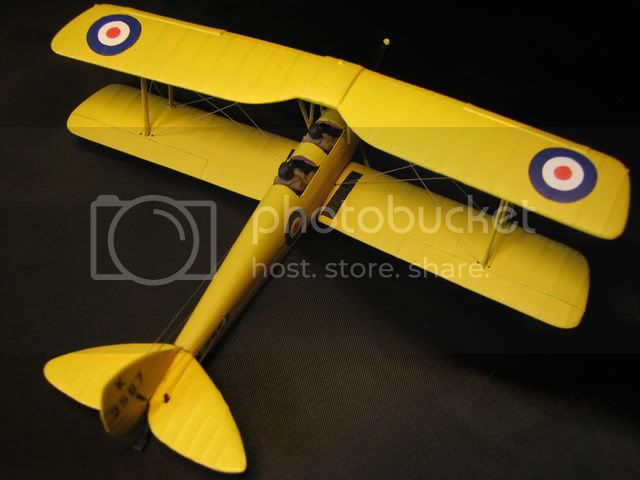
Im still cleaning this up but its getting there.
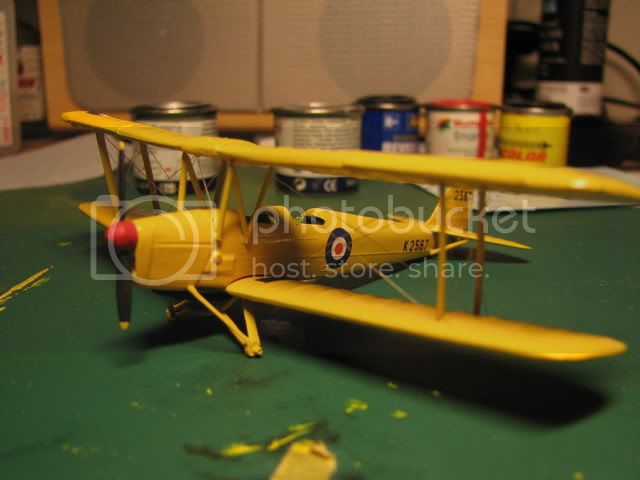
Heres how Im progressing at the moment,,and a photo of the failed first attempt at this kit.

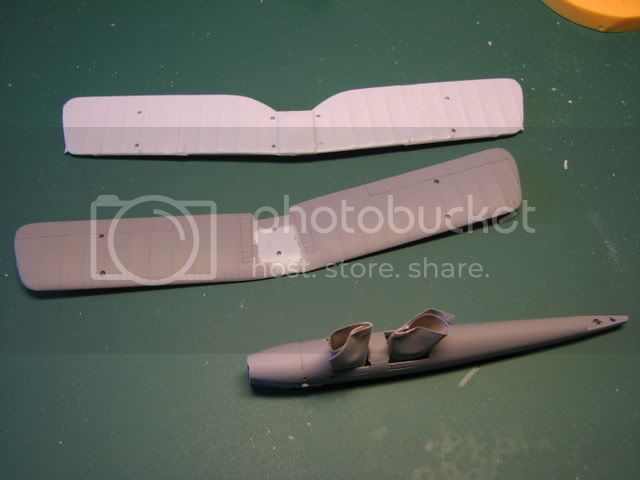
Fusalage together and primed.Still some filling and sanding to go on this,and also on the wing sections.

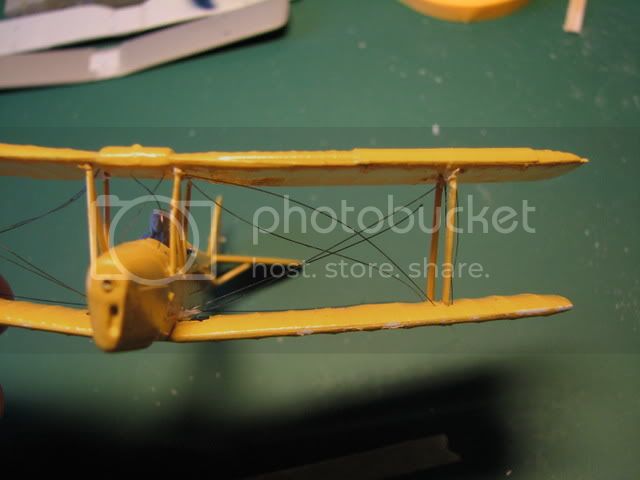
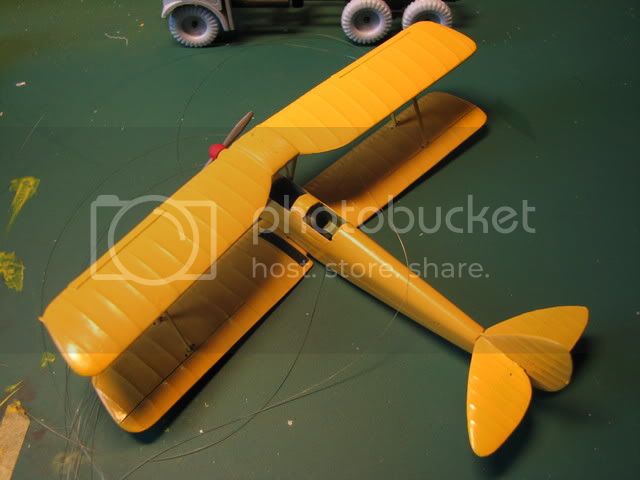
How the first attempt ended up.Snapped rigging,burn marks and just a general disaster area.
Lets hope "take 2" turns out a lot better.
Nige
almonkey
_VISITCOMMUNITY
England - East Midlands, United Kingdom
Joined: March 23, 2003
KitMaker: 2,124 posts
AeroScale: 788 posts
Posted: Sunday, June 10, 2007 - 07:28 PM UTC
its about time you got this done!
one heads up, on mine i had to shave down both pilots arms to get them to actually fit in the cockpit. also i find a lightbulb is the best way to heat up rigging to stretch the stuff (leaves no burn marks!)
lampie
#029
_VISITCOMMUNITY
England - East Midlands, United Kingdom
Joined: December 23, 2005
KitMaker: 6,249 posts
AeroScale: 3,270 posts
Posted: Sunday, June 10, 2007 - 10:05 PM UTC
Hi Phil.
Thanks for the heads up on the pilots.Luckily Ive got 4 of them incase I mess up,and Ive also got the undercarriage/prop and decals from the first kit. Loads of spares
This time around the rigging holds no fear,I think it will actually be one of the easier parts of the build to be honest.The last 2 biplane builds I drilled right through the bottom wing and no heat treatment was required to tension the wires.Ive also bought some of that elastic thread that people have been talking about in the forums recently so I might give that a try. Having said that,almost a year since being built theres no loss of tension on my Camels.
These old sprues are certainly taking some work to tidy up ready for assembly. On the fusalage/wings/rudder Im having to remove all the locating pins and fill the holes so everything lines up,but its getting there.
Best part about this build is going to be that its one colour overall and no canopy to mask
Just the small matter of another tour I have to do and then I can get it finished
One question. I seem to remember your "Commended" Tiger Moth being finished in a gloss or satin varnish. Is that the correct finish?
Nige
AIRGUNNER
_VISITCOMMUNITY
England - South East, United Kingdom
Joined: September 27, 2006
KitMaker: 246 posts
AeroScale: 234 posts
Posted: Monday, June 11, 2007 - 05:37 AM UTC
Hi,

Where did you get the elastic thread? I have tried my local haberdashers shop but they have no clue what I am on about!!

Steve
almonkey
_VISITCOMMUNITY
England - East Midlands, United Kingdom
Joined: March 23, 2003
KitMaker: 2,124 posts
AeroScale: 788 posts
Posted: Monday, June 11, 2007 - 06:50 AM UTC
my tiger moth was finished in humbrol 69 straight out of the tin, and i probably mixed a few drops of 69 with white primer to act as an undercoat. i have somewhere,(possibly put onto disc) quite a few reference pics, i'll have a dig around to try to find them and post them up.
JackFlash
_VISITCOMMUNITY
Colorado, United States
Joined: January 25, 2004
KitMaker: 11,669 posts
AeroScale: 11,011 posts
Posted: Monday, June 11, 2007 - 11:53 AM UTC
Greetings Nigel!

Let me encourage you to try Aeoclub "STRUTZ." This extruded brass will give you build uncommon strength. Plus you can use the right diameter / crossection to get he correct scale. Model On!
lampie
#029
_VISITCOMMUNITY
England - East Midlands, United Kingdom
Joined: December 23, 2005
KitMaker: 6,249 posts
AeroScale: 3,270 posts
Posted: Tuesday, June 12, 2007 - 01:57 AM UTC
Thanks for the feedback guys
Steve,,rigging with elastic from Ebay,,,,buy it now about £2 if my memory serves me right,,delivered in a couple of days.
Back off yet another tour at the end of June,,and the campiagn builds are stacking up,, but hopefully I can get this little Moth finished quite quickly once everything fits together ok.
My dad soloed a Tiger Moth from first familiarisation flight to solo in 10 1/2 hours,,,its taken me almost that time top get to this stage
Nige
lampie
#029
_VISITCOMMUNITY
England - East Midlands, United Kingdom
Joined: December 23, 2005
KitMaker: 6,249 posts
AeroScale: 3,270 posts
Posted: Monday, July 02, 2007 - 12:11 PM UTC
Finally,after what has seemed like a week but was in fact a couple of days Im almost ready for preshading and assembling this little baby.
So much sanding,shaving,filling,primering,sanding again etc,,you get the picture. It seems like Im going to end up with another 1:73 scale Airfix kit.
The centre struts are glued in place,and when Ive checked everything with fresh eyes tomorrow I will carry on.
Now it seems like all the donkey work has been done hopefully I can get this together quite quickly. Well,,quickly for me that is

Nige
lampie
#029
_VISITCOMMUNITY
England - East Midlands, United Kingdom
Joined: December 23, 2005
KitMaker: 6,249 posts
AeroScale: 3,270 posts
Posted: Tuesday, July 03, 2007 - 11:22 AM UTC
All in all a very frustrating day at the bench
I was hoping to be heading to bed tonight with the struts in place on the bottom wing having a nice overnight dry.
However,the best laid plans of mice and men etc,,LOL.
Instead,Ive spent the afternoon and all of tonight applying layer upon layer of Xtraacrylic RAF Trainer Yellow. I really cant get the hang of this stuff. Its a sod to spray,'scuse my French.
Anyway,,its not a race, and Ive finally managed to get everything sprayed.It really is a nice yellow and this should stand out well in the collection when its done.

At least I have the battered remains of my first attempt at this kit to keep me motivated
Nige
lampie
#029
_VISITCOMMUNITY
England - East Midlands, United Kingdom
Joined: December 23, 2005
KitMaker: 6,249 posts
AeroScale: 3,270 posts
Posted: Wednesday, July 04, 2007 - 05:21 AM UTC
Slow but sure progress.
The rigging thread is attached and the wings are in place and startng a 24 hour drying session.
Ive made a start painting the prop and I'll work on the other bits and pieces.Hopefully I can connect up the rigging and maybe decal the fusalage tomorrow.
I couldnt justify getting some brass struts for this build Stephen,but I will seriously consider getting some for when I have a biplane building frenzy to clear some of the WW1 subjects in my stash.Hopefully the rigging will add some strength to the build. Ive just got to be carefull that when I connect all the rigging up I dont start to pull the wings out of shape.
All very precarious,,and all very Airfix,,LOL.

This is almost as far as I got first time around.Fingers crossed this makes it to the finishing line,otherwise Im going to end up with a scrapyard of Airfix Tiger Moths decorating the house.
Nige
FalkeEins
_VISITCOMMUNITY
England - South East, United Kingdom
Joined: March 07, 2005
KitMaker: 868 posts
AeroScale: 690 posts
Posted: Wednesday, July 04, 2007 - 06:24 AM UTC
Hi Nige,

..nice to see you wrestling with an ancient kit like this - and winning ! Just a thought, an undercoat of Halfords Yellow primer might have eased the Xtracolor worries..
lampie
#029
_VISITCOMMUNITY
England - East Midlands, United Kingdom
Joined: December 23, 2005
KitMaker: 6,249 posts
AeroScale: 3,270 posts
Posted: Wednesday, July 04, 2007 - 11:02 AM UTC
Hi Neil.
Wrestling is quite an apt term for building this kit!
Good news as I call it quits for tonight. Ive done the wing rigging,which means Ive got further than my last attempt at this little biplane!
This is how she stands at the moment.

Ive still got to trim the excess thread from the exit points on the lower wing.When I dust these over in Trainer Yellow I will also spray the undercarriage,which is sitting on the remains of the first attempt.(quite handy to have this as a jig)
After that its just a matter of painting the pilots and decalling. The finishing post is in site and the little Moth is gaining its character.
As for Xtraacrylics. I had primed the model with grey plastic primer. It wasnt so much covering the primer,it was trying to get the paint to a consistency that it would spray and cover well at. Im going to give the whole airframe a further dusting over of yellow before I decal as I feel its a bit thin in places.
Nige
TedMamere
_VISITCOMMUNITY
Moselle, France
Joined: May 15, 2005
KitMaker: 5,653 posts
AeroScale: 4,347 posts
Posted: Wednesday, July 04, 2007 - 06:59 PM UTC
Hi Nigel!

Looking good so far, especially with the rigging. The propeller hub seems to have an odd shape though... is it the kit's part?

Jean-Luc
lampie
#029
_VISITCOMMUNITY
England - East Midlands, United Kingdom
Joined: December 23, 2005
KitMaker: 6,249 posts
AeroScale: 3,270 posts
Posted: Wednesday, July 04, 2007 - 09:01 PM UTC
Thanks Jean-Luc!
The propeller is indeed a bit of an odd shape.Its the kit part,
Remember Almonkeys lovely little Airfix Tiger Moth about 18 months ago? His is the same. Infact, it was seeing Phils TM at a show last year that made me want to build this. So its all the barons fault,LOL
Hopefully the next couple of days will see this finished.
Nige
lampie
#029
_VISITCOMMUNITY
England - East Midlands, United Kingdom
Joined: December 23, 2005
KitMaker: 6,249 posts
AeroScale: 3,270 posts
Posted: Thursday, July 05, 2007 - 12:03 PM UTC
The end of another day and its off to bed with a smile on my face tonight because the undercarriage is in place and the decals are on and settling down with Microsol
Hopefully I'll get this finished tomorrow.


Nige
lampie
#029
_VISITCOMMUNITY
England - East Midlands, United Kingdom
Joined: December 23, 2005
KitMaker: 6,249 posts
AeroScale: 3,270 posts
Posted: Friday, July 06, 2007 - 08:58 PM UTC
All finished.


This is very satisfying as its the only kit Ive previously failed to finish.
Its also the first part of my aim to build each of the types flown by my late father. Next on the list is a Stearman.
When theyre all done I will display them with some of dads photos from #1 BFTS Terrell Texas, his wings and his membership card to the famous Caterpiller Club.

Nige
glamdring
Joined: May 21, 2007
KitMaker: 77 posts
AeroScale: 76 posts
Posted: Saturday, July 07, 2007 - 03:08 AM UTC
Hey Nige,

Looks really nice. Congrats on a vastly improved go at this kit. I wish I had saved some of the early junkers for motivation and visible improvement.

Recently, I picked up an eduard weekend edition biplane to try. Can you give me a quick lesson in how you do the rigging? Do you do one long thread that enters and exits the bottom wing? Thanks for any tips.

Allen
TedMamere
_VISITCOMMUNITY
Moselle, France
Joined: May 15, 2005
KitMaker: 5,653 posts
AeroScale: 4,347 posts
Posted: Saturday, July 07, 2007 - 04:43 AM UTC
Hi Nigel!

Nice one! ... and definitely an improvement over your first attempt! Congratulations for your perseverance...

Jean-Luc
lampie
#029
_VISITCOMMUNITY
England - East Midlands, United Kingdom
Joined: December 23, 2005
KitMaker: 6,249 posts
AeroScale: 3,270 posts
Posted: Saturday, July 07, 2007 - 11:18 AM UTC
Thanks guys!
What a difference a year on Aeroscale makes...( speaking of which,,its about time for our first birthday party )
Allen.
For the rigging I drill seperate top and bottom points for each line.On the top wing I just drill in far enough to secure the thread.On the bottom wing I drill all the way through. The threads are all atached to the top wing before assembly.
I then feed each thread through the bottom wing.Weight it with a pair of locking tweeezers,clamp,clothes peg etc.This way the thread is held taught and theres no need for any heat shrinking methods.
I secure the thread with a drop of CA, and when its all dry I snip off teh thread and sand any excess glue away.Then I spray over and the hole has gone
Hope this helps
Nige
SuccorPhysh
_VISITCOMMUNITY
Texas, United States
Joined: June 24, 2007
KitMaker: 82 posts
AeroScale: 81 posts
Posted: Sunday, July 08, 2007 - 11:32 AM UTC
Nigel, I actually live near Terrell, Texas and, once upon a time, wrote a story about No. 1 BFTS and several pilot graduates that returned to the Dallas area. Its been several years since I wrote it but I am currently actively trying to locate it. If you are interested, I will send you a copy.
lampie
#029
_VISITCOMMUNITY
England - East Midlands, United Kingdom
Joined: December 23, 2005
KitMaker: 6,249 posts
AeroScale: 3,270 posts
Posted: Sunday, July 08, 2007 - 10:31 PM UTC
Hi Mike.
Interested?,,of course I am!
One of the cadets on my fathers course returned (and still lives) in Terell.
Henry Madgewick.he actually became major of Terell, and is active in the #1 BFTS museum there.
I will PM you later today or tomorrow.
Nige
SuccorPhysh
_VISITCOMMUNITY
Texas, United States
Joined: June 24, 2007
KitMaker: 82 posts
AeroScale: 81 posts
Posted: Monday, July 09, 2007 - 03:56 AM UTC
The gentlemen I met were all Mossie pilots in the war. They were part of one of the first classes that went through the Terrell course. Not many of their comrades survived the war and only a handful returned to Texas. Most had met young women while they were training and returned to marry them. Several were employed locally at the Chance Vought plant in Grand Prairie, Texas.
I made the mistake of asking how they enjoyed flying bombers and was quickly corrected that the Mossie was a fighter.
Do you recall what class your father was in and what he flew in service?
lampie
#029
_VISITCOMMUNITY
England - East Midlands, United Kingdom
Joined: December 23, 2005
KitMaker: 6,249 posts
AeroScale: 3,270 posts
Posted: Monday, July 09, 2007 - 05:08 AM UTC
Mike,,check your PM's
Nige
 _GOTOTOP