Hey everyone
I am new to making models. I have bought myself about 10 model kits to start my hobby. 3 tank kits and around 7 aircraft kits, one of which is an academy MIG-21. It is a very simple kit, 5 instructions in total it looks pretty good for a beginner.
I have broused the forums and got myself a couple of modle magazines. so ive learnt a little on how to paint and putty my models. but there is a couple of things i want help on before i do my MIG-21.
1. Do you really have to PRIME your model before you paint
2.what are some good kits for beginers?
3.How many coats of paint should i put on my models?
4.If so what colours should i use?
5.I have some humbrol enamel paints and tamiya thinners, what ratio should i use in my airbrush?
6.Is 4 part acrylic/waterbased paint & 6 part thinners the ratio for acrylic/waterbased paints?
7.how do i weather my models?
8. any other general tips about modeling will be extremly appreciated
P.S. would annyone like to see my unpainted F-16 and tell me what can be done to make it better?
Thanks in advance for whoever helps
James.
Start Here (for Beginners)
This forum is for younger modelers or people just starting out in the hobby.
Hosted by Jim Starkweather
Tips & Hints apreciated
jam2727
Victoria, Australia
Joined: June 28, 2007
KitMaker: 171 posts
AeroScale: 113 posts
Joined: June 28, 2007
KitMaker: 171 posts
AeroScale: 113 posts
Posted: Friday, June 29, 2007 - 09:18 PM UTC
goldstandard
California, United States
Joined: March 29, 2007
KitMaker: 208 posts
AeroScale: 186 posts
Joined: March 29, 2007
KitMaker: 208 posts
AeroScale: 186 posts
Posted: Saturday, June 30, 2007 - 06:13 AM UTC
1. Yes, you should always primer your model before applying paint. A white background layer ensures that brighter colors painted on later will be bright. It also helps in detecting any flaws on the surface that need attention before painting, like scratch marks, insufficiently filled seams, etc. It also aids in leveling out areas where you have done a lot of sanding. Finally, it helps acrylic paints stick to your model better.
2. Academy kits are generally good for beginners, so you are on the right track there. Natural metal finishes, on the other hand, are not so easy. Since you have humbrol paints, I would recommend trying the silver color for the Mig, as aluminum is a bit too dark.
3. Depends, I usually put on a layer, let it dry, then inspect it to see if I need another layer. For metalic paints your best bet is to mist on several light coats to ensure that recessed details don't get filled in, as thicker gloss and metalic paints are known to do.
4. Whatever your references say is correct. When information is unavailable, use your best judgement.
5 and 6. First off, tamiya thinner is for acrylic paints only, not enamel paints. Personally, I use testors airbrush thinner for any of my enamel based paints and plain old isopropyl alcohol to thin my acrylic paints. Some people use windex for acrylics but I have read somewhere that ammonia reacts with certain binders in acrylics, causing them to gel.
Acrylics have the advantage of being less toxic than enamels, as they are water based rather than petroleum or oil based. The main disadvantage with acrylics is their weak bond with the surface they are painted on. As a result, you have to be very careful when masking them, or your finish will be ruined. With either acrylic or enamel paints, you want to be wearing a respirator approved for paint and pesticide vapors, normal dust masks won't do. The reason for this is that the solvents used for these paints, be they rubbing alcohol or paint thinner, are harmful when breathed. It may be much more expensive than a plain dust mask, but the extra money now will save your family from an untimely funeral bill later...
Finally, if you are living in a particularly hot, dry climate, like I do in California, it helps to buy some acrylic retarder to mix with acrylic paints, to prevent it from drying before it ever hits the model surface. If you use a rattle can primer for your model, use enamel only, as you can't mix retarder into a rattle can. You can find this stuff at any well stocked arts and crafts store, in the paint section with the acrylics.
7. Weathering depends on what kind of look you want to achieve. For a natural metal finish you want to keep it to a minimum as you want the model to be nice and shiny. Now, for a tank that has seen a lot of combat, you will definitely want to use lots of powdered dry pastels to simulate dried dirt. Look closely at your references, to find out just what kind of weathering you need. For washes, I would recommend starting with water colors, as they are more user friendly than oil based washes. Usually the wet tube watercolors are more finely ground than the dry cake based ones.
8. I cannot say this enough: Always test fit everything before gluing, no matter what! Also, make sure to find decent three view diagrams (whenever possible) to check your model for the correct proportions and angles. A quick and dirty method for printing a diagram to match your model's size is to carefully measure the wingspan of the model, then open Microsoft word and embed the three view in the document, resizing it to match the measured wingspan using the ruler at the top of the document screen. (I read that one user on these forums, who uses an ALPS printer to make homemade decals, uses this method to ensure they are in scale too.)
Don't worry if your first few efforts are less than satisfactory to you. It takes a while before you become skilled enough to turn out quality models on a consistent basis. Also, there will be times during a build when you will become frustrated and discouraged. Some people deal with it by putting the model aside for a while, I usually get though it by reminding myself how cool it will look once I get it done. (for me this is usually when rigging my biplanes.) Sometimes, it is only the final outcome of an activity that is enjoyable, rather than its execution.
jam2727
Victoria, Australia
Joined: June 28, 2007
KitMaker: 171 posts
AeroScale: 113 posts
Joined: June 28, 2007
KitMaker: 171 posts
AeroScale: 113 posts
Posted: Saturday, June 30, 2007 - 02:25 PM UTC
Ok thank you alot mate.
what should i use as a primer to put on my models?
on my first model i put a white matt tamiya acrylic coat over it, as i kept painting it would come off the suface and get all lumpy so its pretty much ruined, is this because i didnt use a primer?
also how do i get paint of my models if i do stuff it up?
thanks again
James
goldstandard
California, United States
Joined: March 29, 2007
KitMaker: 208 posts
AeroScale: 186 posts
Joined: March 29, 2007
KitMaker: 208 posts
AeroScale: 186 posts
Posted: Saturday, June 30, 2007 - 07:08 PM UTC
personally, I try to avoid acrylic primers whenever possible when it is warm and dry out. I suppose that since you are in Australia it should be winter about now. I personally prefer a good enamel base primer instead, but stay away from the testors stuff, it isn't that good, and leaves a texture on the surface similar to orange peel. Some people swear by a good automotive primer, which I haven't gotten around to trying yet but supposedly you can get it at auto body shops in a tin can along with a thinner that you can spray though your airbrush. One thing though, when you apply the primer it would be a good idea to use OOOO steel wool or at least 1000 grit sandpaper to smooth the surface a bit for the metal finish. You want it to be nice and smooth for the metallic paint.
It is also very important to ensure that the surface of the model is entirely clean when spraying your primer coat on it. Any release agent left from the molding process or oil from your skin will interfere with the paint's ability to properly bond with the surface, especially with acrylics. Before I start any project I always soak all the plastic in a warm bath of water with some detergent mixed in with it. Then I thoroughly rinse it all off, making sure that no soap residue is left on the parts either. Some people will wash their model prior to final painting but I always worried about water getting trapped inside the fuselage. I always use latex gloves when handling the major fuselage pieces I will be airbrushing later, so I don't need to do the final cleaning, but before painting the model I give it a good rubdown with Polly Scale Plastic Prep, a pink liquid that is advertised as being able to eliminate all the remaining oils that could be on the surface, as well as rendering the model static free so dust is less likely to stick to it.
Here is a link with some info on paint stripping.
Hope that helps.
jam2727
Victoria, Australia
Joined: June 28, 2007
KitMaker: 171 posts
AeroScale: 113 posts
Joined: June 28, 2007
KitMaker: 171 posts
AeroScale: 113 posts
Posted: Saturday, June 30, 2007 - 08:13 PM UTC
Ok thanks alot mate.
Your a gerat help. i extemly apreciate it
Iver been reading around some more and found that some people put the primer,then their coat of paint, decals and then a gloss finish at the end. i couldnt find out what the gloss finish was for but why do you have to do it, if you have to?
Your a gerat help. i extemly apreciate it
Iver been reading around some more and found that some people put the primer,then their coat of paint, decals and then a gloss finish at the end. i couldnt find out what the gloss finish was for but why do you have to do it, if you have to?
Posted: Saturday, June 30, 2007 - 11:02 PM UTC
Hi James.
Welcome to Aeroscale
Primer serves two purposes. Firstly it will allow you to see any imperfections before you spray on the main colours, what areas still need attention etc, and secondly it acts as a key for the main paint.
I use a rattle can of plastic primer from Halfords which is a motor factors chain in the uk.
Before decalling I give the model at least 2 coats of Klear/Future. This is actually a floor polish. This will give a gloss surface to apply the decals over,eliminating any possible silvering. After decals the model gets another 3 coats. This seals the decals and also aids the application of a wash to accenuate the panel lines.
Keep asking questions and post photos of your builds.
You will find answers to everything on this site
Nige
jam2727
Victoria, Australia
Joined: June 28, 2007
KitMaker: 171 posts
AeroScale: 113 posts
Joined: June 28, 2007
KitMaker: 171 posts
AeroScale: 113 posts
Posted: Saturday, June 30, 2007 - 11:59 PM UTC
Cheers mate.
How would i cover the decals for the fina coat of paint?
at what stage do you actually paint your model, inbetween priming and the 2 coat gloss-decal -3 coat or after all your priming and glossing?
Thanks
James
How would i cover the decals for the fina coat of paint?
Quoted Text
Before decalling I give the model at least 2 coats of Klear/Future. This is actually a floor polish. This will give a gloss surface to apply the decals over,eliminating any possible silvering. After decals the model gets another 3 coats.
at what stage do you actually paint your model, inbetween priming and the 2 coat gloss-decal -3 coat or after all your priming and glossing?
Thanks
James
Posted: Sunday, July 01, 2007 - 01:00 AM UTC
Hi James.
Heres the order I do the main painting.(not including any detail painting)
Plastic primer,
Preshading. ( Dont worry about this at first, there are articles on the site detailing how and why this is done)
Main colours.
Klear/Future.
Decalling.
Klear/Future.
Washs and weathering.
Matt Varnish
Pictures say a thousand words, so take a look at the build thread for my recent P47 build
HERE
Nige
jam2727
Victoria, Australia
Joined: June 28, 2007
KitMaker: 171 posts
AeroScale: 113 posts
Joined: June 28, 2007
KitMaker: 171 posts
AeroScale: 113 posts
Posted: Sunday, July 01, 2007 - 01:11 PM UTC
Cool thanks mate.
your P-47 is absolutley stunning, detail is fabulous. i hope i get to the stage where i make models that good.
in one of you pictures you used Eduard precut mask to cover the canopy, whats that stuff? and in some pictures down the bottom of the first page you have put paper mash in the undercarrige where the wheels go, whats that for? and whats Tamiya smoke? also what is matt varnish?
Last of all where do i get all these items in your list, exept for the paint
Thanks heaps
James
goldstandard
California, United States
Joined: March 29, 2007
KitMaker: 208 posts
AeroScale: 186 posts
Joined: March 29, 2007
KitMaker: 208 posts
AeroScale: 186 posts
Posted: Sunday, July 01, 2007 - 02:37 PM UTC
Eduard express masks are sheets of precut masking film that greatly speeds up the process of masking off your parts, particularly the windows. For some canopies like Japanese fighters, this can be a real time saver.
Eduard's website.
The stuff he put in the wheel wells was probably tissue paper, slightly dampened. It is used to keep paint out of the wheel wells, which were already painted. If you are in an office supplies store sometime you can also get this stuff that is usually called bluetack, which is like silly putty but really sticky, and can be used for masking as well.
Tamiya smoke is a semi transparent gray paint. It is often used either alone or with powdered pastels to simulate soot marks from exhaust and gunpowder streaks around the machine guns. Matt varnish is just a transparent coating you put as the last coat on the model, in order to even out the sheen on your model. Gloss coats and varnishes give it a really shiny finish, while matt coats take away the shine. On WW2 aircraft they typically kept them pretty matt, as a glossy sheen would reflect sunlight and make them more visible. For a metallic finish I would probably avoid a matt finish though, as it would take the shine out of the metal. Use a gloss coat instead. There are also coats that aren't glossy or matt, but a mixture of the two. These are usually referred to as semi-gloss or satin coats. Matt coats can also be called dull or flat coats.
jam2727
Victoria, Australia
Joined: June 28, 2007
KitMaker: 171 posts
AeroScale: 113 posts
Joined: June 28, 2007
KitMaker: 171 posts
AeroScale: 113 posts
Posted: Sunday, July 01, 2007 - 03:06 PM UTC
thanks michael, ur a champ
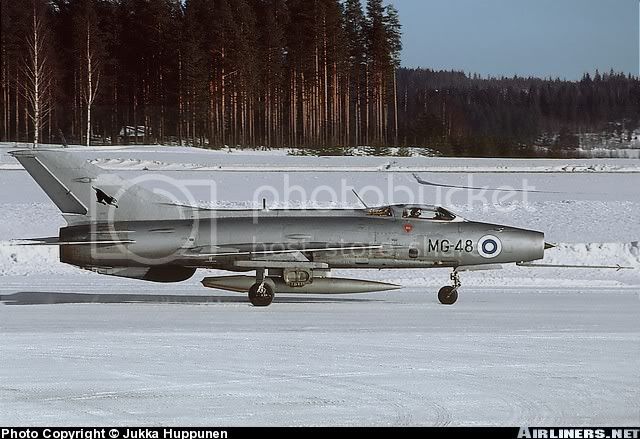
For my mig-21 its kinda natural metal panels on it so should i put a gloss finish on it? (the kit doent have paint intructions), i ahve some pictures of the exact plane im making but i cant make my mind up what finish it should be, its looks more metallic.
P.S can you tell me how you upload photos from you computer onto the forums EG. your finished models.
thanks heaps
James
goldstandard
California, United States
Joined: March 29, 2007
KitMaker: 208 posts
AeroScale: 186 posts
Joined: March 29, 2007
KitMaker: 208 posts
AeroScale: 186 posts
Posted: Sunday, July 01, 2007 - 06:52 PM UTC
Woah, you might want to edit that link you posted. Making it so long makes the resulting screen extra wide and you have to scroll one whole screen to the right just to reach the text box for writing a reply...
Anyways, the trick with long URL's is to embed them in a BB-code URL tag.
When you write or edit a new posting, the text box has a bar beneath it with several buttons. I have made a screenshot since a picture is much easier to explain.
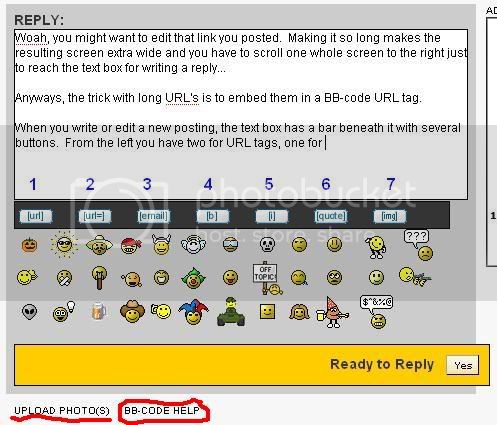
1. is the plain vanilla URL tag. You press this button and paste the link between the two tags it generates.
2. In the first tag this generates, you get to choose the text that will make up the link you actually click on. The URL goes between the = and ] in the first tag, and the visible text goes between the tags.
3. Email addresses don't work with URL tags, so you have to use the Email tag instead.
4. Anything between the two tags this generates will be in bold.
5. This makes text Italic.
6. This is for quoting text from another post.
7. This is for embedding an image in your post. You can post a plain link to the image using URL if the picture is too big to embed in a reply.
I have underlined the button for uploading photos, and circled the button for BB code help if you have any further questions. Personally, I always use photobucket and just link to my photos from there, you get tons more storage than provided by aeroscale. It allows you to make sub albums and it will also automatically generate the link for the photo with the BB code tags included.
http://photobucket.com
As for deciding what you want do do with the paint, I would suggest getting several small pieces of sheet styrene, for example an evergreen sheet cut into small pieces, and do some test runs until you find the finish you want. The key is to not be afraid to experiment, and don't worry too much about screwing up a bit the first few times.
One more tip: You will eventually find in your kits that pieces are misshapen, warped or otherwise unfit for assembly. As an example, look at my WIP (Work In Progress) thread on that Toko Strutter I built:
Look at my second post.
There you will see that there is a bar of plastic holding the upper part of the fuselage slightly apart. The fuselage was slightly pinched which meant that the upper decking would have hung over the edges by about a millimeter. Checking the three view drawing showed that the fuselage was too narrow, so I had a choice, I could have left it as it was and then rebuild new sides for the fuselage with thin plastic sheet, losing all that nice fabric texture, or take the easy way and just fill in the open area along the top section behind the cockpit, using styrene shims to hold it in place. You can see what choice I made.
P.S. I almost forgot. When embedding photos make sure to restrict them to a maximum of 1024 pixels in width, because if you make it too wide it will cause the same problem as that really wide URL you left in your last post. (You might want to edit that out and repost the link using those URL tags I showed you.)
jam2727
Victoria, Australia
Joined: June 28, 2007
KitMaker: 171 posts
AeroScale: 113 posts
Joined: June 28, 2007
KitMaker: 171 posts
AeroScale: 113 posts
Posted: Sunday, July 01, 2007 - 07:18 PM UTC
Hey Michael
here is the actual plane im making.
Thanks for the help on the menu for a post, and for the advice on misshaps
James
here is the actual plane im making.
Thanks for the help on the menu for a post, and for the advice on misshaps
James
Posted: Sunday, July 01, 2007 - 07:27 PM UTC
Hi James!
Welcome to Aeroscale!
If you have some time, consider participating to one of the Aeroscale Campaigns (link on the black menu bar above).
Michael, wow! What can I say? Fantastic job you did on explaining and answering the questions of James!
Jean-Luc
Welcome to Aeroscale!
If you have some time, consider participating to one of the Aeroscale Campaigns (link on the black menu bar above).
Michael, wow! What can I say? Fantastic job you did on explaining and answering the questions of James!
Jean-Luc
Posted: Sunday, July 01, 2007 - 07:31 PM UTC
Quoted Text
Cool thanks mate.
your P-47 is absolutley stunning, detail is fabulous. i hope i get to the stage where i make models that good.
in one of you pictures you used Eduard precut mask to cover the canopy, whats that stuff? and in some pictures down the bottom of the first page you have put paper mash in the undercarrige where the wheels go, whats that for? and whats Tamiya smoke? also what is matt varnish?
Last of all where do i get all these items in your list, exept for the paint
Thanks heaps
James
Hi James.
I think Michael covered everything,,thanks Michael
For an Australian supplier of Future/Klear. If you dont get an answer on here in the next day or so,Id suggest PM'ing one of our Australian members and they should be able to help you.
Thanks for the kind comments on my recent P-47 build.
Im really pleased with it,and a year ago I couldnt have imagined building a model looking that good.Everything Ive learnt has been learnt from this website and its members.
Go for it!
Happy Modelling
Nige
goldstandard
California, United States
Joined: March 29, 2007
KitMaker: 208 posts
AeroScale: 186 posts
Joined: March 29, 2007
KitMaker: 208 posts
AeroScale: 186 posts
Posted: Sunday, July 01, 2007 - 08:40 PM UTC
Quoted Text
Michael, wow! What can I say? Fantastic job you did on explaining and answering the questions of James!
Thanks. Being an English major, I don't mind taking the time to explain things in detail. Gotta keep myself sharp for the next semester...
BTW, starting tomorrow I plan on contributing a little In-Box review of an AML kit. One of the local hobby shops had several kits made by this manufacturer for sale and I snagged a 1/72 Heinkel He-45 for 15 bucks. Not a bad kit, but does have some flaws that will need to be overcome.
Posted: Sunday, July 01, 2007 - 11:38 PM UTC
Hi again Michael!
I'm looking forward to it!
The fact that you are an English major is also interesting for me as it will help me to make some progress in my limited English writting...
Jean-Luc
Quoted Text
BTW, starting tomorrow I plan on contributing a little In-Box review of an AML kit. One of the local hobby shops had several kits made by this manufacturer for sale and I snagged a 1/72 Heinkel He-45 for 15 bucks. Not a bad kit, but does have some flaws that will need to be overcome.
I'm looking forward to it!
The fact that you are an English major is also interesting for me as it will help me to make some progress in my limited English writting...
Jean-Luc
goldstandard
California, United States
Joined: March 29, 2007
KitMaker: 208 posts
AeroScale: 186 posts
Joined: March 29, 2007
KitMaker: 208 posts
AeroScale: 186 posts
Posted: Monday, July 02, 2007 - 09:08 AM UTC
I have a question about the size of the photos for submitting for the review. What size should they be? I usually format my photos at about 800 pixels wide, so if that is acceptable I will just send them that way.
P.S. To be honest Jean-Luc, you write better in English than some of my fellow college students who were born here...
jam2727
Victoria, Australia
Joined: June 28, 2007
KitMaker: 171 posts
AeroScale: 113 posts
Joined: June 28, 2007
KitMaker: 171 posts
AeroScale: 113 posts
Posted: Monday, July 02, 2007 - 12:49 PM UTC
Thanks for all you help guys.
I will consider entering my next kit in a Campaign but what Campaign would a 1960's finland MIG-21 go into?
Once again thanks
james
I will consider entering my next kit in a Campaign but what Campaign would a 1960's finland MIG-21 go into?
Once again thanks
james
goldstandard
California, United States
Joined: March 29, 2007
KitMaker: 208 posts
AeroScale: 186 posts
Joined: March 29, 2007
KitMaker: 208 posts
AeroScale: 186 posts
Posted: Monday, July 02, 2007 - 01:09 PM UTC
Hmm, I don't think any of the campaigns we have coming up include that particular aircraft. The closest I can think of would have been the Mark Sharpe campaign. However, it appears the subject matter only encompasses modern aircraft. If the Finnish Mig 21 served well into the modern era I can't see why they wouldn't let you participate. The only remaining issue though, is that you have to start the build when the campaign starts, and you would have to wait until the beginning of September to get started. I think the best option would be to go ahead and just start building, there is plenty of time to pick out a subject for the coming campaigns.
jam2727
Victoria, Australia
Joined: June 28, 2007
KitMaker: 171 posts
AeroScale: 113 posts
Joined: June 28, 2007
KitMaker: 171 posts
AeroScale: 113 posts
Posted: Monday, July 02, 2007 - 01:33 PM UTC
Yeah. i have just looked and i really want to enter the Bye bye baby campaign. i have a hobbycraft F-14A but im doing it after my MIG and i get a few more supplies together (F-14 is my al time favourite plane) and theres only 2 months left so i dont think i have the time.
but hey ill still build the mig now
James
but hey ill still build the mig now
James
goldstandard
California, United States
Joined: March 29, 2007
KitMaker: 208 posts
AeroScale: 186 posts
Joined: March 29, 2007
KitMaker: 208 posts
AeroScale: 186 posts
Posted: Monday, July 02, 2007 - 01:54 PM UTC
How big is the Hobbycraft kit? You could get started on the interior bits while you wait for the paint on the Mig to dry.
jam2727
Victoria, Australia
Joined: June 28, 2007
KitMaker: 171 posts
AeroScale: 113 posts
Joined: June 28, 2007
KitMaker: 171 posts
AeroScale: 113 posts
Posted: Monday, July 02, 2007 - 02:02 PM UTC
Its a 1/72 kit
but the other problem is i dont have the paint or a compressor for my airbrush, i should be getting one this year.
and for my mig i have a gun metal and chrome silver, for the darker metal panels im thinking of mixing the chrome silver with a little bit of gun metal because the gun metals way too dark. (what colour should paint the exaust?).
P.S does annyone have a Light Compass Ghost Grey (FS.36375) (hunbrol 127) they could sell to me, i didnt see any close paints to theat in my local hobby shop
goldstandard
California, United States
Joined: March 29, 2007
KitMaker: 208 posts
AeroScale: 186 posts
Joined: March 29, 2007
KitMaker: 208 posts
AeroScale: 186 posts
Posted: Monday, July 02, 2007 - 02:46 PM UTC
I don't have that paint but maybe another company makes what you need.
Try this cross reference guide
As for the exhaust, I can't really say what exactly you should color it as. But I do remember coming across a link that shows some useful info for painting exhausts:
Click here.
Try this cross reference guide
As for the exhaust, I can't really say what exactly you should color it as. But I do remember coming across a link that shows some useful info for painting exhausts:
Click here.
jam2727
Victoria, Australia
Joined: June 28, 2007
KitMaker: 171 posts
AeroScale: 113 posts
Joined: June 28, 2007
KitMaker: 171 posts
AeroScale: 113 posts
Posted: Tuesday, July 03, 2007 - 06:07 PM UTC
Ok cool thanks that has helped heaps.
I just want to know before i get fully underway, what can i use as a matt finish? and whats the name for the klear/future floor polish so i can look it up on ebay.
Thanks
James
I just want to know before i get fully underway, what can i use as a matt finish? and whats the name for the klear/future floor polish so i can look it up on ebay.
Thanks
James