Start Here (for Beginners)
This forum is for younger modelers or people just starting out in the hobby.
This forum is for younger modelers or people just starting out in the hobby.
Hosted by Jim Starkweather
info please
UNITEDSTATESNAVY

Joined: July 07, 2007
KitMaker: 243 posts
AeroScale: 150 posts

Posted: Saturday, July 07, 2007 - 12:10 AM UTC
I am building a 1/72nd scale academy brand stuka, it seems like it is necessary but very difficult to paint the canopy frame, do I hand paint or mask? the canopy frame is so tiny! the model is a ju87g-1 stuka tank buster, my other concern is being able to duplicate the camo, it is an angular pattern that would require masking? I have a brand new single action Aztek airbrush and a new testors compressor. my next model will be 1/48th scale...seems that would be easier, I believe I would require a double action air brush for blotch type camo work? seems like the angular type camo could be done with my current airbrush.

Emeritus

Joined: March 30, 2004
KitMaker: 2,845 posts
AeroScale: 1,564 posts

Posted: Saturday, July 07, 2007 - 04:00 AM UTC
When painting canopy frames, masking is the way to go. I like tamiya's tape.
The camo scheme is the hard-edged splinter pattern, I presume?
That scheme could be brush-painted, but since you got an airbrush, I would spray it on. That will require masking though, but the finish you can achieve with by airbrushing is superior.
You can easily make the masks from tape if the instructions have proper drawings of the scheme (left, right and upper views). Here's how I have done it before.
First take photocopies of the painting instruction drawings at the same size as your model if they're not. Take measures of the model & drawings and then calculate how much you have to enlarge (or reduce) the copy to get them the same size. The copies should be the same size as the model because they will be templates for the masks. Then cover the copies with clear self-adhesive film (edges of the camo pattern are subtle, trace them with a black marker to ease cutting), now just cover the patterns with masking tape and cut to shape with a sharp knife.
Although mottled camo is usually painted with double action brushes, basic blotche camo can be done with single-action ones as well with masks. The mask is held a short distance from the surface of the model when spraying, resulting in a soft-edged shape.
The camo scheme is the hard-edged splinter pattern, I presume?
That scheme could be brush-painted, but since you got an airbrush, I would spray it on. That will require masking though, but the finish you can achieve with by airbrushing is superior.
You can easily make the masks from tape if the instructions have proper drawings of the scheme (left, right and upper views). Here's how I have done it before.
First take photocopies of the painting instruction drawings at the same size as your model if they're not. Take measures of the model & drawings and then calculate how much you have to enlarge (or reduce) the copy to get them the same size. The copies should be the same size as the model because they will be templates for the masks. Then cover the copies with clear self-adhesive film (edges of the camo pattern are subtle, trace them with a black marker to ease cutting), now just cover the patterns with masking tape and cut to shape with a sharp knife.
Quoted Text
my next model will be 1/48th scale...seems that would be easier, I believe I would require a double action air brush for blotch type camo work?
Although mottled camo is usually painted with double action brushes, basic blotche camo can be done with single-action ones as well with masks. The mask is held a short distance from the surface of the model when spraying, resulting in a soft-edged shape.
UNITEDSTATESNAVY

Joined: July 07, 2007
KitMaker: 243 posts
AeroScale: 150 posts

Posted: Saturday, July 07, 2007 - 07:27 AM UTC
thanks so much for your help, this site is excellent, it is the hard edged splinter pattern, the painting instructions are a smaller scale, are you able to precisely change the photocopy size to match the model exactly? the clear adhesive film I have in mind is not very pliable...not enough to conform to the model surface, is it a special type bought in hobby shops?
UNITEDSTATESNAVY

Joined: July 07, 2007
KitMaker: 243 posts
AeroScale: 150 posts

Posted: Saturday, July 07, 2007 - 07:41 AM UTC
I am discovering things about my printer I never knew! matching the scale of the painting instructions to the model is not a problem now, however the self adhesive film is still baffling me.
Posted: Saturday, July 07, 2007 - 08:53 AM UTC
Hi David,
Here's a very, very helpful and free tool for reducing/enlarging pics on a printer.
http://www.clubhyper.com/reference/calculatorfc_1.htm
Here's a very, very helpful and free tool for reducing/enlarging pics on a printer.
http://www.clubhyper.com/reference/calculatorfc_1.htm

Emeritus

Joined: March 30, 2004
KitMaker: 2,845 posts
AeroScale: 1,564 posts

Posted: Monday, July 09, 2007 - 12:57 AM UTC
Quoted Text
I am discovering things about my printer I never knew! matching the scale of the painting instructions to the model is not a problem now, however the self adhesive film is still baffling me.
Sorry, I didn't make it clear enough. The masks are cut from normal masking tape, the function of the clear adhesive film is only to provide a gloss surface so the tape won't stick to the print.
Remember to enhance the edges of the printed camo with a black marker pen or it won't be easily visible through the masking tape applied on the drawing. That of course depends on the tape you're using, but with tamiya's tape, it was needed.
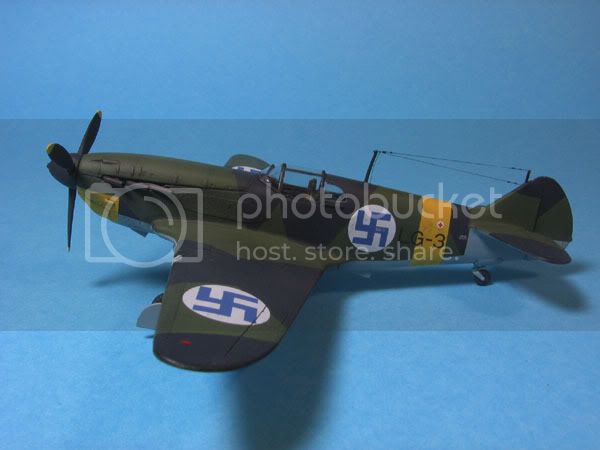
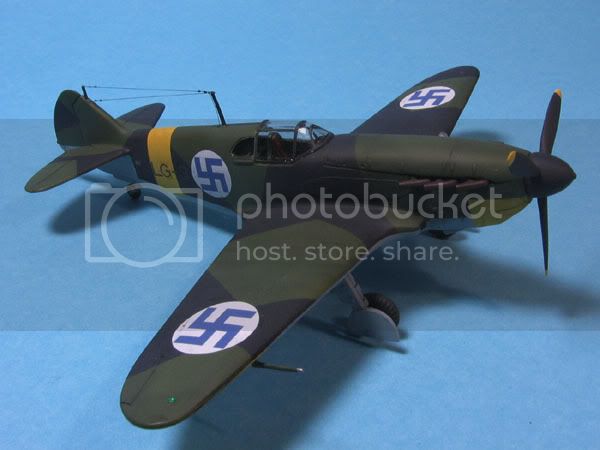
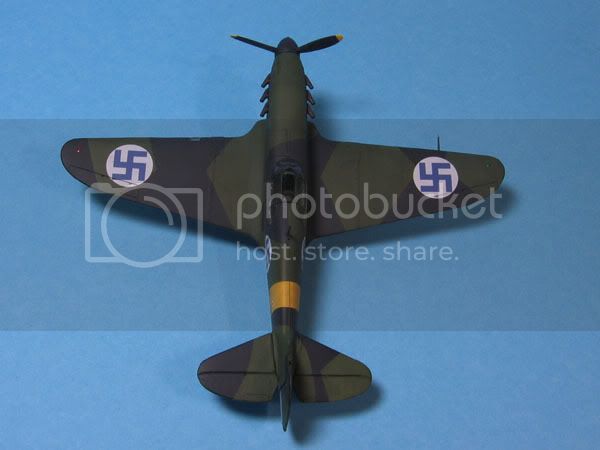
Here's a LaGG-3 I painted using masks made with this method:


Because a two-dimensional drawing can accurately depict patterns only on a flat surface, I used masks cut with printed patterns on the wings and sides of the fuselage, completing the pattern with pieces cut by hand according to the drawings.
UNITEDSTATESNAVY

Joined: July 07, 2007
KitMaker: 243 posts
AeroScale: 150 posts

Posted: Tuesday, July 10, 2007 - 02:34 AM UTC
thanks so much for your help, I do understand now and feel confident enough to begin, have a great day 

UNITEDSTATESNAVY

Joined: July 07, 2007
KitMaker: 243 posts
AeroScale: 150 posts

Posted: Tuesday, July 10, 2007 - 02:36 AM UTC
that is some awesome work on that plane, I plan on doing that model next.

Emeritus

Joined: March 30, 2004
KitMaker: 2,845 posts
AeroScale: 1,564 posts

Posted: Tuesday, July 10, 2007 - 05:52 AM UTC
Quoted Text
that is some awesome work on that plane, I plan on doing that model next.
Thanks for the compliments.
That LaGG of mine is Roden's 1:72 scale kit. If you're building it too, here's a good review of the kit, with excellent reference on which versions can be built and what parts are needed for which variant: http://mig3.sovietwarplanes.com/lagg3/toko/toko.html
Notice that Roden's three kits contain exactly the same styrene as Toko's one boxing, only with different decals for different versions.
If you're planning to build a Finnish plane, the same site has these great articles about two of the three fighters captured by the Finns.
LG-1
LG-3
Don't miss the main LaGG section of the site either, great stuff. Here
As said in the review, the Finnish decals in the 35th series boxing are inaccurate and best replaced (techmod's recent FAF markings set is ideal), so it's not absolutely necessary to get that version, since you get the same plastic in all Roden's LaGG-3's. And the painting instructions in the kit leave a lot to be desired, like the other half of the fuselage! Fortunately, those two articles about LG-1 & 3 I linked above have good drawings of the correct camo pattern. In fact, I used those for making the masks for my model.
Btw, I posted some WIP pics in the 'fighters under the midnight sun' campaign thread. Here's a link to the page of the thread where I started building LG-3, if you're interested. Click
 |


