_GOTOBOTTOM
World War II: Germany
Aircraft of Germany in WWII.
Hosted by Rowan Baylis
Bf 109g-6 paint job
ice32
_VISITCOMMUNITY
England - East Anglia, United Kingdom
Joined: March 29, 2006
KitMaker: 131 posts
AeroScale: 3 posts
Posted: Tuesday, July 31, 2007 - 03:12 PM UTC
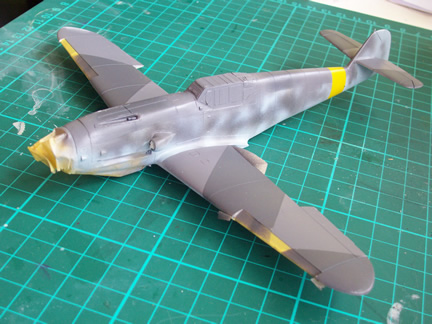
Hi everyone ive just started to buid some planes i have in my stash as im off work for a bit and im a bit stuck on the paint jobs on the old 109,
I do manly armour so its a bit of a change for me, now can anyone tell me how or the best way to get the camo right on a 109 where it is one colour at the top and then sort of goes all blochey then into another colour as you get to the bottom of the plane.
Sounds stupid of me but how do i do this so it looks right.
Thanks
Richard
JPTRR
Staff MemberManaging Editor
RAILROAD MODELING
#051
_VISITCOMMUNITY
Tennessee, United States
Joined: December 21, 2002
KitMaker: 7,772 posts
AeroScale: 3,175 posts
Posted: Tuesday, July 31, 2007 - 04:54 PM UTC
Hi Richard,

Not to be too picky, but the answer is...depends.

Early-war 109s wore a splinter scheme of black green RLM 70 and dark green RLM 71 upon all upper surfaces, with a light blue RLM 65 bottom. This is usually annotated as 70/71/65.

Around the middle of 1940 the 65 was raised about 2/3 the way up the fuselage. Mottling of RLM 70, 71 and 02 gray-green, was often applied upon the RLM 65.

In 1941 a new fighter scheme was introduced, similar to the above but different colors. The RLM 65 was replaced by RLM 76, a blue-gray, and RLM 74 gray Green and RLM 75 gray-violet; mottling was as above.

Finally, around 1944-45, the RLM 74/75 was replaced with RLM 81 and 82, a brown-green and olive green over RLM 76.

During that time those flying over Africa were painted a brown-tan RLM 80 over RLM 78, a bright blue-gray.

That is 109's colors in a nutshell. Others on-site can give you more detail if you need.

This is a good site:

Don Color's Luftwaffe
wizard179
_VISITCOMMUNITY
New South Wales, Australia
Joined: January 27, 2006
KitMaker: 251 posts
AeroScale: 179 posts
Posted: Tuesday, July 31, 2007 - 06:49 PM UTC
Hi Richard

N.B. This assumes you are using an airbrush.

The way I have done it in the past is is to paint the underside colour about 2/3 of the way up the side of the fuselage. I then used the Blu-tak/tape masking method to protect the side fuselage from overspray whilst I sprayed the top colours on the fuselage. Use the masking to protect from overspray and not as an edge, so that you don't get a hard demarcation line; You want a really soft edge here otherwise it gets difficult to blend in the mottling on the side. Once that dries I remove the masking and freehand the mottling with thin paint and low air pressure.

You can see the result in my gallery

1/48 Hasegawa BF-109G-4

Actually, in the picture below you can see what I mean by a hard edge being difficult to blend. I ended up touching it up by mottling some of the underside colour over the greys.


Cheers
Wiz
ice32
_VISITCOMMUNITY
England - East Anglia, United Kingdom
Joined: March 29, 2006
KitMaker: 131 posts
AeroScale: 3 posts
Posted: Tuesday, July 31, 2007 - 07:12 PM UTC
Hi guys thank you very much for the help and ill be doing this by hand as i dont have a airbrush.
Thanks
Richard
 _GOTOTOP