_GOTOBOTTOM
Early Aviation
Discuss World War I and the early years of aviation thru 1934.
How to paint wood / Roden Albatros 1/32
odybvig
Joined: June 03, 2007
KitMaker: 22 posts
AeroScale: 18 posts
Posted: Saturday, August 25, 2007 - 03:23 PM UTC
In addition to my Nieuport 11, I am also working on a Albatros D.III in 1/32 from Roden.

The inside looks like this


First a cote of Tamiya Tamiya TS 46 Light Sand is painted. Then Burnt Sienna Oil Paint is liberally applied. Then removed with a dry brush

I am waiting for some Eduard etch, so in the meantime I can work on the tail

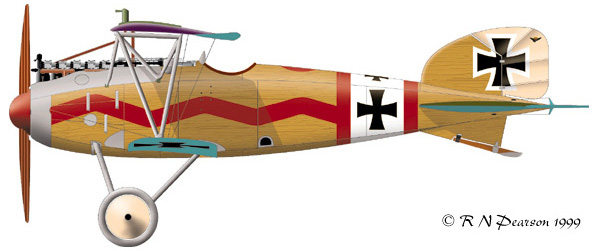
I was planning to do this bird


The tail is painted with Vallejo Air 71074 Radome Tan


Then Burnt Sienna Oil-paint


Removed


But this time I would try Spada Decals Wood Effect 32-005


Quite nice effect I would say

My workbench (corner in the kitchen)


Olve
JackFlash
_VISITCOMMUNITY
Colorado, United States
Joined: January 25, 2004
KitMaker: 11,669 posts
AeroScale: 11,011 posts
Posted: Saturday, August 25, 2007 - 08:08 PM UTC
Most impressive!
Familyman
_VISITCOMMUNITY
Uusimaa, Finland
Joined: January 11, 2007
KitMaker: 88 posts
AeroScale: 87 posts
Posted: Saturday, August 25, 2007 - 09:00 PM UTC

Quoted Text

Most impressive!


I do agree!

But, Olve, as your build looks so good so far, You might want to do the scheme as accurate as possible, right? Here's Bob Pearson's interpretation of this Jasta 11 bird:


You'll find the drawing at:

History in Illustration

The serial on the fin is censored in the original press photo and the number is not known. AFAIK D. 2958 is too late a serial for an early D.III with the radiator in the centre of the upper wing.

OK. I might be just a stinker who spreads his serious AMS all over the place. In that case, just ignore me!


Mikko
JackFlash
_VISITCOMMUNITY
Colorado, United States
Joined: January 25, 2004
KitMaker: 11,669 posts
AeroScale: 11,011 posts
Posted: Saturday, August 25, 2007 - 09:40 PM UTC

Quoted Text

'. . .Here's Bob Pearson's interpretation of this Jasta 11 bird:


. . .The serial on the fin is censored in the original press photo and the number is not known. AFAIK D. 2958 is too late a serial for an early D.III with the radiator in the centre of the upper wing.

. . .OK. I might be just a stinker who spreads his serious AMS all over the place. In that case, just ignore me!
Mikko'


Mikko has a valid point but to clarify further, Johannistahl Albatros D.III serials were;

D. 1910/16 - 2309/16
D. 600/17 - 699/17
D. 700/17 - 799/17
The first machine with an offset radiator was D.2199/16.

The closest serial the above profile could match in basic outline shapes of the numbers is D.2058/16. But as has been stated the original is unknown. It will have the three colour camouflage on the upper flying surfaces. Light blue undersurfaces .
odybvig
Joined: June 03, 2007
KitMaker: 22 posts
AeroScale: 18 posts
Posted: Sunday, August 26, 2007 - 12:31 AM UTC
Hello

I would say that this dark area (red arrow) indicate a red nose.


Olve
Familyman
_VISITCOMMUNITY
Uusimaa, Finland
Joined: January 11, 2007
KitMaker: 88 posts
AeroScale: 87 posts
Posted: Sunday, August 26, 2007 - 01:36 AM UTC
Olve!

The nose sure looks all dark in most of the copies of the famous photo. That is why the all red nose interpretation of the plane is also very common. In some better copies of the photo, however, the dark wavy line can be seen going all the way to the nose.

In Aces High by Alan Clark (1973), for example, you can find a copy of the photo with the wavy line showing.

Stephen!

I think, too, that this bird probably had 3 colour camo or at least some green/brown, not green mauve combination on the upper flying surfaces (i.e. Bob Pearson's profile might make a mistake there). The colours on the upper wing, however, do not seem to be in the usual order: dark green, reddish brown, light green. In this plane the lightest stripe is in the middle. Could it even be, that this plane had only 2 colours camo?

yours Mikko
RAGIII
_VISITCOMMUNITY
North Carolina, United States
Joined: June 19, 2007
KitMaker: 604 posts
AeroScale: 600 posts
Posted: Sunday, August 26, 2007 - 01:39 AM UTC

Quoted Text

Hello

I would say that this dark area (red arrow) indicate a red nose.


Olve


The photo posted is not of very good quality and who knows what generation of re-print. I have a version in one of my books that shows this area to be much lighter and you can see the RED squigly line all the way to the cowl ring.,Just Barely! To get off of the "Discussion" about the profile, Your work is fantastic, keep posting no matter which way you go with the scheme!
RAGIII
TreadHead
_VISITCOMMUNITY
Colorado, United States
Joined: January 12, 2002
KitMaker: 5,000 posts
AeroScale: 370 posts
Posted: Sunday, August 26, 2007 - 02:43 AM UTC
Howdy odybvig,

Seriously good work there pard' I just love what you did with the interior structures...beatiful, a darn shame most of it will be hidden.

As to the discussion of the two versions of that particualr bird, I would also lean towards the second version based on the available photograph...but look at it this way, that just means there's more of your great woodgrain showing!

Tread.

PostScript: Could you maybe give us some more info on the 'Spada Decals Wood Effect' ?
CaptainA
_VISITCOMMUNITY
Indiana, United States
Joined: May 14, 2007
KitMaker: 3,117 posts
AeroScale: 2,270 posts
Posted: Sunday, August 26, 2007 - 02:56 AM UTC
I love these discussions about schemes. Keeps the hobby interesting. I wonder what kind of arguments modelers will have about our current aircraft 90 years from now.
odybvig
Joined: June 03, 2007
KitMaker: 22 posts
AeroScale: 18 posts
Posted: Sunday, August 26, 2007 - 06:42 AM UTC
Hello Gordon

The decals are from Spada Decals
http://spada-decals.com/cariboost1/crbst_2.html

The decals are very thin and somewhat difficult to operate. It called Laserline and do not stick well to the surface. So I more or less soacked the area with Future clear polish and then put the decals on. In this way it will stick and not tare off with masking tape. One panel is taken and excess decal removed with a sharp knife. Then the next. A messy and boring job, but nice when done.

Regarding the fuselage color.
I was hoping for a red nose, since it looks more "cool" that way. Can I say that like most of Jasta 11 a/c the nose was painted red two days after this photo was taken, and still be taken seriously

Best
Olve
JackFlash
_VISITCOMMUNITY
Colorado, United States
Joined: January 25, 2004
KitMaker: 11,669 posts
AeroScale: 11,011 posts
Posted: Sunday, August 26, 2007 - 08:52 AM UTC

Quoted Text

". . .Stephen!

I think, too, that this bird probably had 3 colour camo or at least some green/brown, not green mauve combination on the upper flying surfaces (i.e. Bob Pearson's profile might make a mistake there). The colours on the upper wing, however, do not seem to be in the usual order: dark green, reddish brown, light green. In this plane the lightest stripe is in the middle. Could it even be, that this plane had only 2 colours camo?

yours Mikko"


Greetings Mikko,

For the Albatros D.III early production types came out too early for the two toned camouflage. Also, the sequence of the colours on the top wing varied every 50 or so machines if I am remembering what Dan san Abbott once told me. Even on the later two coloured schemes the position of the colours were switiched at fairly regular intervals in the production batches. This image was known to be taken in late March - early April 1917. The two toned schemes did not seem to come out until late June 1917.
odybvig
Joined: June 03, 2007
KitMaker: 22 posts
AeroScale: 18 posts
Posted: Sunday, August 26, 2007 - 10:31 AM UTC
Small accident today

Completely disaster with my airbrush

Ok lets start again


Isn't this a great hobby
Ipsa scientia potestas est. ~ Knowledge itself is power

Olve
TreadHead
_VISITCOMMUNITY
Colorado, United States
Joined: January 12, 2002
KitMaker: 5,000 posts
AeroScale: 370 posts
Posted: Sunday, August 26, 2007 - 10:54 AM UTC
Howdy odybvig,

Thx for the informative reply regarding the Spada Decals. I was kinda curious how they were applied so your descriptive cleared that up.

A method I have used in the past has been to use a small wire toothbrush {available from most any auto parts store} with really buggered bristles and draw it across the surface to be painted. Then perform the base coat/top coat/ wipe application. You have obviously done a remarkable job of simulating woodgrain without any of that physical disfigurement to the kit.

To your desire to paint your Albatros with a big red nose.....heck, as our good CaptainA just said, we are all debating these things even today!....so, I think you should paint your Alby any bloody way you want to...

Again, gotta say...nice work.

Tread.
Familyman
_VISITCOMMUNITY
Uusimaa, Finland
Joined: January 11, 2007
KitMaker: 88 posts
AeroScale: 87 posts
Posted: Sunday, August 26, 2007 - 07:07 PM UTC

Quoted Text


Quoted Text

". . .Stephen!

I think, too, that this bird probably had 3 colour camo or at least some green/brown, not green mauve combination on the upper flying surfaces (i.e. Bob Pearson's profile might make a mistake there). The colours on the upper wing, however, do not seem to be in the usual order: dark green, reddish brown, light green. In this plane the lightest stripe is in the middle. Could it even be, that this plane had only 2 colours camo?

yours Mikko"


Greetings Mikko,

For the Albatros D.III early production types came out too early for the two toned camouflage. Also, the sequence of the colours on the top wing varied every 50 or so machines if I am remembering what Dan san Abbott once told me. Even on the later two coloured schemes the position of the colours were switiched at fairly regular intervals in the production batches. This image was known to be taken in late March - early April 1917. The two toned schemes did not seem to come out until late June 1917.


So it is reddish brown/light green/dark green. Cool. I'm especially interested, since I have been considering to build this one.

Mikko
Familyman
_VISITCOMMUNITY
Uusimaa, Finland
Joined: January 11, 2007
KitMaker: 88 posts
AeroScale: 87 posts
Posted: Sunday, August 26, 2007 - 07:32 PM UTC

Quoted Text


Regarding the fuselage color.
I was hoping for a red nose, since it looks more "cool" that way. Can I say that like most of Jasta 11 a/c the nose was painted red two days after this photo was taken, and still be taken seriously

Best
Olve


I was not there. Maybe it WAS painted red a few days later!!
Looking for"historically accurate" schemes should always be just part of the fun, not a ball and a chain!

Mikko
TheZOX
_VISITCOMMUNITY
Slovenia
Joined: August 23, 2007
KitMaker: 86 posts
AeroScale: 75 posts
Posted: Sunday, August 26, 2007 - 09:27 PM UTC

Quoted Text

Small accident today

Completely disaster with my airbrush

Ok lets start again


Isn't this a great hobby
Ipsa scientia potestas est. ~ Knowledge itself is power


Olve


Hi Olve.
Your albatros looks great so far and the wood effect is very realistic. But accidents happen, when something really bad happens to me (like fingerprints on the clear coat) I ask myself: "Why the f#*@ am I doing this? ". And at the end when it looks good I know why.
TreadHead
_VISITCOMMUNITY
Colorado, United States
Joined: January 12, 2002
KitMaker: 5,000 posts
AeroScale: 370 posts
Posted: Monday, August 27, 2007 - 09:13 AM UTC


"... Looking for"historically accurate" schemes should always be just part of the fun, not a ball and a chain! ...."

Well said.
 _GOTOTOP