_GOTOBOTTOM
World War II
Discuss WWII and the era directly before and after the war from 1935-1949.
Hosted by Rowan Baylis
WIP: AZmodels Morane Saulnier M.S. 406 1/48
alpha_tango
_VISITCOMMUNITY
Germany
Joined: September 07, 2005
KitMaker: 5,609 posts
AeroScale: 5,231 posts
Posted: Wednesday, October 24, 2007 - 05:54 AM UTC
Hi All

unfortunately the latest AZ News thread shifted to a MS 406 discussion, which will miss most people interested in this a/c model.


I hope Eetu will repost his remarks here or open an own thread so we can motivate each other.

in short some of my remarks in the other thread:

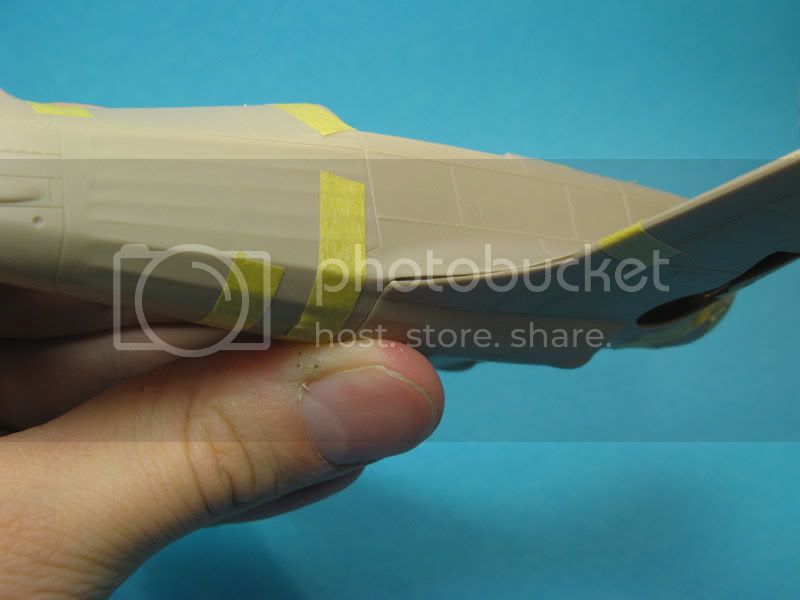
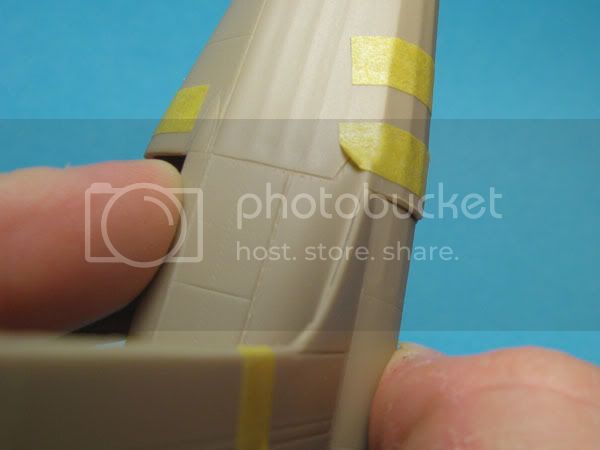
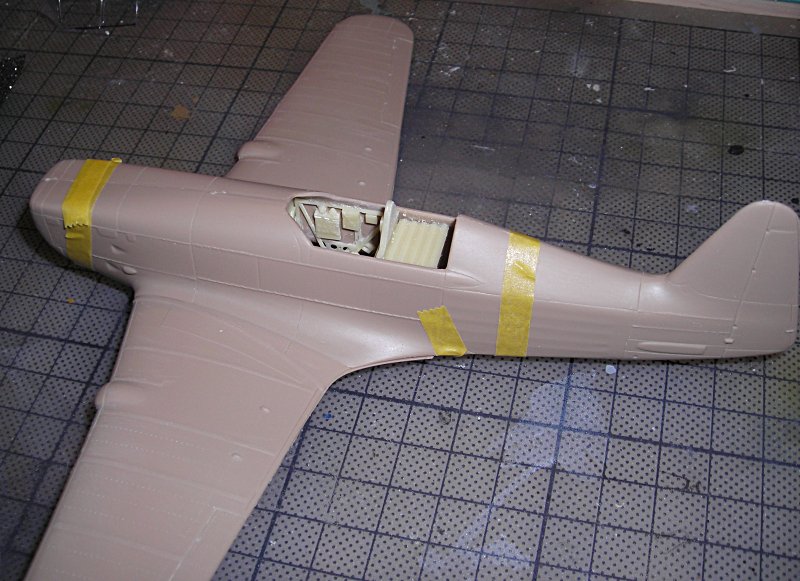
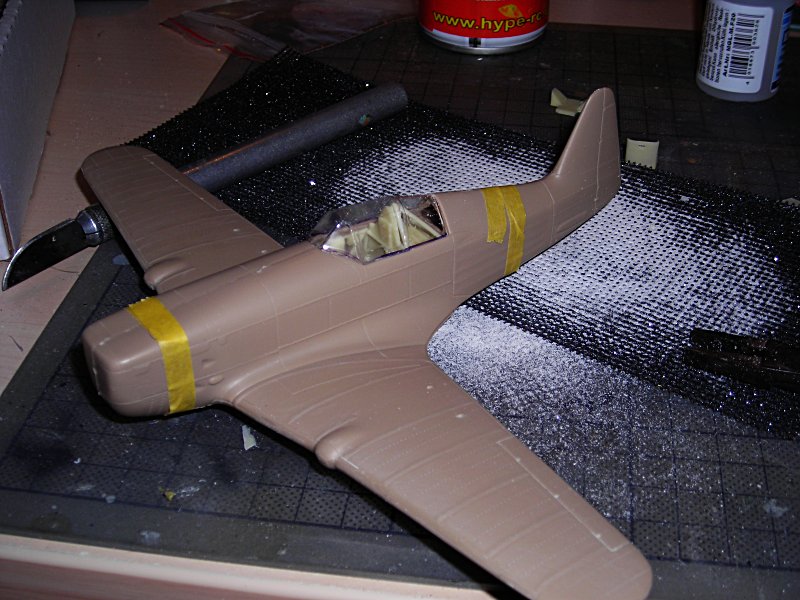
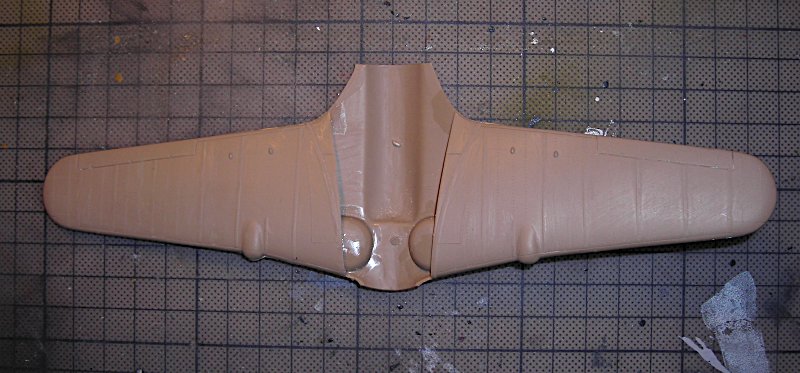
The surface is a little rogh, but I fixed that in a minute with steel wool. During this process and the following try to reduce the "wing bands" the nice rivets got lost ... luckily Rosie resides in my toolbox . I grinded a little plastic away from the wheel well inserts. The wings fit quite well after that only the right wing (in flying direction) needed some help of a clamp


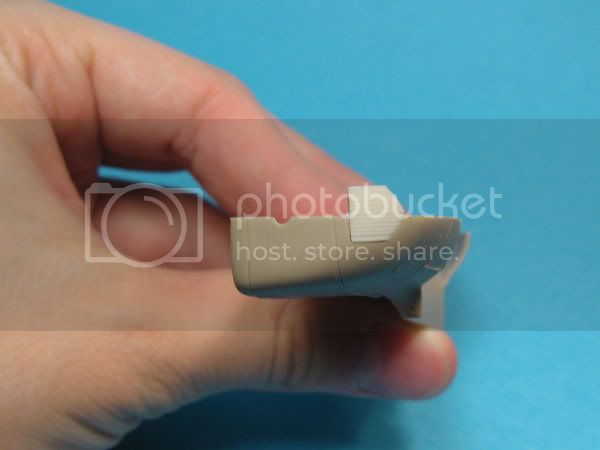
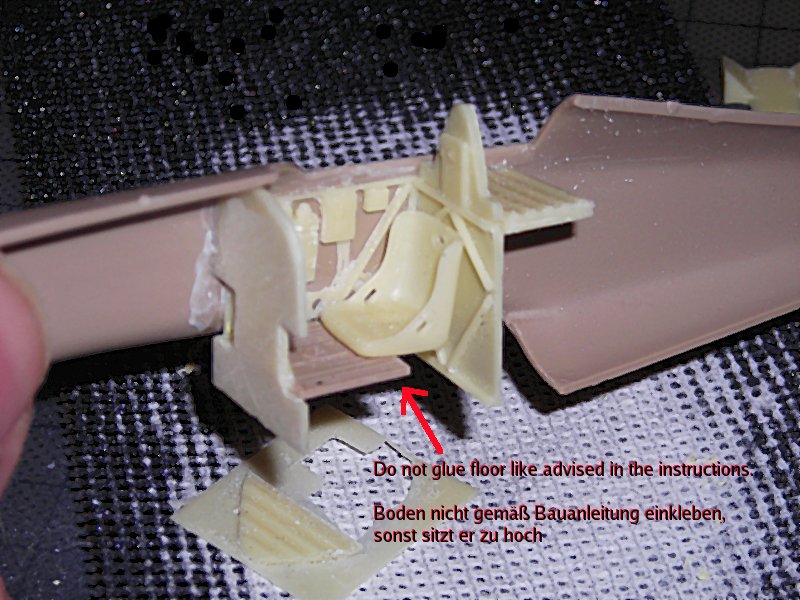
Today I spent half an hour sanding the cockpit resin parts ... with this result:


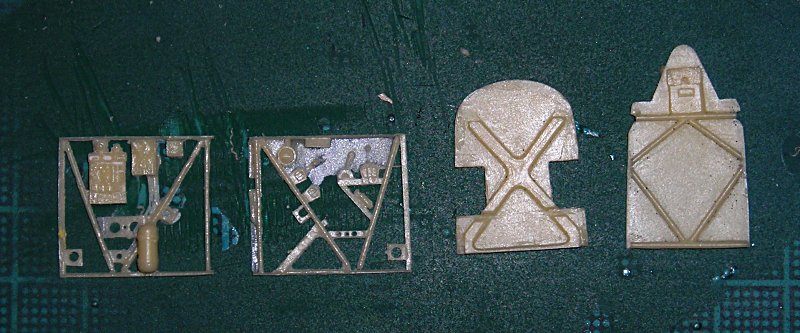
I stopped on the side wall with the levers, as I feared I would break them. Maybe I will have to grind away some plastic from the fuselage halfs, but we will see.

thats all for now

best wishes

Steffen


Emeritus
_VISITCOMMUNITY
Uusimaa, Finland
Joined: March 30, 2004
KitMaker: 2,845 posts
AeroScale: 1,564 posts
Posted: Wednesday, October 24, 2007 - 06:27 AM UTC
This will be interesting to watch. I got several campaign entries to build so I can't even think about starting my Morane for a while.

That's some sanding on the cockpit walls!
I didn't go through the solid sidewalls while building my MPM mörkö-morane, fearing that I would break the delicate details. (The solid sides were meant to remain in the part. Sanding them away makes it look more realistic) Interestingly, the instructions seem to advice sanding away all the backing, leaving the framework. I wonder if that's a shortcut to avoid thinning out the fuselage insides or what...

While assembling the cockpit, don't rush and glue the cockpit floor to the middle of the front bulkhead. I think that's an error in the drawings, in the following steps, the floor is clearly shown to go lower.
alpha_tango
_VISITCOMMUNITY
Germany
Joined: September 07, 2005
KitMaker: 5,609 posts
AeroScale: 5,231 posts
Posted: Wednesday, October 24, 2007 - 06:38 PM UTC
Hi Eetu

Thanks, I though you could repost your post from the AZ News November thread to keep the stuff in one building thread (or you start your own) ...

Well, I already did gluie the part, but I shortened it as advised in the instructions .. which was not enough, so I had to cut away an the edge where the oxygene bottle sits. At the moment I think it is the right height for the foots, but I have not yet installed the seat ..

The interior fits well, but I managed to put it a mm or so too far to the front ... hope I can hide it. I also cut out the vacu canopy, which worked quite well .. but I think I'll leave it closed.

No photos yet ... maybe this evening.

best wishes

Steffen
Emeritus
_VISITCOMMUNITY
Uusimaa, Finland
Joined: March 30, 2004
KitMaker: 2,845 posts
AeroScale: 1,564 posts
Posted: Thursday, October 25, 2007 - 12:27 AM UTC

Quoted Text

Hi Eetu

Thanks, I though you could repost your post from the AZ News November thread to keep the stuff in one building thread (or you start your own) ...


Okay, I'll grab that post and put it here too. I was I could start building the kit, with two campaign entries to build, I can't at the moment.

I presume you meant this post:
(straight from the "AZ Model News for November" thread)

-----------------------------------------------------

Quoted Text


Quoted Text

The fit of the main components is quite good. I have the wing together end the fuselage halves fit in between...


I've been doing some dryfitting as well. Looks like the basic airframe components fit together pretty well, although there's still the problem with the fusalage fitting to the wing.
When you line up the rear fuselage with the lower wing, you get a gap at both sides:


If you press the wing against the fuselage, the components meet with little or no gap at the sides, but then there's an ugly step between the fuselage and the wing bottom:

I'd shim the side seams with styrene sheet instead of trying to rebuild the contours of the fuselage bottom.

Check this out:

The resin front radiator left over from MPM's mörkö-morane (that in turn being a slightly modified CA 406) fits quite well to the fuselage...
But that's enough teaser pics, the rest comes with the review.


Quoted Text


I have the French MS 406 kit and the Finnish on order. I will use the very old eduard decals for Edmond La Meslée but first some severe sanding of the cockpit sides will be necessary.


Unbelievable!
They do all kinds of neat upgrades to the kit, but left this one out.
Well, they added riveted guidelines inside the fuselage for positioning the cockpit, but what's the point, with the grinding & sanding operation looming ahead?
They advice to sand the tops of the wheel wells in the instructions, but don't say a word about the cockpit (assuming it's un-altered).
With MPM's Mörkö, I had to grind down both the wheel well tops and the wing ceilings, and both the cockpit walls and the fuselage halves.
Well, we'll see how it goes together.


-------------------------
I hope I got he quote tags right.
alpha_tango
_VISITCOMMUNITY
Germany
Joined: September 07, 2005
KitMaker: 5,609 posts
AeroScale: 5,231 posts
Posted: Thursday, October 25, 2007 - 02:20 AM UTC
Thank you Eetu!

I just came across a new book over at HS:
Morane Saulnier MS406 pt.1
ISBN: 80-903637-5-X


cheers

Steffen
alpha_tango
_VISITCOMMUNITY
Germany
Joined: September 07, 2005
KitMaker: 5,609 posts
AeroScale: 5,231 posts
Posted: Thursday, October 25, 2007 - 05:48 AM UTC
Some photos:


Seems I lack the proper colour for interior painting .. hope to get it at the weekend (I am not sure if there is a good hobby shop in Karlsruhe ...)

best wishes

Steffen
Emeritus
_VISITCOMMUNITY
Uusimaa, Finland
Joined: March 30, 2004
KitMaker: 2,845 posts
AeroScale: 1,564 posts
Posted: Thursday, October 25, 2007 - 06:33 AM UTC

Quoted Text

Thank you Eetu!

I just came across a new book over at HS:
Morane Saulnier MS406 pt.1
ISBN: 80-903637-5-X


cheers

Steffen


Oh yes, I think I saw that book in a LHS when was there last weekend. Only took a quick glance, looked okay.
Emeritus
_VISITCOMMUNITY
Uusimaa, Finland
Joined: March 30, 2004
KitMaker: 2,845 posts
AeroScale: 1,564 posts
Posted: Thursday, October 25, 2007 - 06:40 AM UTC
Looks great!
So the interior fits inside the fuselage without thinning the sides, when the cockpit sidewalls are sanded like that? Good that this came up, I'll revise my review accordingly.
Btw, how did you do the sanding. Just sandpaper, a flat surface and circular motions?

That radio deck lenght shouldn't be too hard to fix. A plate with similar pattern shouldn't be to hard to make from styrene sheet. And with the canopy in place, it's not that noticable if the parts don't match perfectly.
Don't forget to add that small rod on top of the rudder.
alpha_tango
_VISITCOMMUNITY
Germany
Joined: September 07, 2005
KitMaker: 5,609 posts
AeroScale: 5,231 posts
Posted: Thursday, October 25, 2007 - 07:00 AM UTC
Hi Eetu

It fits inside and I did(do) not need to remove anything from the fuselage sides.


Quoted Text

Btw, how did you do the sanding. Just sandpaper, a flat surface and circular motions?


Well, I developed my own approach to this ... I always broke parts when sanding and I always ended up with unevenly sanded parts ... especially with parts like these which have no real point to hold the part. So here is what I use:

blue tac (actually I use Uhu Tac aka Patafix, but the othere stuff is more widely known)
and sanding mesh used for dry walls (we call the walls "Rigips" here in Germany) ..

I have 60 or 80grit stuff at home, but I forgot it and I only got 120 grit here ... it just takes a little longer

now I put the part on the mesh and then I press a larger ball of blue tac on the part (it is fully covered so nothing can bend up) and start sanding in circles and 8's holding/pressing the part down with the blue tac handle ... it is wise to check the progress from time to time.

When I have sanded through until the first blue tac appears on the mesh, I check if it is evenly thin (or away) and if necessary carefully go on. Then I remove the blue tac very (VERY) carefully ... you do not want to break the part at this point . I remove leftovers of the peel with a scalpell ... et voilá

Hope that makes sense ....


Quoted Text

That radio deck lenght shouldn't be too hard to fix. A plate with similar pattern shouldn't be to hard to make from styrene sheet. And with the canopy in place, it's not that noticable if the parts don't match perfectly.
Don't forget to add that small rod on top of the rudder.


Thanks and you are right .. should not be too hard to fix .. still it is slightly inaccurate

best wishes

Steffen
Emeritus
_VISITCOMMUNITY
Uusimaa, Finland
Joined: March 30, 2004
KitMaker: 2,845 posts
AeroScale: 1,564 posts
Posted: Thursday, October 25, 2007 - 09:00 PM UTC
The radio deck will probably be just fine, with the diagonal rollcage and canopy in place, I hope the 1mm issue won't be a big issue for the rest of the office.

I presume that French version has the same instructions, telling to use "transparent part" for the gunsight glass, with way too large glass parts drawn in the instructions? I think they could have included acetate film with printed outlines for the sight glass parts. But there's not a single piece of film included, the instruments being of the new Eduard style, just PE.
Another thing, what are you planning to do with the belly radiator? Adding the omitted retractraction mechanism rods would boost realism down there.

Btw, do you mind being mentioned by your name in my up-coming review on the interior thing, or should just say "fellow modeler"?
alpha_tango
_VISITCOMMUNITY
Germany
Joined: September 07, 2005
KitMaker: 5,609 posts
AeroScale: 5,231 posts
Posted: Thursday, October 25, 2007 - 09:24 PM UTC
Hi Eetu

The only problem that I think of at the moment will be the dash board with the gun sight ... maybe I'll have to "adjust" things there.

I do not have any reference for this plane, so I stick to (or I am stuck with) the instructions. When you have some hints regarding inaccuracies or additional detail, could you please post a picture of what you mean?! (belly radiator flap actuator rods ...)

I have no problems being mentioned (it would be obvious anyway ) ...

best wishes

Steffen
Emeritus
_VISITCOMMUNITY
Uusimaa, Finland
Joined: March 30, 2004
KitMaker: 2,845 posts
AeroScale: 1,564 posts
Posted: Thursday, October 25, 2007 - 11:39 PM UTC

Quoted Text


I do not have any reference for this plane, so I stick to (or I am stuck with) the instructions. When you have some hints regarding inaccuracies or additional detail, could you please post a picture of what you mean?! (belly radiator flap actuator rods ...)


Regarding pics, check your email.

Some more hints?
Well, comparing the measurements given in the instructions to my references, it appears the kit got the pitot tube and machine gun lenghts incorrect.
My reference shows the MG's protruding 6mm from the wing leading edge, the pitot's tube part should extend 19,3mm, the pitot head another 4,5mm (viewed from above).
Also, I feel there's not enough tubing provided for the parts using it.
alpha_tango
_VISITCOMMUNITY
Germany
Joined: September 07, 2005
KitMaker: 5,609 posts
AeroScale: 5,231 posts
Posted: Friday, October 26, 2007 - 12:01 AM UTC
Many Thanks Eetu!

.. got the email and I'll check it on the weekend.

cheers

Steffen
alpha_tango
_VISITCOMMUNITY
Germany
Joined: September 07, 2005
KitMaker: 5,609 posts
AeroScale: 5,231 posts
Posted: Friday, October 26, 2007 - 09:03 PM UTC
Some more progress.

As Eetu suggested the floor should be glued in the lowest position and not as shown in the instructions!


That done I used the plastic rear "wall" on the model and cut the missing mm from the resin part (shown below the model in the picture above). Then I added the cage using the resin parts and test fit the canopy ... things running well so far:


cheers

Steffen
Emeritus
_VISITCOMMUNITY
Uusimaa, Finland
Joined: March 30, 2004
KitMaker: 2,845 posts
AeroScale: 1,564 posts
Posted: Friday, October 26, 2007 - 09:33 PM UTC
Looking good.
Are you going for an open or closed cockpit btw? Posing it open won't be so tricky, as two canopies are provided.

Those instruction are indeed confusing regarding the office. One step shows the floor glued to the middle of the front bulkhead, the others to the lower edge of the sidewalls. And there's that groove cut into the bulkhead, giving the impression that the floor should go there. In the earlier kit, the bulkhead didn't have this groove. Strange.
Oh, I submitted my review yesterday. You think I should ask the staff to revise it to point out this cockpit floor issue?

One more thing, do you want to add the hand-hold and rear view mirror to the canopy? I could send you some more reference if you're going for it.

alpha_tango
_VISITCOMMUNITY
Germany
Joined: September 07, 2005
KitMaker: 5,609 posts
AeroScale: 5,231 posts
Posted: Saturday, October 27, 2007 - 12:11 AM UTC
Hi Eetu

at the moment I am trying to get the colours together .. it seems really strage that I shoul duse extra dark sea grey on the lower side and dark sea grey on the upper :so the underside is darker ?

I will leave the canopy closed as it is easier to paint and I want this thing finished ---- I too have to do entries for Red Stars, East Asia, Mark Sharp, Malvinas, Wheels and "Get the damn thing finished" campaigns !!!


Quoted Text

Those instruction are indeed confusing regarding the office. One step shows the floor glued to the middle of the front bulkhead, the others to the lower edge of the sidewalls. And there's that groove cut into the bulkhead, giving the impression that the floor should go there. In the earlier kit, the bulkhead didn't have this groove. Strange.
Oh, I submitted my review yesterday. You think I should ask the staff to revise it to point out this cockpit floor issue?


I will give a hint in my building report on my side as the groove is really tempting


Quoted Text

One more thing, do you want to add the hand-hold and rear view mirror to the canopy? I could send you some more reference if you're going for it.


I have not though about such things yet .. you know, I have no refs so I do what the kit has (I will also leave the cooler closed, but maybe add some details according to your pix) ... so if you think there are severe omissions in the kit .. . just keep the info comming

best wishes

Steffen
Emeritus
_VISITCOMMUNITY
Uusimaa, Finland
Joined: March 30, 2004
KitMaker: 2,845 posts
AeroScale: 1,564 posts
Posted: Saturday, October 27, 2007 - 03:34 AM UTC
You got some mail again.

Sorry, I can't help with French colors. But since the suggested Finnish colors on my kit were slightly odd, I'd consult some references before trusting them.
IPMS stockholm's paint charts are a good place to start: http://www.ipmsstockholm.org/colorcharts/stuff_eng_colorcharts_france.htm

I don't recall any other serious omissions. I told you about that missing rod on top the rudder.
Then there's the exhaust pipes, which could be replaced with flattened metal tubing for a more realistic appareance. And if it bugs you, there's a rectangular scribed-in scoop under the recessed intake in the nose on the right side. According to photos, this should be a hole (recessed at least), and a bit longer and positioned a little lower. Not a big issue IMO.
The model could also use some brake lines, but I'm searching for good references for that myself.

alpha_tango
_VISITCOMMUNITY
Germany
Joined: September 07, 2005
KitMaker: 5,609 posts
AeroScale: 5,231 posts
Posted: Saturday, October 27, 2007 - 04:51 AM UTC
Hello Eetu

seems this is a private party with us two as only participants .. but as long as it helps me to get the things right, I am ok with that

Thank you for the email .. it helps a lot, but I am not sure if french planes had the mirror? ... I think I pass on the handle .. it is barely visible when the canopy is closed and the danger of messing up is high (at least for me).

Thank you for the hint ... I forgot to look there (even if I tried to find colour matches on the other chart at IPMS Stockholm ... can you imagine that .. I will just change the two colours .. the lighter one for the under side ... I ordered the colours I lack .. which will postpone this project, but then I can start my 110 or a jet for the "Mark Sharp" commemoration campaign besides I have a few projects that need tio be finished .. some Fw 190 come to mind or the ICM Bf 109 ....

Unfortunately the c&m I wanted to do was not a MS 406 but a Hawk 75 .. so I have to search for another one .. Jean-Luc (or any other) can you help me out on this?? ... an ace would be preferable (does not need to be a MS 406 ace) .. sadly I have LeGloane on a D.520 (and I really like that Syrian c&m)

Thanks again for your great help!

best wishes

Steffen
Emeritus
_VISITCOMMUNITY
Uusimaa, Finland
Joined: March 30, 2004
KitMaker: 2,845 posts
AeroScale: 1,564 posts
Posted: Saturday, October 27, 2007 - 06:29 AM UTC
I conducted some more searches. Couldn't find any pics of French examples with the mirror clearly visible. I think the closest is this:


Here's a good shot of the canopy from a Finnish Morane, showing the mirror folded down:


TedMamere
_VISITCOMMUNITY
Moselle, France
Joined: May 15, 2005
KitMaker: 5,653 posts
AeroScale: 4,347 posts
Posted: Saturday, October 27, 2007 - 06:51 AM UTC

Quoted Text

Unfortunately the c&m I wanted to do was not a MS 406 but a Hawk 75 .. so I have to search for another one .. Jean-Luc (or any other) can you help me out on this?? ... an ace would be preferable (does not need to be a MS 406 ace) .. sadly I have LeGloane on a D.520 (and I really like that Syrian c&m)


Hi Steffen!

Sorry for not being of much help for the colors. I always mix the french three tone camouflage by myself. But the underside grey should be definitely lighter than the uperside grey.

If I understood well (remember I'm french), you don't want to do the LeGloan decoration because you already want to do a D520 of the same pilot? Is that right? So you need a decoration for another French ace who flew the MS 406?

Sorry to ask that, it's just that I want to know exactly what I have to search for...

Jean-Luc
Antoni
_VISITCOMMUNITY
England - East Midlands, United Kingdom
Joined: June 03, 2006
KitMaker: 574 posts
AeroScale: 573 posts
Posted: Saturday, October 27, 2007 - 07:31 AM UTC
White Ensign Miniatures (WEM) have French colours in their range.

Eduard had a Decal sheet called French Aces (very loose definition of French as one Polish and one Czech pilot). Probably cannot get it now. Two newish sheets from Carpena and I think you can still get the Aeromaster sheets:

http://www.hannants.co.uk/search/?FULL=CA48019
http://www.hannants.co.uk/search/?FULL=CA48020

Another book Monographie Lotnicze 28 M.S.406 Gaston Botquin. Typical AJ Press book. All Polish text. Most of the detail photos and diagrams are in the new Czech book but there are also some scale plans with full interior details and colour cutaway drawing and colour perspective drawing of the cockpit. Difficult to find now but happy to scan anything on request.
alpha_tango
_VISITCOMMUNITY
Germany
Joined: September 07, 2005
KitMaker: 5,609 posts
AeroScale: 5,231 posts
Posted: Saturday, October 27, 2007 - 07:42 AM UTC
Many Thanks Antoni .. i have the eduard sheet .. will have a closer look at the two pilots there ... I was so diappointed that I could not do Marin La Mesleé that I totally dropped the sheet. Furthermore I will have look for the Carpena sheets. (the site was down recently ... hope they are still in business)

@Jean-Luc .. I already have the D520 in Le Gloane's c&m :


The nationality of the pilot does not matter, but it should be in Armee de L'Air markings .. I have another one coming for a Finish pilot.

Many thanks

Steffen

 _GOTOTOP