_GOTOBOTTOM
World War II: Great Britain
Aircraft of Great Britain in WWII.
Hosted by Rowan Baylis
Xtrakit Spitfire XII!
magnusf
_VISITCOMMUNITY
Stockholm, Sweden
Joined: May 02, 2006
KitMaker: 1,953 posts
AeroScale: 1,902 posts
Posted: Friday, November 02, 2007 - 01:32 AM UTC
Every now and then, the postman brings something of particular interest. This was especially true yesterday when the Xtrakit Spitfire XII arrived.

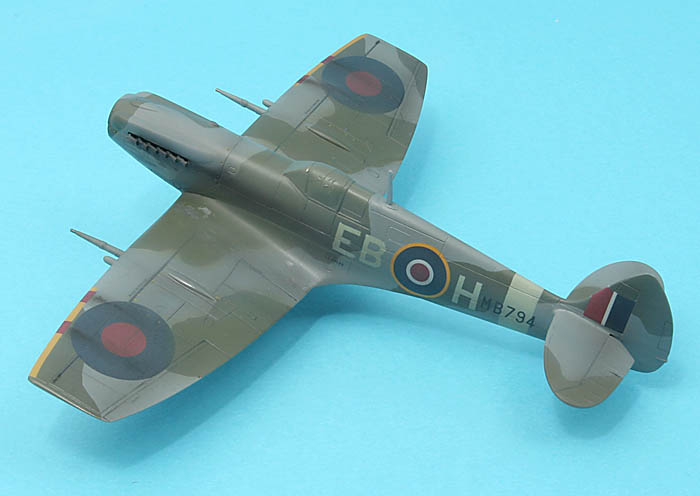
This Spitfire have always been a favourite with me, combining what is basically a Mk V airframe with a Griffon engine creating a rather brutal looking beast that had rocket performance at sea level. The later Mk XIV was a much more refined machine that has better proportions but this was the first of the Spitfires to be really able to match low flying FW-190s over the channel.

I haven't come any further than opening the box but I plan on building this one starting after the weekend.

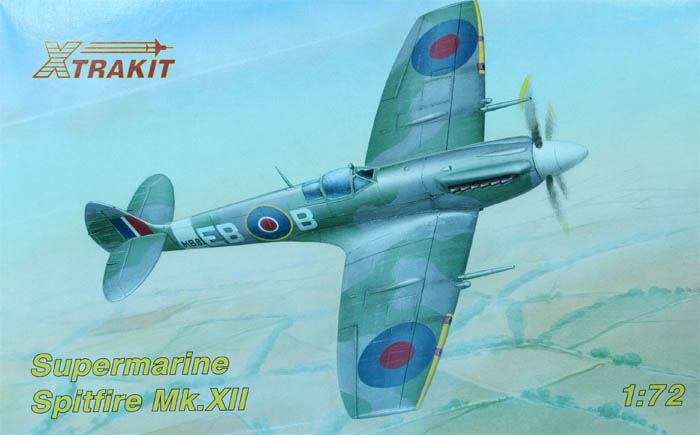
Box art (could be better but who cares really...):


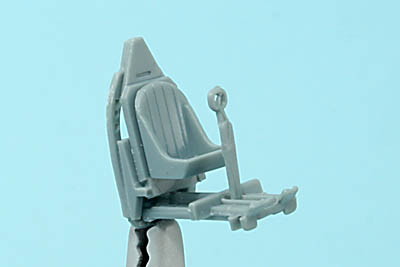
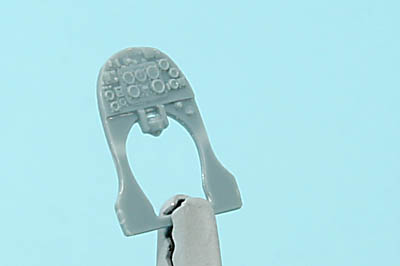
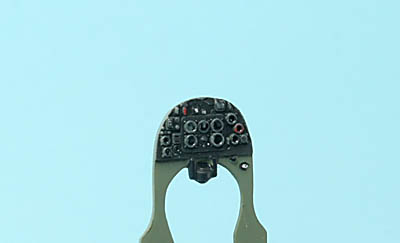
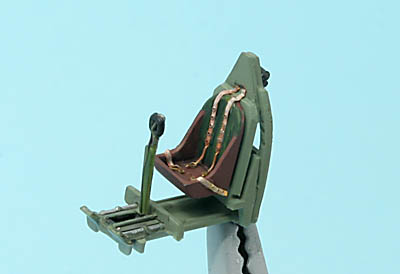
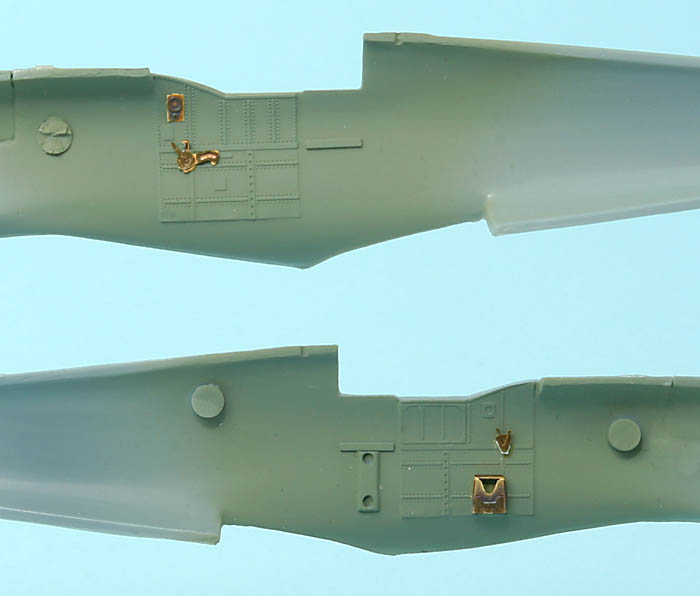
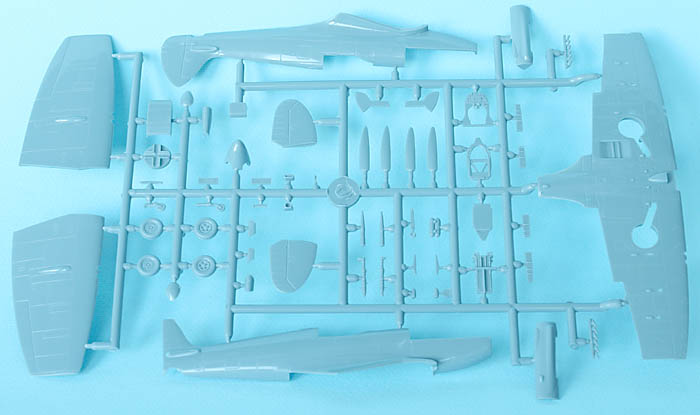
One sprue of well moulded plastic parts:


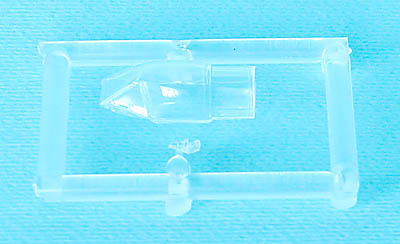
A one piece canopy. I will probably use a Falcon canopy:


And a decal sheet with markings for four aircraft.


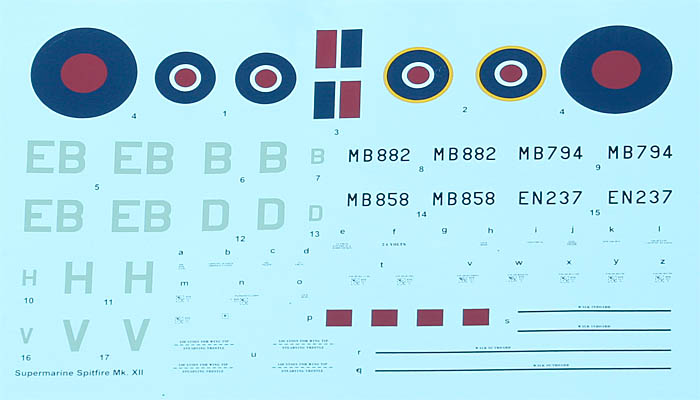
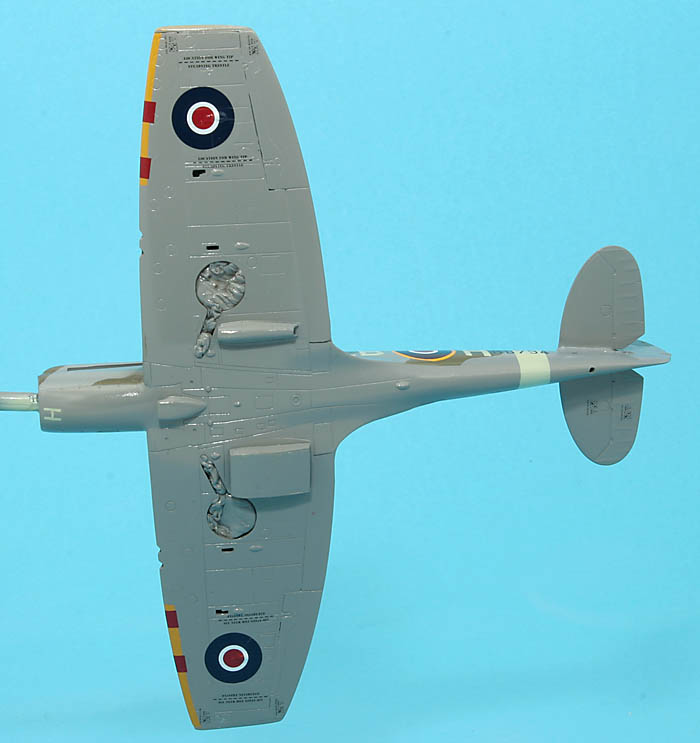
A quick inspection of the parts shows two kinds of wheels, one with ordinary hubs and one with the plain ones that were used on early Spit XIIs. There is also a choice of fixed or retractable tail wheel.

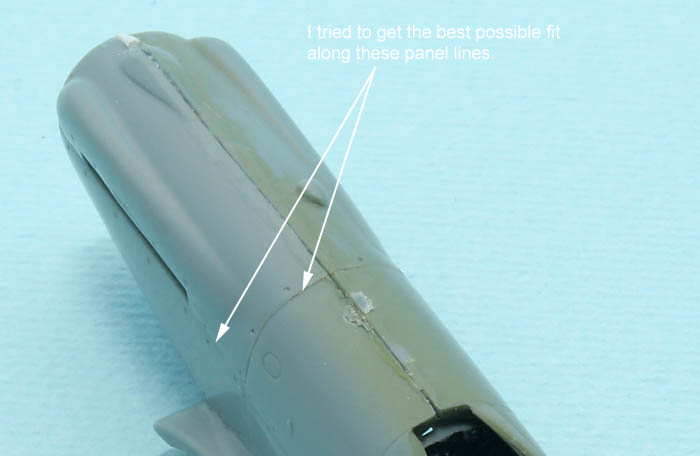
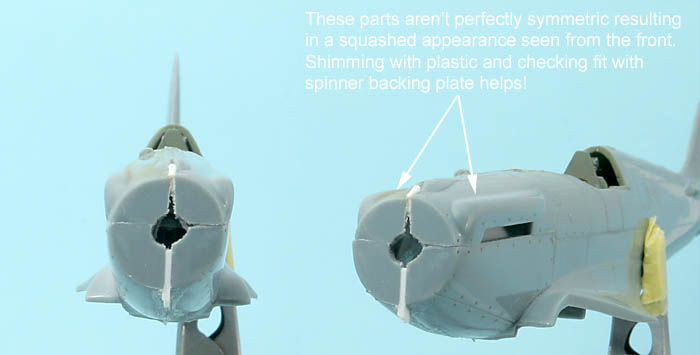
Finally: This one is NOT made by MPM, unlike the earlier Gloster Meteor. This one is made by Sword. I can't comment on the parts more than that they look very nice and crisp. As for fit: he who lives will see....

Regards

Magnus
Merlin
Staff MemberSenior Editor
AEROSCALE
#017
_VISITCOMMUNITY
United Kingdom
Joined: June 11, 2003
KitMaker: 17,582 posts
AeroScale: 12,795 posts
Posted: Friday, November 02, 2007 - 08:11 AM UTC
Nice one Magnus

Could you write us a Review of this kit? - it's bound to be popular!

All the best

Rowan
StenEk
_VISITCOMMUNITY
Stockholm, Sweden
Joined: October 02, 2007
KitMaker: 31 posts
AeroScale: 29 posts
Posted: Friday, November 02, 2007 - 01:53 PM UTC
Be careful when you chose which individual aircraft to build. Rebuilt Mk.V airframes had fixed tailwheels, rebuilt Mk.VIII airframes had retractable tailwheels. Serial nos. EN221 to EN627 were former Mk.V's and thus had fixed tailwheels. In other words, of the alternatives offered in the kit decals, only EN237 should have a fixed taiwheel, all the others a retractable tailwheel.
calvin2000
_VISITCOMMUNITY
Colorado, United States
Joined: July 25, 2007
KitMaker: 886 posts
AeroScale: 332 posts
Posted: Friday, November 02, 2007 - 02:54 PM UTC
looks like a nice kit to build I will watch and see how it goes and maybe try one for myself
magnusf
_VISITCOMMUNITY
Stockholm, Sweden
Joined: May 02, 2006
KitMaker: 1,953 posts
AeroScale: 1,902 posts
Posted: Thursday, November 08, 2007 - 08:12 AM UTC
Not much modelling the last few days but hopefully the projects will pick up a bit of speed over the weekend...
Sten wrote:

Quoted Text

Be careful when you chose which individual aircraft to build. Rebuilt Mk.V airframes had fixed tailwheels, rebuilt Mk.VIII airframes had retractable tailwheels. Serial nos. EN221 to EN627 were former Mk.V's and thus had fixed tailwheels. In other words, of the alternatives offered in the kit decals, only EN237 should have a fixed taiwheel, all the others a retractable tailwheel.


They really have made their homework on this one! It is clearly and correctly stated what part goes where on which decal option. Thumbs up for the instructions.

I have managed to glue the cockpit parts together. Very nicely detailed for being injection moulded and more than adequate considering the rather miniscule cockpit opening of a Spitfire!


I will add an etched seatbelt but apart from that I am more than happy with what is supplied out of the box!

Regards

Magnus
magnusf
_VISITCOMMUNITY
Stockholm, Sweden
Joined: May 02, 2006
KitMaker: 1,953 posts
AeroScale: 1,902 posts
Posted: Sunday, November 11, 2007 - 08:54 AM UTC
I'll manage a short Spitfire update as well tonight...

Interior just about finished. I added some bits and pieces from an Eduard set I found in the stash. I thought I would just use the seat belts but without them the rest of the set is fairly useless so I used a few more things. The interior as it is is good for being 1/72 but I get the feeling that there will be a high-tech issue of this kit some time in the future.

Instrument panel. Just the original plastic one with a bit of drybrushing and some Tamiya clear for the instrument bezels


Cockpit is also out of the box except for seat belts and the odd "double cylinder" thing behind the armour plate. I think it has something to do with the radio since it has a certain electrical look (My M.Sc. was in applied mechanics so I am a bit sceptical when it comes to electricity...). And before you ask: The Spit XII didn't have a headrest on the armour plate. Almost all other Spits had them but not the XII (at least not in the photos I have seen).


And finally the fuselage halves. I should have installed the etch before painting really... The cast detailing on the fuselage sides looks as if they have glued etch into the mould halves. Odd...


I have promised to write a review of this build but I think I will continue blogging it and then use the blog as a base for writing the review.

Regards

Magnus
magnusf
_VISITCOMMUNITY
Stockholm, Sweden
Joined: May 02, 2006
KitMaker: 1,953 posts
AeroScale: 1,902 posts
Posted: Saturday, November 17, 2007 - 09:30 PM UTC
Never let the looks of a kit betray you! Moulding quality and surface texture is nothing short of excellent but fit is still not Hasegawa...

Fuselage is now closed with careful checking of fit both with the spinner and the wings in order to make life easier later on in the project... Fit of the separate engine covers could be better, I choose to optimize the rear end since that will be the hardest one to fix later. The front end was adjusted as per photos below! The gap between the fuselage halves was filled with super glue to make sure that it doesn't crack up or deform later.


With the Meteor now safely installed in the display cabinet, the Spitfire build will make some progress I hope!

Regards

Magnus
magnusf
_VISITCOMMUNITY
Stockholm, Sweden
Joined: May 02, 2006
KitMaker: 1,953 posts
AeroScale: 1,902 posts
Posted: Tuesday, November 20, 2007 - 09:51 AM UTC
Less of an update, more of a request tonight!

Is there anyone out there who have studied the lumps and bumps of Spitfire wings, preferrably how these interact with different kinds of wheels...

I was just about to install a set of teardrop shaped bulges over the wheel wells as per the kit instructions. It wasn't that clear where they were supposed to go so I checked some photos and guess what: I could see no bulges! Digging throught all my available litterature I can't find one photo where I can positively identify that bulge on a Mk XII. In fact, the only place where I can see one is on the E-wing of a Mk XVI. There are also E-wings without the bulge, the vast majority as it appears... And my Fujimi XIVE hasn't got them either...

I lean towards not installing them since I don't think they ever were there but you all get 24 hours to enlighten me regarding this! A thougt is that it might have something to do with the wheels, five-spoke versus plain hubs?

As you can see below, the bulge as supplied in the kit isn't exactly discrete either... (Don't worry, I have only used ClearFix to install it for the photo...)


Eagerly awaiting your collective wisdom on this subject

Regards

Magnus
StenEk
_VISITCOMMUNITY
Stockholm, Sweden
Joined: October 02, 2007
KitMaker: 31 posts
AeroScale: 29 posts
Posted: Tuesday, November 20, 2007 - 09:57 PM UTC
Magnus,
I've checked all my available references for Spitfires and I can't see bulges for the wheels on any of the photos of Mk. XII airframes. I would not fit them.

BTW, my way of building a Mk. XII seems a lot easier; Hasegawa Mk. IX kit and Paragon resin nose and prop.
magnusf
_VISITCOMMUNITY
Stockholm, Sweden
Joined: May 02, 2006
KitMaker: 1,953 posts
AeroScale: 1,902 posts
Posted: Tuesday, November 20, 2007 - 10:32 PM UTC

Quoted Text

Magnus,
I've checked all my available references for Spitfires and I can't see bulges for the wheels on any of the photos of Mk. XII airframes. I would not fit them.


That makes two of us then! Thanks!


Quoted Text


BTW, my way of building a Mk. XII seems a lot easier; Hasegawa Mk. IX kit and Paragon resin nose and prop.


I have that one as well, I might give it a try some day just to see which way is the easiest to go... I will of course fit mine to one of my five Ventura Mk IX...


Magnus
StenEk
_VISITCOMMUNITY
Stockholm, Sweden
Joined: October 02, 2007
KitMaker: 31 posts
AeroScale: 29 posts
Posted: Wednesday, November 21, 2007 - 06:28 AM UTC
I just found this on Olaf Hungnes website http://www.uio.no/~hungnes/ :


Quoted Text

"Bumps" above wheel wells
With the introduction of the "c" or "universal" wing on the MkV, the "D"-shaped bump above the wheel wells disappeared. This was a consequence of an increased forward rake of the extended undercarriage legs resulting in less space being needed for the wheel when retracted. Mk Vcs and early MkIXs thus have completely flat wheel well roofs. Then, at some point, a second type of wheel well roof blisters, of tear-drop-shape, began to appear, these are especially frequent among currently airworthy examples. According to Rolf Meum, who has accumulated 100+ hrs of Spitfire flying with the Old Flying Machine Company, Duxford, the teardrop-shaped blisters above the wheel wells correlate to a modified wheel axle geometry adapted to tarmac/concrete runway operation; the original "grassfield" undercarriage has a substantial toe-in which results in severe wear on the port mainwheel when flying from tarmac/concrete airfields. With the modification the wheels no longer lie flat in the wheel wells and need more space. This may explain why the blisters are frequently seen on surviving warbirds and other post-war Spitfires while being rare on pictures taken during the war.


I think this answers the question to some degree.
magnusf
_VISITCOMMUNITY
Stockholm, Sweden
Joined: May 02, 2006
KitMaker: 1,953 posts
AeroScale: 1,902 posts
Posted: Wednesday, November 21, 2007 - 07:03 AM UTC
Super Sten!

I thougt that Olav's web site was long gone but luckily it is obviously still around.

No bumps on my Mk XII then!

Regards

Magnus
magnusf
_VISITCOMMUNITY
Stockholm, Sweden
Joined: May 02, 2006
KitMaker: 1,953 posts
AeroScale: 1,902 posts
Posted: Wednesday, November 21, 2007 - 10:20 AM UTC
For those of us who haven't bought this, a ceramic tile, copious amounts of yellow tape and some scrap plastic will have to do...


Wings attached to fuselage, wing joint filled with Milliput, airframe jigged using two pencils to get the wings level and the stabilisers added. Everything square i hope...

Regards

Magnus
magnusf
_VISITCOMMUNITY
Stockholm, Sweden
Joined: May 02, 2006
KitMaker: 1,953 posts
AeroScale: 1,902 posts
Posted: Friday, November 23, 2007 - 09:56 AM UTC
Nearing completion...

As you can see, I did use a bit of putty both on the wing roots and on the stabiliser joints. I probably would have needed less around the wing roots if I had added a spacer in the fuselage, which I didn't... The stabiliser joins are pretty hopeless with two contoured edges that shoud fit together. Needless to say, the profile isn't the same... Some filing helps but it far from achieves a perfect fit!


Magnus
magnusf
_VISITCOMMUNITY
Stockholm, Sweden
Joined: May 02, 2006
KitMaker: 1,953 posts
AeroScale: 1,902 posts
Posted: Monday, November 26, 2007 - 09:50 AM UTC
A coat of grey base paint and some more sanding... I decided to use the original canopy since the Falcon canopy I have was a bit too wide, I think that one fits the Airfix Mk V.


Regards

Magnus
TedMamere
_VISITCOMMUNITY
Moselle, France
Joined: May 15, 2005
KitMaker: 5,653 posts
AeroScale: 4,347 posts
Posted: Monday, November 26, 2007 - 06:25 PM UTC
Hi Magnus!

Is there a plastic model under the filler?

Jokes aside you are doing a fine job on that kit. I can't wait to see it camouflaged...

Jean-Luc
magnusf
_VISITCOMMUNITY
Stockholm, Sweden
Joined: May 02, 2006
KitMaker: 1,953 posts
AeroScale: 1,902 posts
Posted: Friday, November 30, 2007 - 10:11 AM UTC

Quoted Text

Hi Magnus!

Is there a plastic model under the filler?

Jokes aside you are doing a fine job on that kit. I can't wait to see it camouflaged...

Jean-Luc


Come on Jean-Luc! You must have seen worse! I really don't think the fit is that bad, if I only had remembered that fuselage spacer...

Two photos to show recent progress:

Yellow leading edges painted and masked using Polly Scale "Reefer Yellow", it is a railway colour but it nevertheless has excellent opacity. Otherwise yellow is a pain to paint, have you ever tried using Gunze yellow? It NEVER covers...


And then a coat of Ocean Grey, I use Agama paint this time with some Xtracrylix white added to lighten it a bit. I tried different variants of Ocean Grey (Old Aeromaster and Aeromaster Warbird (the ones made by Vallejo)) but I fell for this one since it is a bit more blueish than the others.


Lots of other small parts are in the painting process now, with a bit of luck it will be decal time early next week!

Regards

Magnus
magnusf
_VISITCOMMUNITY
Stockholm, Sweden
Joined: May 02, 2006
KitMaker: 1,953 posts
AeroScale: 1,902 posts
Posted: Sunday, December 02, 2007 - 10:18 AM UTC
Camo masked and painted. Some day I have to try some other method because all this masking is boring and tedious and it isn't especially exact either... Paint demarcations on the Spitfire XII were sharp so freehanding isn't an option either and would produce too much overspray anyway...

On to the photos, first one after a few hours of careful masking:


Second one after a few minutes of airbrushing and de-masking:


Magnus
StenEk
_VISITCOMMUNITY
Stockholm, Sweden
Joined: October 02, 2007
KitMaker: 31 posts
AeroScale: 29 posts
Posted: Sunday, December 02, 2007 - 01:16 PM UTC
Hmmm... Interestig strakes along the outer half of the wing leading edges.
Haven't seen these on a Spitfire before.
magnusf
_VISITCOMMUNITY
Stockholm, Sweden
Joined: May 02, 2006
KitMaker: 1,953 posts
AeroScale: 1,902 posts
Posted: Sunday, December 02, 2007 - 07:15 PM UTC

Quoted Text

Hmmm... Interestig strakes along the outer half of the wing leading edges.
Haven't seen these on a Spitfire before.


If I forget them during de-masking I will say that they are stall strakes, just like on a PA-28!

Magnus
magnusf
_VISITCOMMUNITY
Stockholm, Sweden
Joined: May 02, 2006
KitMaker: 1,953 posts
AeroScale: 1,902 posts
Posted: Wednesday, December 05, 2007 - 10:28 AM UTC
No, I didn't forget the "strakes" during de-masking but guess what went CRACK when I pulled the tape from below the wing...


I try to build strong models but these things tend to happen every now and then anyway... One thing that I have learnt after 25 years in the hobby is that almost anything is fixable though. Some sanding later...


I didn't like the rather green code letters from the decal sheet, besides it makes it hard to match the colour of the fuselage band and the spinner. I cut a mask from tape, using a scan of the decal sheet as a template cutting with a sharp scalpel blade and a steel ruler. The letter B is a bit awkward but it is possible to cut the two small D-shapes and position them carefully...


And the final result:


Some minor touchup with a brush, then it is as good as the decals!

Magnus
magnusf
_VISITCOMMUNITY
Stockholm, Sweden
Joined: May 02, 2006
KitMaker: 1,953 posts
AeroScale: 1,902 posts
Posted: Sunday, December 09, 2007 - 03:08 AM UTC
I look into the mirror and tell myself: Just about everything is fixable...

When I had loaded the airbrush with Gunze clear that wing joint went CRACK for the second time This time I used thin super glue and made sure that the joint was really filled with glue before adding some kicker. I then sanded and repainted and managed to get the gloss coat on the same evening anyway.

Decals were added in one session yesterday evening. They are really nice: Thin and pliable especially when using very hot water (I have come to the conclusion that using water from the tea pot can overcome the stiffest and most unwilling decals).


Time for some weathering now, from the photos I have seen especially the lower surfaces were rather grimy.

I have a new background for the photos, I hope you like it. A bit more colour makes the photos more interesting I think!

See you soon!

Magnus
magnusf
_VISITCOMMUNITY
Stockholm, Sweden
Joined: May 02, 2006
KitMaker: 1,953 posts
AeroScale: 1,902 posts
Posted: Monday, December 10, 2007 - 10:27 AM UTC
I have started weathering. I have always been a bit of a coward when it comes to this part of a model but I have decided to be a little braver with this one!

I started out using the airbrush with clear tinted with a drop of grey to even out the finish a bit. Then I proceeded with Tamiya smoke roughly along the panel lines. And when I had been painting for an hour or so (It is dangerously fun!) I realised that I had lost far too much contrast and everything was starting to look grey...


A bit of touchup of the green areas using Agama paint heavily thinned with Tamiya thinner and the grey lightened a bit using dry pastels, things are looking a bit better again.


I will be travelling tomorrow so I will have a few hours in the car to think about the next step...


Magnus
Merlin
Staff MemberSenior Editor
AEROSCALE
#017
_VISITCOMMUNITY
United Kingdom
Joined: June 11, 2003
KitMaker: 17,582 posts
AeroScale: 12,795 posts
Posted: Monday, December 10, 2007 - 11:00 AM UTC
Hi Magnus

That is definitely starting to look like a VERY tasty Spitfire!

All the best

Rowan
magnusf
_VISITCOMMUNITY
Stockholm, Sweden
Joined: May 02, 2006
KitMaker: 1,953 posts
AeroScale: 1,902 posts
Posted: Sunday, December 16, 2007 - 10:47 AM UTC

Quoted Text

Hi Magnus

That is definitely starting to look like a VERY tasty Spitfire!

All the best

Rowan


Thanks Rowan! Just a few days more and there will be a full review (I hope so at least, the last few days haven't been exactly succesful modellingwise...)

Note painting disaster below the exhaust stubs (or rather an unfortunate accident involving an airbrush, some overspray and the removal of said overspray using a Q-tip that obviously had been dipped in alcohol before use...). I have sanded that area and will repaint tomorrow!


I manage to break off a gear leg as well when handling the kit (I avoid attaching anything that can even be suspected to be fragile too early during the build but sooner or later you have to anyway...)

Regards

Magnus
 _GOTOTOP