Colorado, United States
Joined: January 25, 2004
KitMaker: 11,669 posts
AeroScale: 11,011 posts
Posted: Monday, May 05, 2008 - 01:49 PM UTC
Quoted Text
Quoted Text
1. Concerning the turtledeck.
My sources tell me that initially, Jco turtledecks were centerline 2 part . Jfa one piece (like the kit). After Sept, 1918 they all became centerline 2 piece. Jfa was absorbed by Jco at this time.
Stephen! So the 5185/18 was of the first Jfa batch and had a one piece turtledeck like the kit, right? how about the other option in the Roden box, the machine with brown fuselage and white and blue stripes? One piece or two piece turtledeck? Any idea? Mikko
Greetings Mikko I checked my image of the original machine that is represented as the second profile Roden has in their kit.
The rear spine is the same as the image I presented earlier in this thread. Parallel and no centerline division and may be two piece with the break across the spine see below.

". . .The most important thing is to know why you build and then get the most that you can out of building." via D.D.
Uusimaa, Finland
Joined: January 11, 2007
KitMaker: 88 posts
AeroScale: 87 posts
Posted: Monday, May 05, 2008 - 05:49 PM UTC
Thanks Stephen!

Mikko
Colorado, United States
Joined: January 25, 2004
KitMaker: 11,669 posts
AeroScale: 11,011 posts
Posted: Tuesday, October 21, 2008 - 01:36 PM UTC
Oh Baby! Just in time! I just got another 1/48 Roden Junkers D.I kit and was thinking about doing some internal trestle and strut work.

". . .The most important thing is to know why you build and then get the most that you can out of building." via D.D.
Colorado, United States
Joined: January 25, 2004
KitMaker: 11,669 posts
AeroScale: 11,011 posts
Posted: Tuesday, October 21, 2008 - 07:54 PM UTC
Greetings all;
I spent a few hours tonight (watching Indianna Jones and the Kingdom of the Crystal Skulls) - cutting out the wing roots of the Junkers D.I and adding two rows of truss structures for each of them.
". . .The most important thing is to know why you build and then get the most that you can out of building." via D.D.
Colorado, United States
Joined: January 25, 2004
KitMaker: 11,669 posts
AeroScale: 11,011 posts
Posted: Saturday, October 25, 2008 - 07:48 AM UTC
Greetings all;
Just for a refresher here is Brad Cancian's fine build as well.
Brad's Build here. 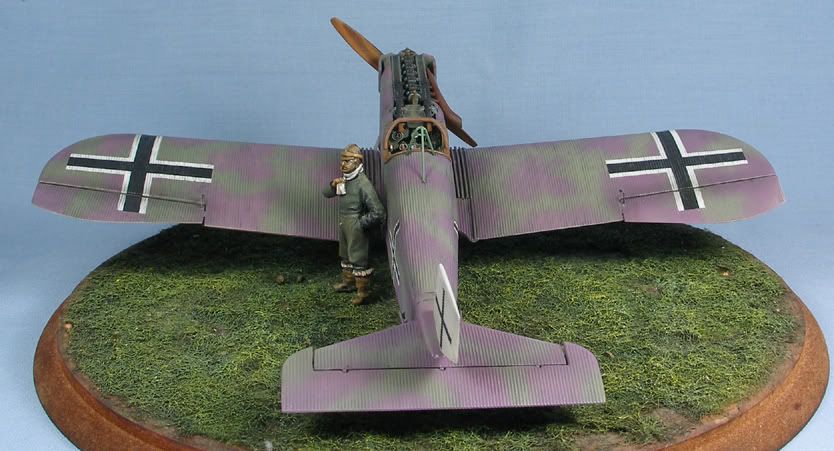
". . .The most important thing is to know why you build and then get the most that you can out of building." via D.D.
Florida, United States
Joined: July 20, 2006
KitMaker: 59 posts
AeroScale: 56 posts
Posted: Wednesday, October 29, 2008 - 05:15 AM UTC
Food for Thought ?
I was in a conversation with a Ukrainian Hobby Supplier yesterday. I asked what WWI Roden might be forth coming be on the Horizon.
I was told Roden 433 a 1/48 Early ? Version Junkers DI ?
Ealry 09
Yours Mike
Colorado, United States
Joined: January 25, 2004
KitMaker: 11,669 posts
AeroScale: 11,011 posts
Posted: Thursday, October 30, 2008 - 02:41 PM UTC
Most interesting Mike!
Next I will be thinning down the interior walls to get more detail inplace. The new Junkers book is nice just no interior shots as I had hoped. I can live with the images Pete Grosz gave me some years ago. Though I still have one European source that might help.
I am truely surprised that only a very few of us have built this little gem and displayed their images. On with the build.
". . .The most important thing is to know why you build and then get the most that you can out of building." via D.D.
Colorado, United States
Joined: January 25, 2004
KitMaker: 11,669 posts
AeroScale: 11,011 posts
Posted: Sunday, November 09, 2008 - 08:13 AM UTC
Greetings all;
Just a bit of clarification.

The Junkers D.I wings don't actually have wing ribs. The truss and support that runs the chord of the wing root is accurate. Since the Junkers D.I "kit" has the wing root and the wing molded in one part I added the truss sections. When united they won't be seen but will help lay the smaller truss works that form as the spars.

". . .The most important thing is to know why you build and then get the most that you can out of building." via D.D.
Colorado, United States
Joined: January 25, 2004
KitMaker: 11,669 posts
AeroScale: 11,011 posts
Posted: Wednesday, December 31, 2008 - 05:19 AM UTC
I have picked up a second Junkers D.I kit (short fuselage.) You will remember the "Flight Magazine" images I put up earlier.

Here is my effort Though I have tried to add a bit of strength to the application.

This angle from the front view. Already I see I will have to go back and repair a bent truss.

Here is a bit of fun note that have removed a portion of the fuselage side wall at the wing root. Also I will have to repair the cockpit framing for the bulk head and seat supports.

". . .The most important thing is to know why you build and then get the most that you can out of building." via D.D.
Colorado, United States
Joined: January 25, 2004
KitMaker: 11,669 posts
AeroScale: 11,011 posts
Posted: Wednesday, December 31, 2008 - 07:08 PM UTC
Ok here is where it gets good. Here is my build up of the interior basics with a couple of modifications.

Here is where it goes.

Viola! slips nicely into place.


". . .The most important thing is to know why you build and then get the most that you can out of building." via D.D.
Alberta, Canada
Joined: January 19, 2008
KitMaker: 6,743 posts
AeroScale: 6,151 posts
Posted: Thursday, January 01, 2009 - 02:04 AM UTC
Looking really great Stephen . Will the side engine covers be off to expose the engine ?
Colorado, United States
Joined: January 25, 2004
KitMaker: 11,669 posts
AeroScale: 11,011 posts
Posted: Thursday, January 01, 2009 - 03:09 AM UTC
Quoted Text
Looking really great Stephen . Will the side engine covers be off to expose the engine ?
Greetings Terri! That is the plan.
". . .The most important thing is to know why you build and then get the most that you can out of building." via D.D.
Moselle, France
Joined: May 15, 2005
KitMaker: 5,653 posts
AeroScale: 4,347 posts
Posted: Thursday, January 01, 2009 - 06:20 AM UTC
Hi Stephen!
Fantastic work!

This thread will be very usefull when I'll start mine...

Happy New Year by the way!

Jean-Luc

Better think one hour and build five minutes...
Than think five minutes and build an hour!
Colorado, United States
Joined: January 25, 2004
KitMaker: 11,669 posts
AeroScale: 11,011 posts
Posted: Thursday, January 01, 2009 - 08:25 AM UTC
Mercy beau coup Jean - Luc! Here is the installation of the cockpit and pilot's left wing with the truss spars. The wing spar truss works are to be slipped in the corresponding angled slots created by the wing truss works.

From behind with both wings installed.

From behind with both wings installed.

Cockpit close up.

". . .The most important thing is to know why you build and then get the most that you can out of building." via D.D.
Mendoza, Argentina
Joined: June 14, 2006
KitMaker: 222 posts
AeroScale: 219 posts
Posted: Thursday, January 01, 2009 - 07:13 PM UTC
Excellent Stephen! It looks like real metal
I have always imagined that Paradise will be a kind of library.
Siempre imagine que el paraíso sería algún tipo de biblioteca.
Jorge Luis Borges
Colorado, United States
Joined: January 25, 2004
KitMaker: 11,669 posts
AeroScale: 11,011 posts
Posted: Friday, January 02, 2009 - 08:40 AM UTC
Thanks Claudio.
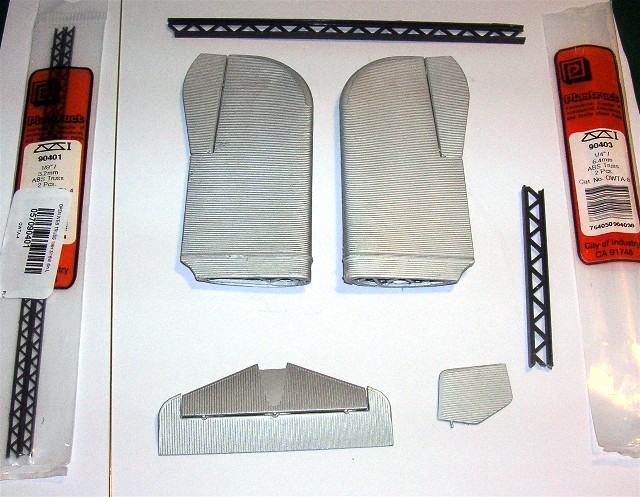
Now for the choice of engine. Since the Junker Company (Jco) did not geta BMW IIIa assigned to them until Sept. 1918 I went for the Mercedes installation. Below are some options and a bit of fun. The 260hp was too large and never done but is wide enought to be accpted in the kit airframe. The Roden 180hp with the stand up air pump is a choice and the Pavla 200hp with the horizontal pump is another.

". . .The most important thing is to know why you build and then get the most that you can out of building." via D.D.
Colorado, United States
Joined: January 25, 2004
KitMaker: 11,669 posts
AeroScale: 11,011 posts
Posted: Friday, January 02, 2009 - 08:53 AM UTC
Working with the new Junker Datafile (#131) I settled on a light mossy green for this build as a base.

". . .The most important thing is to know why you build and then get the most that you can out of building." via D.D.
Colorado, United States
Joined: January 25, 2004
KitMaker: 11,669 posts
AeroScale: 11,011 posts
Posted: Friday, January 02, 2009 - 08:58 AM UTC
I went with the 200hp Mercedes D.IIIav with the horizontal airpump. Since the engine cowlings will be off I scribed the back of the radiator to look like mesh screen. More to come.

". . .The most important thing is to know why you build and then get the most that you can out of building." via D.D.
Colorado, United States
Joined: January 25, 2004
KitMaker: 11,669 posts
AeroScale: 11,011 posts
Posted: Friday, January 02, 2009 - 09:10 AM UTC
Now for the propeller. This image shows a comparison of kit props with the Axial company paddle profile. Note
rotary engine props are shorter than
inline engine props. I chose the extra Roden axial prop from their Fokker D.VII kit. It and the Eduard version shown here are the correct length for the inline Mercedes six cylinder engine. In simple terms, the Roden Junkers kit prop is too short for an inline engine.

". . .The most important thing is to know why you build and then get the most that you can out of building." via D.D.
Alberta, Canada
Joined: January 19, 2008
KitMaker: 6,743 posts
AeroScale: 6,151 posts
Posted: Friday, January 02, 2009 - 01:57 PM UTC
Wow Stephen you are just motoring along here with this build ! Your engine looks fantastic !
Colorado, United States
Joined: January 25, 2004
KitMaker: 11,669 posts
AeroScale: 11,011 posts
Posted: Wednesday, January 07, 2009 - 12:18 AM UTC
Greetings all I am in the home stretch on this one.


". . .The most important thing is to know why you build and then get the most that you can out of building." via D.D.
Alberta, Canada
Joined: January 19, 2008
KitMaker: 6,743 posts
AeroScale: 6,151 posts
Posted: Wednesday, January 07, 2009 - 02:40 AM UTC
The green and purple sure stand out ! Very well done Stephen . Are you going to use the kit decals or use AM ?
Colorado, United States
Joined: January 25, 2004
KitMaker: 11,669 posts
AeroScale: 11,011 posts
Posted: Wednesday, January 07, 2009 - 06:34 AM UTC
Greetings Terri. This scheme is based on a Junkers Co, type. It does seem a little bright but the Datafile #131 has some interesting information about the term "mossy green". It also has a couple of typographical errors by the way. Nothing serious.
For instance it mentions a Mercedes that was New in May 1918. But misidentifies it as a 1917 variant. All in all the green may have been a shade lighter but I like the results for a scale effect. I may be able to just use the Roden decals. We do not know much about the Junkers Co serials so I am going with photo images.
". . .The most important thing is to know why you build and then get the most that you can out of building." via D.D.
Mendoza, Argentina
Joined: June 14, 2006
KitMaker: 222 posts
AeroScale: 219 posts
Posted: Wednesday, January 07, 2009 - 06:32 PM UTC
Beautiful Stephen, I love the cockpit !!!
I have always imagined that Paradise will be a kind of library.
Siempre imagine que el paraíso sería algún tipo de biblioteca.
Jorge Luis Borges
Colorado, United States
Joined: January 25, 2004
KitMaker: 11,669 posts
AeroScale: 11,011 posts
Posted: Wednesday, January 07, 2009 - 10:59 PM UTC
Greetings all, its done! Thanks Claudio. Its a bit of a kitchen clean up of parts. But I am pleased with the way it all came together.


". . .The most important thing is to know why you build and then get the most that you can out of building." via D.D.


