

Hi all
A question to all you guru's out there. I am at the stage with my modelling where I am begining to want to add extra detail to my aircraft cockpits, enigines, undercarriage etc. you get the idea. i have seen some fantastic pics of guys who have upgraded cockpits with bits of stretched sprue, wire or whatever is at hand. I attempted this and found slicing off small bits of stretched sprue a challenge let alone trying to glue it in place without it looking less than average. The same goes for adding brake lines to undercarriages. I have tried with with and sprue with less than favourable results. So my question is how do all you guys go about it. Im keen to hear what different techniques you all use.
Cheers guys
Hosted by Jim Starkweather
Upgrading cockpits etc

chopped

Joined: April 18, 2007
KitMaker: 6 posts
AeroScale: 5 posts
Posted: Friday, January 11, 2008 - 07:57 PM UTC

lampie

#029

Joined: December 23, 2005
KitMaker: 6,249 posts
AeroScale: 3,270 posts

Posted: Sunday, January 13, 2008 - 11:40 AM UTC
Hi Mick.
Upgrading cockpits,,the start of the slippery slope
Apart from detail painting and drybrushing to bring out the kit detail, the two things I like to try and improve on in a cockpit are the instrument panel and seat belts, as I feel that these are the main points that the eye is drawn to when you look into a models cockpit.
With the instrument panel I first paint it white. When this is dry I paint it black and while its still wet I wipe my thumb over the dials. This will expose the white paint on the edges and other raised detail. If theres a decal included I apply it at this stage, and then some dry brushing usually finishes the instrument panel off.
Since trying Eduard pre painted PE seatbelts Ive used nothing else
However, if you dont want to go to this expense you could make them yourself out of either Tamiya tape or wine bottle foil. Alternatively carefully cut around the seatbelt decal if theres one included and attach it with a tiny drop of CA. This will give it some depth, and with some washes and dry brushing will look very effective.
This and all the photos are a Tamiya P47 in 1:72 scale.


When youve been bitten by the bug you'll find yourself wanting to add hydraulic wire to wheel wells, undercarriage brake pipes and engine ignition harnesses.
Using wire instead of sprue will give you a lot more flexibility (literally).
I have a selection of wire that Ive either bought or appropriated since I got the "wiring" bug.
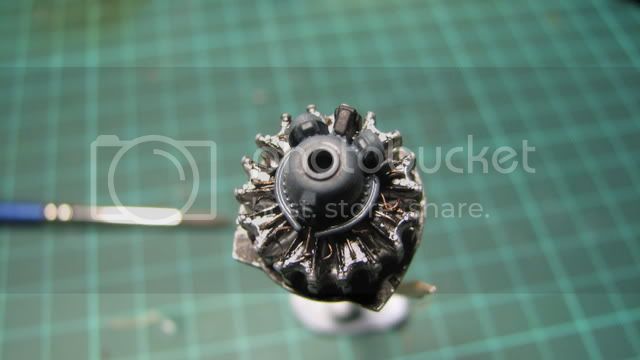
One option is fuse wire, which comes on a card with different Amperage ratings. 5A is pretty good for 1:72 hydraulic pipes. Another source of wire is old telephone cable, Cat5 cables etc. Youd be surprised whats lying around. I also have a roll of 0.03mm black coated wire that I picked up at a model show recently, and this looks great as brakepipes on undercarriage.
You'll need some micro drills to make holes to seat the ends of the wire in. You can buy sets of these at most LHS's. I usually use,(and break with annoying regularity) 0.03mm drill bits.
Heres a few more photos from the same build.
A wired engine.
Hydraulic pipes in the wheel wells.

And some undercarriage wired using the black coated wire.
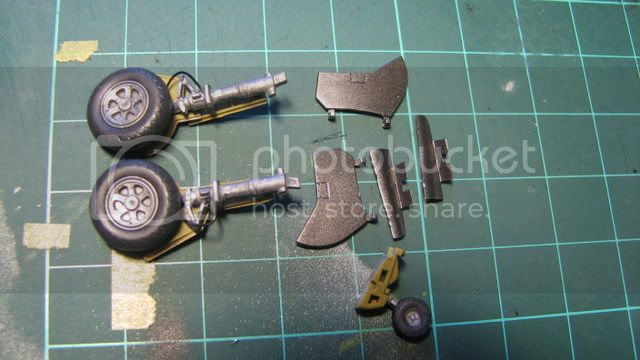
A lot of this is representative rather than 100% accurate, and of course most of it cant be seen when the model is finished, but we know its there
Hope this helps.
Nige
Upgrading cockpits,,the start of the slippery slope
Apart from detail painting and drybrushing to bring out the kit detail, the two things I like to try and improve on in a cockpit are the instrument panel and seat belts, as I feel that these are the main points that the eye is drawn to when you look into a models cockpit.
With the instrument panel I first paint it white. When this is dry I paint it black and while its still wet I wipe my thumb over the dials. This will expose the white paint on the edges and other raised detail. If theres a decal included I apply it at this stage, and then some dry brushing usually finishes the instrument panel off.
Since trying Eduard pre painted PE seatbelts Ive used nothing else
However, if you dont want to go to this expense you could make them yourself out of either Tamiya tape or wine bottle foil. Alternatively carefully cut around the seatbelt decal if theres one included and attach it with a tiny drop of CA. This will give it some depth, and with some washes and dry brushing will look very effective.
This and all the photos are a Tamiya P47 in 1:72 scale.
When youve been bitten by the bug you'll find yourself wanting to add hydraulic wire to wheel wells, undercarriage brake pipes and engine ignition harnesses.
Using wire instead of sprue will give you a lot more flexibility (literally).
I have a selection of wire that Ive either bought or appropriated since I got the "wiring" bug.
One option is fuse wire, which comes on a card with different Amperage ratings. 5A is pretty good for 1:72 hydraulic pipes. Another source of wire is old telephone cable, Cat5 cables etc. Youd be surprised whats lying around. I also have a roll of 0.03mm black coated wire that I picked up at a model show recently, and this looks great as brakepipes on undercarriage.
You'll need some micro drills to make holes to seat the ends of the wire in. You can buy sets of these at most LHS's. I usually use,(and break with annoying regularity) 0.03mm drill bits.
Heres a few more photos from the same build.
A wired engine.
Hydraulic pipes in the wheel wells.
And some undercarriage wired using the black coated wire.
A lot of this is representative rather than 100% accurate, and of course most of it cant be seen when the model is finished, but we know its there
Hope this helps.
Nige


gbyrnsie

Joined: July 12, 2006
KitMaker: 770 posts
AeroScale: 22 posts
Posted: Monday, January 14, 2008 - 05:23 AM UTC
One thing to bear in mind when you look at photos of other people's work is that sometimes the cockpit has been detailed with photo-etched or resin parts. Also scale will play a factor. If you're looking at photo's of someone's 1/24 scale plane you're not going to be able to get the same results in 1/72.
In addition to collecting a variety of wire (fine solder wire is great too), you'll want to start a collection of styrene sheet, strip and rod. Evergreen and Squadron make a wide variety of shapes and sizes. I'll use platic rod for throttle levers for example. One trick I've learned is to leave the rod a longer than I need it for gluing purposes. Once set you can trim it to size with some handy-dandy clippers.
Working with small bits can be frustrating. I'm always amazed at just how fast a small bit of plastic can move off the end of an x-acto knife. A couple of things you can try is to place your material on a rolled bit of masking tape while cutting or what I do alot is to put my finger over the bit I'm cutting off and applying the blade gently but firmly.
GB

JMartine

Joined: October 18, 2007
KitMaker: 1,698 posts
AeroScale: 96 posts

Posted: Monday, January 14, 2008 - 06:37 AM UTC
Good info here... do you sand off the built-in undercarriage raised "pipes"? Or lay down the wire on top?
Do you "scratch" the wire a bit for painting (surgace prep) ? If so, dont use solder wire, it contains lead that can be toxic in dust form (inhalation) if you sand it.
I will try medical tape for seat belts, I saw some pics, has the same (well, close enough) texture as cloth seat belts.
Do you "scratch" the wire a bit for painting (surgace prep) ? If so, dont use solder wire, it contains lead that can be toxic in dust form (inhalation) if you sand it.
I will try medical tape for seat belts, I saw some pics, has the same (well, close enough) texture as cloth seat belts.

StenEk

Joined: October 02, 2007
KitMaker: 31 posts
AeroScale: 29 posts
Posted: Monday, January 14, 2008 - 04:45 PM UTC
Nigel, I suspect you mean 0.3 mm wire and dril bits, and not 0.03 mm. The latter would just slightly thicker than a human hair! Furthermore, from the looks of your photos it definitely looks like 0.3 mm wire to me. (Been there, done that - in 1/72 scale)
lampie
#029
Joined: December 23, 2005
KitMaker: 6,249 posts
AeroScale: 3,270 posts
Posted: Monday, January 14, 2008 - 06:48 PM UTC
Quoted Text
Nigel, I suspect you mean 0.3 mm wire and dril bits, and not 0.03 mm. The latter would just slightly thicker than a human hair! Furthermore, from the looks of your photos it definitely looks like 0.3 mm wire to me. (Been there, done that - in 1/72 scale)
Sten,you could well be correct.
Not only are the eyes going but the brains on its way out as well

Nige

Augie
Joined: May 13, 2003
KitMaker: 711 posts
AeroScale: 107 posts
Posted: Friday, January 18, 2008 - 01:55 PM UTC
Quoted Text
I am at the stage with my modelling where I am begining to want to add extra detail to my aircraft cockpits, enigines, undercarriage etc. you get the idea.
You're heading down a slippery slope there! You'll be buying aftermarket parts to add. Then you'll be doing minor scratch-building. This soon leads to scratch-building major parts for your builds and then finally doing a whole scratch-build!!!
Stop while you can!!!!!! It's a sickness, I tell you!!!!!

Percheron
Joined: September 23, 2006
KitMaker: 432 posts
AeroScale: 360 posts

Posted: Friday, January 18, 2008 - 07:15 PM UTC
Mick,
Like everyone else said, once you start...... But I think you will find that doing up a cockpit is really enjoyable. In such a small area you get a lot of detail and it is gratifying to see it all come together. Plus you can keep things relatively cheap, $6-8 for a Eduard cockpit zoom and it makes a big difference I think. Resin wheels really helps dress things up too. I would recommend getting a PE bending tool like Mission Models Etch Mate. It is really handy!
For wire and duct work I use speaker wire, just a couple of strands does a lot for looks
-Derek
JMartine
Joined: October 18, 2007
KitMaker: 1,698 posts
AeroScale: 96 posts
Posted: Saturday, January 19, 2008 - 06:47 AM UTC
Derek, can you also bend wire with the PE bending tool? Or only PE? I am researching and will be buying a PE beding tool soon... thanks
Percheron
Joined: September 23, 2006
KitMaker: 432 posts
AeroScale: 360 posts
Posted: Saturday, January 19, 2008 - 08:10 AM UTC
James, you can do both with it. It really is pretty versatile. Here is a link to a review . http://www.modelingmadness.com/scotts/detailsets/etchmate3c.htm
-Derek
-Derek
JMartine
Joined: October 18, 2007
KitMaker: 1,698 posts
AeroScale: 96 posts
Posted: Saturday, January 19, 2008 - 08:30 AM UTC
Derek, thanks for the info and the link, cheers! James
 |

WEB HOSTING BY


Copyright ©2021 AeroScale and Kitmaker Network, a subsidiary of Silver Star Enterprises
All Rights Reserved. Please read our Conditions of Use and Privacy Policy.
All Rights Reserved. Please read our Conditions of Use and Privacy Policy.