_GOTOBOTTOM
Pre-Flight Check
Constructive critique of your finished or in-progress photos.
1/32 Bf109 in progress
Grifter
_VISITCOMMUNITY
North Carolina, United States
Joined: November 17, 2002
KitMaker: 608 posts
AeroScale: 55 posts
Posted: Thursday, February 07, 2008 - 06:31 PM UTC
Ok, here's my attempt at the old Hasegawa Bf109e. It's my second serious aircraft attempt after getting back to the hobby. When I bought the kit I wasn't really ready for the challenges of such an old molding, but I'm doing the best I can without being overly obsessive, since I'd like to actually finish this in my lifetime! I'm a very slow builder to start with.
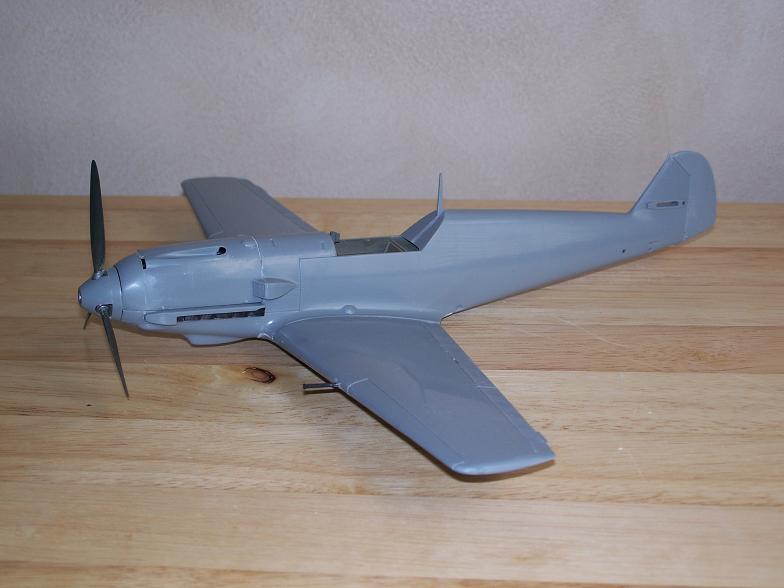
It's all OOB. I'm almost to the point of priming, and I know there's some bad spots, especially the wing roots, that are beyond my skills and patience to correct on this build. I still have to work on the tailplane braces, the fit on one of them isn't even close!
I may add a couple details, like brake lines to the gear legs, and maybe try to add the raised rib below the cockpit. It'll be finished as Brown 2 of 6./JG 54 from the Eagle Strike decal sheet BOB Luftwaffe Aces II.


propwash
_VISITCOMMUNITY
Charente, France
Joined: July 06, 2007
KitMaker: 289 posts
AeroScale: 231 posts
Posted: Thursday, February 07, 2008 - 11:55 PM UTC
Hi Greg, I'm only on my first model after too many years, so you're in good company. I think your 109 is coming on very well and look I forward to seeing your progress............perhaps I can learn something new from you, too........
TedMamere
_VISITCOMMUNITY
Moselle, France
Joined: May 15, 2005
KitMaker: 5,653 posts
AeroScale: 4,347 posts
Posted: Friday, February 08, 2008 - 12:05 AM UTC
Hi Greg!

I will follow this build with great interest. The camouflage you've chose is very interesting! I can't wait to see more pictures of this build...

Jean-Luc
CMOT70
_VISITCOMMUNITY
Victoria, Australia
Joined: August 23, 2007
KitMaker: 629 posts
AeroScale: 539 posts
Posted: Friday, February 08, 2008 - 05:23 AM UTC
I actually think you've done an excellent job of getting the main airframe together with so little filling work....i've heard that that kit is a real pig as far some fit issues are concerned. So well done so far!

Andrew
Grifter
_VISITCOMMUNITY
North Carolina, United States
Joined: November 17, 2002
KitMaker: 608 posts
AeroScale: 55 posts
Posted: Friday, February 08, 2008 - 06:37 AM UTC
Thanks for the comments so far!

Jean-Luc, I'll try to make sure to get more photos as things progress.

Andrew, The main fuselage halves actually fit pretty well. The real pain is the cowling pieces....lots of sanding and trial fitting there. I also had a hard time with the firewall and instrument panel/ cockpit fitment. The wing root fit could be better, but the wing halves weren't too bad. I got the tailplanes on today, and they fit well, but the support struts are a problem I'll have to work on.
Grifter
_VISITCOMMUNITY
North Carolina, United States
Joined: November 17, 2002
KitMaker: 608 posts
AeroScale: 55 posts
Posted: Wednesday, February 13, 2008 - 01:04 AM UTC
Just a tiny update.
I've attached the stabilizers, which went pretty well, but the braces just fit horribly!
Actually they don't fit no matter which side or which way I turn them. Here's my crude attempt to fair in the base of the port brace with apoxie sculpt. I've also drilled out the tow bar holes on either side. Next up is the starboard brace which will be even worse than this one.


It ain't perfect, but it's a whole lot better than it was!!
Grifter
_VISITCOMMUNITY
North Carolina, United States
Joined: November 17, 2002
KitMaker: 608 posts
AeroScale: 55 posts
Posted: Saturday, March 22, 2008 - 12:41 AM UTC
After a few setbacks I've managed to make some progress finally.
This is what it looked like after my masking tape pulled up large portions of the blue.


So on the third try, I was finally able to keep the blue on the model instead of the tape. These shots show the RLM 02 in place. I tried to preshade a little using the RLM 71, crudely I might add. I probably should have stopped and redone the shading because it wasn't going throught the brush very well, but I figured most of it won't be seen anyway.
I actually now have the 71 complete, but haven't photographed that yet.


Now I have to either repair the starboard gun or replace them both since I broke it during the masking. The flared ends of the kit guns don't look right to me, maybe I can replace them with some plastic tubing? We'll see.
Thanks for looking!
Grifter
_VISITCOMMUNITY
North Carolina, United States
Joined: November 17, 2002
KitMaker: 608 posts
AeroScale: 55 posts
Posted: Friday, April 11, 2008 - 05:41 AM UTC
I've finally gotten the camo finished on the ole 109. I got the gloss on yesterday, and it's curing now. The shading ended up showing through just right for my taste, I like it a little subdued.
I ended up repairing the starboard wing gun instead of replacing them, I couldn't find anything in my stuff that was the appropriate size and would look better than the kit parts.
Next up is mine and everyone's favorite, canopy masking! Next time I'll try masking and attaching before I pain the fuselage like most of y'all do. I just dread it so much that I put it off until I can't anymore.
Anyway, I did my best to replicate the camo patterns and I think I got reasonably close, good enough for this build at least.
Thanks for looking.


 _GOTOTOP