_GOTOBOTTOM
World War II: Germany
Aircraft of Germany in WWII.
Hosted by Rowan Baylis
Eduard Fw-190 A8 (Black 9)
thehannaman
_VISITCOMMUNITY
New York, United States
Joined: April 04, 2006
KitMaker: 279 posts
AeroScale: 194 posts
Posted: Saturday, February 09, 2008 - 02:51 AM UTC
Hello, all

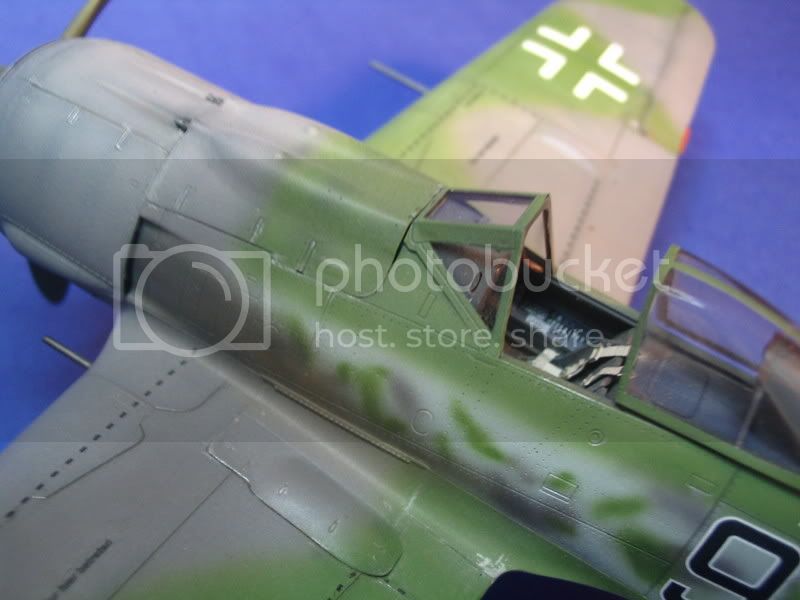
I completed this kit about two months ago and am finally getting around to posting. This is the VERY SWEET Eduard Fw190A8 in all of it's p/e-laden, accurate as can be, glory. I really enjoyed building this kit. There are fit issues, no doubt. However, I found that as long as I took my time and showed this kit the respect it deserved, everything worked itself out. One mark against the kit is that if you want to close it up the way I did, you have to do some extra work to get everything to button down properly, especially in the cowl and nose gun panel area.

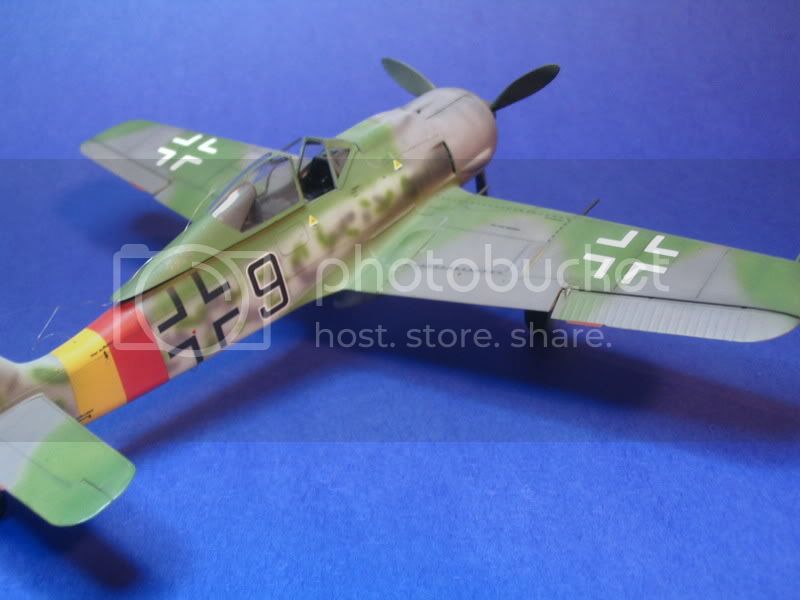
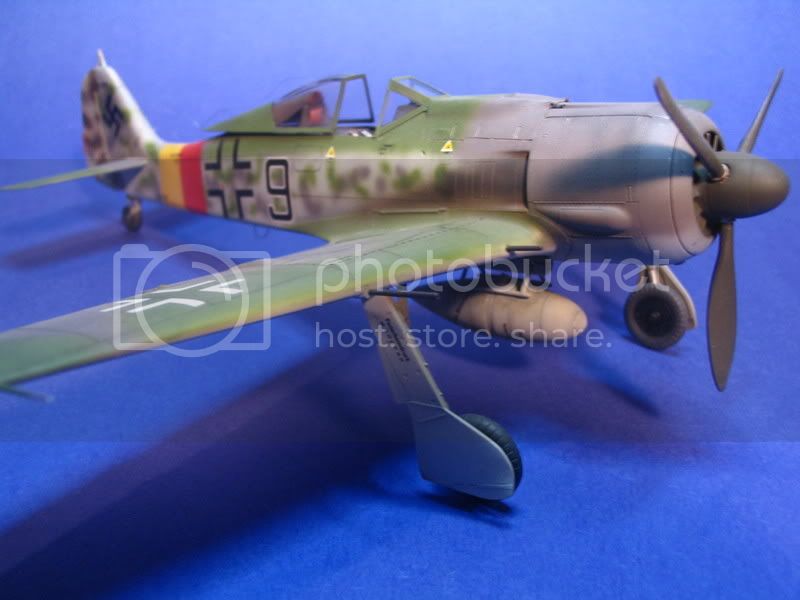
I used the kit decals which represent black 9 of JG 301 in May of '45. (Some folks think that this should, in fact, be red 9. I don't know enough about the plane to want to hunt down two acceptable red "9's," and I preferred the black numbers anyhow.) THis a/c interested me because it has a replacement rudder (i dig replacement panels/parts on wartime a/c), and a blown canopy, which is rare on A-8's. THis too could be a replacement. Other sources think that the entire cowling my be a replacement parts as well since it isn't mottled.

I drilled out the barrels and exhausts and painted the RDB on the fuse (I hate decaling these.) What do you folks honestly think about the aerial wire. I wanted something that looked metalic and sort of kinked like steel wire. I used invisible mending thread that I "curled" with tweezers the way you would ribbon with a pair of scissors. I'm not sure if I like the results.

All comments and criticisms welcome, and thanks for looking.


SGTJKJ
#041
_VISITCOMMUNITY
Kobenhavn, Denmark
Joined: July 20, 2006
KitMaker: 10,069 posts
AeroScale: 3,788 posts
Posted: Sunday, February 10, 2008 - 01:32 PM UTC
Great build, Justen.

I have this kit in my stash and can't wait to get started. I really did a good job on this one. I hope I will be able to do this kit justice as well.

Thanks for sharing
_H_Dori
_VISITCOMMUNITY
England - East Anglia, United Kingdom
Joined: November 09, 2006
KitMaker: 295 posts
AeroScale: 276 posts
Posted: Sunday, February 10, 2008 - 03:27 PM UTC
Great!! I've recently made a start at this kit so it's really good to see what you've done with your version. The paints come out ever so well.

I'm not sure on the aerial wire myself, I don't really know enough about the way they hung if the tension spring wasn't on the a/c. I was under the impression that they hung to one side of the fuselage and made quite a noise

H
TedMamere
_VISITCOMMUNITY
Moselle, France
Joined: May 15, 2005
KitMaker: 5,653 posts
AeroScale: 4,347 posts
Posted: Sunday, February 10, 2008 - 06:15 PM UTC
Hi Justen!

Great work! Especially since you decided to build it all closed which is more difficult than the contrary on this model. Any pictures of the build? Let's say to submit it as a feature for Aeroscale?

Jean-Luc
propwash
_VISITCOMMUNITY
Charente, France
Joined: July 06, 2007
KitMaker: 289 posts
AeroScale: 231 posts
Posted: Sunday, February 10, 2008 - 06:45 PM UTC
Great job on the camo scheme. I would never even attempt anything like that right now................Also like your chosen insignia.
Emeritus
_VISITCOMMUNITY
Uusimaa, Finland
Joined: March 30, 2004
KitMaker: 2,845 posts
AeroScale: 1,564 posts
Posted: Sunday, February 10, 2008 - 08:08 PM UTC
Great-looking model.
Looks like pre-shading on it, or am I mistaken?
I also got this kit in my stash waiting to be built.

About the antenna wire. I don't know how much exactly did the wire droop, but you can't go much wrong if you use the same lenght of wire that would go between the canopy and the tail mast if the canopy was closed. As there was now mechanism to keep the wire tight when the canopy opened, the droopiness is directly related to the position of the canopy.
Canopy closed --> tight wire, canopy open --> drooping wire.

If you don't mind some slight nit-picking, it seems to me you have used a regular type canopy with the headrest structure of the later bulged canopy (which had no tensioning mechanism, resulting in a drooping antenna wire when opened)
thehannaman
_VISITCOMMUNITY
New York, United States
Joined: April 04, 2006
KitMaker: 279 posts
AeroScale: 194 posts
Posted: Monday, February 11, 2008 - 04:10 AM UTC
Thanks for all of the great complements guys! It means a lot.

Jean Luc, message inbound! thanks!

Eetu, Thanks for the input. Believe it or not, this is the blown (bulged) canopy. The angles that I took the photo at are deceptive. I'll take a full broad-side shot and post.

Thanks again guys!
Emeritus
_VISITCOMMUNITY
Uusimaa, Finland
Joined: March 30, 2004
KitMaker: 2,845 posts
AeroScale: 1,564 posts
Posted: Monday, February 11, 2008 - 11:16 PM UTC
Oh, sorry. My bad on the canopy.
ludovik
_VISITCOMMUNITY
Jihormoravsky Kraj, Czech Republic
Joined: February 14, 2008
KitMaker: 10 posts
AeroScale: 9 posts
Posted: Wednesday, February 13, 2008 - 05:23 PM UTC
Hello,
very nice work, but I have a few notes. I quite disagree with Eduard's interpretation of colours as well as mottling. Moreover, even if the decals from Aviprint are very nice, the crosses have bad dimensions and thickness. I would also say that the crosses on the undersurfaces should be the simplified black outline version.....

Here is my interpretation of "Black 9" (actually I opted "Red 9")....I tried to follow one known photo of this bird published e.g. in Squadron Walk Arround No. 22

http://modelforum.upce.cz/forum/viewtopic.php?f=6&t=14466&p=237868&hilit=%C4%8Cerven%C3%A1+9#p237868

 _GOTOTOP