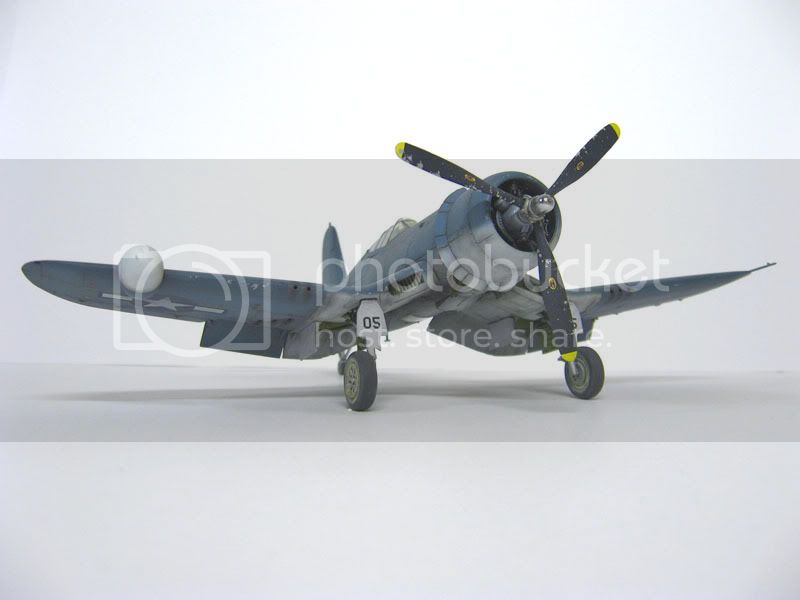
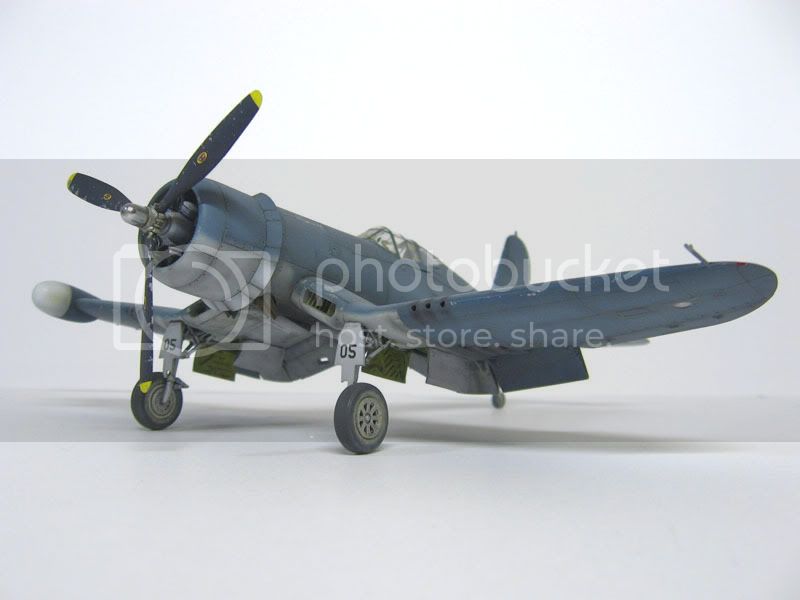
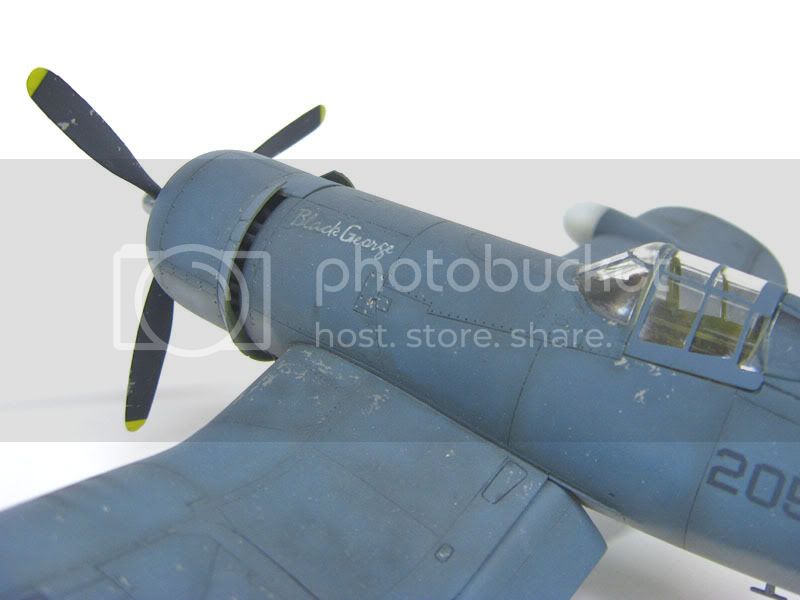
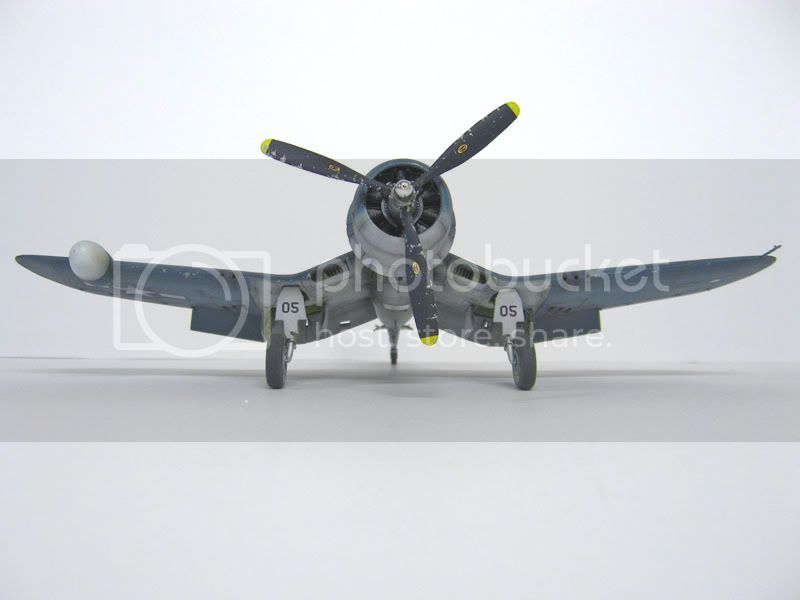
Here's my bent wing bird that I finished last year. It's one of my favorites and I thought I'd share some photos I took recently with my still relatively new camera.
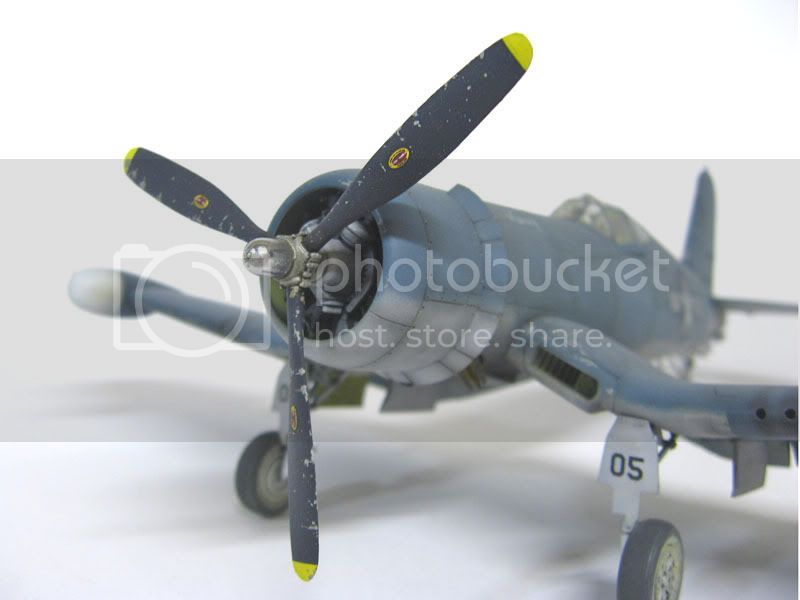
It is 100% OOB. My first OOB in a looooooong time. I must recommend everyone build an OOB every now and then just for fun. It's so quick and easy. At least with a marvelous kit like this it is. The decals are also from the kit and the paint is Tamiya. Well except for the propeller boss. This was sprayed Alcad II chrome. And chrome it really is. She went together in about half a week and I spent most of that time airbrushing the finish. I did forget to fill in the step in the starboard flap but I didn't know this was incorrect until later. Guess I'll have to build another.
This is the closest to bling you will find on my "whistling death".
And my favorite angle of any Corsair.
Thanks for looking.
-Matt
Hosted by Rowan Baylis
Tamiya 1/48 F4U-2 "Black George"
f1matt
Manitoba, Canada
Joined: August 13, 2006
KitMaker: 1,021 posts
AeroScale: 184 posts
Joined: August 13, 2006
KitMaker: 1,021 posts
AeroScale: 184 posts
Posted: Monday, February 18, 2008 - 09:08 AM UTC
WingTzun
Illinois, United States
Joined: February 01, 2006
KitMaker: 853 posts
AeroScale: 137 posts
Joined: February 01, 2006
KitMaker: 853 posts
AeroScale: 137 posts
Posted: Monday, February 18, 2008 - 09:15 AM UTC
Very Nice Matt. I really like your weathering
Posted: Monday, February 18, 2008 - 01:03 PM UTC
Hi Matthew!
Your model looks fantastic and I also like the weathering very much. The Alcad propeller boss is the icing on the cake...
I see on your profile page that you've never submitted a feature for Aeroscale. Maybe it's time to change this?
Jean-Luc
Your model looks fantastic and I also like the weathering very much. The Alcad propeller boss is the icing on the cake...
I see on your profile page that you've never submitted a feature for Aeroscale. Maybe it's time to change this?
Jean-Luc
Posted: Monday, February 18, 2008 - 04:36 PM UTC
Looks great, Matthew. As the rest of the guys I really like the faded and chipped weathering. The chipping is subtle and realistic without being overdone.
Thanks for sharing
Thanks for sharing
propwash
Charente, France
Joined: July 06, 2007
KitMaker: 289 posts
AeroScale: 231 posts
Joined: July 06, 2007
KitMaker: 289 posts
AeroScale: 231 posts
Posted: Wednesday, February 20, 2008 - 05:41 AM UTC
That's a great-looking model and the weathering very impressive
f1matt
Manitoba, Canada
Joined: August 13, 2006
KitMaker: 1,021 posts
AeroScale: 184 posts
Joined: August 13, 2006
KitMaker: 1,021 posts
AeroScale: 184 posts
Posted: Friday, February 22, 2008 - 04:13 PM UTC
Hey guys. I'm glad you like how Black George turned out. Personally I'm pleased as punch with how she looks. Thanks for all the comments.
To be honest Jean-Luc, I simply never thought of submitting a feature. But I do plan on starting my first Phantom soon so maybe when she's all done I will send one in.
Thanks again guys.
-Matt
To be honest Jean-Luc, I simply never thought of submitting a feature. But I do plan on starting my first Phantom soon so maybe when she's all done I will send one in.
Thanks again guys.
-Matt
Roxter
Rigas, Latvia
Joined: July 04, 2007
KitMaker: 268 posts
AeroScale: 245 posts
Joined: July 04, 2007
KitMaker: 268 posts
AeroScale: 245 posts
Posted: Saturday, February 23, 2008 - 01:03 AM UTC
Gorgeous Corsair! I love that subtle weathering!
Phantom2
Östergötland, Sweden
Joined: April 18, 2006
KitMaker: 708 posts
AeroScale: 678 posts
Joined: April 18, 2006
KitMaker: 708 posts
AeroScale: 678 posts
Posted: Saturday, February 23, 2008 - 03:35 AM UTC
Hi Matt!
That´s one of the best weathering jobs I have ever seen!
Subtle but effective, less is more!
Please, write a feature or a "How to" article on how you achived the weathering!
Let us see how you build your Phantom, I´m sure It will be just as good as the Corsair!
Cheers!
Stefan E
That´s one of the best weathering jobs I have ever seen!
Subtle but effective, less is more!
Please, write a feature or a "How to" article on how you achived the weathering!
Let us see how you build your Phantom, I´m sure It will be just as good as the Corsair!
Cheers!
Stefan E
f1matt
Manitoba, Canada
Joined: August 13, 2006
KitMaker: 1,021 posts
AeroScale: 184 posts
Joined: August 13, 2006
KitMaker: 1,021 posts
AeroScale: 184 posts
Posted: Thursday, February 28, 2008 - 04:46 PM UTC
Hello Roxter. Stefan. I'm glad you guys like the weathering. It's one of my favorite parts of building any model. When I start my F-4 I will be sure to show the entire build start to finish in a blog. I'll try to show step by step the painting and weathering.
Happy modeling
-Matt
Happy modeling
-Matt
glamdring
Joined: May 21, 2007
KitMaker: 77 posts
AeroScale: 76 posts
KitMaker: 77 posts
AeroScale: 76 posts
Posted: Monday, March 03, 2008 - 04:14 PM UTC
Your corsair looks great Matt! I am sitting here amazed at the work you accomplished in half a week. How do you people do that?
Just out of curiousity, what is the relatively new camera?
Allen
Just out of curiousity, what is the relatively new camera?
Allen
f1matt
Manitoba, Canada
Joined: August 13, 2006
KitMaker: 1,021 posts
AeroScale: 184 posts
Joined: August 13, 2006
KitMaker: 1,021 posts
AeroScale: 184 posts
Posted: Tuesday, March 04, 2008 - 06:54 AM UTC
Thanks Allen. The kit was an OOB build so the kit was built in less then two days. It goes together so easily. Once the paint on the cockpit was dry the kit went together in hours. The only tricky part was getting the flaps aligned but it wasn't too bad. The rest was painting. And when you only have two colours it doesn't take very long even with layers of post shading. The camera was one I picked up because mine had just died and it was on sale. A Cannon A550. Nice little camera. I can't really adjust the depth of field but with the macro setting it takes decent pictures close up. If I can take some better pictures with it (I'm still learning) I will send in a photo feature.
-Matt
-Matt
skyhawk
Florida, United States
Joined: June 03, 2003
KitMaker: 1,095 posts
AeroScale: 52 posts
Joined: June 03, 2003
KitMaker: 1,095 posts
AeroScale: 52 posts
Posted: Saturday, September 27, 2008 - 05:55 AM UTC
Great looking corsair Matt. Out of curiosity, what reference did you find the info on the chrome prop boss?
Also, how did you do the chipping on your blades?
Ive got one of these in the project pile..."Midnight Cocktail". Seeing yours makes me want to pull her out and finish her up.
Andy
Also, how did you do the chipping on your blades?
Ive got one of these in the project pile..."Midnight Cocktail". Seeing yours makes me want to pull her out and finish her up.
Andy
f1matt
Manitoba, Canada
Joined: August 13, 2006
KitMaker: 1,021 posts
AeroScale: 184 posts
Joined: August 13, 2006
KitMaker: 1,021 posts
AeroScale: 184 posts
Posted: Saturday, September 27, 2008 - 07:06 PM UTC
Thanks Andy. The prop boss was either supposed to be like that according the boxart or it was just a personal choice. It was built a while ago and I can't seem to remember.
The chipping on the blades was done with a fine brush and a small bottle of Testors silver. I find it has the perfect consistency for that kind of work. I made sure to look at a reference photo when I did the chipping. This helped me keep it looking accurate. Not only in where the chips should go but also in what size and shape.
Midnight Cocktail. Great name. Makes me want to build another myself. I do need an "A" model for my collection. Of course I should probably finish my P-47. And my Gundam. And the Panther "F" I just bought.
Matt
chukw1
California, United States
Joined: November 28, 2007
KitMaker: 817 posts
AeroScale: 729 posts
Joined: November 28, 2007
KitMaker: 817 posts
AeroScale: 729 posts
Posted: Sunday, September 28, 2008 - 05:43 AM UTC
She's a beauty, Matt- excellent work! The chips are beautiful- and the overall effect is superb. Cheers!
chuk
chuk
f1matt
Manitoba, Canada
Joined: August 13, 2006
KitMaker: 1,021 posts
AeroScale: 184 posts
Joined: August 13, 2006
KitMaker: 1,021 posts
AeroScale: 184 posts
Posted: Sunday, September 28, 2008 - 07:21 PM UTC
Thanks Chuck. Means a lot coming from you. Give Abe and Lil' Chuck my best.
Matt
Matt
CaptainA
Indiana, United States
Joined: May 14, 2007
KitMaker: 3,117 posts
AeroScale: 2,270 posts
Joined: May 14, 2007
KitMaker: 3,117 posts
AeroScale: 2,270 posts
Posted: Tuesday, September 30, 2008 - 10:19 AM UTC
I agree with the rest of the gang. Your build is well worth emulating. And we all want to learn your secrets.
f1matt
Manitoba, Canada
Joined: August 13, 2006
KitMaker: 1,021 posts
AeroScale: 184 posts
Joined: August 13, 2006
KitMaker: 1,021 posts
AeroScale: 184 posts
Posted: Tuesday, September 30, 2008 - 04:53 PM UTC
Thank you very much Captain. Well nothing to note as far as the construction side is concerned. That's just Tamiya quality. Simply superb.
The painting was applied in my now usual manner, although I'm trying to tweak it always. Didn't bother with a preshade on this one. No point since it will be completely covered by the layers of paint to come.
The blue went on like this. A base coat to get even coverage. Than I mix some dark paint in with the blue. This is sprayed on mostly over the panel lines. Along with anywhere you're references show to be especially dirty. Also spray it lightly over the aircraft. Well anywhere blue. But don't spray an even coat over the whole thing. Make it splotchy or mottled. Random. This breaks up the monotone colour. Represents light amounts of dirt and grime. You can also spray a darker shade in recessed areas that will have shadows.
Same thing with the lighter shade. Only don't go over the panel lines too much. And focus on areas that receive sunlight. The spine of the fuselage and tops of wings. This could almost be considered similar to the modulation technique. And again. Spray it in a patchy fashion. Not one even coat. Otherwise there will be no variety in the finish. And you can do as many layers as you want. I usually do two highlight shades and two darker shades for each colour. And if there is too much contrast you can just spray on a thin layer of the base coat and get your finish back under control.
That's about it Carl. Of course I'd appreciate it if you'd keep these secrets to yourself.
What do you mean everyone can see this?
Matt
The painting was applied in my now usual manner, although I'm trying to tweak it always. Didn't bother with a preshade on this one. No point since it will be completely covered by the layers of paint to come.
The blue went on like this. A base coat to get even coverage. Than I mix some dark paint in with the blue. This is sprayed on mostly over the panel lines. Along with anywhere you're references show to be especially dirty. Also spray it lightly over the aircraft. Well anywhere blue. But don't spray an even coat over the whole thing. Make it splotchy or mottled. Random. This breaks up the monotone colour. Represents light amounts of dirt and grime. You can also spray a darker shade in recessed areas that will have shadows.
Same thing with the lighter shade. Only don't go over the panel lines too much. And focus on areas that receive sunlight. The spine of the fuselage and tops of wings. This could almost be considered similar to the modulation technique. And again. Spray it in a patchy fashion. Not one even coat. Otherwise there will be no variety in the finish. And you can do as many layers as you want. I usually do two highlight shades and two darker shades for each colour. And if there is too much contrast you can just spray on a thin layer of the base coat and get your finish back under control.
That's about it Carl. Of course I'd appreciate it if you'd keep these secrets to yourself.
What do you mean everyone can see this?
Matt