_GOTOBOTTOM
Pre-Flight Check
Constructive critique of your finished or in-progress photos.
F-4EJ in Progress
shonen_red
_VISITCOMMUNITY
Metro Manila, Philippines
Joined: February 20, 2003
KitMaker: 5,762 posts
AeroScale: 543 posts
Posted: Thursday, March 06, 2008 - 03:11 AM UTC
Yep, I'm also into Phantom, but only this one:


At first I want this one to be a quick build, but the kit desires for more.


Started with the cockpit ofcourse. Very well detailed, except ofcourse the sidewalls, which suck. I was contemplating on grabbing Aires' E detail set just for the side walls, but nevermind. The fig will be blocking it anyway.

Oh yeah, the stock MB Mk. 7 seats lack in detail. I was thinking on going with the resin or just modify it since I'll be adding the fig inside? Need inputs.


The inside of the intakes had a nasty opening. Filled with milliput.


Modified the bland exhaust. On the left is the bland exhaust, on the right is the modded one.


Now both have been modded


The body, dry fitted. Most of the parts have received rescribing.

Comments and criticism welcome.
RedwingNev
_VISITCOMMUNITY
England - East Midlands, United Kingdom
Joined: February 07, 2004
KitMaker: 911 posts
AeroScale: 415 posts
Posted: Thursday, March 06, 2008 - 06:47 PM UTC
I have this exact same kit, which I was thinking of building for the F-4 GB, so I shall be following this one with intrest.

As for the seats, if you are adding the crew, I would use the kit seats with whatever detail added you want. I you splash out for resin seats, you'll have to scrape away most of the detail to get the figures in, so waste of $$$ IMO
shonen_red
_VISITCOMMUNITY
Metro Manila, Philippines
Joined: February 20, 2003
KitMaker: 5,762 posts
AeroScale: 543 posts
Posted: Saturday, March 08, 2008 - 03:32 AM UTC
So the madness continues....


Fuel tanks. I just read in the manual that you can only put either the centerline tank or the two others. Oh well....


I made something to the wing. Oh yeah, several holes for the fuel tanks have been filled since they won't be there.


Ohkay... I've spiced up the landing gear bay. My question now is why? It won't be seen anyway.


Wires added to the front landing gear.


The two pilots. The air hose will be made from scratch. Question: where do I attach the other end of the hose?


Oh yeah, be sure to fill this up. A small part of it will be visible when the cockpit is attached.


You can barely see it there.

Fire away!
shonen_red
_VISITCOMMUNITY
Metro Manila, Philippines
Joined: February 20, 2003
KitMaker: 5,762 posts
AeroScale: 543 posts
Posted: Saturday, March 08, 2008 - 09:47 PM UTC
More madness:


Milliput sanded to smooth finish. Oh yeah, weight the nose!!! I'm not sure if the sprues would hold it down, since I don't have other stuff to put in it. (No coins, they are more useful for buying stuffs). Hopefully this ain't a tail sitter on it's own might. Else I'll be really pissed...


Remember those small details on the fuselage that's not barely there? Let's see if by painting they will pop out.


A few more hours of work and here she is.


Another shot. I guess I'll leave it for a day for the glue to harden before I scribe it.


Oh yeah, the nose and the tail are not yet glued to position. I'm thinking of adding a gimmick to the nose if I ever get the resources to do so.


Closeup.


The intake. Question: How do I fill it in? I've already masked the inside for the lip but how do I cover the rest? Note also the gap on the rear of the front pilot. I wish putty can solve that.

Fire away!

RedwingNev
_VISITCOMMUNITY
England - East Midlands, United Kingdom
Joined: February 07, 2004
KitMaker: 911 posts
AeroScale: 415 posts
Posted: Saturday, March 08, 2008 - 10:48 PM UTC

Quoted Text


Fuel tanks. I just read in the manual that you can only put either the centerline tank or the two others. Oh well....

The two pilots. The air hose will be made from scratch. Question: where do I attach the other end of the hose?


By the manual do you mean the kit instruction? The 3 fuel tanks is one of the classic features of the Phantom. I'll try and post a pic tonight of a blue 8 Hiko-Tai F-4 with all 3 tanks.

As for the air hose, from memory is goes into the right hand panel, again I'll check when I get home tonight.

EDIT: A quick search on airliners.net shows that normally its either centreline *or* wing tanks, but they can be found with both, see here

http://www.airliners.net/photo/Japan---Air/Mitsubishi-F-4EJ-Phantom/0981879/M/
shonen_red
_VISITCOMMUNITY
Metro Manila, Philippines
Joined: February 20, 2003
KitMaker: 5,762 posts
AeroScale: 543 posts
Posted: Sunday, March 09, 2008 - 01:10 AM UTC

Quoted Text

By the manual do you mean the kit instruction? The 3 fuel tanks is one of the classic features of the Phantom. I'll try and post a pic tonight of a blue 8 Hiko-Tai F-4 with all 3 tanks.

As for the air hose, from memory is goes into the right hand panel, again I'll check when I get home tonight.

EDIT: A quick search on airliners.net shows that normally its either centreline *or* wing tanks, but they can be found with both, see here

http://www.airliners.net/photo/Japan---Air/Mitsubishi-F-4EJ-Phantom/0981879/M/


Thanks thanks! It's indicated in the manual to put one or the other. Anyways, the two side tanks have raised panel lines (including the pylons). I'll skip it anyhow.
RedwingNev
_VISITCOMMUNITY
England - East Midlands, United Kingdom
Joined: February 07, 2004
KitMaker: 911 posts
AeroScale: 415 posts
Posted: Sunday, March 09, 2008 - 08:30 AM UTC
OK - going through my folder of F-4 photos, I've found a couple with all 3 tanks, but it does seem the exception in Japanese service.

As for the oxygen hose, I can't find anything definitive, but I have a few photos with a hose coming out the RHS panel, level with the seat. It's not the hose for the anti-G suit as that is definately on the left.
shonen_red
_VISITCOMMUNITY
Metro Manila, Philippines
Joined: February 20, 2003
KitMaker: 5,762 posts
AeroScale: 543 posts
Posted: Monday, March 10, 2008 - 01:59 AM UTC
Here we go!!!


Got screwed? Cause I did . Added three more screws on the nosetip so it won't get down on it's tail. Question is, will the front landing gear hold? Hehehe...


The pilots waiting for their seats. Anyone have good shots of the MB Mk 7 seats?


Oh yeah, the small dimple on the inside of the burner can had been removed/puttied.


Rear landing gears. I wish to add another thin wire but it looks thick at that scale, even though it's hairline thick!


Another shot. I'm starting to love wiring


Remember the large gap? Filled with styrene strips and wired the rear. Not sure if it's accurate though.


Nose gun. Notice the small styrene strips. Instead of puttying the gap, styrene works... and gives a bit more detail.

As for the body?


Scribed the left hand side of the plane. Tomorrow I'll do the right hand side also those landing gear doors.

Fire away!
shonen_red
_VISITCOMMUNITY
Metro Manila, Philippines
Joined: February 20, 2003
KitMaker: 5,762 posts
AeroScale: 543 posts
Posted: Wednesday, March 12, 2008 - 02:13 AM UTC
Just a bit of minor update


Rescribed 90% of the kit. After which I'll be sanding the putty away especially on the gaps.


Test fit of the Mk 7 seats with crew on the plane. Note the head direction and the arm of the RIO.


Me thinks the RIO panel needs more wires.

Oh yeah, build may progress longer than expected. A new toy just arrived:


mother
_VISITCOMMUNITY
New York, United States
Joined: January 29, 2004
KitMaker: 3,836 posts
AeroScale: 1,036 posts
Posted: Wednesday, March 12, 2008 - 03:30 PM UTC
Hey Ralph,
The Phantom is looking great, nice work. I’ve built a few Phantoms over the years and pick up a few tips that I’d like to share.

First, those nasty intakes. Only real solution is to get resin intake covers, or work from the inside before closing up the fuselage. What I did was cut the intakes inners from the fuselage, then install the outer sections and putty and sand. Them replaced the cut section using evergreen plastic card.

Exhaust nozzles, what I did first was to sand off the back side of the blades and screens. This gave it the look as if it went completely through. And for the nozzle details I used .005 brass metal sheet cut to size and glued in. you can also use those aluminum pop cans which work great. I also scribed the outer detail feathers, it gave a look as if it wasn’t just a molded on bumps.

Ejection seats, resin ones are worth it, but if your using figures then go with the kit supplied one and spice them up. As to the hoses, well I do know where they go on US Air Force and Navy/Marine Phantoms, but I can’t say for sure on yours and I’d hate to give the wrong info. Here are a few site that may help you…

Ejection site 1

Ejection site 2

Ejection site 3

Ejection site 4

Ejection site 5

Panel scribing…what a job right! Anyhow it looks great, what are you using to scribe with. I too had my fair share of scribing, when I’m finished I’ll go over it with 1000 grit and light swipe across the line with Ten-X to smooth out the line and to clean them out.

As for the rest of the detail, it all looks good and can't wait for the next update.

Joe
shonen_red
_VISITCOMMUNITY
Metro Manila, Philippines
Joined: February 20, 2003
KitMaker: 5,762 posts
AeroScale: 543 posts
Posted: Thursday, April 03, 2008 - 03:13 AM UTC
Progress at last!

Mix work and high speed internet connection with PS3 and Call of Duty 4, you got a slow builder.

Internet was down a few hours ago so I was able to work on the EJ again.


Here she is now, ready for priming. Note the rescribed scribed panel lines.


Fig and seat placed in position (more about the seat later).


Top view


Seat detail. I didn't put very much detail since only the topmost part could be seen.


The fig with the scratchbuilt hose (waiting for CA glue to dry).

Fire away!
shonen_red
_VISITCOMMUNITY
Metro Manila, Philippines
Joined: February 20, 2003
KitMaker: 5,762 posts
AeroScale: 543 posts
Posted: Thursday, April 03, 2008 - 03:19 AM UTC
Hi Joe! Been a while, sorry I was busy. I'd follow your advice, but instead of using grit 1k, I use 1.5k (I'm a heavy sander). Quick question: What's Ten-X?
mother
_VISITCOMMUNITY
New York, United States
Joined: January 29, 2004
KitMaker: 3,836 posts
AeroScale: 1,036 posts
Posted: Thursday, April 03, 2008 - 06:18 AM UTC
Ralph,
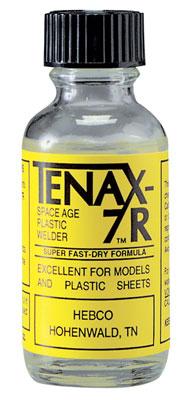
Tenax-7r is a liquid cement, dries fast and smooth. It works great for build kits where super glue is hard to get into. Pretty much like Tamiya and Testors liquid glues.


Joe
shonen_red
_VISITCOMMUNITY
Metro Manila, Philippines
Joined: February 20, 2003
KitMaker: 5,762 posts
AeroScale: 543 posts
Posted: Friday, April 04, 2008 - 04:02 AM UTC
Joe, thanks for the info. Unfortunately we don't have that product here. I may take a bottle or two when I go overseas again in the near future. Is it better than Tamiya extra thin cement?
Tin_Can
_VISITCOMMUNITY
Florida, United States
Joined: January 26, 2002
KitMaker: 1,560 posts
AeroScale: 750 posts
Posted: Friday, April 04, 2008 - 04:06 AM UTC
I've used Tenax and liked it.

Ralph, nice progress so far.
 _GOTOTOP