_GOTOBOTTOM
World War II
Discuss WWII and the era directly before and after the war from 1935-1949.
Hosted by Rowan Baylis
Classic Airframes Bf 109A
Moeggo
_VISITCOMMUNITY
Wellington, New Zealand
Joined: March 15, 2005
KitMaker: 169 posts
AeroScale: 132 posts
Posted: Thursday, March 20, 2008 - 09:57 AM UTC
I currenty building this kit for a Group Build on another site... (ARC 109 GB)

Its my first time building a Limited Run kit... So it should be interesting!


A little bit about the kit - it contains 35 grey plastic parts and 22 tanish resin parts, PE fret and Clear injectton canopy in 3 parts. The decal sheet is beautiful and contains 6 aircraft options + two bouns markings that are printed on the decal sheet. The detail on the resin and plastic parts are very good!

onto some pic's!

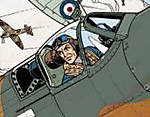
Cockpit is made for the resin and PE parts with beautiful clear detail. The outcome is wonderful! This has to be one of my best cockpits so far!


vanize
_VISITCOMMUNITY
Texas, United States
Joined: January 30, 2006
KitMaker: 1,954 posts
AeroScale: 1,163 posts
Posted: Thursday, March 20, 2008 - 10:08 AM UTC
I did an extended in-box review of this kit which may help you a little:

http://armorama.com/review/1403
Moeggo
_VISITCOMMUNITY
Wellington, New Zealand
Joined: March 15, 2005
KitMaker: 169 posts
AeroScale: 132 posts
Posted: Thursday, March 20, 2008 - 10:09 AM UTC
The cockpit was painted with Tamiya colours and Model Masters RLM 02.

The fuselage needed a little bit of clean up around some of the edges and there's no locating pins to aid the gluing of the halfs together, so I took my time in this process.


After joining the two halfs together I had to fill a couple of little areas but the fit was great. The resin part for the upper engine cowl was then superglued into place. There are two options of the upper cowl supplied with the kit. And also the cockpit has been fitted too.


Moeggo
_VISITCOMMUNITY
Wellington, New Zealand
Joined: March 15, 2005
KitMaker: 169 posts
AeroScale: 132 posts
Posted: Thursday, March 20, 2008 - 10:15 AM UTC
The wing halfs are next! The kit comes with some nice looking resin wheel wells but they are way to thick to be fitted between the two wing halfs. After sanding them both down, the inner part of the upper wing had to be sanded too, once done they both sandwiche very nicely between the wing halfs...


Thats it for the moment!
Yeti123
_VISITCOMMUNITY
Michigan, United States
Joined: February 11, 2008
KitMaker: 311 posts
AeroScale: 278 posts
Posted: Friday, March 21, 2008 - 03:45 PM UTC
David:
Looks really good so far. I have this kit in my stash and I am glad to see how well it builds up. Have you decided on the paint scheme yet? Have you looked at the photos that have been posted in this forum? They have some great Condor Legion shots that might help

Vance:
Thanks for the link on the review. It was a big help
Holdfast
Staff MemberPresident
IPMS-UK KITMAKER BRANCH
#056
_VISITCOMMUNITY
England - South West, United Kingdom
Joined: September 30, 2002
KitMaker: 8,581 posts
AeroScale: 4,913 posts
Posted: Saturday, March 22, 2008 - 12:01 AM UTC
Looking good, I like the idea of adding the seat belts before painting the cockpit, then painting the belts. This is one way to prevent paint flaking off the belts when you bend them to shape, nice one

Mal
 _GOTOTOP