Hello Boys and Girls,
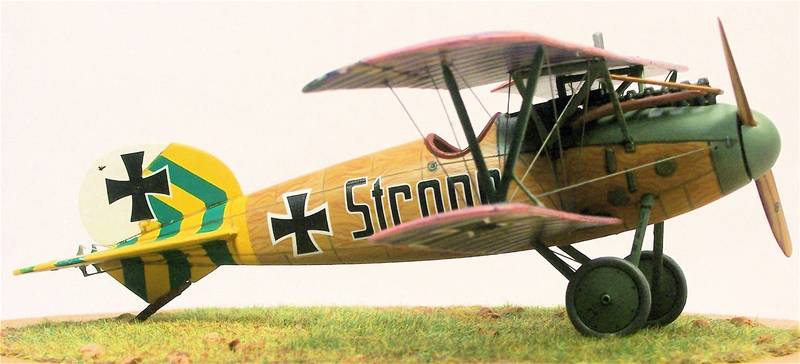
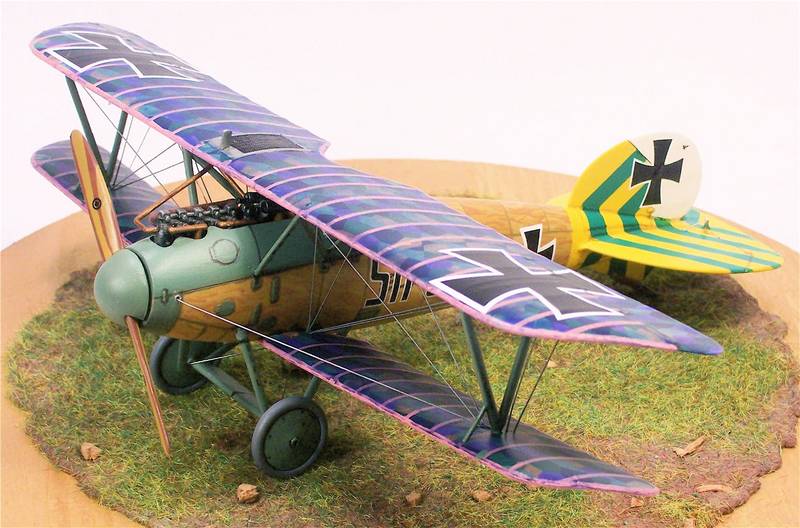
Just thought I'd share my latest Albatros. I've been working on toning down the panel lines and finishing the kits with a flat finish. This one is out of the box as well with monofilament and guitar string rigging. I used Model Master and Humbrol paints and Techmod lozenge and tapes.
I glazed the lozenge with several coats of Future floor finish tinted by Ultramarine Blue and Burnt Sienna which is a deep reddish brown. For the wood grain I used a base coat of Humbrol #63 and over painted that two times with lighter shades of #63 adding #74 in increasing amounts. The final touch was a darker shade of #63 applied using #107. It took a bit of time but was comparable to applying decals and the four shades works pretty good as opposed to just two. I think I will use the Spada decals in the future along with at least two shades of the base coat.
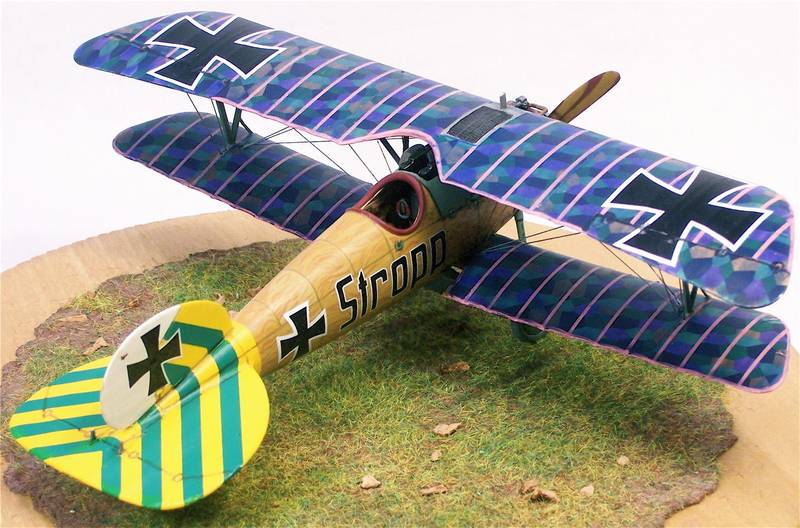
As always your comments and critique are welcome, thats how I learn.
Thanks, Dwayne
Early Aviation
Discuss World War I and the early years of aviation thru 1934.
Hosted by Jim Starkweather
Jasta 46 Stropp
Dwaynewilly
New York, United States
Joined: December 15, 2006
KitMaker: 365 posts
AeroScale: 344 posts
Joined: December 15, 2006
KitMaker: 365 posts
AeroScale: 344 posts
Posted: Tuesday, April 08, 2008 - 12:09 AM UTC
modelguy2
Ohio, United States
Joined: March 09, 2002
KitMaker: 818 posts
AeroScale: 137 posts
Joined: March 09, 2002
KitMaker: 818 posts
AeroScale: 137 posts
Posted: Tuesday, April 08, 2008 - 04:47 AM UTC
Beautiful job Dwayne
CaptainA
Indiana, United States
Joined: May 14, 2007
KitMaker: 3,117 posts
AeroScale: 2,270 posts
Joined: May 14, 2007
KitMaker: 3,117 posts
AeroScale: 2,270 posts
Posted: Tuesday, April 08, 2008 - 09:31 AM UTC
Very, very nice. No negative comments. Nice decal finishing. Great looking wood grain. Nice clean job with the bracing wires. Will we be seeing this in the MOM?
JackFlash
Colorado, United States
Joined: January 25, 2004
KitMaker: 11,669 posts
AeroScale: 11,011 posts
Joined: January 25, 2004
KitMaker: 11,669 posts
AeroScale: 11,011 posts
Posted: Tuesday, April 08, 2008 - 10:20 AM UTC
Excellent job on one of my favorite schemes. I have some additional information for you if interested. The Lozenge wings that it weas sent to America with, were from at least three different aircraft. Originally the wings were two colour uppersurfaces (dk grn and mauve coloured wings.) Brought down on about April 3 1918. Thr "RF" on the nose meant "Republique Francaise" and was part of a Liberty loan bond drive display. The spinner and wheel covers were yellow when captured.
The scheme you have done fits the restored version from the NASM shops before some dolt over painted the iron crosses on the lower wings to match the May 1918 configuration Balkan crosses.
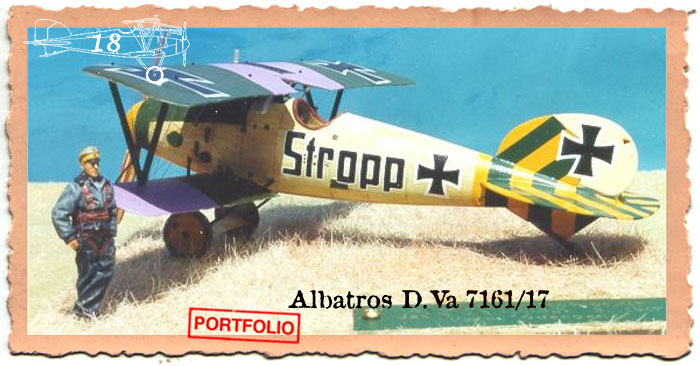
Here is my version from the time it was captured (April 3, 1918.)
The scheme you have done fits the restored version from the NASM shops before some dolt over painted the iron crosses on the lower wings to match the May 1918 configuration Balkan crosses.
Here is my version from the time it was captured (April 3, 1918.)
thegirl
Alberta, Canada
Joined: January 19, 2008
KitMaker: 6,743 posts
AeroScale: 6,151 posts
Joined: January 19, 2008
KitMaker: 6,743 posts
AeroScale: 6,151 posts
Posted: Tuesday, April 08, 2008 - 04:24 PM UTC
wow , i really like your wood effect , how did you do it ? I'm just starting to learn how to do this and any pointers would be wonderful .
Kalt
Mendoza, Argentina
Joined: June 14, 2006
KitMaker: 222 posts
AeroScale: 219 posts
Joined: June 14, 2006
KitMaker: 222 posts
AeroScale: 219 posts
Posted: Tuesday, April 08, 2008 - 07:16 PM UTC
Really nice!! This is the 1:48 Eduard kit?
Dwaynewilly
New York, United States
Joined: December 15, 2006
KitMaker: 365 posts
AeroScale: 344 posts
Joined: December 15, 2006
KitMaker: 365 posts
AeroScale: 344 posts
Posted: Wednesday, April 09, 2008 - 04:59 PM UTC
Thank you to everyone for your comments.
Carl, I'm not sure what you mean by MOM.
Claudio, the kit is the Eduard 1/48 scale Weekend Edition. I used decals from another Eduard kit, number 8110. My eyes are not what they used to be so 1/48 scale it is. The Roden 1/32 scale stuff is lookin mighty sweet right now and I've picked up several and like what I see.
Stephen, always the endless font of information. I should consult you on every build, I'm sure you could throw a twist on just about every aircraft known. I'd love to take a peek at your reference library.
Terri, If you use the colors I mentioned above it isn't that difficult. There are many here who are much better at this than I am, Brad, Stephen, Nico and RAGIII to name just a few. One of the biggest benefits I've received from observing their work is that even though they use different shades of the base color, they never stray too far or too dramatically from it. I think this is the key to trying to replicate the wood grain, a subtle gradation of color. I also don't use black or white to lighten or darken the colors. Using those colors mentioned above and mixing them with the base color brings them into a close harmony. I apply the base and let it dry over night. I then place a few large drops of the base color on some form of palette, either a piece of glass or scrap paper, and place a few more of the lighter color near it. I then mix small amounts together using small amounts of a thinner and start applying it to the panels, a panel at a time. I keep mixing in more when I need it. I attempt to apply this second color to mimic the lines and form found on plywood sheets. Remember that you will be applying more colors so you can be broad with the first variation of the base. I then apply an even lighter color more sparsely to add high lights and then finish the whole process with the darker shade which I use to depict actual grain. This last shade can also be used to mark the gaps in the panels. You have to be careful not to use too dark a variation (Guilty of this myself) of the base for this and a thin brush is necessary, like 0 to a 000. Always try to follow the flow of your previous lines when applying the high lights and low lights. You can try to apply the second, third and fourth coats in the same session or on consecutive sessions. One other thing that I find important is to make sure that the brush you are using is kept moist with the thinning medium you are using. By moist I mean that there is no dry paint accumulating in it. Keep dipping your brush in your thinner or water, removing the excess thinner before loading it with paint, to make sure that when you load it, the paint will flow. Try it and experiment with it and adapt it to make it your own method, and most importantly, have fun! As Stephen would say,"it's only a model"!
JackFlash
Colorado, United States
Joined: January 25, 2004
KitMaker: 11,669 posts
AeroScale: 11,011 posts
Joined: January 25, 2004
KitMaker: 11,669 posts
AeroScale: 11,011 posts
Posted: Wednesday, April 09, 2008 - 08:04 PM UTC
Quoted Text
". . .Stephen, always the endless font of information. I should consult you on every build, I'm sure you could throw a twist on just about every aircraft known. I'd love to take a peek at your reference library. . ."
Your wish is my command.
Click here
CaptainA
Indiana, United States
Joined: May 14, 2007
KitMaker: 3,117 posts
AeroScale: 2,270 posts
Joined: May 14, 2007
KitMaker: 3,117 posts
AeroScale: 2,270 posts
Posted: Thursday, April 10, 2008 - 09:00 AM UTC
MOM=Model of the Month Contest here on Aeroscale
Dwaynewilly
New York, United States
Joined: December 15, 2006
KitMaker: 365 posts
AeroScale: 344 posts
Joined: December 15, 2006
KitMaker: 365 posts
AeroScale: 344 posts
Posted: Thursday, April 10, 2008 - 10:36 AM UTC
Carl,
Are you trying to make me blush? Thank you kindly, as I never thought about it myself. It would be an honor to be considered and I'll just leave it at that. I know there are much better efforts on view here at the website. Just happy to share with you folks and learn from the advice that I've received, all of which has been constructive.
Thanks, Dwayne
JackFlash
Colorado, United States
Joined: January 25, 2004
KitMaker: 11,669 posts
AeroScale: 11,011 posts
Joined: January 25, 2004
KitMaker: 11,669 posts
AeroScale: 11,011 posts
Posted: Friday, February 27, 2009 - 06:18 PM UTC
Here is an artists rendition of Stropp before capture. Like my version.
thegirl
Alberta, Canada
Joined: January 19, 2008
KitMaker: 6,743 posts
AeroScale: 6,151 posts
Joined: January 19, 2008
KitMaker: 6,743 posts
AeroScale: 6,151 posts
Posted: Saturday, February 28, 2009 - 02:05 AM UTC
Who is the artist of this fine prints ?
guitarlute101
West Virginia, United States
Joined: December 18, 2006
KitMaker: 1,121 posts
AeroScale: 1,063 posts
Joined: December 18, 2006
KitMaker: 1,121 posts
AeroScale: 1,063 posts
Posted: Saturday, February 28, 2009 - 02:25 AM UTC
Wow, Dwayne, that is really an excellent build. Every part is eye catching in it's own way. I definitely encourage you to enter it in MOM.
Mark
RAGIII
North Carolina, United States
Joined: June 19, 2007
KitMaker: 604 posts
AeroScale: 600 posts
Joined: June 19, 2007
KitMaker: 604 posts
AeroScale: 600 posts
Posted: Wednesday, March 04, 2009 - 11:27 AM UTC
Dwayne,
Really sharp build! I think you are closer than you admit to being a master of the WOOD Grain EFFECT! WELL DONE!
RAGIII
Really sharp build! I think you are closer than you admit to being a master of the WOOD Grain EFFECT! WELL DONE!
RAGIII
Dwaynewilly
New York, United States
Joined: December 15, 2006
KitMaker: 365 posts
AeroScale: 344 posts
Joined: December 15, 2006
KitMaker: 365 posts
AeroScale: 344 posts
Posted: Thursday, March 05, 2009 - 02:17 PM UTC
Mark, Rick and Stephen,
Thanks fellas, your kind words and encouragement mean a lot, especially when I see what you guys can do! Stephen, special thanks for revisiting this build.
I've been in a bit of a rut lately due to work and domestic commitments so modeling time is at a premium, but I still manage to get a "sanity" break every so often.. I just started on the last six kits of my Jasta 5 line up and I'm in the pre-painting stage, six kits at once. I have also been chipping away for some time now on a Voss D III in 1/48 and I am at the point where I'm ready to do the wood grain so I will chronicle that for a little demo and post the pics as soon as I'm done.
Stayed tuned and thanks for the pick up.
Model on, Dwayne
JackFlash
Colorado, United States
Joined: January 25, 2004
KitMaker: 11,669 posts
AeroScale: 11,011 posts
Joined: January 25, 2004
KitMaker: 11,669 posts
AeroScale: 11,011 posts
Posted: Thursday, March 05, 2009 - 05:33 PM UTC
When its relavent and the workmanship is this good, its worth revisiting. "Stropp" raised a few questions on other sites as well. I wish I could post some of the images from the bond drive I have seen. Thats how the old girl wound up in Calif and eventually in the NASM.
JackFlash
Colorado, United States
Joined: January 25, 2004
KitMaker: 11,669 posts
AeroScale: 11,011 posts
Joined: January 25, 2004
KitMaker: 11,669 posts
AeroScale: 11,011 posts
Posted: Thursday, March 05, 2009 - 05:38 PM UTC
Quoted Text
Here is my version from the time it was captured (April 3, 1918.)
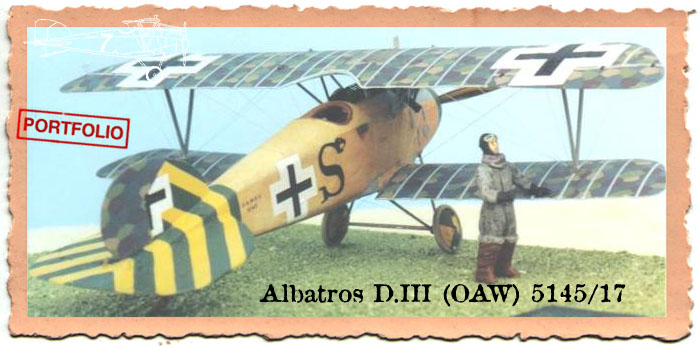
Here is another provisional scheme showing the tail colours in reversed positions. Usually this was done to denote different flights or Kette. Albatros D.III (OAW) 5145/17 of Jasta 46, 27 June 1918. Flown by Vzfw. Steinbrecker. This ‘provisional scheme is based on existing photographs of Jasta 46 machines in their general personal marking applications.
CaptainA
Indiana, United States
Joined: May 14, 2007
KitMaker: 3,117 posts
AeroScale: 2,270 posts
Joined: May 14, 2007
KitMaker: 3,117 posts
AeroScale: 2,270 posts
Posted: Saturday, March 07, 2009 - 11:26 AM UTC
I think I need to do one of these for myself.
iart7aero
United States
Joined: April 24, 2009
KitMaker: 2 posts
AeroScale: 1 posts
Joined: April 24, 2009
KitMaker: 2 posts
AeroScale: 1 posts
Posted: Friday, April 24, 2009 - 03:45 AM UTC
Dwayne, YES very good looking models. I especially like the first (top) photo and also very much like the "provisional" model colors. The wood grain looks excellent and I like the tiny logo on the propeller.
I would however, suggest you get a better camera so we can see the model better. Pictures are a little fuzzy and over-exposed lighting washes out some of the photos.
---------------------------------------------------------------------------------------------------------------
Stephen, thanks for showing my paintskins. The images are [u]not correct[/u] for the following reason: the skin is placed over a 3-D model which is used in a game sim. Defects in the 3-D model skin will not allow proper placement of artwork just below the cockpit. If I do, the artwork is reversed (mirrored) on the starboard side of the plane. This will not do as far as the game is concerned. Therefore, I had to reduce the size of the "STROPP" letters to about 75% of the actual size. I can fix it for the sake of publication, but I could only show one side of the plane or the other. I have a few pics of the proper-sized "STROPP" letters but don't know if I can find them right away.
---------------------------------------------------------------------------------------------------------------
Terri, je m'apelle Art Flores
---------------------------------------------------------------------------------------------------------------
Art
http://www.iart7.com/WARBIRDS/gallery21d.html
JackFlash
Colorado, United States
Joined: January 25, 2004
KitMaker: 11,669 posts
AeroScale: 11,011 posts
Joined: January 25, 2004
KitMaker: 11,669 posts
AeroScale: 11,011 posts
Posted: Friday, April 24, 2009 - 04:29 AM UTC
Greetings Arthur!
I am very gratified that you would be here. As in the commentary about his images of Stropp, he explained the issues he had to deal with on the skin. Most excellent for an artist to give us a heads up. We may yet see this young fellow's art work in kit profiles in the future.
Best Regards Art.
Stephen
JackFlash
Colorado, United States
Joined: January 25, 2004
KitMaker: 11,669 posts
AeroScale: 11,011 posts
Joined: January 25, 2004
KitMaker: 11,669 posts
AeroScale: 11,011 posts
Posted: Monday, March 22, 2010 - 07:18 AM UTC
Just brining this up for those interested in the WNW profile in their new 1:32 Alb. D. Va kit.