

..Thanks ..very helpful....you don't mention the 'brown' colour - looks very Olive Drab.... if I've understood correctly the 'lighter' areas are those you leave clear on first application - both sections are dry-brushed, but with differing amounts of paint on the brush ..??? could you clarify that for me..
cheers
( 33 1:48 Dr.I builds .. !!!)
Early Aviation
Discuss World War I and the early years of aviation thru 1934.
Discuss World War I and the early years of aviation thru 1934.
Hosted by Jim Starkweather
Fok. Streaked Camouflage 101

FalkeEins

Joined: March 07, 2005
KitMaker: 868 posts
AeroScale: 690 posts
Posted: Tuesday, March 24, 2009 - 08:56 PM UTC

JackFlash

Joined: January 25, 2004
KitMaker: 11,669 posts
AeroScale: 11,011 posts
Posted: Wednesday, March 25, 2009 - 12:09 AM UTC
The fabric olive colour varied with age it seems. Dark green olive or brown-ish olive. The metal paint tended to be either brown-ish olive or a lighter green olive. These are base coats. I still have a bit more to do.
The fabric olive is not dry brushed at first it is mostly thinner with some pigment, after that over all "wash dries then you add the more solid areas. These are still translucent. The final coat adds a bit more and is the dry brushed portion. Do not scrub. Each step must dry. For me I usually do either an acrylic base and enamel streaks or vise versa.
Working on 34 & 35 (DML Triplanes) see my Feature portfolio #4 on the subject. Also the correct designation is Fok. Dr.I in typing text. Germans like the Roman numerals.

thegirl

Joined: January 19, 2008
KitMaker: 6,743 posts
AeroScale: 6,151 posts
Posted: Wednesday, March 25, 2009 - 12:59 AM UTC
Gee Stephen are you trying to start your own airforce ? Looking might fine, now I can't wait to see the final assemle of the kit's !
Have you ever built the bluemax kit of the Fokker Dr.1 . It's not a kit that gets discussed about and I don't ever recall any one building it . How does this one compare or stand up to the rest ?
Have you ever built the bluemax kit of the Fokker Dr.1 . It's not a kit that gets discussed about and I don't ever recall any one building it . How does this one compare or stand up to the rest ?

RAGIII
Joined: June 19, 2007
KitMaker: 604 posts
AeroScale: 600 posts
Posted: Wednesday, March 25, 2009 - 10:24 AM UTC
Quoted Text
Here is a bit of fun concerning 1/48 scale streaking and a further note of how to do it.
Fokker Streaked camouflage 1/48 - painted. At right the base coat is a light almond colour representing unbleached linen. At left the finished Fokker type streaked camouflage. The dark solid fields were for the crosses. It was ordered to bring the factory white fields of the pattee or iron crosses down to a narrow border. With the balkan crosses the border was at first widened then narrowed down in specific ratio later in the war.
Fokker Streaked camouflage 1/48 - painted. Here the finished Fokker type streaked camouflage. The wings were hand painted at the factory and the streaked fields varied from airframe to airframe.
Stephen,
I can't say much yet. We WILL have an alternative soon.
RAGIII
RAGIII
Joined: June 19, 2007
KitMaker: 604 posts
AeroScale: 600 posts
Posted: Thursday, April 02, 2009 - 01:19 PM UTC
Stephen, I can now say that a new company, Gunsight Graphics, has released their first product, German Fokker Streaking in 1/72nd , 1/48th, and 1/32nd scale. I am currently putting together a review for Aeroscale which I will forward to you.
RAGIII
RAGIII
JackFlash
Joined: January 25, 2004
KitMaker: 11,669 posts
AeroScale: 11,011 posts
Posted: Thursday, April 02, 2009 - 07:47 PM UTC
Just to repeat;
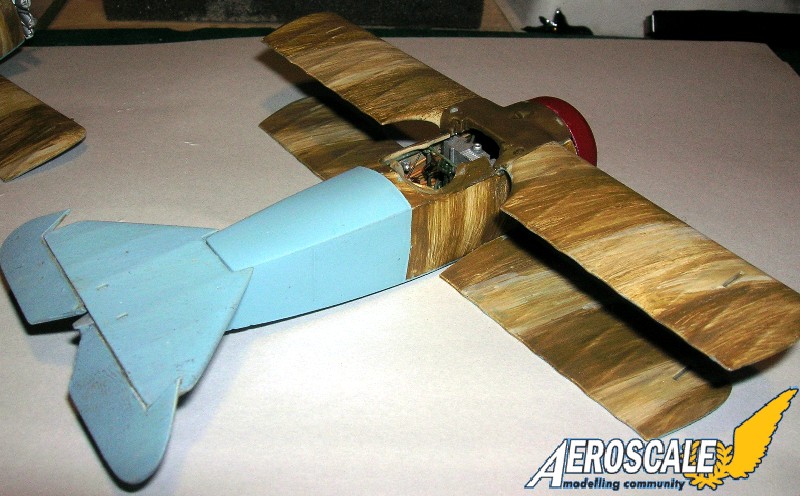
The entire skeletal airframe was covered with the same fabric. The undersurfaces were painted the blue color that slightly varied (Methuen codes 22 B 3.5 to 24 A 5). The undersurfaces were painted with one coat sky blue. After varnishing (to waterproof the fabric) the color shifted to turquoise 25 B/C 5. On the bottom edge of the fuselage and top edge of the tailplane, the turquoise wrapped around the edged 20mm.
The sides of the fuselage and the top surfaces had the Fokker camouflage (greenish color streaks) applied then the bottom surfaces were painted the blue color. There was no over-paint in the top surfaces from the factory just the green streaked camouflage.
The upper surface color was olive-brown and varied from very dark to very light. The fabric on the wings, tailplane and rudder were given two coats of clear dope, one cocoat of the olive -brown streaking, the fuselage was given one coat of clear dope and one color coat of olive streaking. All fabric surfaces were given a final coat of varnish to waterproof the fabric. The Metheun colors codes are: dark, 4F8; medium, 4E5; and light 4D8.
These colors were coded by Paul S. Leaman from fabric samples taken from Fok.DR.I 144/17.
JackFlash
Joined: January 25, 2004
KitMaker: 11,669 posts
AeroScale: 11,011 posts
Posted: Tuesday, April 07, 2009 - 08:12 PM UTC
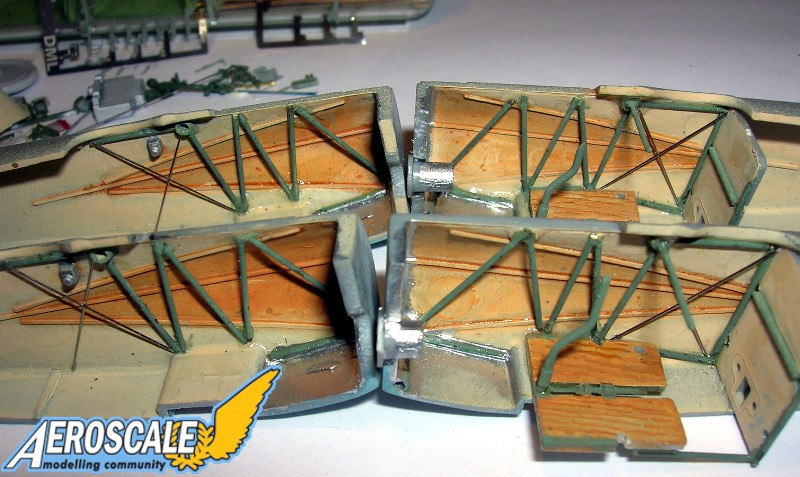
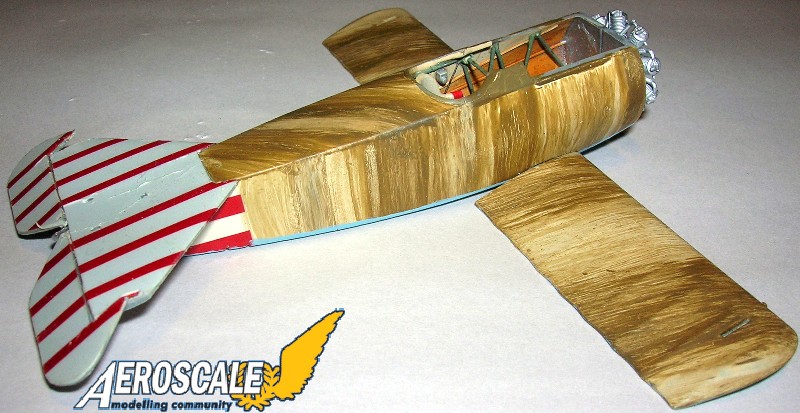
This shot is to show that when you represent the interiors of these aircraft were not pentrated by the camouflage paint. So should be represented as unbleached linen.
JackFlash
Joined: January 25, 2004
KitMaker: 11,669 posts
AeroScale: 11,011 posts
Posted: Saturday, April 11, 2009 - 01:01 PM UTC
From a couple of PM messages it looks like there is a need for one. So I will do a detailed "how to" on the applications of this camouflage scheme.
JackFlash
Joined: January 25, 2004
KitMaker: 11,669 posts
AeroScale: 11,011 posts
Posted: Saturday, April 11, 2009 - 01:34 PM UTC
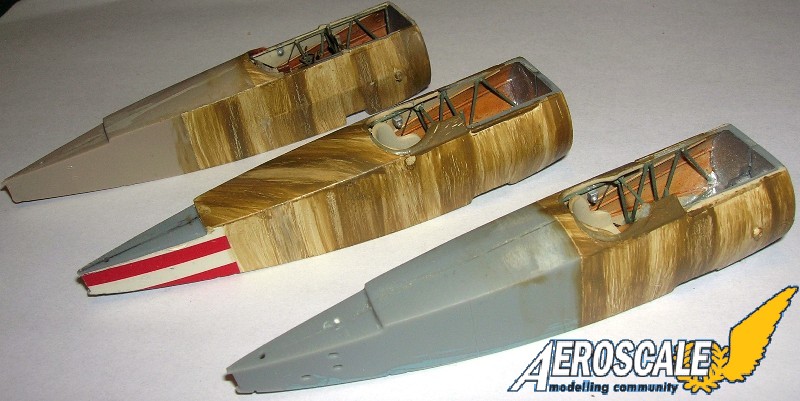
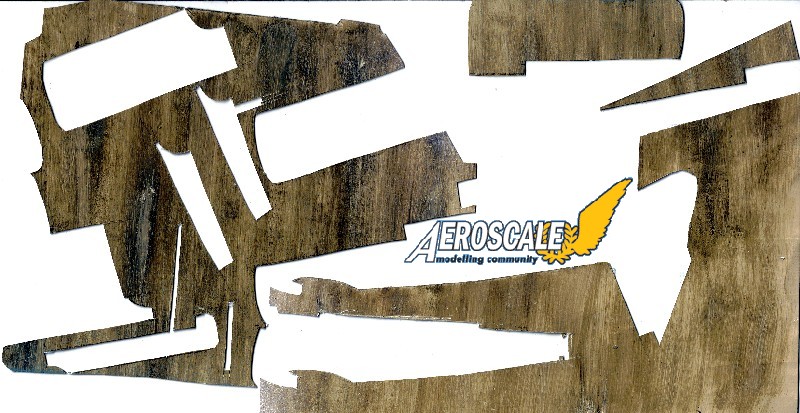
In the above image of the fuselages I decided to add the wood grain using a decal. More later. As a refresher back to the wings. Here is a bit of fun concerning 1/48 scale streaking and a further note of how to do it.
Fokker Streaked camouflage 1/48 - painted. At right the base coat is a light almond colour representing unbleached linen. At left the finished Fokker type streaked camouflage. The dark solid fields were for the crosses. It was ordered to bring the factory white fields of the pattee or iron crosses down to a narrow border. With the balkan crosses the border was at first widened then narrowed down in specific ratio later in the war.

Fokker Streaked camouflage 1/48 - painted. Here the finished Fokker type streaked camouflage. The wings were hand painted at the factory and the streaked fields varied from airframe to airframe.
Fokker Streaked camouflage 1/48 - painted. At right the base coat is a light almond colour representing unbleached linen. At left the finished Fokker type streaked camouflage. The dark solid fields were for the crosses. It was ordered to bring the factory white fields of the pattee or iron crosses down to a narrow border. With the balkan crosses the border was at first widened then narrowed down in specific ratio later in the war.
Fokker Streaked camouflage 1/48 - painted. Here the finished Fokker type streaked camouflage. The wings were hand painted at the factory and the streaked fields varied from airframe to airframe.
JackFlash
Joined: January 25, 2004
KitMaker: 11,669 posts
AeroScale: 11,011 posts
Posted: Thursday, May 21, 2009 - 07:04 PM UTC
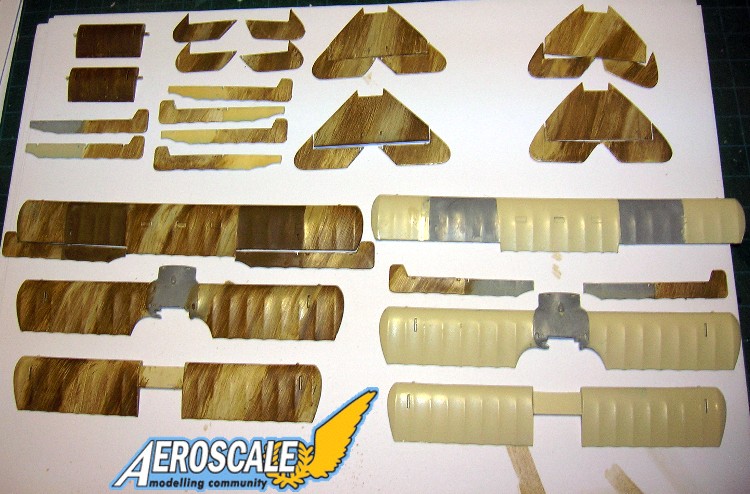
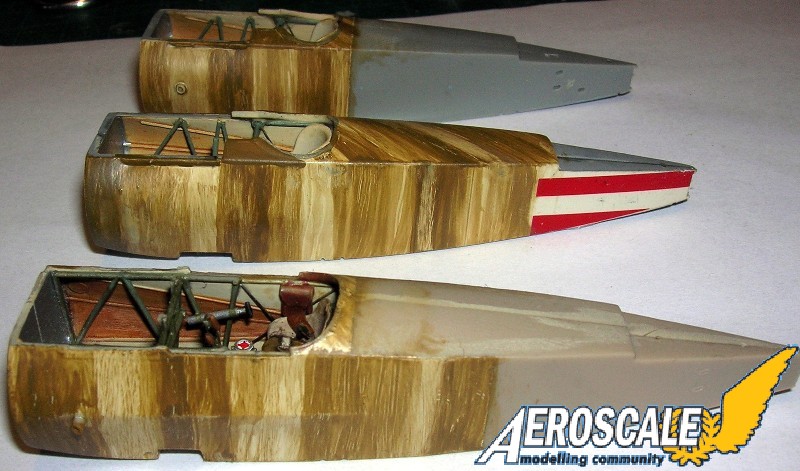
Here are some examples of hand painted streaking on Eduard and DML Dr.I kit fuselages
JackFlash
Joined: January 25, 2004
KitMaker: 11,669 posts
AeroScale: 11,011 posts
Posted: Thursday, May 21, 2009 - 07:08 PM UTC
For those of you who remember my Dr.I cutaways, this is how I did the wing & fuselage sections for the skeletals.
JackFlash
Joined: January 25, 2004
KitMaker: 11,669 posts
AeroScale: 11,011 posts
Posted: Wednesday, May 27, 2009 - 10:08 AM UTC
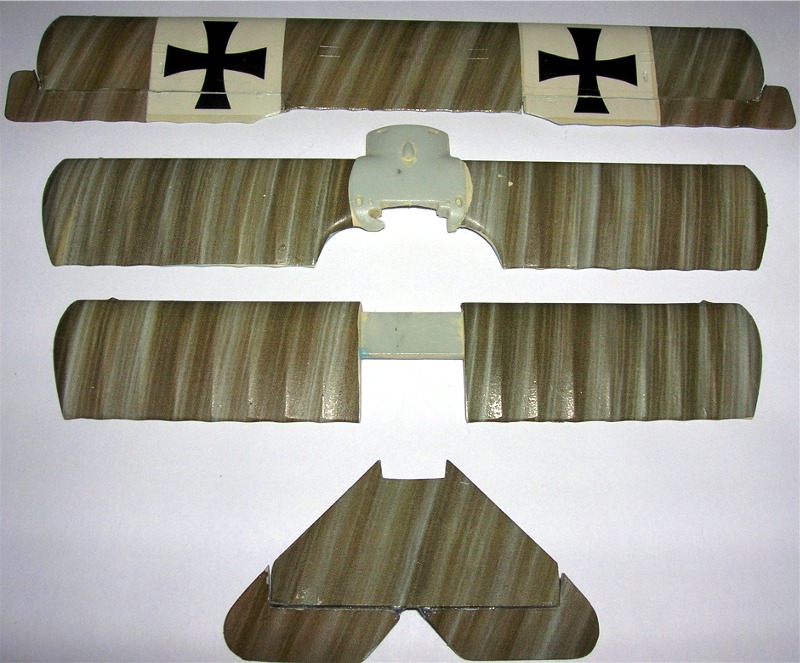
Greetings all here is a bit more progress. Note the angle of the streaking tend to vary from one upper surface to the other. Also elevators and ailerons were done separately on all "production aircraft."

JackFlash
Joined: January 25, 2004
KitMaker: 11,669 posts
AeroScale: 11,011 posts
Posted: Thursday, May 28, 2009 - 01:03 AM UTC
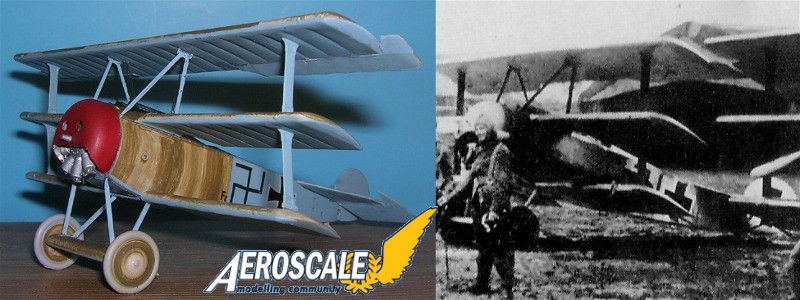
Alamotom's version of Ltn. R. Klimke's machine from Jasta 27 looks like the Eduard 1:48 kit with the Hecker and Goros figure of Voss & Timm.
thegirl
Joined: January 19, 2008
KitMaker: 6,743 posts
AeroScale: 6,151 posts
Posted: Thursday, May 28, 2009 - 03:23 AM UTC
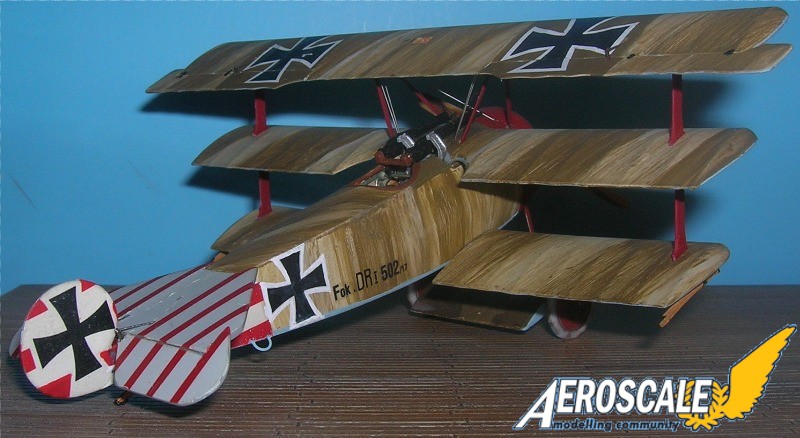
Well what can I say Stephen , but - I like it a lot ! Did you use decals for the red stripes ?
Regarding the wing with damage , did you do this ? I have seen this method done before with tissue paper and rice paper . It does look like it was done with decals, which would have me on edge when dusting and moving it around , just in the building stage I can see a finger or two making more holes in it .
Regarding the wing with damage , did you do this ? I have seen this method done before with tissue paper and rice paper . It does look like it was done with decals, which would have me on edge when dusting and moving it around , just in the building stage I can see a finger or two making more holes in it .
JackFlash
Joined: January 25, 2004
KitMaker: 11,669 posts
AeroScale: 11,011 posts
Posted: Thursday, May 28, 2009 - 10:10 AM UTC
Quoted Text
Well what can I say Stephen , but - I like it a lot ! Did you use decals for the red stripes ?
Red and white, cross and serial Dr.I 502/17 decals are from the Blue Rider set.
Quoted Text
Regarding the wing with damage, did you do this ? I have seen this method done before with tissue paper and rice paper. It does look like it was done with decals, which would have me on edge when dusting and moving it around , just in the building stage I can see a finger or two making more holes in it .
I painted clear decal film and used thick applications for strength. The key is to put it on a base so you don't touch it directly.
JackFlash
Joined: January 25, 2004
KitMaker: 11,669 posts
AeroScale: 11,011 posts
Posted: Thursday, May 28, 2009 - 11:22 PM UTC
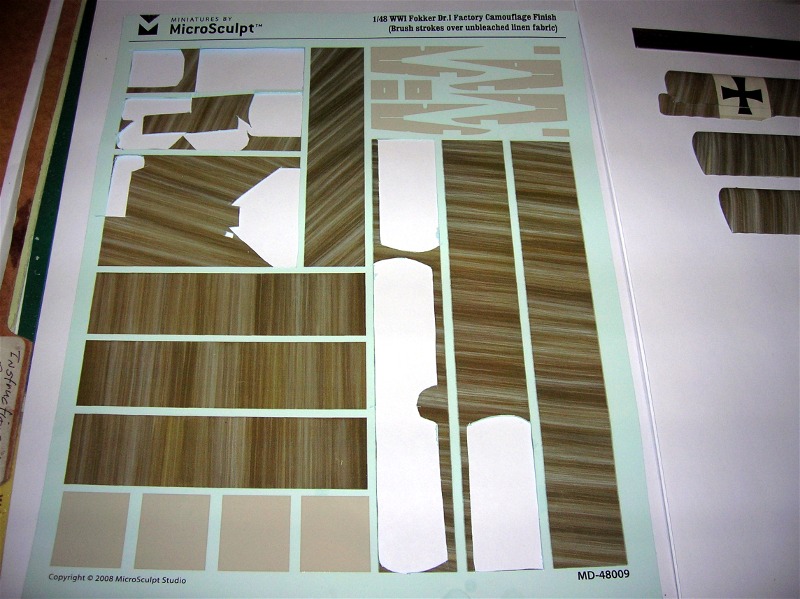
Tonight I finished applying the Microsculpt streaked decals to a set of 1/48 Fok. Dr.I wings. The decals are great to apply. Very tolerant of even the most hamfisted modeler (I should know) and react well to Micro Sol & Set from Krasel industries. Images by the weekend. I will have to do a review on them as well.
JackFlash
Joined: January 25, 2004
KitMaker: 11,669 posts
AeroScale: 11,011 posts
Posted: Saturday, May 30, 2009 - 07:57 PM UTC
Here is a bit of a taste on the excellent Microsculpt set.

Kornbeef
Joined: November 06, 2005
KitMaker: 1,667 posts
AeroScale: 1,551 posts

Posted: Saturday, May 30, 2009 - 11:01 PM UTC
well I'm sold already, they look incredible Stephen.
JackFlash
Joined: January 25, 2004
KitMaker: 11,669 posts
AeroScale: 11,011 posts
Posted: Monday, June 08, 2009 - 09:03 PM UTC
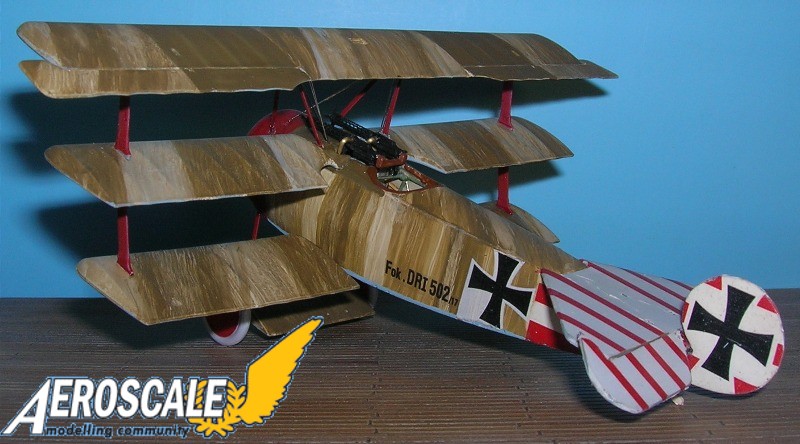
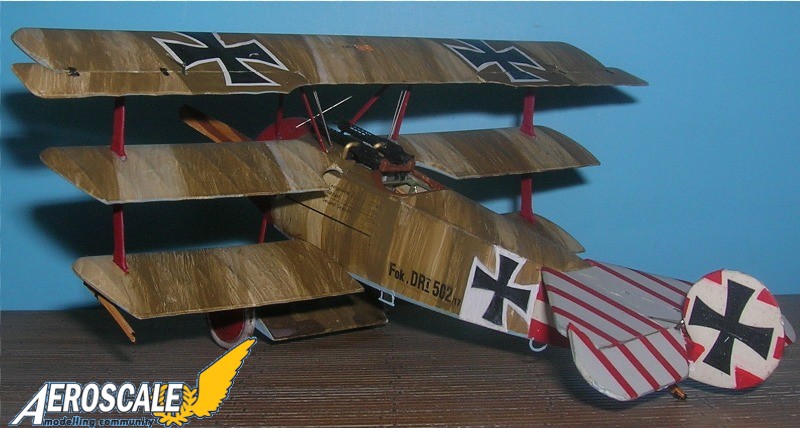
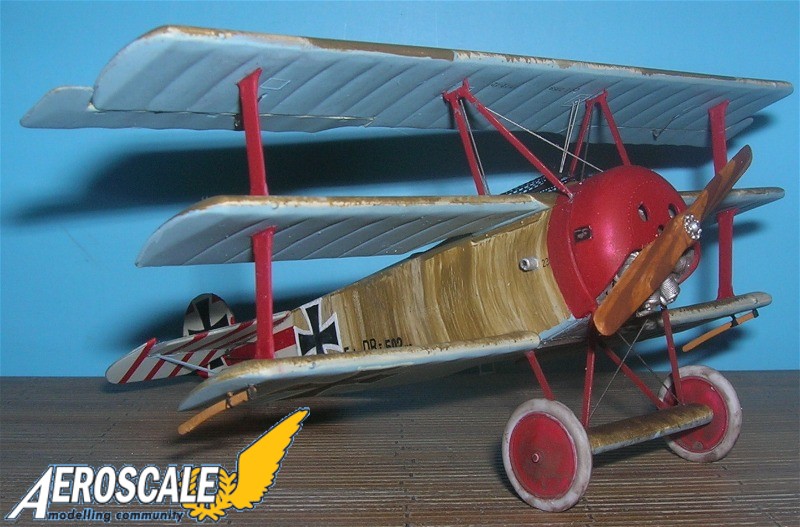
Here is the progression of the builds. First Dr.I 502/17.

JackFlash
Joined: January 25, 2004
KitMaker: 11,669 posts
AeroScale: 11,011 posts
Posted: Monday, June 08, 2009 - 09:08 PM UTC
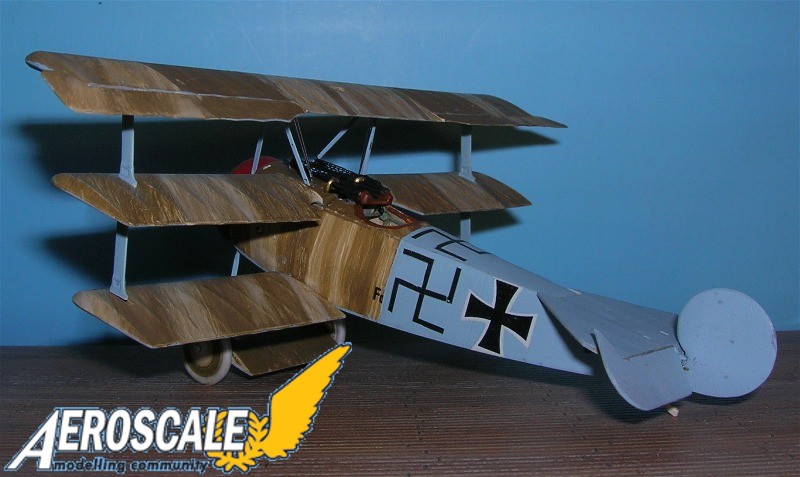
Here is the Dr.I . This type of marking was originally called a "Hakenkreuz." The legs turning to the left made this a "female version." The origins can be seen on the prehistoric caves of almost every part of the world.

JackFlash
Joined: January 25, 2004
KitMaker: 11,669 posts
AeroScale: 11,011 posts
Posted: Monday, June 15, 2009 - 10:27 PM UTC
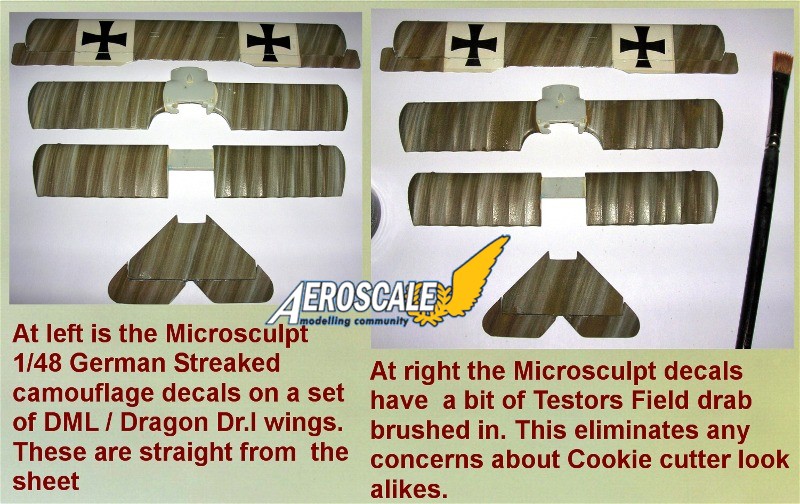
And here is a bit of fun with the Microsculpt set. More later on this.

JackFlash
Joined: January 25, 2004
KitMaker: 11,669 posts
AeroScale: 11,011 posts
Posted: Sunday, June 21, 2009 - 05:39 PM UTC
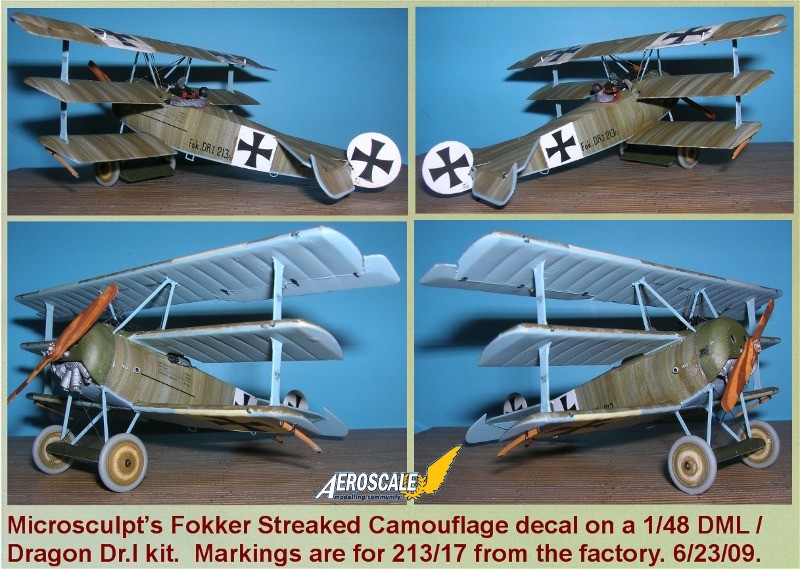
Now I asked myself, since this is for Microsculpt''s website which machine should I represent in just factory finish. So I went through my decal sheets and it became abundantly clear. To get all the serial & werke numbers for all the various locations I needed multiple sheets of a well known profile. I decided on the one machine that has been in several decal profiles and in kit form. The answer was now clear Fokker Dr.I 213/17 will be this build's identity. But before the Jasta B and personal markings were applied.
DML/ Dragon's kit #5601, Blue Rider Luftstreitkrafte 2 and Aeromaster Fokker Dr.I #1 had everything I needed.
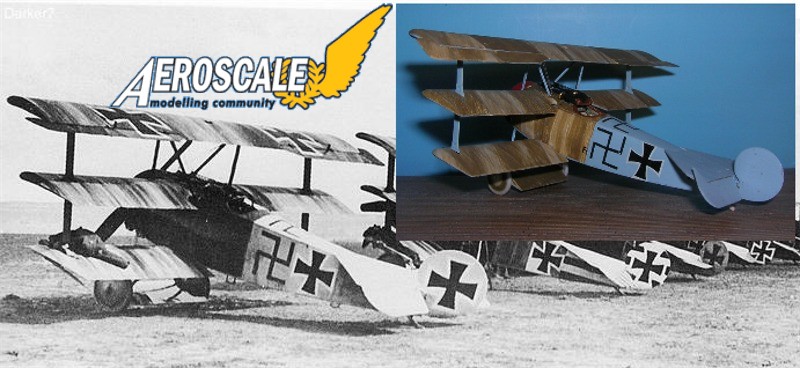
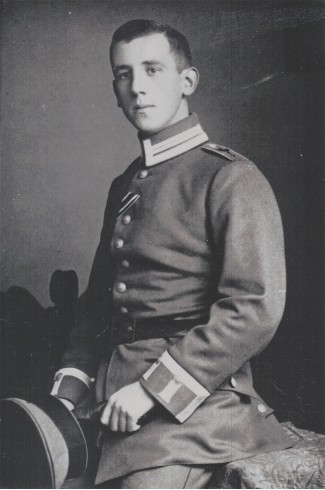
Fokker Dr.I 213/17 as flown by Ltn. des Res. Friedrich Paul Kempf. The machine was rec'd on 12 Jan. 1918. Friedrich Kempf was born on May 9th, 1894, in Freiburg. He entered military service in 1913 after putting his technical studies on hold. In May, 1915, he transferred from the infantry to the air service. He flew with the bombing unit Kagohl 4 on both the Western and Balkan fronts. He came from AFP 1 on 8 April 1917 to Jasta 2 (Boelcke). On 17 Oct. 1917 he was transferred to JsSch I as an instructor. He returned on 28 Jan. 1918 and stayed until 18 Aug 1918 we was returned to JsSch I as an instructor, where he stayed until the EOW.
Ltn. des Res.Kempf flew this machine and another one similarly marked Kempf. Kennscht mi noch?, translating to Kempf. Remember Me?. The problem areas are the fuselage below the tail was painted with the white on the pilot's left and black on the right side. Jasta 2 as well as other aircraft in the nearby JG III (Jasta 26, 27 & 36) had many of their Dr.I machines augmented with stay bars / rods behine the rear landing gear struts. Dr.I 213/17 had these. These were standard items in the DML / Dragon kit. Dr.I 213/17 also carried Kette (flight) leader's streamers on the lower interplane struts.
Friedrich Kempf survived both world wars, and died in 1966.
JackFlash
Joined: January 25, 2004
KitMaker: 11,669 posts
AeroScale: 11,011 posts
Posted: Tuesday, June 23, 2009 - 05:44 AM UTC
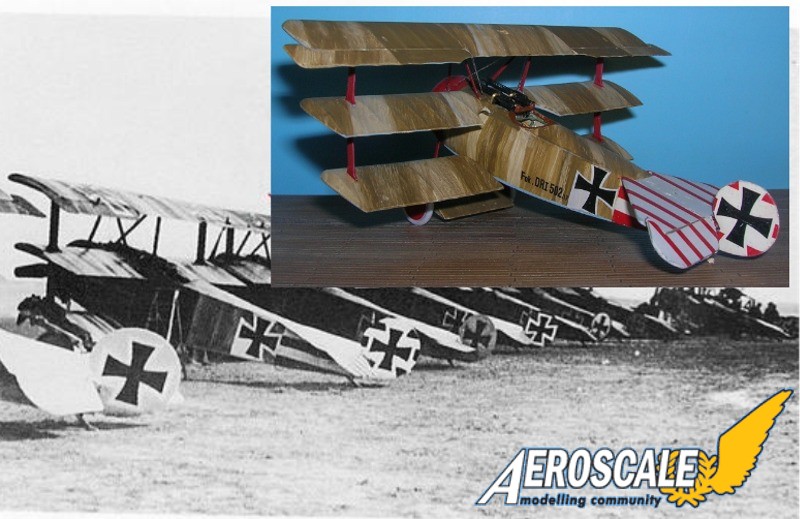
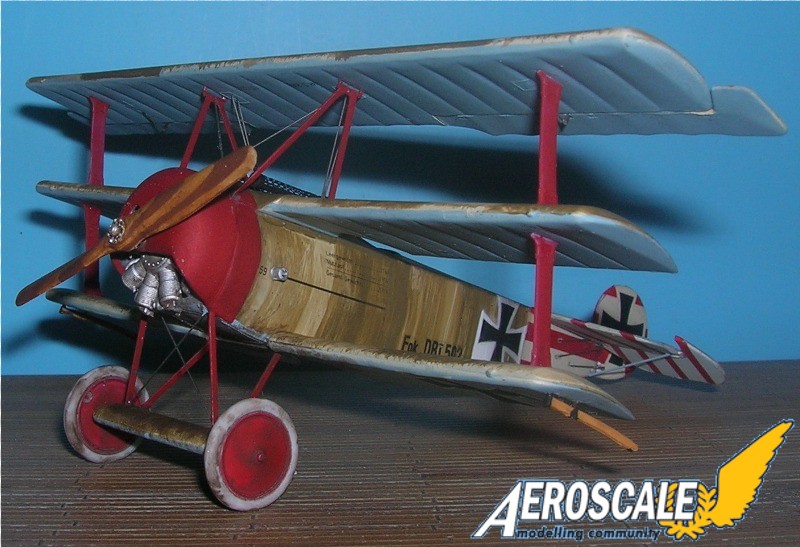
Stick a fork in it. This one is done.
One more time:
The entire skeletal airframe was covered with the same fabric. The undersurfaces were painted the blue color that slightly varied (Methuen codes 22 B 3.5 to 24 A 5). The undersurfaces were painted with one coat sky blue. After varnishing (to waterproof the fabric) the color shifted to turquoise 25 B/C 5. On the bottom edge of the fuselage and top edge of the tailplane, the turquoise wrapped around the edged 20mm.
The sides of the fuselage and the top surfaces had the Fokker camouflage (greenish color streaks) applied then the bottom surfaces were painted the blue color. There was no over-paint in the top surfaces from the factory just the green streaked camouflage.
The upper surface color was olive-brown and varied from very dark to very light. The fabric on the wings, tailplane and rudder were given two coats of clear dope, one cocoat of the olive -brown streaking, the fuselage was given one coat of clear dope and one color coat of olive streaking. All fabric surfaces were given a final coat of varnish to waterproof the fabric. The Metheun colors codes are: dark, 4F8; medium, 4E5; and light 4D8.
These colors were coded by Paul S. Leaman from fabric samples taken from Fok.DR.I 144/17.
JackFlash
Joined: January 25, 2004
KitMaker: 11,669 posts
AeroScale: 11,011 posts
Posted: Thursday, June 25, 2009 - 06:15 PM UTC
As I work on the last two Dr.I and one D.VII kits that I planned for this thread I have noted some points of interest.
One is the decal instructions for Gunsight Graphics. They were not airframe specific in the text about what D.VII machines carried the streaking. I called up the owner and had a great conversation with him. Two things he made clear to me were that;
A. Because the carrier was clear the decals could be overlapped to create and even more varied and intense pattern.
B. He was advised by his instructions editor "Not to be too specific otherwise you sound too much like a Know it all."
Let me take this opportunity to encourage ANYONE who is putting out decals or aftermarket kits or etc. Be a know it all. The average modeler knows less than you do about your product. Give people as much info as you have gathered to let them know your product is sound.
My other consideration is If you get these decals use them. Don't let them sit on your shelf. These kinds of decals have appeared and disapppeared before in WWI modeling. None are left today because they were an oddity to be collected. Personally If a model company could include these items in their kits the scope of WWI modeling would reach newer modelers and expand the hobby as much as lozenge decals have. One fellow who comes here use to have the motto "Cut the bullo and build!" Try these decals and you will be pleasantly surprised.
JackFlash
Joined: January 25, 2004
KitMaker: 11,669 posts
AeroScale: 11,011 posts
Posted: Monday, June 29, 2009 - 11:42 PM UTC
One more Dr.I done one to go.
 |

WEB HOSTING BY


Copyright ©2021 AeroScale and Kitmaker Network, a subsidiary of Silver Star Enterprises
All Rights Reserved. Please read our Conditions of Use and Privacy Policy.
All Rights Reserved. Please read our Conditions of Use and Privacy Policy.