


Last friday I finally got my J-35 Draken kits, three of them!
This kit is one of my most wanted EVER, and I had no hope to see it from any mainstream manufacturer.
I heard some talk about a coming Draken in 1/48 last year, but you can´t believe in loose talk!
When It was displayed at the Nuernberg Toy fair, Then I could believe It really was true!
Now Hasegawa finally have released a new-tool kit of the SAAB J-35J/F Draken!
The box is fairly big, and heavy as it´s quite well filled with parts, and has a lovley boxart by the great S. Kikeo.
The plastic parts are moulded in the usual light grey used by Hase.
Details are fine and crisp and the moulding is perfectly done.
Almost all sprue inlets are in places you can´t see after assembly and parts break down mainly follows panel lines.
There´s also very few of those pesky small stamp-circles, very well done Hasegawa!
The clear parts are supplied in a seperate bag along with the decals, and are very clear and free from scratches.
Decals are well done and as far as I can judge, correctly done.
The blue color of the Swedish markings are almost spot on, and so are the day-glo red/orange color .
All printing are perfectly in register and seems to be of good color density.
There´s three options to choose from;
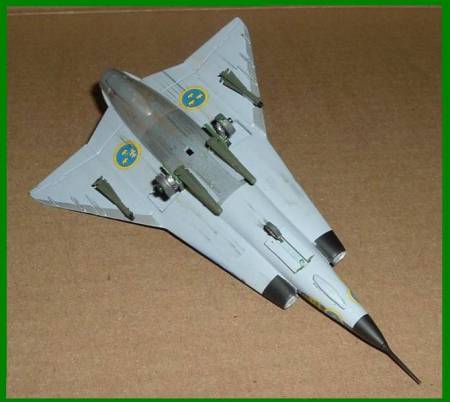
1) J-35F-2, Div3 F-10 / 06 in Blue Green Camouflage (called "Sea Camouflage) with grey underside.
This option have big white ID numbers (06) on the top wings.
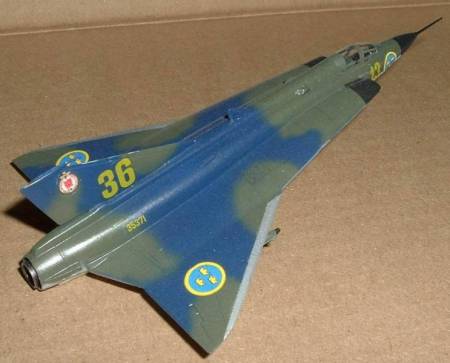
2) J-35J, Div1 F-10 / 52, same as above but without the ID-numbers
3) J-35J, Div2 F-10 / 39, Two tone grey camouflage with big Day-glo red/orange ID numbers on top wings and small day-glo numbers on the fin.
I settled for the option no.1 as i liked the looks of the white ID-numbers.

I couldn´t resist but immideatly cleaned the workbench, ripped up the bags and started cutting plastic!

Not before long I had all major subassemblies done and was ready for paint.

The afterburner section was painted with a mix of Humbrol 53 Gunmetal and H171 Antique Bronze, followed by a heavy black wash.

For the cockpit, Hasegawa suggests a dark green color ( H116), which I consider much too dark.
I have seen many Draken cockpits, and even been sitting in a few, and from my memory it should be a rather pale green.
Based on this, I choose Humbrol 120 Light Green for the cockpit.
I also used the instrument decals on the instrument panel and consoles.
With liberally amounts of Micro-sol, the decals settled down very nicely over the raised details.
To finish the cockpit a heavy black wash was applied.


Now I could glue the cockpit to the lower hull, along with a small 10g fishing weight.
Hasegawa suggests only 3g of weight, but that´s not enough.
I used two more of these weights to keep the nose safley on the ground, approx. 30grams in total!

Before the fuselage is closed up, don´t forget to open up all holes for the wing glove pylons (if used), tanks and the IR-unit in the nose!

This far It have been a very fast and effortless build, as everything fits so good together!
Fit is perfect as you can expect from a Hasegawa kit today!
More pics to follow!
Cheers!

Stefan E


