
Start Here (for Beginners)
This forum is for younger modelers or people just starting out in the hobby.
This forum is for younger modelers or people just starting out in the hobby.
Hosted by Jim Starkweather
insturment panels
rgriveson

Joined: April 21, 2008
KitMaker: 15 posts
AeroScale: 9 posts

Posted: Friday, May 02, 2008 - 06:52 PM UTC
at the risk of sounding silly, how do people do this magnificent insturment panels?


Posted: Friday, May 02, 2008 - 11:16 PM UTC
Hi Roger.
Welcome to Aeroscale
The only silly questions are the ones that never get asked.
Heres how I do my instument panels, its no dark art.
Firstly, I paint the whole thing in Xtracolour tyre black, but any dark grey will suffice. Although the kit instructions invariably specify matt black dark grey is better and allows the dials to stand out more.
Next step is to drybrush the panel, with white. This brings out the edges of the individual instruments and any raised detail.
In the case of my Thunderbolt builds, the kit decal is then added. Take care lining it up and once inplace soak it with Microsol and walk away from it for at least overnight if not longer. This will allow the Microsol to really pull the decal into the engraved detail.
Next stage is to matt varnish the whole panel, after which add a tiny drop of Klear/Future into each instument face. You'll be amazed at how they stand out when you do this.
Finally, another very light drybrushing and then pick out some switches in red or yellow to highlight a couple of areas and your done.
Heres the panel from my latest build, a 1:48 Tamiya P-47M
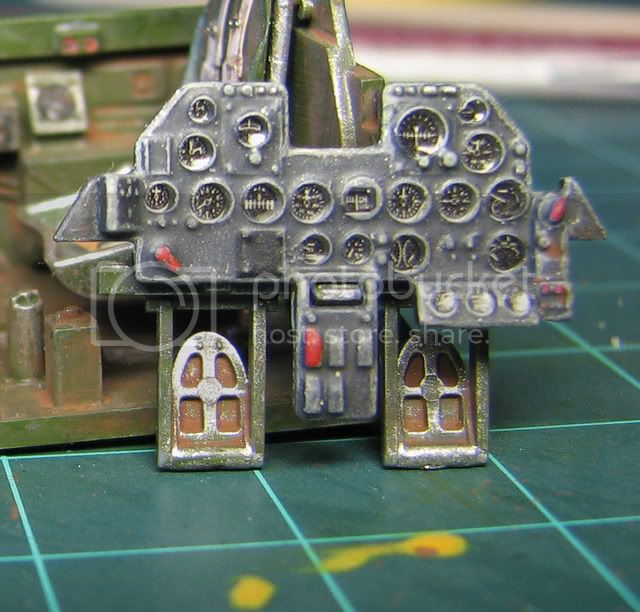
Bear in mind that the actual panel is roughly the size of your thumbnail. Each square on the green cutting mat its sitting on is 1cm across.
Hope this helps.
Nige
Welcome to Aeroscale

The only silly questions are the ones that never get asked.
Heres how I do my instument panels, its no dark art.
Firstly, I paint the whole thing in Xtracolour tyre black, but any dark grey will suffice. Although the kit instructions invariably specify matt black dark grey is better and allows the dials to stand out more.
Next step is to drybrush the panel, with white. This brings out the edges of the individual instruments and any raised detail.
In the case of my Thunderbolt builds, the kit decal is then added. Take care lining it up and once inplace soak it with Microsol and walk away from it for at least overnight if not longer. This will allow the Microsol to really pull the decal into the engraved detail.
Next stage is to matt varnish the whole panel, after which add a tiny drop of Klear/Future into each instument face. You'll be amazed at how they stand out when you do this.
Finally, another very light drybrushing and then pick out some switches in red or yellow to highlight a couple of areas and your done.
Heres the panel from my latest build, a 1:48 Tamiya P-47M

Bear in mind that the actual panel is roughly the size of your thumbnail. Each square on the green cutting mat its sitting on is 1cm across.
Hope this helps.
Nige

Posted: Saturday, May 03, 2008 - 09:48 AM UTC
That's a cracking panel Nige for something so small. Is it one decal or individual dials?
Posted: Saturday, May 03, 2008 - 09:57 AM UTC
Thanks Murdo.
Its actually 2 decals.
One for the main part of the panel and one doing the three gauges in a row at the bottom right hand side.
Nige
Its actually 2 decals.
One for the main part of the panel and one doing the three gauges in a row at the bottom right hand side.
Nige

Posted: Saturday, May 03, 2008 - 10:05 AM UTC
I assume it is the Klear on the dial face that makes them look darker?
chris1

Joined: October 25, 2005
KitMaker: 949 posts
AeroScale: 493 posts

Posted: Saturday, May 03, 2008 - 10:12 AM UTC
Nige,
Do you cut out each individual dial? or do you dry brush over the top the entire decal?
TIA
Chris
Do you cut out each individual dial? or do you dry brush over the top the entire decal?
TIA
Chris
Posted: Saturday, May 03, 2008 - 10:26 AM UTC
Hi again 
The Klear makes the dial face look like its got a glass face.
Its the decal detail itself that makes the gauge darker.
The main panel (apart from the 3 gauges at the bottom right) is one whole decal.
I dry brush before to bring out the rim around each gauge and very sparingly again after the decals been applied (24 hours after) just to blend it all together.
Nige

Quoted Text
I assume it is the Klear on the dial face that makes them look darker?
The Klear makes the dial face look like its got a glass face.
Its the decal detail itself that makes the gauge darker.
Quoted Text
Nige,
Do you cut out each individual dial? or do you dry brush over the top the entire decal?
The main panel (apart from the 3 gauges at the bottom right) is one whole decal.
I dry brush before to bring out the rim around each gauge and very sparingly again after the decals been applied (24 hours after) just to blend it all together.
Nige

Posted: Saturday, May 03, 2008 - 10:58 AM UTC
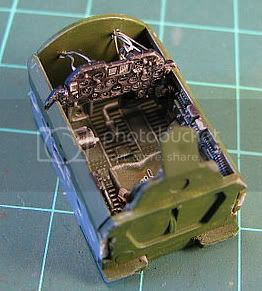
Heres one in 1:72 scale.
I used the same method as for the larger panel posted earlier.
Nige
I used the same method as for the larger panel posted earlier.

Nige

Posted: Saturday, May 03, 2008 - 11:09 AM UTC
Yikes!!! 


Posted: Saturday, May 03, 2008 - 11:58 AM UTC
Instrument panels and cockpit done the same basic way as Nige's but in 1/32nd scale. The instrument dials were individual decals and some of the dial rims were dry brushed in different colours.
Andy

Andy

Posted: Saturday, May 03, 2008 - 11:00 PM UTC
Andy that Arado just looks better and better everytime you post a pic, and Im really looking forward to seeing it up close again. Hopefully next time I see it it'll be finished.
Does the MDC Typhoon come with individual instrument decals as well?
Nige
Does the MDC Typhoon come with individual instrument decals as well?
Nige

Posted: Saturday, May 03, 2008 - 11:06 PM UTC
Quoted Text
Does the MDC Typhoon come with individual instrument decals as well?
Nige
Hi Nige,
Yes the Typhoon and the Ki61-I "Hei" both come with seperate instrument panel decals.
Andy

HawkeyeV

Joined: September 20, 2006
KitMaker: 319 posts
AeroScale: 129 posts

Posted: Tuesday, May 06, 2008 - 06:25 AM UTC
The one thing about instrument panels is that they don't have "Chrome" rings around them. That is fine for sports cars but not aircraft.


Too many modelers us a light color as a wash and end up with definitive "chrome" looking rings around their gauges. Can you imagine flying in a real aircraft on a sunny day with the reflection off those rings and bezels in your face while trying to read the gauges...its hard enough with just the reflection off the glass faces.
I once rode in a plane that had a machined metal panel...after two flights the owner broke out the flat black spray can and covered it up...too much glare and reflection...even at night.

Cazzie

Joined: March 25, 2008
KitMaker: 25 posts
AeroScale: 19 posts

Posted: Wednesday, May 07, 2008 - 03:36 AM UTC
Instrument panels can be done in so many different ways. Of coarse the painted P/E panels are a snitch, but on other, I either apply the gauges from the decals individually or used Mike Grant's generic instrument decals: http://www.mikegrantdecals.com/Instruments.html. Mike's gauge decals are printed on an ALPS printer, therefore the white is already printed on the gauge and no white backing is required.
Of course, one can make their own panels using Photoshop or PSP. I did so with the recently finished Sopwith Strutter.
Here's a little how-to:
I start by getting the contour of the upper decking where the panel will fit using a contour gauge. This is transferred to index card and drawn out with a pencil. The calipers are use to measure the width of the panel for the decking, which is 0.306-in in this case.

The card template is cut and the center marked (must be cut down a tad for the Vickers mount) and the template is etched out on styrene sheet stock, cut close with scissors, and sanded back to the etch marks.


It's off to the scanner and Photoshop now. Since the plastic styrene is white, it is best to place a dark background over it before scanning, this will make cutting out the scanned panel easier. Scan at a very high dpi (I use 1200).

Once the scanned panel is in, I open up my trusty Texture folder I use for FS2004 and find a woodgrain that I like, This is resized to 1200 dpi and a pixel width just a bit larger than that of the scanned panel. I high light the scanned panel with Photoshop's Magic Wand and choose Select All and Copy on the wood texture. I then hit Paste Into and botta-bing, I got a wood panel.


Next up I choose some gauges that will do for generics. I made these gauges and will give all of you a tut on how to do so in another topic later. If you have any good graphics program, it is not that hard, though it is time consuming. Silver mounts for the gauges are done with the Brush tool before pasting the gauges and placing them.

Now I need a placard and a brass control, so again it's off to the Texture folder to gett this. thios too is resized to 1200 dpi and a pixel width to match that of the panel. The placard is cropped and sized to fit from the texture and some script added and embossed inward. The control is done with a brush of appropriate size and the Ellipse Tool. All gauges and controls benefit for an outer drop shadow effect, with the shadow centered and sized to highlight the item.

And here's your finished panel. I cut one I printed and put it over the plastic to check the size, no problem. It looks way better than this photo, as the photo paper is glossy and I used a flash. I think you can get a good idea anyhow.


Caz
Of course, one can make their own panels using Photoshop or PSP. I did so with the recently finished Sopwith Strutter.
Here's a little how-to:
I start by getting the contour of the upper decking where the panel will fit using a contour gauge. This is transferred to index card and drawn out with a pencil. The calipers are use to measure the width of the panel for the decking, which is 0.306-in in this case.

The card template is cut and the center marked (must be cut down a tad for the Vickers mount) and the template is etched out on styrene sheet stock, cut close with scissors, and sanded back to the etch marks.


It's off to the scanner and Photoshop now. Since the plastic styrene is white, it is best to place a dark background over it before scanning, this will make cutting out the scanned panel easier. Scan at a very high dpi (I use 1200).

Once the scanned panel is in, I open up my trusty Texture folder I use for FS2004 and find a woodgrain that I like, This is resized to 1200 dpi and a pixel width just a bit larger than that of the scanned panel. I high light the scanned panel with Photoshop's Magic Wand and choose Select All and Copy on the wood texture. I then hit Paste Into and botta-bing, I got a wood panel.


Next up I choose some gauges that will do for generics. I made these gauges and will give all of you a tut on how to do so in another topic later. If you have any good graphics program, it is not that hard, though it is time consuming. Silver mounts for the gauges are done with the Brush tool before pasting the gauges and placing them.

Now I need a placard and a brass control, so again it's off to the Texture folder to gett this. thios too is resized to 1200 dpi and a pixel width to match that of the panel. The placard is cropped and sized to fit from the texture and some script added and embossed inward. The control is done with a brush of appropriate size and the Ellipse Tool. All gauges and controls benefit for an outer drop shadow effect, with the shadow centered and sized to highlight the item.

And here's your finished panel. I cut one I printed and put it over the plastic to check the size, no problem. It looks way better than this photo, as the photo paper is glossy and I used a flash. I think you can get a good idea anyhow.


Caz
Posted: Wednesday, May 07, 2008 - 05:14 AM UTC
Blinkin' flip that looks good
Andy
Andy
 |


