_GOTOBOTTOM
Early Aviation
Discuss World War I and the early years of aviation thru 1934.
Gotha G.I Bomber
guitarlute101
_VISITCOMMUNITY
West Virginia, United States
Joined: December 18, 2006
KitMaker: 1,121 posts
AeroScale: 1,063 posts
Posted: Monday, June 16, 2008 - 05:39 AM UTC
Hello everyone,

Here's a project I've had on the shelf for a few years while I've moved around and I'm finally going to complete this. I've completed the rear fuselage, parts of the forward fuselage and the tailplane. I'm making resin copies so I can build more than one and work on my molding skills.

Here's some shots............the rear fuselage.........


The bottom of the forward fuselage with carved wooden block I vacuformed over...............


Test fit,,,,,,,,,,,,,,,


Top of the forward fuselage with wooden block....i might need to reform this part.........we'll see.........


Here's my vertical tailplane with hinges....................


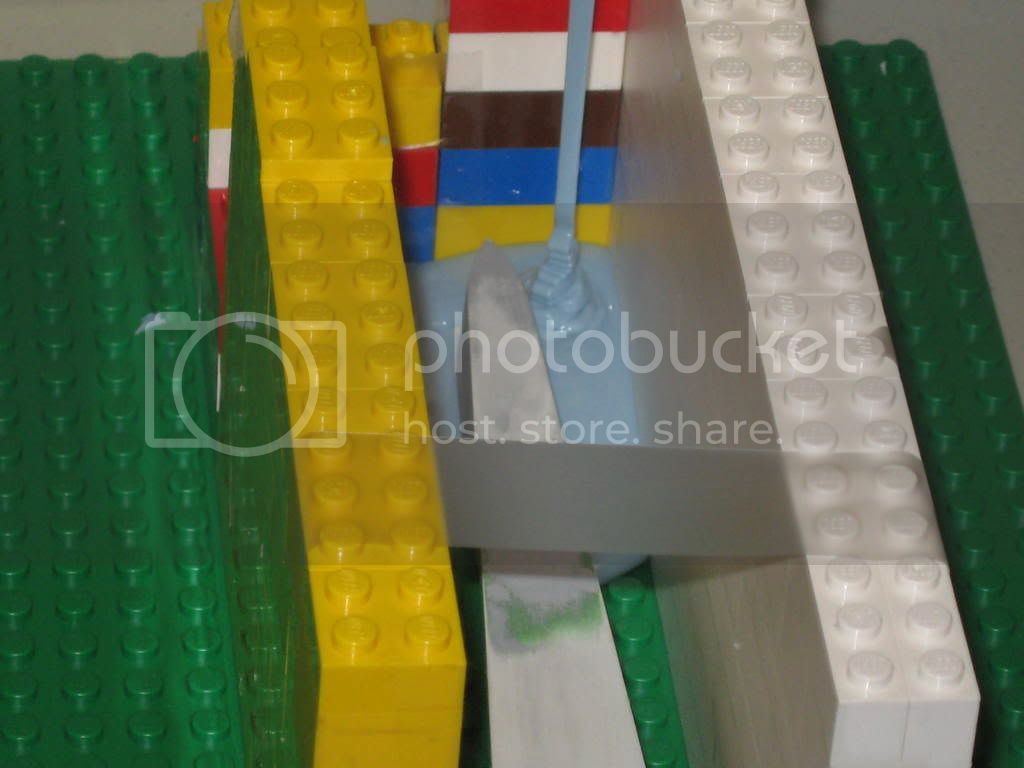
Make sure it's straight before casting the mold in my state of the art customizable mold casting box.................


Let it "cure" then remove the mold and slice off the top to the bottom of the pour block.....................................


Remove the master and pour in some resin........let it cure and there you have it......copies.....................


Next I'll do the same with the tailplane.


Later,
Mark
Repainted
_VISITCOMMUNITY
Östergötland, Sweden
Joined: April 04, 2006
KitMaker: 1,058 posts
AeroScale: 1,004 posts
Posted: Monday, June 16, 2008 - 06:14 AM UTC
Sweet jesus
don´t stall this build again please keep this going and send in updates as it progress.
When I´m seeing modelmaking like this, i starts wonder what I´m doing, I´m just put on some paint...

Thanks for sharing

Larsa q
MerlinV
_VISITCOMMUNITY
Victoria, Australia
Joined: November 26, 2006
KitMaker: 608 posts
AeroScale: 602 posts
Posted: Monday, June 16, 2008 - 11:29 AM UTC
Mark,

You are showing the rest of us the way. Keep it up, I am enjoying learning from your posts.

Cheers,

Hugh
guitarlute101
_VISITCOMMUNITY
West Virginia, United States
Joined: December 18, 2006
KitMaker: 1,121 posts
AeroScale: 1,063 posts
Posted: Tuesday, June 17, 2008 - 01:08 AM UTC
Hello everyone,

Here's the master tailplane and it's resin copy. I'm very happy with how the the rib detail turned out. I used the "sandwich" technique that I described in my Grigorovich M-5 thread in making the master part.


Here's how the tailplane will look eventually..........................


Thanks for checking in. More later,
Mark
SGTJKJ
#041
_VISITCOMMUNITY
Kobenhavn, Denmark
Joined: July 20, 2006
KitMaker: 10,069 posts
AeroScale: 3,788 posts
Posted: Tuesday, June 17, 2008 - 01:24 AM UTC
Very impressive work. This is true model making in its most basic, but difficult form.

Looking forward to see more.
thegirl
_VISITCOMMUNITY
Alberta, Canada
Joined: January 19, 2008
KitMaker: 6,743 posts
AeroScale: 6,151 posts
Posted: Tuesday, June 17, 2008 - 03:05 AM UTC
What type of resin are you using ? and what is the blue stuff ? This is something that I have not tried before . looking forward on seeing more . Thanks and cheers
guitarlute101
_VISITCOMMUNITY
West Virginia, United States
Joined: December 18, 2006
KitMaker: 1,121 posts
AeroScale: 1,063 posts
Posted: Wednesday, June 18, 2008 - 10:06 AM UTC

Terri,

I'll do a step by step in my next posting on the materials I use and how to create the mold and copies.

In the meantime, here's the fuselage front blocked off...........


Supports added around the bottom and sides.......


Next I'll add the crew entry door to the fuselage......................


I added punched circles using my sub-miniature punch and die set to represent the attaching bolts. The door looked a little wider in the actual pictures of the aircraft than in the drawing so I made it wider......................


Here it is attached to the outside................


And don't forget one for the the inside.......................


More later,

Mark
guitarlute101
_VISITCOMMUNITY
West Virginia, United States
Joined: December 18, 2006
KitMaker: 1,121 posts
AeroScale: 1,063 posts
Posted: Thursday, June 19, 2008 - 03:49 AM UTC
OK Terri, here's what I use and how I make a mold and copies.

First of all, I'd like to say a lot of what I know of mold making came from the fortune of spending a few days with Jef Verswyvel of vdmstudios.com, the makers of "Black Box" and "Avionix" resin detail sets a few years ago. I went to his shop here in WV and showed him my masters and he was impressed and he gave me a tour of the shop and some pointers on the mold making and resin casting. He was very kind to me and he was very generous with his help and encouragement. I owe a lot ot him. He is a true model master and an excellent person. I couldn't say enough good things about him.

You can also check out the book "Secrets of Expert Mold Making and Resin Casting" by Karl Juelch if it's still available.


I'll be making a copy of the rear fuselage. First I need to attach a pour block to the part. I'm extremely low tech so i'm using an old pour block from another resin kit I bought years ago.


I attach the block to the part with Elmers glue. It's strong enough to hold and will come off of the master part very easily .


I use 1 to 1 silicone mold rubber by Micro-Mark.


Measure out and mix 50% white to 50% blue.


I put the mold box together and used and old brush to brush in some mold rubber into the undercut areas and creases where it might have a hard time flowing into.


Next, pour the rubber mixture into the corners of the mold and let it flow and cover the part. Don't pour on top of the master part!!!


Cure time (hardening time) is 4 hours. I usually let my molds and resin castings set overnight.


Cut off the top to the pour block with a sharp Exacto.............


Pull the sides away from the master to release it, carefully removing it from the mold.


Next I mix up 50% to 50% resin also from Micro-Mark.


Pour it in and let it cure.


Remove the copy just like you did the master part.


I hope that helps. Send out some comments.

Mark
MerlinV
_VISITCOMMUNITY
Victoria, Australia
Joined: November 26, 2006
KitMaker: 608 posts
AeroScale: 602 posts
Posted: Thursday, June 19, 2008 - 11:18 AM UTC
Comments?

Wow! Thanks heaps for going into so much detail Mark.

This is so inspiring. I am going to have to try this... when I get some time...

Now where did I leave my old Leggo blocks?

Cheers,

Hugh
guitarlute101
_VISITCOMMUNITY
West Virginia, United States
Joined: December 18, 2006
KitMaker: 1,121 posts
AeroScale: 1,063 posts
Posted: Thursday, June 19, 2008 - 04:02 PM UTC


Thanks Hugh, here's one last post for the day.

I finished casting the last part of the tailplane................


Here's the lineup..............


I like it when it works out like I planned.

Mark
JackFlash
_VISITCOMMUNITY
Colorado, United States
Joined: January 25, 2004
KitMaker: 11,669 posts
AeroScale: 11,011 posts
Posted: Thursday, June 19, 2008 - 07:11 PM UTC
Very interesting! Vacuforming and resin pours. I like it.
thegirl
_VISITCOMMUNITY
Alberta, Canada
Joined: January 19, 2008
KitMaker: 6,743 posts
AeroScale: 6,151 posts
Posted: Friday, June 20, 2008 - 01:55 PM UTC
Mark sorry for taking so long to reply , I do find your use of the leggo a very neet way of doing the boxes . Thanks for showing on how to set all of thank you for showing on how to set all that up . This is something that I would like to try in the future . Can all of this stuff be cleaned up with water ?
Terri
guitarlute101
_VISITCOMMUNITY
West Virginia, United States
Joined: December 18, 2006
KitMaker: 1,121 posts
AeroScale: 1,063 posts
Posted: Friday, June 20, 2008 - 04:05 PM UTC


Terri,

Once the rubber mold material hardens you can peel it off of just about anything. Thin segments feel like latex doctors gloves. Same with the resin but it sticks to more surfaces. I put a few layers of cardboard under my resin castings in case there's any spill over.

Mark
 _GOTOTOP