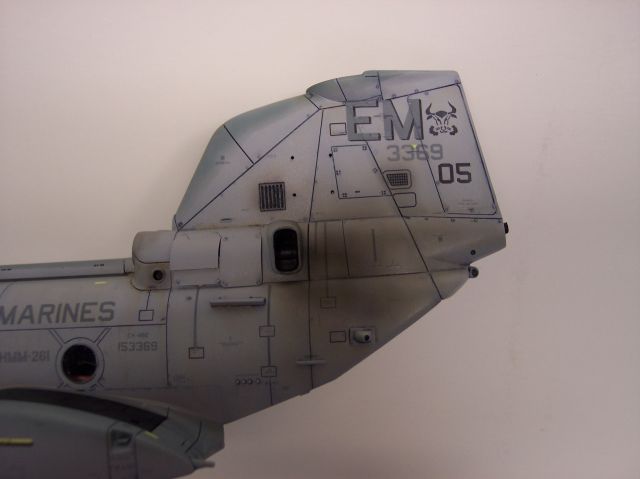
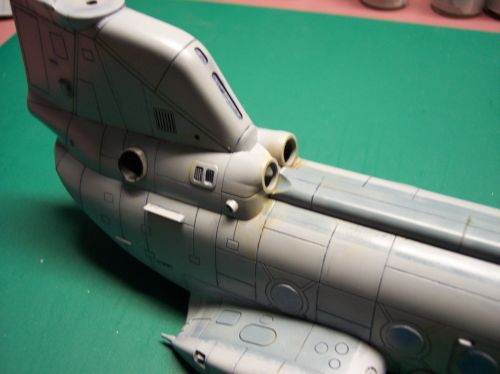
I got motivated to build a seaknight after playing the Call of Duty 4 missions. I want to build one with the same marine color scheme which i think is in grey.
So i went down to the hobbyshop and only manage to get a Hobby Boss 1/72 CH-46D version which is somewhat in dark blue or green color. The decals are not the low profile ones, its like bright and with the "come shoot me" effect.
The instructions are not so detail and i dont have any painting instructions for the internal compartments.
I was hoping whether someone could email me a copy of the academy 1/35 build manual or paint manual so that i can produce a the recent grey version which are being use by the US Marines.
And maybe suggestions on where i can get an updated decal to fit todays CH-46D
Rotary Wing
Discuss helicopters and other rotary wing aircraft from any era.
Hosted by Gino P. Quintiliani
Need Help CH-46 SeaKnight
eerie
United Kingdom
Joined: September 26, 2004
KitMaker: 1,008 posts
AeroScale: 106 posts
Joined: September 26, 2004
KitMaker: 1,008 posts
AeroScale: 106 posts
Posted: Wednesday, July 02, 2008 - 03:26 AM UTC
mother
New York, United States
Joined: January 29, 2004
KitMaker: 3,836 posts
AeroScale: 1,036 posts
Joined: January 29, 2004
KitMaker: 3,836 posts
AeroScale: 1,036 posts
Posted: Wednesday, July 02, 2008 - 06:05 AM UTC
One of my favorite helis...I've built many including the 1/72 HobbyBoss kits. Ok painting, well here is a link to a painting guide for the SeaKnight,
SeaKnight
This helicopter gets dirty and shows. Weathering is fairly easy doing an oil wash into the panel lines, and a very diluted (10%paint 90% thinner) for the exhaust which is airbrushed by building it up.
I also use burnt sienna and yellow ochre to simulate stains.
The interior was painted using light ghost gray followed by a wash and the cargo floor was painted in a medium gray. The walkways/non-slips were painted in Tamiyas NATO black. Troop seats can be painted in flat red or dark gray. I my painting is done with Tamiyas.
Cockpit was painted in a flat black, here I used MM’s aircraft black dry brushed lightly with dark gray just enough to pick out the detail.
Here is a great walkaround from Prime Portal...
CH-46E
Looking forward to you build,
Joe
eerie
United Kingdom
Joined: September 26, 2004
KitMaker: 1,008 posts
AeroScale: 106 posts
Joined: September 26, 2004
KitMaker: 1,008 posts
AeroScale: 106 posts
Posted: Wednesday, July 02, 2008 - 03:33 PM UTC
Thanks mother,
This will be my 2nd heli build since the disastrous Huey Frog from academy 3 years ago. To add to that, my colleague at work was asking me to help her build a CH-47D for her husband. She wanted it as an anniversary gift to him cos he flies the local Ds here.
arkhunter
Illinois, United States
Joined: June 11, 2006
KitMaker: 116 posts
AeroScale: 13 posts
Joined: June 11, 2006
KitMaker: 116 posts
AeroScale: 13 posts
Posted: Wednesday, July 02, 2008 - 04:31 PM UTC
Mother that is absolutely beautiful.
eerie
United Kingdom
Joined: September 26, 2004
KitMaker: 1,008 posts
AeroScale: 106 posts
Joined: September 26, 2004
KitMaker: 1,008 posts
AeroScale: 106 posts
Posted: Tuesday, July 15, 2008 - 04:00 AM UTC
Anybody can help me with the interior photos? Cos there is a shortfall in the Hobby Boss Seaknight. The seats are just blocks running from rear to front. Is the seaknight jump seats collapsable? Can it be folded to the wall? I think i have to improvise on mine. Plus any suggestion to populate my seaknight interior walls with?
mother
New York, United States
Joined: January 29, 2004
KitMaker: 3,836 posts
AeroScale: 1,036 posts
Joined: January 29, 2004
KitMaker: 3,836 posts
AeroScale: 1,036 posts
Posted: Tuesday, July 15, 2008 - 05:20 AM UTC
Hey Eerie,
Here's a great link that will help you....it's also the same one your building.
CH-46E
Joe
Here's a great link that will help you....it's also the same one your building.
CH-46E
Joe
wizard179
New South Wales, Australia
Joined: January 27, 2006
KitMaker: 251 posts
AeroScale: 179 posts
Joined: January 27, 2006
KitMaker: 251 posts
AeroScale: 179 posts
Posted: Tuesday, July 15, 2008 - 06:27 PM UTC
Hey Eerie
Good luck with this kit... Mine ended up in the trash, after flying into a brick wall... I had trouble with the decals; the "MARINES" one and the the stars and bars folded back on themselves and I stuck very quickly. I couldn't get them unfolded or off the model.
Here are a couple of picks with what I did to the interior. It's just thin styrene rod painted chrome, with tamiya tape painted red.
I found some reference photos on the web to help me. See CH-46D
Cheers
Wiz
eerie
United Kingdom
Joined: September 26, 2004
KitMaker: 1,008 posts
AeroScale: 106 posts
Joined: September 26, 2004
KitMaker: 1,008 posts
AeroScale: 106 posts
Posted: Wednesday, July 16, 2008 - 01:55 AM UTC
Quoted Text
Hey Eerie
Good luck with this kit... Mine ended up in the trash, after flying into a brick wall... I had trouble with the decals; the "MARINES" one and the the stars and bars folded back on themselves and I stuck very quickly. I couldn't get them unfolded or off the model.
Here are a couple of picks with what I did to the interior. It's just thin styrene rod painted chrome, with tamiya tape painted red.
I found some reference photos on the web to help me. See CH-46D
Cheers
Wiz
Outstanding work on the jumpseats dude, i ll attempt on scratch building them, if all else fail, i ll do the empty version like the ones displayed on the site above
eerie
United Kingdom
Joined: September 26, 2004
KitMaker: 1,008 posts
AeroScale: 106 posts
Joined: September 26, 2004
KitMaker: 1,008 posts
AeroScale: 106 posts
Posted: Friday, July 18, 2008 - 09:01 PM UTC
Wizard do you have anymore reference photos to ur model. How do you populate the cockpit esp the pilot seats which are rather bare
wizard179
New South Wales, Australia
Joined: January 27, 2006
KitMaker: 251 posts
AeroScale: 179 posts
Joined: January 27, 2006
KitMaker: 251 posts
AeroScale: 179 posts
Posted: Saturday, July 19, 2008 - 09:01 PM UTC
Hi Eerie
Thanks for the comments! I didn't do any work on the cockpit, the buid was supposed to be something to do whilst I was at home, sick. The cargo interior was just too plain to live with, especially with the rear ramp down. It was pretty rough, the seats are not to scale (but it looked good closed up)
All the reference I had was pulled from the internet. The only pictures of the cockpit were of the instrument panel with glimpses of the seats. I'll PM you a couple, I don't know which site they came from so I can't give the appropriate credit for them. I ended up using Google images and searching for combinations of "CH-46", "Sea Knight", "interior" and "Cockpit"
Cheers
Wiz
eerie
United Kingdom
Joined: September 26, 2004
KitMaker: 1,008 posts
AeroScale: 106 posts
Joined: September 26, 2004
KitMaker: 1,008 posts
AeroScale: 106 posts
Posted: Tuesday, July 22, 2008 - 05:09 AM UTC
My current progress. I ve completed the wash and painting but have yet to take photos. I even manage to fabricate the seats
eerie
United Kingdom
Joined: September 26, 2004
KitMaker: 1,008 posts
AeroScale: 106 posts
Joined: September 26, 2004
KitMaker: 1,008 posts
AeroScale: 106 posts
Posted: Friday, July 25, 2008 - 04:05 AM UTC