_GOTOBOTTOM
Early Aviation
Discuss World War I and the early years of aviation thru 1934.
Airfix RE8 in 1:72
JimMrr
_VISITCOMMUNITY
Ontario, Canada
Joined: January 03, 2007
KitMaker: 1,505 posts
AeroScale: 595 posts
Posted: Tuesday, July 29, 2008 - 10:52 AM UTC
Here is the RE8 by airfix . I believe the date stampled on the inside of the fuselage was 1958 for the molds
The intirior was completely scratch built, using windsock datafile for reference

The insturment panel guages were drilled using microdrills(I didnt have a holepunch at the time) and backed with sheetstock.The needles were scratched in with a knife and peclil residue was used to colour the scratch,leaving a nice thin needle.

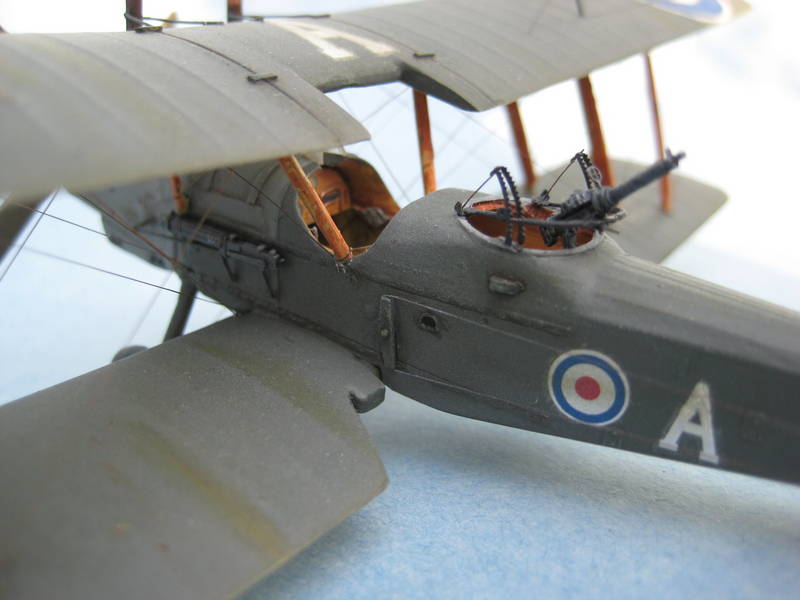
the machine guns were stolen from a toko kit,and the SCARFF ring is Eduard photo etch.

The engine started as an Aeroclub Liberty engine. I cut down the number of cylinders and Frankenstiened it to fit the airframe.

The exhaust pipes are aluminum pipe,flattened and drilled out,grafted to the original engine manifold.

Another shot of the observers office.

The tailskid is completely scratchbuilt.

MerlinV
_VISITCOMMUNITY
Victoria, Australia
Joined: November 26, 2006
KitMaker: 608 posts
AeroScale: 602 posts
Posted: Tuesday, July 29, 2008 - 11:20 AM UTC
Wow! That is a little ripper Jim.
Obviously you like to rework things that mere mortals fear to touch.

Cheers,

Hugh
JimMrr
_VISITCOMMUNITY
Ontario, Canada
Joined: January 03, 2007
KitMaker: 1,505 posts
AeroScale: 595 posts
Posted: Tuesday, July 29, 2008 - 11:27 AM UTC
Thanks Hugh..I dont know what got into me
Murdo
_VISITCOMMUNITY
Scotland, United Kingdom
Joined: May 25, 2005
KitMaker: 2,218 posts
AeroScale: 211 posts
Posted: Tuesday, July 29, 2008 - 11:58 AM UTC
Lovely model Jim. Lovely, lovely model!
JackFlash
_VISITCOMMUNITY
Colorado, United States
Joined: January 25, 2004
KitMaker: 11,669 posts
AeroScale: 11,011 posts
Posted: Tuesday, July 29, 2008 - 12:15 PM UTC
The old Harry Tate in 1/72 never looked so good. Nicely done sir!
thegirl
_VISITCOMMUNITY
Alberta, Canada
Joined: January 19, 2008
KitMaker: 6,743 posts
AeroScale: 6,151 posts
Posted: Tuesday, July 29, 2008 - 01:57 PM UTC
Wonderful job done Jim . The office is fantastic , how did you do your wood grain ?
JimMrr
_VISITCOMMUNITY
Ontario, Canada
Joined: January 03, 2007
KitMaker: 1,505 posts
AeroScale: 595 posts
Posted: Tuesday, July 29, 2008 - 02:16 PM UTC
Thanks again Terri. Its a simple tecnique really...it just takes a bit of practice. I Do all my woodgrain using it.
1-start by undercoating using Humbrol linen. allow to cure for 4 days minimum
2- apply a thin coat of future floor polish(acrylic gloss). Allow to cure 1 day minimum
3-apply a slightly thinned oilpaint (from tube) I use Raw Sienna or Burnt Umber depending upon your desired effect. Iv heard the goal is to see a honey colour, but I usually go deeper. Use a brush for this,and go kinda slow...youre looking for brushmarks,not a smooth finish..the brushmarks are your grain......alllow to set for 5 days minimum.
Its not hard,but I find its not that predictable either...I like to work up my "mojo"before doing it....practice on evergreen stock or an old model.....I have a Lloyd from Special Hobby that Im waiting to REALLY put this tecnique to the test on.....(I think youd like the Lloyd kit ,Terri...check it out at your LHS)
thegirl
_VISITCOMMUNITY
Alberta, Canada
Joined: January 19, 2008
KitMaker: 6,743 posts
AeroScale: 6,151 posts
Posted: Tuesday, July 29, 2008 - 02:47 PM UTC
Thanks for tips Jim . I still need to work on this tecknic some more . I do have Raw Umber oil paint in the tube . Just nothing to thin it with and for clean up . I already have the Special Hobby kit of the Lloyd C.V and it is a very nice kit indeed and very cool looking ! Thanks for the link as well . I would like to get another one , one with the Gun housing and one with out .
JimMrr
_VISITCOMMUNITY
Ontario, Canada
Joined: January 03, 2007
KitMaker: 1,505 posts
AeroScale: 595 posts
Posted: Wednesday, July 30, 2008 - 12:07 PM UTC
I always use Enamel thinners straight from the bottle. I take an eyedropper, transfer what I need to a small "working jar" and work my brush from there so as not to taint my supply.
thegirl
_VISITCOMMUNITY
Alberta, Canada
Joined: January 19, 2008
KitMaker: 6,743 posts
AeroScale: 6,151 posts
Posted: Wednesday, July 30, 2008 - 02:14 PM UTC
So any Enamel thinner will work then ? I can't even remember when I got the paint or where
RAGIII
_VISITCOMMUNITY
North Carolina, United States
Joined: June 19, 2007
KitMaker: 604 posts
AeroScale: 600 posts
Posted: Wednesday, July 30, 2008 - 03:26 PM UTC

Quoted Text

So any Enamel thinner will work then ? I can't even remember when I got the paint or where


Terri,
You will find that that Testors model masters airbrush thinner or any similar product works with tube oils. They actually enhance drying time! I don't know that burnt umber would give you the effect you want, try as Jim said, burnt sienna and RAW sienna.

Jim, beautiful work on that old relic of a kit!
RAGIII
JimMrr
_VISITCOMMUNITY
Ontario, Canada
Joined: January 03, 2007
KitMaker: 1,505 posts
AeroScale: 595 posts
Posted: Thursday, July 31, 2008 - 12:50 PM UTC
Many thanks Rick!!
JimMrr
_VISITCOMMUNITY
Ontario, Canada
Joined: January 03, 2007
KitMaker: 1,505 posts
AeroScale: 595 posts
Posted: Monday, August 04, 2008 - 01:47 PM UTC
Terri I use a generic enamel paint thinner that I pick up at my LHS for thinning oil paints all the time ..works great..I use Laquer thinner from Canadian Tire to clean my airbrushes
thegirl
_VISITCOMMUNITY
Alberta, Canada
Joined: January 19, 2008
KitMaker: 6,743 posts
AeroScale: 6,151 posts
Posted: Monday, August 04, 2008 - 02:28 PM UTC
thanks jim !
 _GOTOTOP