Merlin
 Senior Editor
#017
United Kingdom
Joined: June 11, 2003
KitMaker: 17,582 posts
AeroScale: 12,795 posts
Posted: Thursday, September 04, 2008 - 09:44 AM UTC
Hi Eetu
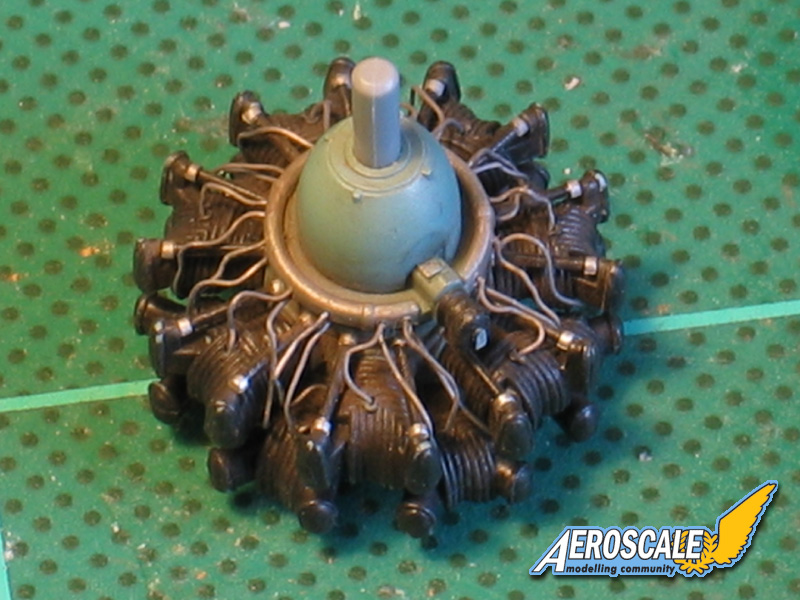
Thanks for spotting that! On the low-res photo I'd used as a reference, only one cable was evident, but in a better pic from a different angle, the two ignition wires seem to start one behind the other. I'll add some extra wires.

All the best
Rowan

BEWARE OF THE FEW...
As I grow older, I regret to say that a detestable habit of thinking seems to be getting a hold of me. - H. Rider Haggard
Merlin
Senior Editor #017
United Kingdom
Joined: June 11, 2003
KitMaker: 17,582 posts
AeroScale: 12,795 posts
Posted: Thursday, September 04, 2008 - 10:03 AM UTC
Hi again
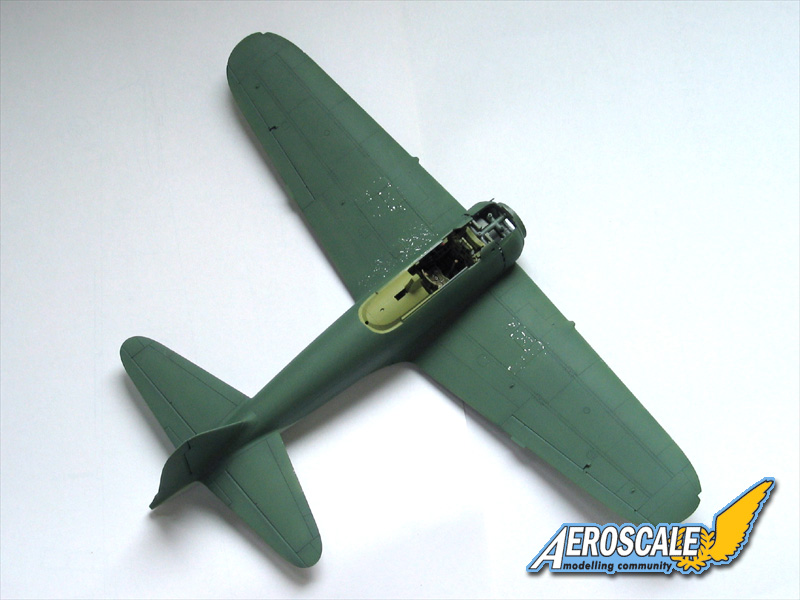
On the subject if the cannon covers, I found that one fit reasonably well (on the top surface) - the other didn't:

The underside of both covers need a lot of filling.
I don't really know how much to weather this kit, because I don't have any photos of the actual aircraft in the decal options. I've felt almost obliged to do some pre-shading - and it gave a chance to try my back-up airbrush that cost less than £20!

All the best
Rowan
BEWARE OF THE FEW...
As I grow older, I regret to say that a detestable habit of thinking seems to be getting a hold of me. - H. Rider Haggard
Merlin
Senior Editor #017
United Kingdom
Joined: June 11, 2003
KitMaker: 17,582 posts
AeroScale: 12,795 posts
Posted: Saturday, September 06, 2008 - 12:56 AM UTC
Hi again
I found a cutaway of the engine in Robert Mikesh's "Zero Fighter (Zokeisha Publications / Jane's, 1981) which shows the extra ignition cables running to the back of each cylinder. I've squeezed them in - a bit of a fudge, but the engine will be largely hidden:
More later.
All the best
Rowan
BEWARE OF THE FEW...
As I grow older, I regret to say that a detestable habit of thinking seems to be getting a hold of me. - H. Rider Haggard
Merlin
Senior Editor #017
United Kingdom
Joined: June 11, 2003
KitMaker: 17,582 posts
AeroScale: 12,795 posts
Posted: Saturday, September 06, 2008 - 09:15 AM UTC
Hi again
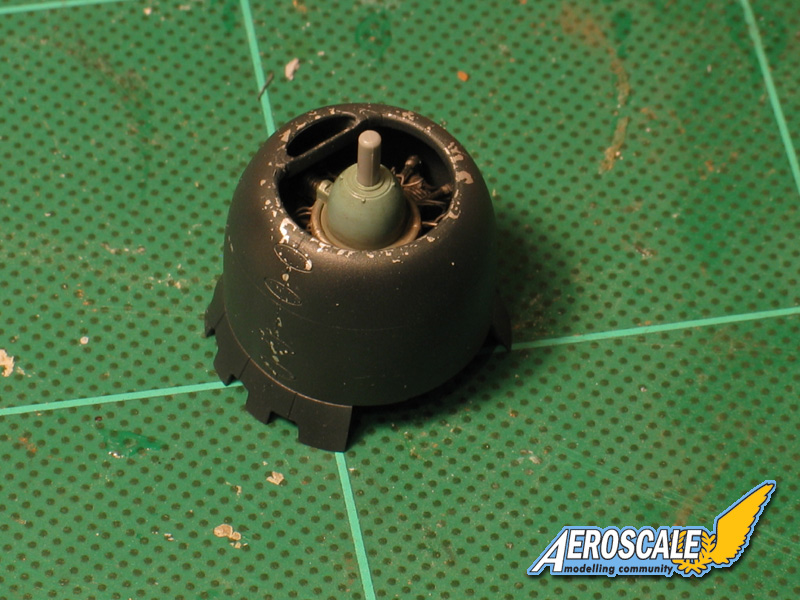
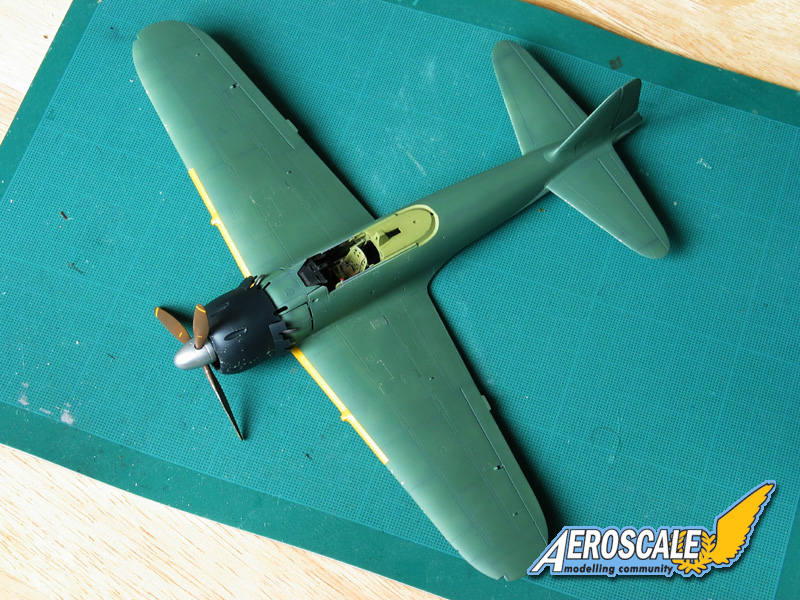
A bit more progress. The engine is in its cowling and I've started a little weathering:
Tamiya's canopy masks are a blessing, but I still can't pretend cutting them out is my favourite job in the world

:
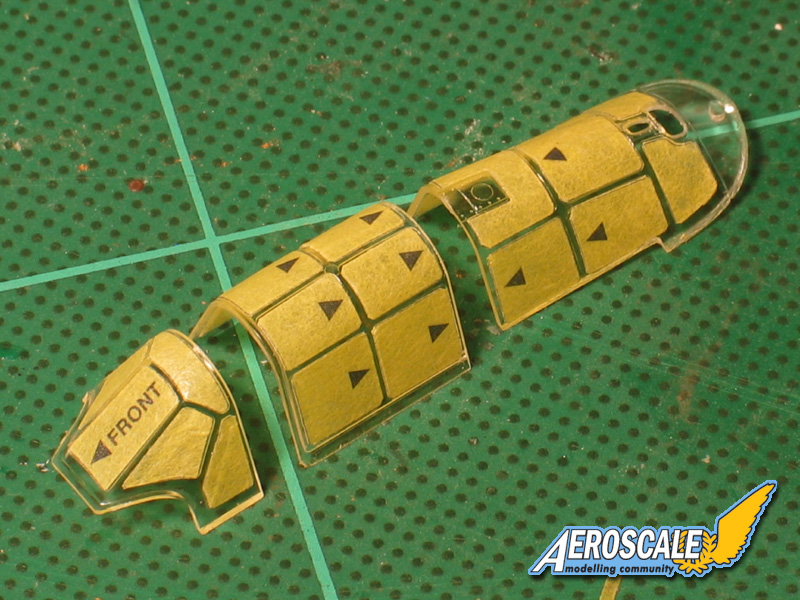
The aircraft's underside is painted and I'll do the topside tonight so it'll be dry in the morning. Touch wood I'll have something looking like a Zero by end of play tomorrow...
All the best
Rowan
BEWARE OF THE FEW...
As I grow older, I regret to say that a detestable habit of thinking seems to be getting a hold of me. - H. Rider Haggard
Merlin
Senior Editor #017
United Kingdom
Joined: June 11, 2003
KitMaker: 17,582 posts
AeroScale: 12,795 posts
Posted: Saturday, September 06, 2008 - 11:02 AM UTC
Hi again
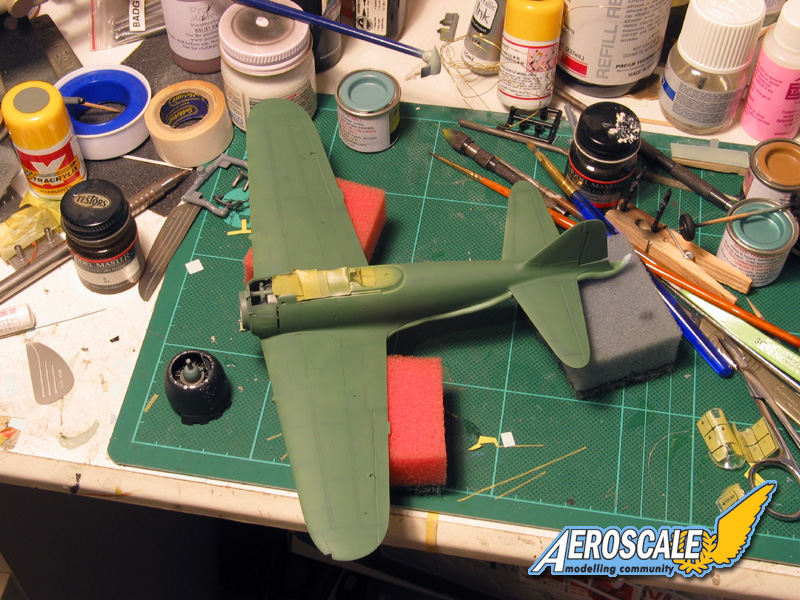
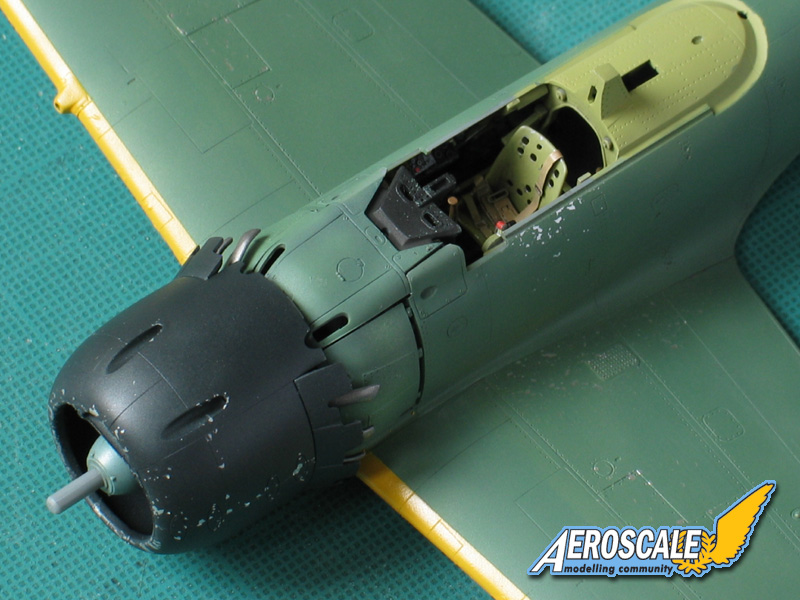
I must admit the top surface colour is a bit of a surprise... it's just somehow not what I was expecting at all:
I'm using WEM's Japanese Colourcoats which have been very favourably reviewed over on
http://www.j-aircraft.com/. If the experts are happy, I am.
So, I've used ACJ02 - Nakajima Navy Grey on the underside and ACJ03 Nakajima Navy Green for the topside. The cowling is painted with a recent addition to the range, ACJ08 - Mitsubishi Cowl Blue-Black. It's not evident in the photo here, but to the eye, there's a subtle blue tint that takes it away from the pure black that Tamiya recommend.
All the best
Rowan
BEWARE OF THE FEW...
As I grow older, I regret to say that a detestable habit of thinking seems to be getting a hold of me. - H. Rider Haggard
Moselle, France
Joined: May 15, 2005
KitMaker: 5,653 posts
AeroScale: 4,347 posts
Posted: Saturday, September 06, 2008 - 11:11 AM UTC
Hi Rowan!
This is looking very good!
Do you plan to add a gloss coat over the paint. If yes, I think it will probably darken the camouflage color a bit. The cowling looks great with that paint chipping. Did you used your Maskol method?
Jean-Luc

Better think one hour and build five minutes...
Than think five minutes and build an hour!
Merlin
Senior Editor #017
United Kingdom
Joined: June 11, 2003
KitMaker: 17,582 posts
AeroScale: 12,795 posts
Posted: Saturday, September 06, 2008 - 11:33 AM UTC
Hi Jean-Luc
Yes, a gloss-coat will darken the green a bit - but then a further matt-coat after weathering will lighten it again. It's still not the colour I expected, but surprise discoveries like this a major part of what makes modelling worthwhile.
I didn't exactly promise a Sunday finish, but that was my target. Anyway, Jay Laverty of MasterCasters has very kindly put a set of his Warpigs finishing pigments in the post to us, so I'll hold off on the final topcoat until I've had a chance to try them on the Zero.
The chipping is done with latex - I don't use Maskol, or any of the proprietary masking fluids, because they are an expensive way of doing what can be achieved with basic latex. You can buy Latex in bulk, which is great for modelling clubs, but be warned - it does go off. Good old Copydex adhesive is a cost-effective alternative.
All the best
Rowan
BEWARE OF THE FEW...
As I grow older, I regret to say that a detestable habit of thinking seems to be getting a hold of me. - H. Rider Haggard
Germany
Joined: September 07, 2005
KitMaker: 5,609 posts
AeroScale: 5,231 posts
Posted: Saturday, September 06, 2008 - 10:12 PM UTC
Wow Rowan
one of your "speed-of-light" builds! Very cleanly executed, excellent paint job and fast!!!
Hope you take some pictures in natural lighting .. I too find the color "unexpected" a little too bright and a little too yellow (might be the lighting) .. do the WEM colours come with a scale brightening?
cheers
Steffen
DULCE ET DECORUM EST PRO HOBBY MORI
Merlin
Senior Editor #017
United Kingdom
Joined: June 11, 2003
KitMaker: 17,582 posts
AeroScale: 12,795 posts
Posted: Saturday, September 06, 2008 - 10:39 PM UTC
Cheers Steffen
Here you go - the colour in the cold light of a rather bleak London morning:
John Snyder has told me in the past that WEM don't do any "scale effect" in their Colourcoats.
All the best
Rowan
BEWARE OF THE FEW...
As I grow older, I regret to say that a detestable habit of thinking seems to be getting a hold of me. - H. Rider Haggard
Germany
Joined: September 07, 2005
KitMaker: 5,609 posts
AeroScale: 5,231 posts
Posted: Saturday, September 06, 2008 - 10:44 PM UTC
Hi Rowan
well, to me this looks quite o.k. now. Some postshading, a filter and/or a washing plus chipping and you'll be all right (at least in my opinion).
thanks for posting the additional pic.
cheers
Steffen
DULCE ET DECORUM EST PRO HOBBY MORI
Merlin
Senior Editor #017
United Kingdom
Joined: June 11, 2003
KitMaker: 17,582 posts
AeroScale: 12,795 posts
Posted: Sunday, September 07, 2008 - 05:28 AM UTC
Hi again
Steady progress - but too little to get to the finishing line tonight. I suppose I should take consolation from the fact that simply keeping going is an achievement for me!
I was measuring up to paint the ID panels on the wings, when I noticed belatedly that the painting instructions show a wraparound of the topside green. So I went back half a stage and added that before the yellow. Once the yellow is properly dry, there's a little latex to peel off for some paint chips.
I'll fit the cowl guns and get the gloss coat on tonight, maybe even some decals - but I think it's more realistic to plan those for tomorrow.
All the best
Rowan
BEWARE OF THE FEW...
As I grow older, I regret to say that a detestable habit of thinking seems to be getting a hold of me. - H. Rider Haggard
betheyn
Senior Editor #019
England - South East, United Kingdom
Joined: October 14, 2004
KitMaker: 4,560 posts
AeroScale: 2,225 posts
Posted: Monday, September 08, 2008 - 07:50 AM UTC
Excellent work Rowan. The finish line is in sight, keep going.
I will be watching you weather the aircraft with pigments with interest. I have tried it a couple of times on aircraft and didn't really like the result much, buts that's probably more to do with how I applied them then the pigments.
Andy
It's not the same, better, but not the same...
Merlin
Senior Editor #017
United Kingdom
Joined: June 11, 2003
KitMaker: 17,582 posts
AeroScale: 12,795 posts
Posted: Monday, September 08, 2008 - 08:14 AM UTC
Cheers Andy
Jay has e-mailed to say he's also sending some test shots of new oil and acrylic washes, so I'll give them an outing too.
By way of a progress report: I've polished the gloss coat and have started applying decals.
All the best
Rowan
BEWARE OF THE FEW...
As I grow older, I regret to say that a detestable habit of thinking seems to be getting a hold of me. - H. Rider Haggard
England - East Anglia, United Kingdom
Joined: November 09, 2006
KitMaker: 295 posts
AeroScale: 276 posts
Posted: Monday, September 08, 2008 - 08:38 AM UTC
Rowan, this is coming on really well and fast too!!
I'm really looking forward to seeing it all finished up. Just out of interest what colour did you use for the prop?
Thanks.
Howard
Merlin
Senior Editor #017
United Kingdom
Joined: June 11, 2003
KitMaker: 17,582 posts
AeroScale: 12,795 posts
Posted: Monday, September 08, 2008 - 09:01 AM UTC
Hi Howard
Many thanks for your kind words. I've painted the propeller with WEM's ACJ13 Red-Brown Primer, and ACJ19 ID Yellow for the stripes.
I've got the first markings on and I think I'm going to have revise my opinion of Tamiya decals! I must admit I haven't used any for years, because I always found them a bit thick. But these ones have responded beautifully to Mr Softener - snuggling down into the fine panel lines and rivet detail:

All the best
Rowan
BEWARE OF THE FEW...
As I grow older, I regret to say that a detestable habit of thinking seems to be getting a hold of me. - H. Rider Haggard
#029
England - East Midlands, United Kingdom
Joined: December 23, 2005
KitMaker: 6,249 posts
AeroScale: 3,270 posts
Posted: Monday, September 08, 2008 - 12:08 PM UTC
Yeah Rowan...
Its painted,its at least partially decalled............
KEEP GOING!!!
Decals look lovely. Tamiya decals Ive found can be a little hit or miss,,Ive had instances of them reacting badly to Microsol, perhaps Mr Softener is a little less fierce?
Looking forward to seeing how the pigments work as well.
Soon be finished!
Nige
It's not the same, better, but not the same...
Moselle, France
Joined: May 15, 2005
KitMaker: 5,653 posts
AeroScale: 4,347 posts
Posted: Thursday, September 11, 2008 - 10:43 PM UTC
Hi Rowan,
I don't know if it is too late... or if I'm right, but are you sure about the color of the decking behind the cockpit? I've read over at
www.j-aircraft.com that this area was painted the same way as the cowling or the upper color, (black or dark green).
Quoted Text
The cockpit decking should be black on the Nakajima A6M5 but is the same FS 4052 green as the rest of the upper surface camouflage green on the Mitsubishi Type 52.
Another source
hereQuoted Text
As for the Zero, notice that the surfaces under the windscreen and the canopy were most of the time (if not systmeatically at factory level) finished the cowling color: Mitsubishi blue-black or Nakajima gray-black.
What do you think?

Jean-Luc
Better think one hour and build five minutes...
Than think five minutes and build an hour!
Merlin
Senior Editor #017
United Kingdom
Joined: June 11, 2003
KitMaker: 17,582 posts
AeroScale: 12,795 posts
Posted: Friday, September 12, 2008 - 12:03 AM UTC
Quoted Text
Hi Rowan,
I don't if it is too late... or if I'm right, but are you sure about the color of the decking behind the cockpit? I've read over at www.j-aircraft.com that this area was painted the same way as the cowling or the upper color, (black or dark green).
Quoted Text
The cockpit decking should be black on the Nakajima A6M5 but is the same FS 4052 green as the rest of the upper surface camouflage green on the Mitsubishi Type 52.
Another source here
Quoted Text
As for the Zero, notice that the surfaces under the windscreen and the canopy were most of the time (if not systmeatically at factory level) finished the cowling color: Mitsubishi blue-black or Nakajima gray-black.
What do you think?
Jean-Luc
Hi Jean-Luc
Thanks for the heads-up! No, it's not too late - I haven't fitted the canopy yet. For once, it's lucky I'm such a slow builder!

By way of an update, the decals are on and a gloss-coat (Future/Klear) applied to seal them. Jay Laverty has sent through some new oil and acrylic washes to test along with his Warpigs, so I'll give them a try tomorrow.
All the best
Rowan
BEWARE OF THE FEW...
As I grow older, I regret to say that a detestable habit of thinking seems to be getting a hold of me. - H. Rider Haggard
Merlin
Senior Editor #017
United Kingdom
Joined: June 11, 2003
KitMaker: 17,582 posts
AeroScale: 12,795 posts
Posted: Friday, September 12, 2008 - 08:40 AM UTC
Hi again Jean-Luc
Checking through the photos of Zeros I've got in various books, all those showing the headrest and the area behind it under canopy painted in the cockpit colour are fully restored museum exhibits. Wartime photos which I've found and the preserved cockpit section at the IWM are much darker.
All the best
Rowan
BEWARE OF THE FEW...
As I grow older, I regret to say that a detestable habit of thinking seems to be getting a hold of me. - H. Rider Haggard
betheyn
Senior Editor #019
England - South East, United Kingdom
Joined: October 14, 2004
KitMaker: 4,560 posts
AeroScale: 2,225 posts
Posted: Wednesday, September 17, 2008 - 01:02 AM UTC
Any more updates on this build Rowan. You haven't "forgotten" about it have you

.
Andy
It's not the same, better, but not the same...
Merlin
Senior Editor #017
United Kingdom
Joined: June 11, 2003
KitMaker: 17,582 posts
AeroScale: 12,795 posts
Posted: Wednesday, September 17, 2008 - 01:59 AM UTC
Hi Andy
I'm afraid not (about the updates) - I haven't had a chance to do any modelling since last week. I hope to do a bit tomorrow night...
All the best
Rowan
BEWARE OF THE FEW...
As I grow older, I regret to say that a detestable habit of thinking seems to be getting a hold of me. - H. Rider Haggard
Germany
Joined: September 07, 2005
KitMaker: 5,609 posts
AeroScale: 5,231 posts
Posted: Tuesday, September 23, 2008 - 04:06 AM UTC
Hi Rowan
I hope you haven't quit modelling ..
a bit more on colours that came up today on HS ...
http://www.network54.com/Forum/149674/thread/1222166122/if you do not hurry I will start this model too .. the Hellcat is nearing completion .. just this darn ignition wires keep me away from it

cheers
Steffen
DULCE ET DECORUM EST PRO HOBBY MORI
Merlin
Senior Editor #017
United Kingdom
Joined: June 11, 2003
KitMaker: 17,582 posts
AeroScale: 12,795 posts
Posted: Sunday, November 02, 2008 - 08:35 AM UTC
Hi again
Just to surprise Jean-Luc and Steffen... here's the scene on the workbench ahead of what was meant to be a solid weekend's modelling - before I caught some sort of bug and was out for the count!

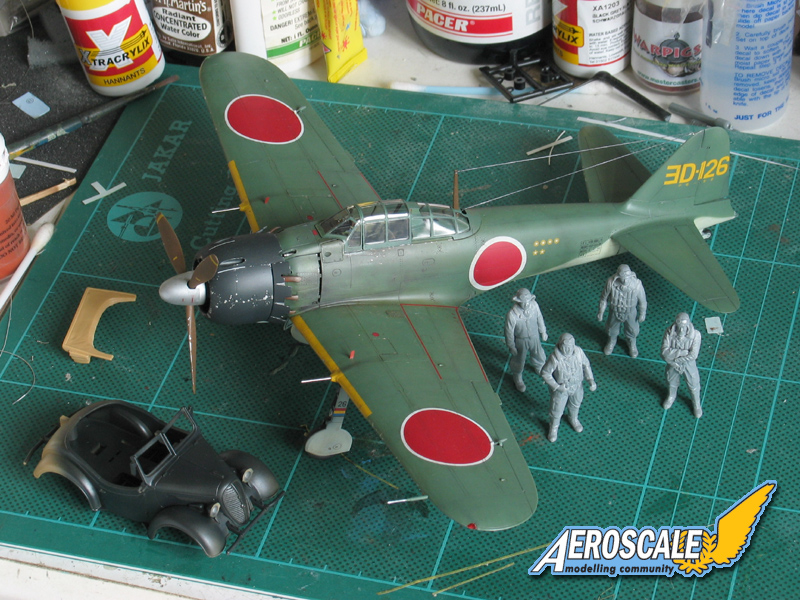
I hardly dare say it, but the Zero is basically finished. As you can see, I'm planning a little vignette with the kit figures and Tamiya's Kurogane - painted in Navy colours, which will both make a change from all the khaki ones and also hopefully hide the simplified interior a bit (I want to model the top down).
I'll take some proper pics once it all comes together.
All the best
Rowan
BEWARE OF THE FEW...
As I grow older, I regret to say that a detestable habit of thinking seems to be getting a hold of me. - H. Rider Haggard
Michigan, United States
Joined: February 11, 2008
KitMaker: 311 posts
AeroScale: 278 posts
Posted: Sunday, November 02, 2008 - 02:05 PM UTC
Rowan:
The Zero looks great. Looking forward to seeing the vignette.
Hope you feel better
Taylor
Current Builds:
FW 190 D (Butcher Bird)
P61A (Night Stalkers)
P47D (CaveTonitrum)
Sea Fury ( Airedale Navy)
S-199 for finish the job again on Armorama
Western Australia, Australia
Joined: June 05, 2007
KitMaker: 2,166 posts
AeroScale: 105 posts
Posted: Sunday, November 02, 2008 - 08:07 PM UTC
Hi Rowan,
Things are looking very nice. I am looking forward to the vignette and figure painting. Be sure to show us your progress on that too!
Chas
Like Military History? Check out the History Club forum here on the Kitmaker Net.