

OK.....I'm a tad new to the WWI era.
In my RAF SE5a, what color is the exterior camo? PC10? I ask that sheepishly as I don't have a clue to what PC10 is..............I have seen them referenced.
Besides winging it, what is a good color for clean linen interior? Clear Doped linen on underwing?
Regards
Steve
Early Aviation
Discuss World War I and the early years of aviation thru 1934.
Discuss World War I and the early years of aviation thru 1934.
Hosted by Jim Starkweather
SE 5a questions
Hatter50

Joined: June 17, 2006
KitMaker: 478 posts
AeroScale: 391 posts

Posted: Monday, August 18, 2008 - 01:15 PM UTC

Cob
Joined: May 23, 2002
KitMaker: 275 posts
AeroScale: 15 posts

Posted: Monday, August 18, 2008 - 01:43 PM UTC
Hi Steve,
I asked the same question a few days ago. I'm told Tamiya deck tan is a good match for clear doped linen.
v/r,
Rob
I asked the same question a few days ago. I'm told Tamiya deck tan is a good match for clear doped linen.
v/r,
Rob

MerlinV

Joined: November 26, 2006
KitMaker: 608 posts
AeroScale: 602 posts

Posted: Monday, August 18, 2008 - 03:22 PM UTC
PC10 can be fairly closely matched with a dark Olive Drab.
It was a standard recipe but it tended to be seen in slightly different shades depending on climate, wear and the time since application...
To my mind, you can't go far wrong with a Tamiya Dark Olive Drab (add a bit of Dark Green to taste).
So far as lower surfaces goes, Cob is right. I use Tamiya Deck Tan with a little white added. You might want to dirty it up along the ribs with a thin spray of Tamiya Dessert Yellow.
I will now post the same photo that I put up for Cob. Notice the diffence where the extra coats of dope have gone on on top of the rib tapes.


Cheers,
Hugh
It was a standard recipe but it tended to be seen in slightly different shades depending on climate, wear and the time since application...
To my mind, you can't go far wrong with a Tamiya Dark Olive Drab (add a bit of Dark Green to taste).
So far as lower surfaces goes, Cob is right. I use Tamiya Deck Tan with a little white added. You might want to dirty it up along the ribs with a thin spray of Tamiya Dessert Yellow.
I will now post the same photo that I put up for Cob. Notice the diffence where the extra coats of dope have gone on on top of the rib tapes.
Cheers,
Hugh
Hatter50
Joined: June 17, 2006
KitMaker: 478 posts
AeroScale: 391 posts
Posted: Monday, August 18, 2008 - 11:25 PM UTC
Ask a stupid question  ................and get some really good answers. Thanks for the help.
I'm slowly "getting there" with the SE5.
Regards
Steve
................and get some really good answers. Thanks for the help. I'm slowly "getting there" with the SE5.
Regards
Steve
MerlinV
Joined: November 26, 2006
KitMaker: 608 posts
AeroScale: 602 posts
Posted: Tuesday, August 19, 2008 - 11:25 AM UTC
Oh, forgot to say...
Humbrol used to do a PC10. It was item number 108, but is now discontinued. I stocked up on a few tins way back when I used to brush paint every thing in Humbrol enamels...
It had that pleasing dark Olive green with a tinge of dark chocolate brown that is sometimes described in PC10. It also had a slight satin sheen which buffed up really well for a 1/48 scale finish.
It's a same that it was discontinued... It's also a shame that I hate spraying with enamels!
Cheers,
Hugh

thegirl

Joined: January 19, 2008
KitMaker: 6,743 posts
AeroScale: 6,151 posts
Posted: Tuesday, August 19, 2008 - 01:41 PM UTC
If you can find it Polly Scale has PC 10 not sure on the paint number though .
Hatter50
Joined: June 17, 2006
KitMaker: 478 posts
AeroScale: 391 posts
Posted: Tuesday, August 19, 2008 - 02:04 PM UTC
I think I'll work a custom Olive Drab. I'll have to work on the color some. It will be airbrushed and most likely will be enamel. I plan to have it slightly sun faded, so that will distort the color anyway.
It certainly is good to have a treasuretrove of experts that can be called up for those simple yet elusive answers. Something as simple as PC10 is a very complicated issue.
Regards
Steve
It certainly is good to have a treasuretrove of experts that can be called up for those simple yet elusive answers. Something as simple as PC10 is a very complicated issue.
Regards
Steve
MerlinV
Joined: November 26, 2006
KitMaker: 608 posts
AeroScale: 602 posts
Posted: Tuesday, August 19, 2008 - 02:58 PM UTC
Quoted Text
Something as simple as PC10 is a very complicated issue.
You have no idea just how complicated!

Cheers,
Hugh
Hatter50
Joined: June 17, 2006
KitMaker: 478 posts
AeroScale: 391 posts
Posted: Wednesday, August 20, 2008 - 04:23 AM UTC
Hugh 

I'm sure it is grounds for long running threads.
My version will be a modified Olive Drab (faded and weathered)
Regards
Steve
I'm sure it is grounds for long running threads.
My version will be a modified Olive Drab (faded and weathered)
Regards
Steve
Hatter50
Joined: June 17, 2006
KitMaker: 478 posts
AeroScale: 391 posts
Posted: Wednesday, August 20, 2008 - 04:44 AM UTC
Lets see if someone notices a few new SE5a Questions for the experts.
1. The wing pulley inspection "openings".....do they have glass over them, or are they open? I ask because some are on the upper portions of the surfaces.........that would allow water to get inside with the wooden structure.
2. Did the SE5a use "cable" for the flying wires in it's operational days, or did they use the stainless steel "one piece" wire (rod) that threads into the turnbuckles as they appear to use today? This one is just a curiousity as it won't affect my build at all.
3. When the SE5 was operational, was the inside of the engine cowlings painted PC10 or left bare metal? I will probably leave mine bare metal.
Regards
Steve
MerlinV
Joined: November 26, 2006
KitMaker: 608 posts
AeroScale: 602 posts
Posted: Wednesday, August 20, 2008 - 11:28 AM UTC
Hi Steve,
Covered. With Cellon I believe, but others may know more. Rodens decal for this is the only downfall of this or any other SE5a kit that they have done in my opnion.
I have seen many builds on various websites that show the cutting out and scratch building of the details in this area.
The SE5a was rigged (Flying and Landing wires) with RAF Wire. This was a high tensile stream lined wire (Aprox 1/2" wide and 1/4" thick) that was threaded at each end and inserted straight into the turnbuckles. This meant a hell of a lot of cutting, trimming and threading for the riggers when maintaining the aircraft.
RAF wires were used almost exclusively on allied machines after about the middle of 1917.
In this scale, there is not a lot of point in trying to replicate the streamlining of the wire.
Question three, I do not know the answer to, but I suspect that they would have been at the very least primed.
Cheers,
Hugh
Quoted Text
1. The wing pulley inspection "openings".....do they have glass over them, or are they open? I ask because some are on the upper portions of the surfaces.........that would allow water to get inside with the wooden structure.
Covered. With Cellon I believe, but others may know more. Rodens decal for this is the only downfall of this or any other SE5a kit that they have done in my opnion.
I have seen many builds on various websites that show the cutting out and scratch building of the details in this area.
Quoted Text
2. Did the SE5a use "cable" for the flying wires in it's operational days, or did they use the stainless steel "one piece" wire (rod) that threads into the turnbuckles as they appear to use today? This one is just a curiousity as it won't affect my build at all.
The SE5a was rigged (Flying and Landing wires) with RAF Wire. This was a high tensile stream lined wire (Aprox 1/2" wide and 1/4" thick) that was threaded at each end and inserted straight into the turnbuckles. This meant a hell of a lot of cutting, trimming and threading for the riggers when maintaining the aircraft.
RAF wires were used almost exclusively on allied machines after about the middle of 1917.
In this scale, there is not a lot of point in trying to replicate the streamlining of the wire.
Question three, I do not know the answer to, but I suspect that they would have been at the very least primed.
Cheers,
Hugh
Hatter50
Joined: June 17, 2006
KitMaker: 478 posts
AeroScale: 391 posts
Posted: Wednesday, August 20, 2008 - 12:13 PM UTC
Hey Hugh,
Thanks for the info. Always with the correct gouge...........Thanks
Steve
Thanks for the info. Always with the correct gouge...........Thanks
Steve

JackFlash
Joined: January 25, 2004
KitMaker: 11,669 posts
AeroScale: 11,011 posts
Posted: Wednesday, August 20, 2008 - 02:15 PM UTC
Quoted Text
". . .1. The wing pulley inspection "openings".....do they have glass over them, or are they open? I ask because some are on the upper portions of the surfaces.........that would allow water to get inside with the wooden structure.
As Hugh mentioned they were covered in clear Cellon plates and had metal framing.
Quoted Text
2. Did the SE5a use "cable" for the flying wires in it's operational days, or did they use the stainless steel "one piece" wire (rod) that threads into the turnbuckles as they appear to use today? This one is just a curiousity as it won't affect my build at all.
Also as Hugh mentioned RAF wires were used on the flying wires. (the ties running from the lower fuselage longerons to the upper wing spars.) Usually painted black.
Bracing cables that start at the cabane struts and lead down to the lower wing spars are normal 5 - 7 strand types. were normal unpainted metal.
Quoted Text
3. When the SE5 was operational, was the inside of the engine cowlings painted PC10 or left bare metal? I will probably leave mine bare metal.
The SE 5 & SE 5a metal cowlings were . . .only painted on their exteriors.
MerlinV
Joined: November 26, 2006
KitMaker: 608 posts
AeroScale: 602 posts
Posted: Wednesday, August 20, 2008 - 03:17 PM UTC
Hey Steve,
You might find this thread interesting. It is in french unfortunately, and the kit is the 1/48 one, but you will get the idea.
http://www.master194.com/forumww1/viewtopic.php?t=345&postdays=0&postorder=asc&start=0
Cheers,
Hugh
You might find this thread interesting. It is in french unfortunately, and the kit is the 1/48 one, but you will get the idea.
http://www.master194.com/forumww1/viewtopic.php?t=345&postdays=0&postorder=asc&start=0
Cheers,
Hugh
MerlinV
Joined: November 26, 2006
KitMaker: 608 posts
AeroScale: 602 posts
Posted: Wednesday, August 20, 2008 - 03:20 PM UTC
You might also find this one helpful for the underside finish.
http://www.master194.com/forumww1/viewtopic.php?t=739
Cheers,
Hugh
http://www.master194.com/forumww1/viewtopic.php?t=739
Cheers,
Hugh
Hatter50
Joined: June 17, 2006
KitMaker: 478 posts
AeroScale: 391 posts
Posted: Wednesday, August 20, 2008 - 10:52 PM UTC
Hello Stephen,
The big news from you was the unfinished inside cowling. Makes me feel a bit better as I'l going to leave mine bare metal.....if for no other reason, a visual contrast to the engine. Thank you for the info.
Hello Hugh,
2 great links there. Even if i can't read french, I can read french photos. It's amazing that, that is in 1/48. I'm already going blind looking thu my magnifyer lamp.
What I'm doing, is breaking new ground FOR ME, and I've been playing with new techniques. I've already been making notes for things to do and not do for my Albatros.
I certainly do appreciate the helpful info here.
Regards
Steve
The big news from you was the unfinished inside cowling. Makes me feel a bit better as I'l going to leave mine bare metal.....if for no other reason, a visual contrast to the engine. Thank you for the info.
Hello Hugh,
2 great links there. Even if i can't read french, I can read french photos.
It's amazing that, that is in 1/48. I'm already going blind looking thu my magnifyer lamp. What I'm doing, is breaking new ground FOR ME, and I've been playing with new techniques. I've already been making notes for things to do and not do for my Albatros.
I certainly do appreciate the helpful info here.
Regards
Steve
MerlinV
Joined: November 26, 2006
KitMaker: 608 posts
AeroScale: 602 posts
Posted: Thursday, August 21, 2008 - 10:09 AM UTC
Hey Steve,
I know what you mean. Every build I do, I try something different and new. All in the quest for a definite technique that I can rely on and achive that ellusive "Consistency".
Cheers,
Hugh
I know what you mean. Every build I do, I try something different and new. All in the quest for a definite technique that I can rely on and achive that ellusive "Consistency".
Cheers,
Hugh
Hatter50
Joined: June 17, 2006
KitMaker: 478 posts
AeroScale: 391 posts
Posted: Friday, August 22, 2008 - 12:42 PM UTC
OK, another SE5a question.
I have seen 27 different ways to "Latch" the front engine cowling down. That is to make sure the wind doesn't pick it up and do bad things with it. From what I "See" in reference photos the cowl laps UP and over the radiator..........good news for the wind, bad for the airplane. I've seen a cable wrapped up and over the cowl in a low channel and the ends bolted to a flange about mid way down the radiator. (this method from Vintage Aviator)
I've seen it bolted down to that flange directly to the cowl. Ive seen a metal rod doing the cables work. I've seen cowling in place that lends no room for any of these methods.
My "Plan" is to do the cable attachment method, will it be reasonably authentic?
Regards
Steve
JackFlash
Joined: January 25, 2004
KitMaker: 11,669 posts
AeroScale: 11,011 posts
Posted: Friday, August 22, 2008 - 03:13 PM UTC
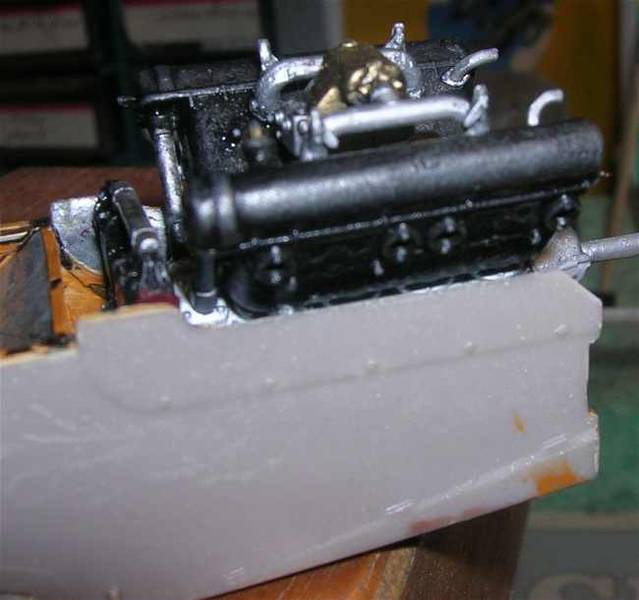
For several different licensed manufacturers of the SE 5a in 1917 - 1918, especially the Viper engine version, the cable was usually used. I am being cautious here because I have not seen every example. The cowlings where the fuselage side is notched on the pilots left at the leading edge is a good indicator of the cable's presence. See below where I cut the corner from the fuselage side panel at the leading edge.
Hatter50
Joined: June 17, 2006
KitMaker: 478 posts
AeroScale: 391 posts
Posted: Friday, August 22, 2008 - 09:50 PM UTC
Stephen,
That was the answer I was looking for, Thanks. I am "assuming" that you cut off the upper cowl skinney tab that reaches down to the notched area of yours?
Regards
Steve
That was the answer I was looking for, Thanks. I am "assuming" that you cut off the upper cowl skinney tab that reaches down to the notched area of yours?
Regards
Steve
JackFlash
Joined: January 25, 2004
KitMaker: 11,669 posts
AeroScale: 11,011 posts
Posted: Saturday, August 23, 2008 - 04:05 AM UTC
Yes, But I may have to "manufacture" a new upper bonnet myself. Even to have the engine area open. The kit items edges are just not scale thickness.

cohiba

Joined: March 19, 2007
KitMaker: 42 posts
AeroScale: 20 posts
Posted: Tuesday, August 26, 2008 - 10:48 AM UTC
Free SE.5a 1/48 decal artwork available for download from Model Airplane International Magazine.
http://www.modelaircraftmagazine.com/
'What's new'
25/07/08 - R.J. Caruana art for decals - S.E.5/5A added>>more
or just click here
http://www.modelaircraftmagazine.com/full_site/frames/info/_decalart.htm
Associated profiles are in the latest issue (#37)
No connection to the magazine or artist and I can't vouch for their accuracy. But no doubt people will find them of use.
Hatter50
Joined: June 17, 2006
KitMaker: 478 posts
AeroScale: 391 posts
Posted: Tuesday, August 26, 2008 - 10:58 AM UTC
Thank you Richard,
I saved them, but will also have to do some research into those units. Thank you for the heads up.
Regards
Steve
I saved them, but will also have to do some research into those units. Thank you for the heads up.
Regards
Steve
JackFlash
Joined: January 25, 2004
KitMaker: 11,669 posts
AeroScale: 11,011 posts
Posted: Tuesday, August 26, 2008 - 11:00 AM UTC
Thanks Richard! They very impressive.
thegirl
Joined: January 19, 2008
KitMaker: 6,743 posts
AeroScale: 6,151 posts
Posted: Tuesday, August 26, 2008 - 01:38 PM UTC
Thanks Richard for the link , They will be useful for when I build my SE 5a .
 |

WEB HOSTING BY


Copyright ©2021 AeroScale and Kitmaker Network, a subsidiary of Silver Star Enterprises
All Rights Reserved. Please read our Conditions of Use and Privacy Policy.
All Rights Reserved. Please read our Conditions of Use and Privacy Policy.