#036
England - West Midlands, United Kingdom
Joined: December 01, 2001
KitMaker: 1,998 posts
AeroScale: 23 posts
Posted: Tuesday, October 14, 2008 - 05:21 AM UTC
Hi all
As part of the display for IPMS kitmaker UK (The Bulldogs) I decided to build a 1/35 Chinook, and as this is for Scale model world in November, have actually made a start to it. The model is a little further on than show but i will try and update this blog over the next few days to catch up
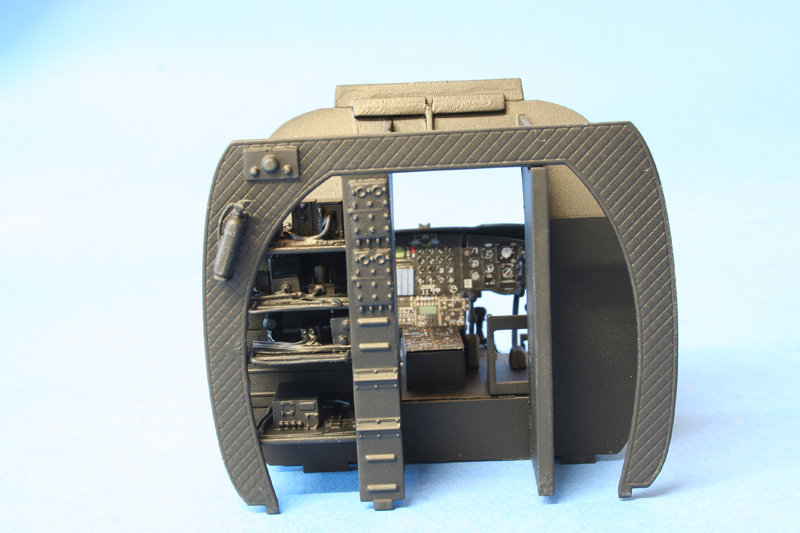
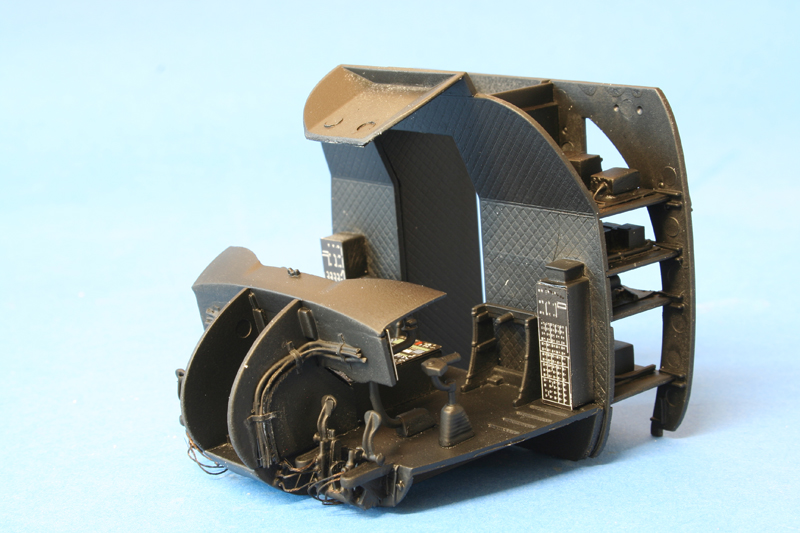
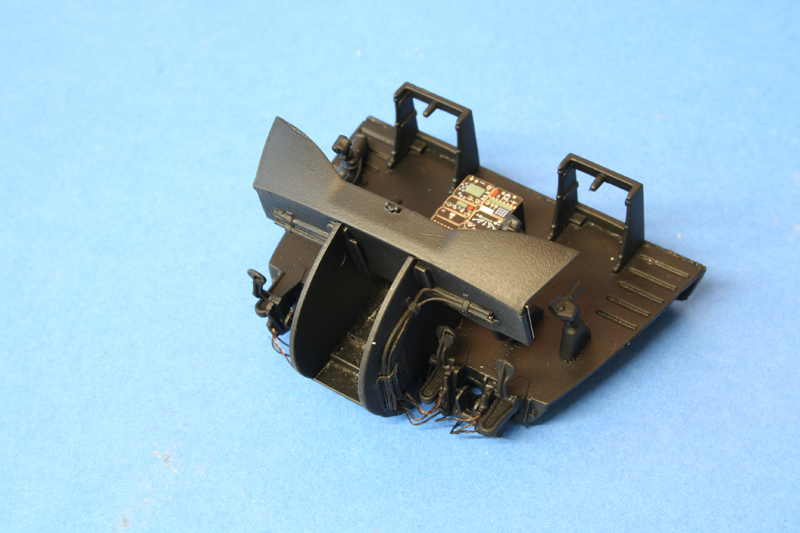
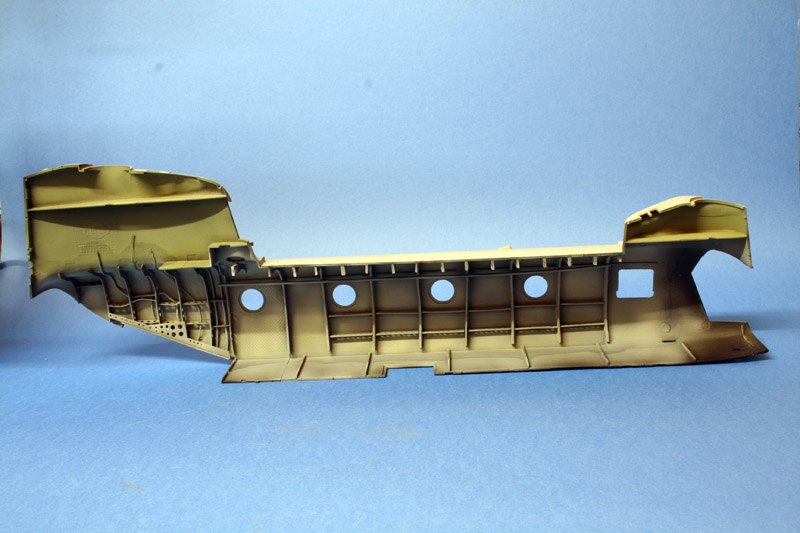
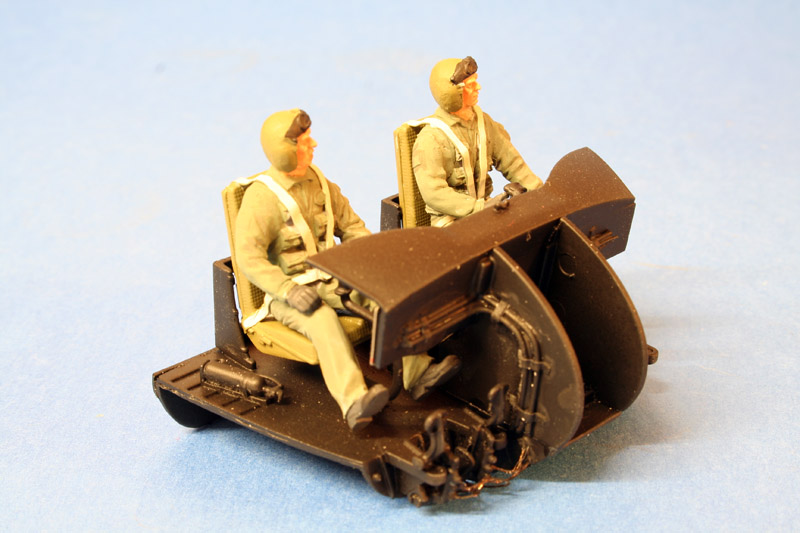
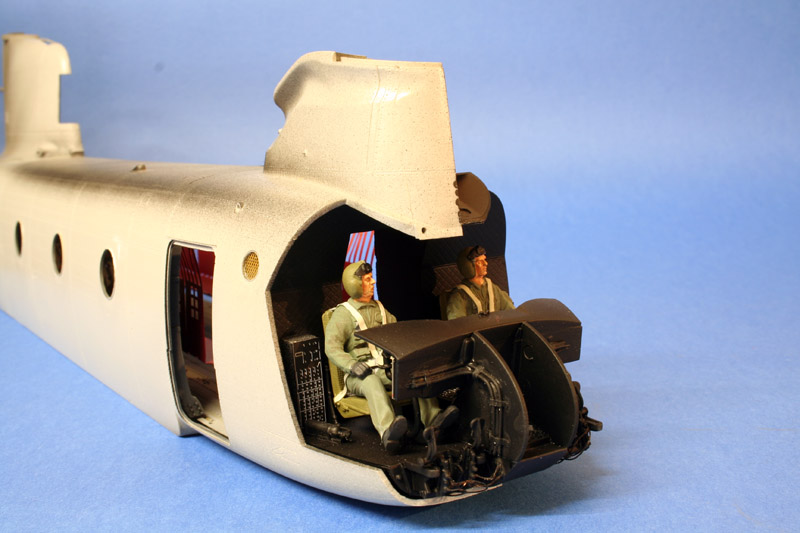
The cabin is made up from the Original Trumpeter kit, the trumpeter aircrew kit (which had another cabin as part of the kit), Cobra Models bits and Eduard Photo etch. All in all quite a bit of fiddling around when you will be unable to see most of it once done. I have added some cables and pipe work but it is minimal, it just need the crew and some detail picking out to be ready.
So to start with the cabin (crew are being painted )
thanks for looking
cheers
Keith Forsyth
A VETERAN - Whether active duty or retired is someone who, at one point in their life, wrote a blank check made payable to "Great Britain", for an amount of "up to and including my life". That is HONOUR, and there are way too many people who forget this
Paris, France
Joined: August 30, 2005
KitMaker: 2,315 posts
AeroScale: 17 posts
Posted: Tuesday, October 14, 2008 - 06:26 AM UTC
Great Keith
To see such 1/35 chopper, Are you going to mix with any 1/35 AFV ??
Or in a dio
Cheers
Seb
Florida, United States
Joined: April 16, 2007
KitMaker: 106 posts
AeroScale: 45 posts
Posted: Tuesday, October 14, 2008 - 09:46 AM UTC
I've always wanted to build this kit but was too iffy about the price and detail. Its good to see someone finally give it a shot. I really havent looked within the forum but I think you are the first. I am going to keep an eye on this one. It looks great so far. Keep it coming!
Oh, by the way.....very, very clean so far....You are da man.

Cheers,
Mike
England - West Midlands, United Kingdom
Joined: June 09, 2005
KitMaker: 613 posts
AeroScale: 46 posts
Posted: Tuesday, October 14, 2008 - 10:33 AM UTC
Hi Keith
Its looking good so far, cant wait to see more. Is this the A or D variant? Keep it coming!! Nick

Singapore / 新加坡
Joined: January 19, 2008
KitMaker: 517 posts
AeroScale: 62 posts
Posted: Friday, October 17, 2008 - 04:27 AM UTC
Looking good Keith...

Lead, follow, or get out of the way.
New York, United States
Joined: January 29, 2004
KitMaker: 3,836 posts
AeroScale: 1,036 posts
Posted: Friday, October 17, 2008 - 07:00 AM UTC
Coming along great Keith, looking real sharp. I assume its the D model being that the cockpit is black. Love the hydraulic line for the rudder pedals. Hope the gage works out
Happy Modeling,
Joe
It feels like bible camp
Only Im not crying pretending Im somewhere else.
Happy Modeling
Joe
#036
England - West Midlands, United Kingdom
Joined: December 01, 2001
KitMaker: 1,998 posts
AeroScale: 23 posts
Posted: Friday, October 17, 2008 - 07:21 AM UTC
Quoted Text
Coming along great Keith, looking real sharp. I assume its the D model being that the cockpit is black. Love the hydraulic line for the rudder pedals. Hope the gage works out
Happy Modeling,
Joe
Thanks for the info Joe
I managed to pick up a plastic version of the gage that went a long way in helping create the rear bits, it took me half the day to remove all the old moulding from the back

.
I just have to wire it up then i will take some pictures.
It is in deed the D I am working on, and all that effort in the cab will be virtually hidden by the nose once done.
I have to remove the window behind the cab so I can fit the armament in, then sort out the seats then hopefully I can paint it all up and close it together.
I didn't realise how much work would be involved with this kit, to build it up to my standard
I know i should have just built it out of the box, but I can't help tinkering
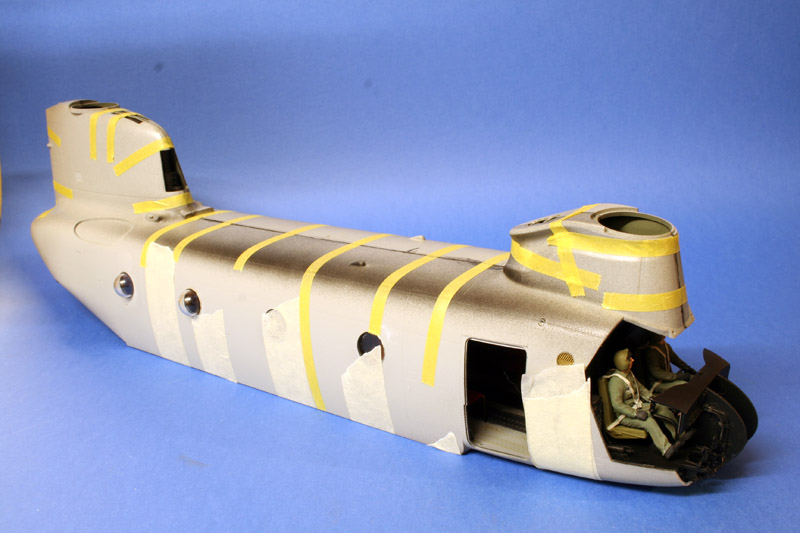
I Just need a different paint scheme other than green, just to help it stand out
will post some more pictures soon
cheers
keith
A VETERAN - Whether active duty or retired is someone who, at one point in their life, wrote a blank check made payable to "Great Britain", for an amount of "up to and including my life". That is HONOUR, and there are way too many people who forget this
#036
England - West Midlands, United Kingdom
Joined: December 01, 2001
KitMaker: 1,998 posts
AeroScale: 23 posts
Posted: Saturday, November 01, 2008 - 08:54 AM UTC
Ok
I have gone that bit further, in fact i have reached the mile stone of having both halves together
so a few more pictures
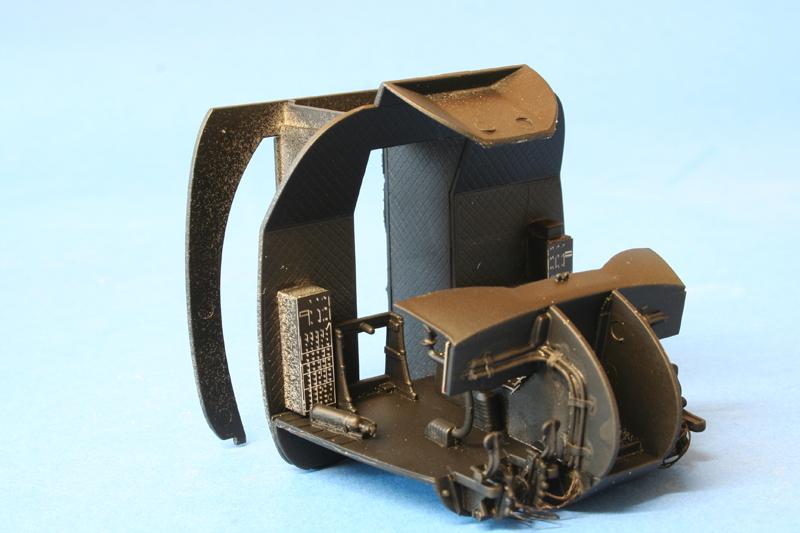
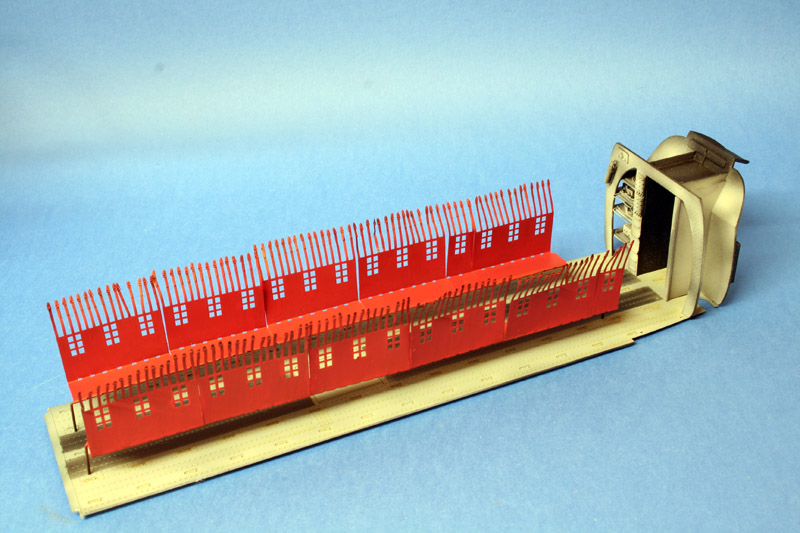
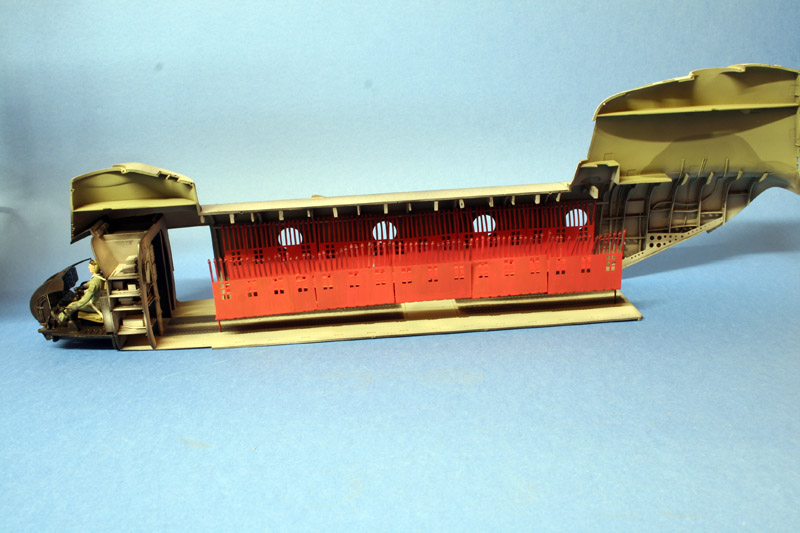
work starts at the rear section
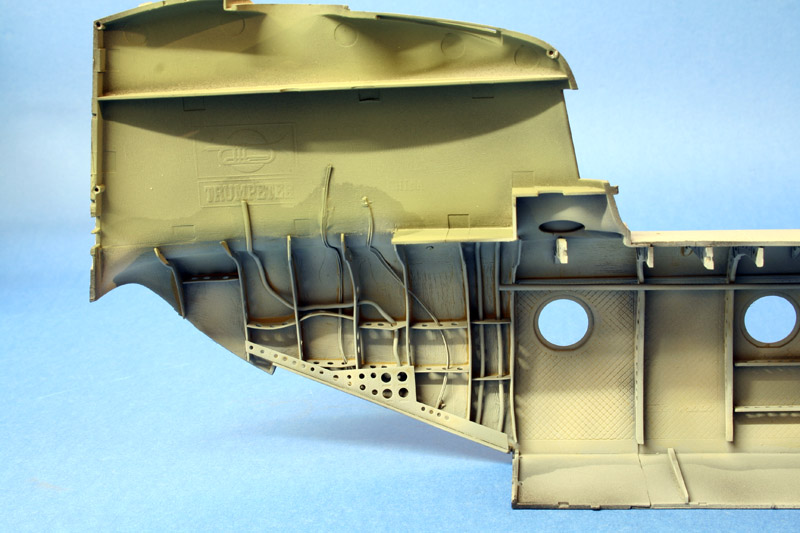
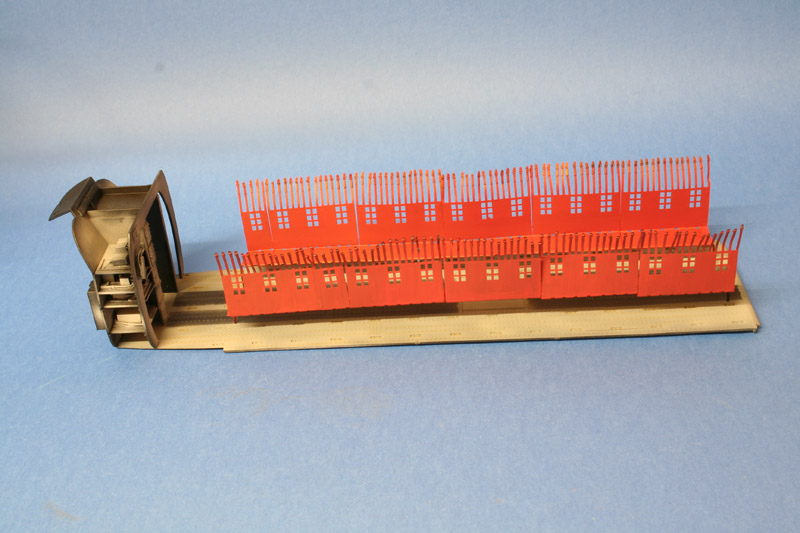
the rear halves painted

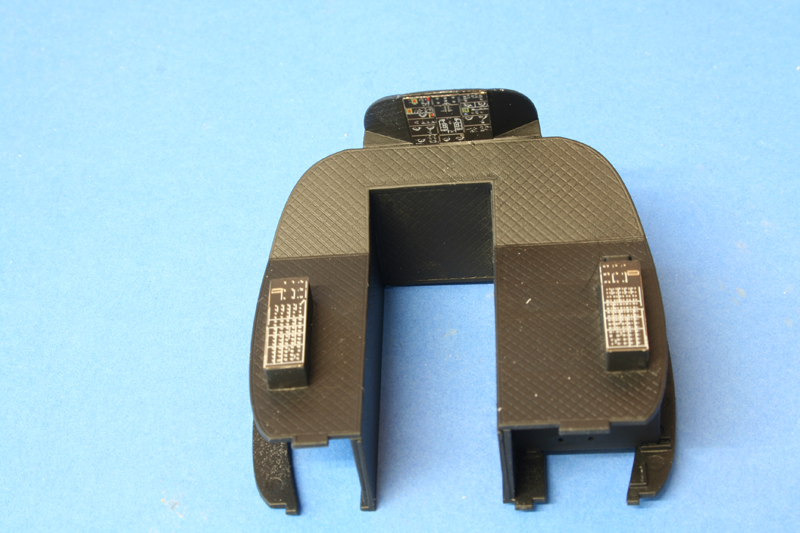
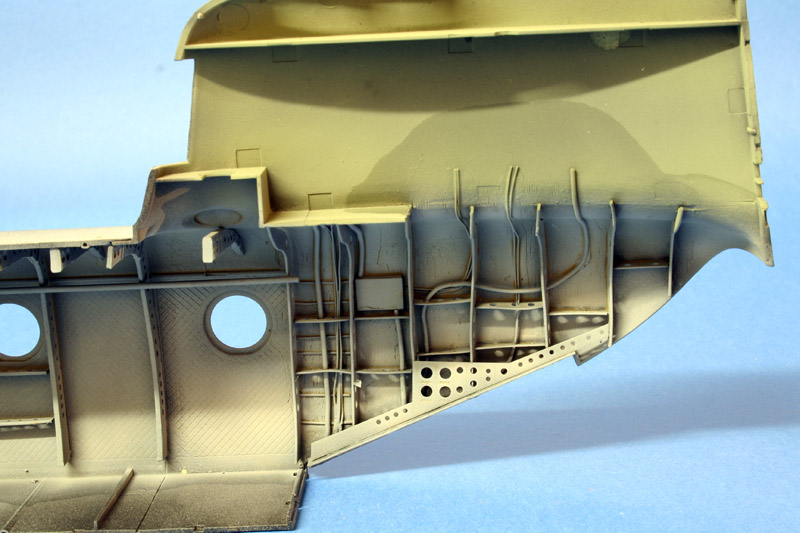
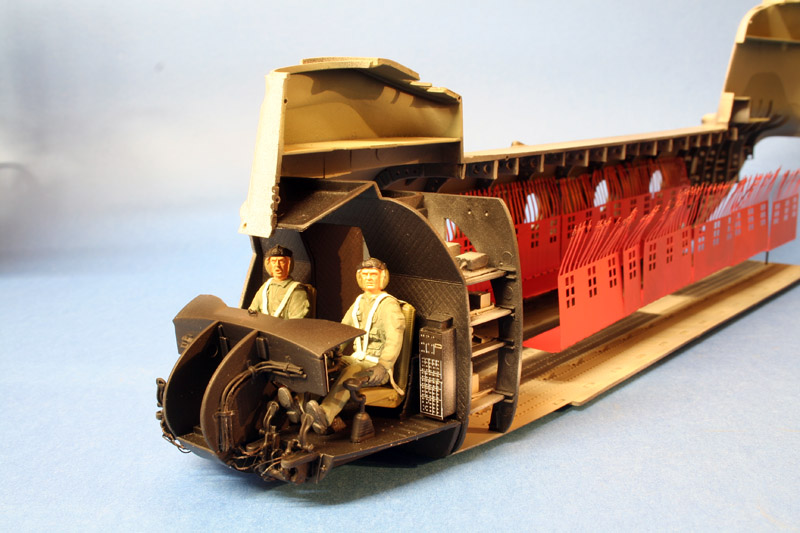
a close up of the rear loading ramp detail
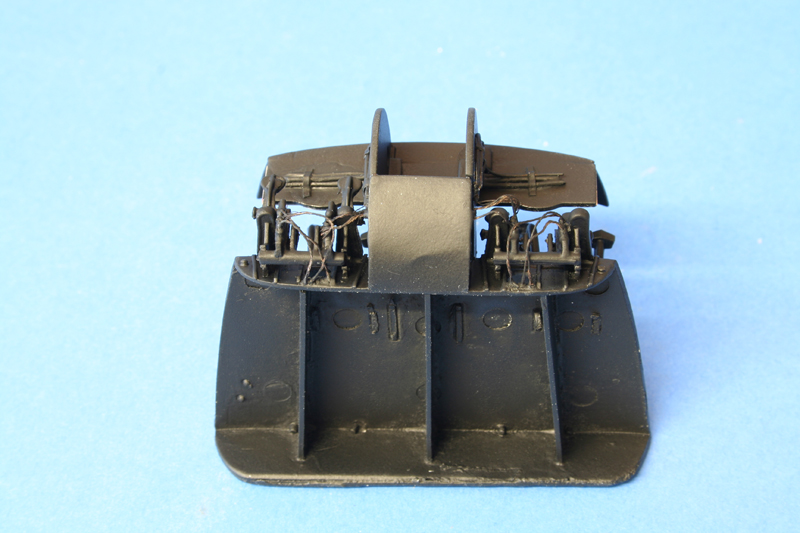
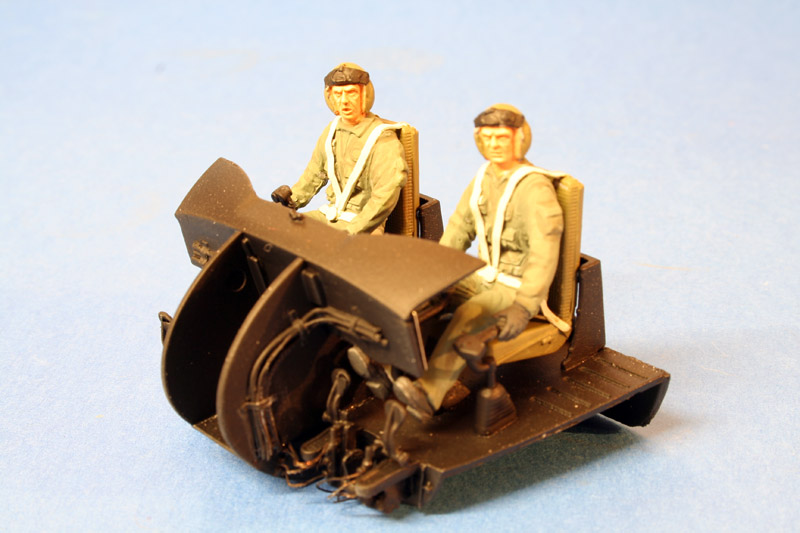
the crew done
the interior rear cargo section done with seats
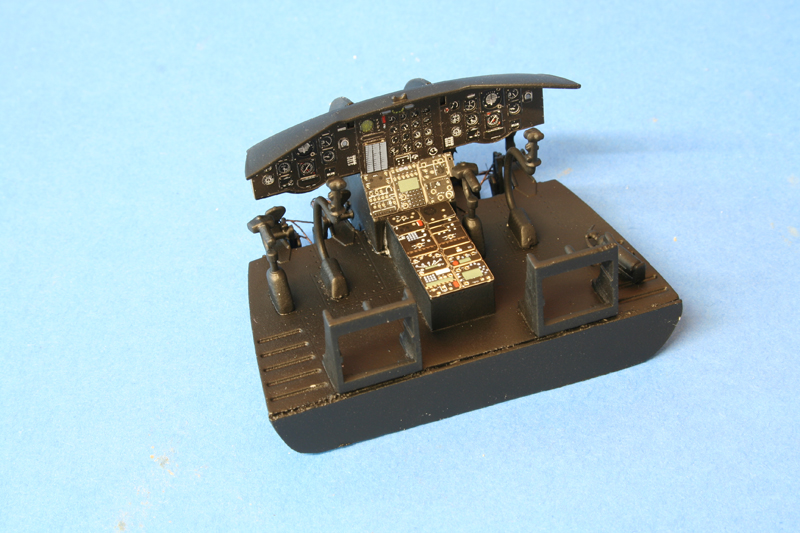
and fitted into the sides with the crew
and finally the two halves together
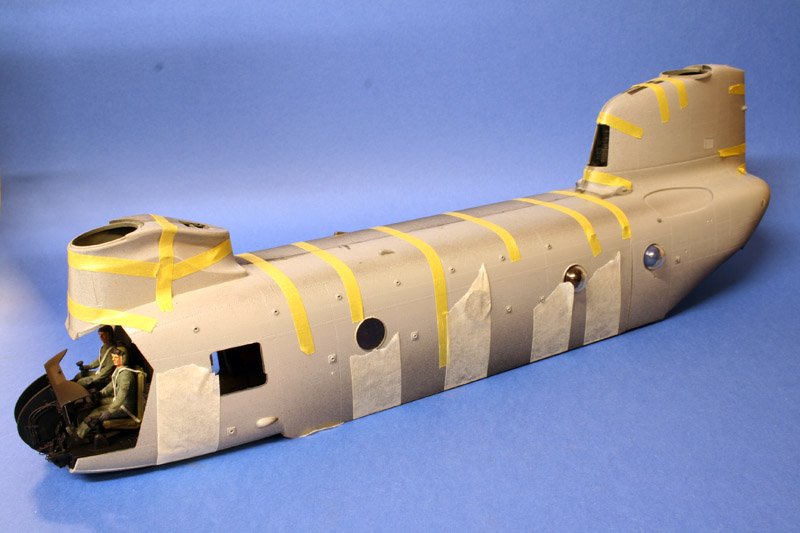
so just the outside and rotors to do now plus all the decals
cheers
Keith
A VETERAN - Whether active duty or retired is someone who, at one point in their life, wrote a blank check made payable to "Great Britain", for an amount of "up to and including my life". That is HONOUR, and there are way too many people who forget this
New South Wales, Australia
Joined: March 18, 2008
KitMaker: 347 posts
AeroScale: 223 posts
Posted: Saturday, November 01, 2008 - 09:02 PM UTC
The interiour, especially the rear section, looks brilliant. Great job and looking forward to seeing more of it

Assumption is the mother of all f*#k ups.
Roma, Italy
Joined: January 28, 2006
KitMaker: 1,368 posts
AeroScale: 377 posts
Posted: Saturday, November 01, 2008 - 09:58 PM UTC
Florida, United States
Joined: May 16, 2002
KitMaker: 17,694 posts
AeroScale: 1,728 posts
Posted: Sunday, November 02, 2008 - 12:58 AM UTC
Looking great. Good job on the interior. Its probably too late now, but there should be legs on the seats about every 3 seatbacks. There should also be diagonal support legs between them as well. Are the seats from Eduard, or did you scratch them? They look pretty good. It also looks like the Trumpeter crew figures don't fit well in the cockpit. Their feet are way back from the pedels. Good job so far. I'm looking forward to seeing this big beauty done.
Field Artillery --- The KING of BATTLE!!!
"People sleep peaceably in their beds at night only because rough men stand ready to do violence on their behalf." -- George Orwell
Showcase
#036
England - West Midlands, United Kingdom
Joined: December 01, 2001
KitMaker: 1,998 posts
AeroScale: 23 posts
Posted: Sunday, November 02, 2008 - 03:29 AM UTC
Quoted Text
Looking great. Good job on the interior. Its probably too late now, but there should be legs on the seats about every 3 seatbacks. There should also be diagonal support legs between them as well. Are the seats from Eduard, or did you scratch them? They look pretty good. It also looks like the Trumpeter crew figures don't fit well in the cockpit. Their feet are way back from the pedels. Good job so far. I'm looking forward to seeing this big beauty done.
Hi Gino
I had plans originally to do the seats with all the support legs, but was unsure how to mate it all together on the model, in the end i took the shot cut of having just one length of brass rod so all the seats sit in a row and in the same place.(i nearly didn't put them in at all)
The figures don't sit to well at all, but then i have had to reset the dashboard back further so the nose of the helicopter will fit correctly. Luckily you cart see all of the cockpit once the nose is on
cheers
Keith
A VETERAN - Whether active duty or retired is someone who, at one point in their life, wrote a blank check made payable to "Great Britain", for an amount of "up to and including my life". That is HONOUR, and there are way too many people who forget this
Paris, France
Joined: August 30, 2005
KitMaker: 2,315 posts
AeroScale: 17 posts
Posted: Sunday, November 02, 2008 - 03:53 AM UTC
Look Realy good Keith and the job on the piping and wiring on the rear section give a better look to the model
Cheers
Seb
Colorado, United States
Joined: January 20, 2005
KitMaker: 7,219 posts
AeroScale: 101 posts
Posted: Wednesday, November 05, 2008 - 11:44 AM UTC
That's looking very nice. Your port and starboard fuse panels look to be placards of some sort. Did you make those yourself? They're also more correct than the ones supplied in the kit.
As for the figures not reaching the pedals, it MAY be the location of the seats.
I have some MH-47 cockpit photos that show the seats' backs farther forward in relation to the center console than in the kit. I'll have to check and see whether the MH-47center console is the same length as for the CH-47. If so, it's a matter of reorienting the seats.
A strong man stands up for himself; A stronger man stands up for others.
Admit nothing. Deny everything. Make counter-accusations.
He is not Khan who calls himself Khan. Afghan proverb
#036
England - West Midlands, United Kingdom
Joined: December 01, 2001
KitMaker: 1,998 posts
AeroScale: 23 posts
Posted: Thursday, November 06, 2008 - 06:01 AM UTC
Quoted Text
That's looking very nice. Your port and starboard fuse panels look to be placards of some sort. Did you make those yourself? They're also more correct than the ones supplied in the kit.
As for the figures not reaching the pedals, it MAY be the location of the seats.
I have some MH-47 cockpit photos that show the seats' backs farther forward in relation to the center console than in the kit. I'll have to check and see whether the MH-47center console is the same length as for the CH-47. If so, it's a matter of reorienting the seats.
The fuse panels are pre-painted items from the Eduard P/e set, as is the console. as I have said I ma not overly concerned with the feet not fitting as once the nose is on you can hardly see them any way
cheers
Keith
A VETERAN - Whether active duty or retired is someone who, at one point in their life, wrote a blank check made payable to "Great Britain", for an amount of "up to and including my life". That is HONOUR, and there are way too many people who forget this
Colorado, United States
Joined: January 20, 2005
KitMaker: 7,219 posts
AeroScale: 101 posts
Posted: Friday, November 07, 2008 - 07:08 AM UTC
Quoted Text
... as I have said I ma not overly concerned with the feet not fitting as once the nose is on you can hardly see them any way
cheers
Keith
Understand on the feet thing. More concerned about the seat location relative to the center console. Any plans for an anchor line cable?
A strong man stands up for himself; A stronger man stands up for others.
Admit nothing. Deny everything. Make counter-accusations.
He is not Khan who calls himself Khan. Afghan proverb
#036
England - West Midlands, United Kingdom
Joined: December 01, 2001
KitMaker: 1,998 posts
AeroScale: 23 posts
Posted: Saturday, November 08, 2008 - 06:35 AM UTC
Quoted Text
Any plans for an anchor line cable?
sorry you will have to excuse my ignorance but what is a anchor line cable? and where does it go
keith
A VETERAN - Whether active duty or retired is someone who, at one point in their life, wrote a blank check made payable to "Great Britain", for an amount of "up to and including my life". That is HONOUR, and there are way too many people who forget this
Colorado, United States
Joined: January 20, 2005
KitMaker: 7,219 posts
AeroScale: 101 posts
Posted: Saturday, November 08, 2008 - 11:12 AM UTC
It's for static line jumping. It does not have to be an MH47 to have one - many CH47s (in fact 90% of the ones I've seen) are so equipped. Runs from the port side of the cabin in front to the starboard side in the rear.
A strong man stands up for himself; A stronger man stands up for others.
Admit nothing. Deny everything. Make counter-accusations.
He is not Khan who calls himself Khan. Afghan proverb
#036
England - West Midlands, United Kingdom
Joined: December 01, 2001
KitMaker: 1,998 posts
AeroScale: 23 posts
Posted: Sunday, November 09, 2008 - 05:41 AM UTC
ok thanks for that, I wont be fitting one now as i have the two halves together so its a bit late.
although i have had a major disaster today with the rear wheel assemblies , the white metal is so weak when you try to insert them into the kit it just breaks up absolute rubbish. I may post some pictures later but feeling a little fed up now.
so close yet so far with this build as it has to be ready for next weekend.
cheers
keith
A VETERAN - Whether active duty or retired is someone who, at one point in their life, wrote a blank check made payable to "Great Britain", for an amount of "up to and including my life". That is HONOUR, and there are way too many people who forget this
Roma, Italy
Joined: March 10, 2006
KitMaker: 302 posts
AeroScale: 112 posts
Posted: Sunday, November 09, 2008 - 07:44 PM UTC
Outstanding work and at what pace!
Sorry to hear about the wheels. Some times a night does cool down hot spirits.
Strange, usually white metal (at least the one used for figures) only breaks if bent a few times.
Klaus
----------------------------------
Don't worry about the world coming to an end today. It is already tomorrow in Australia. (C.Schulz)
Flying is learning how to throw yourself at the ground and miss. (D.Adams)
Colorado, United States
Joined: January 20, 2005
KitMaker: 7,219 posts
AeroScale: 101 posts
Posted: Wednesday, November 12, 2008 - 02:54 PM UTC
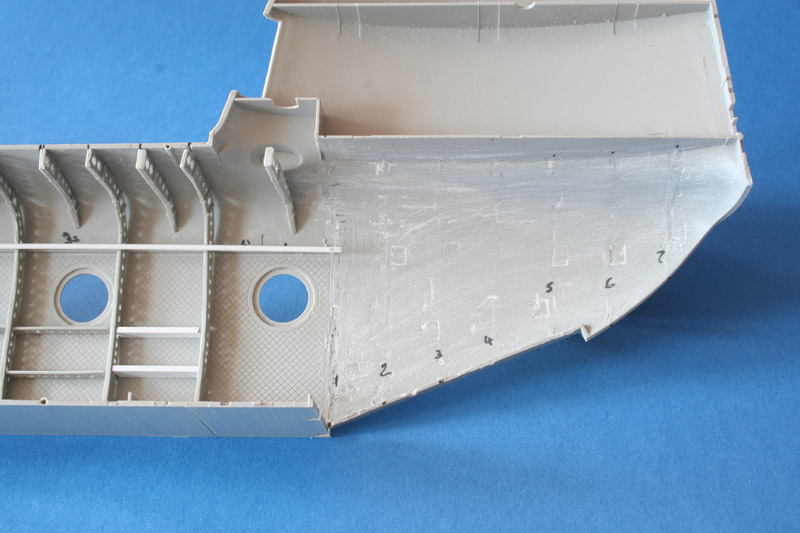
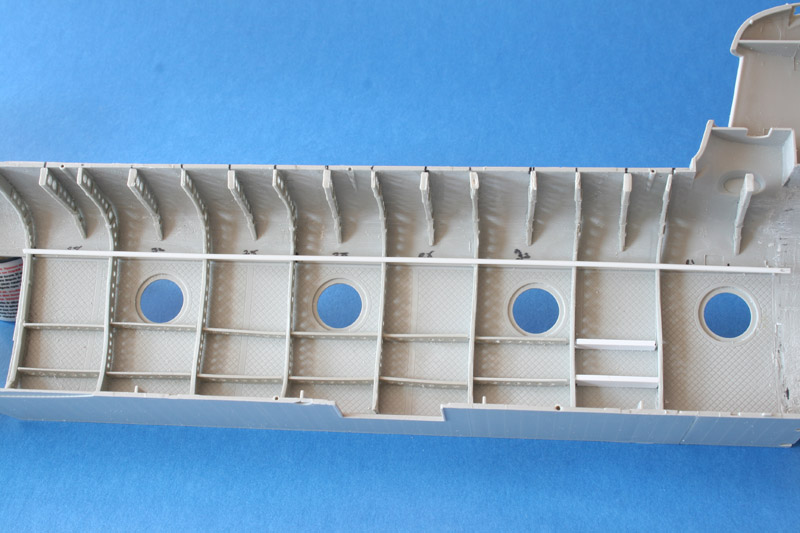
That really is a great job on the internal fuselage braces. Unfortunately Trumpeter should have added separate quilted panels instead of engraving them directly to the fuselage walls. They hide all of those braces forward of the ramp area. But this photo (admittedly from an MH47) shows how nice your work in the ramp area is:

A strong man stands up for himself; A stronger man stands up for others.
Admit nothing. Deny everything. Make counter-accusations.
He is not Khan who calls himself Khan. Afghan proverb
England - East Anglia, United Kingdom
Joined: December 31, 2007
KitMaker: 33 posts
AeroScale: 32 posts
Posted: Monday, November 17, 2008 - 01:07 AM UTC
Saw this at Telford yesterday (I think!), it certainly looked like it, and was on the appropriate stand. It looks amazing in the 'flesh' I had to crane my neck (and told my friends to do the same) to have a look inside but it was worth it, you've done a brilliant job mate.
Newfoundland, Canada
Joined: December 08, 2005
KitMaker: 1,370 posts
AeroScale: 11 posts
Posted: Tuesday, November 25, 2008 - 10:44 AM UTC
Kieth
Any chance you could share photos of your finished build?
Thanks
Bill
Slowly, slowly catch your monkey.
Kentucky, United States
Joined: May 17, 2005
KitMaker: 9 posts
AeroScale: 1 posts
Posted: Wednesday, December 10, 2008 - 02:37 AM UTC
Hey Keith...nice looking kit. I was going to ask about the support structure in the rear of the helo...they all look bent up and such where the conduit is passing through, I was curious if this is how a lot of very "used" helo rears look in real life, or if that was just a product of some "not so great" parts.
Also, I like the cockpit area very much, and I would agree that the figures look a little off, but they are ok. One thing that would concern ME though...is how pissed off they look...
West Virginia, United States
Joined: August 30, 2005
KitMaker: 60 posts
AeroScale: 5 posts
Posted: Saturday, January 17, 2009 - 10:36 AM UTC
Great work on the interior, looking forward to more progress.