W.I.P: Academy 1/35 Pave Hawk
Roma, Italy
Joined: March 10, 2006
KitMaker: 302 posts
AeroScale: 112 posts
Posted: Sunday, November 16, 2008 - 10:06 PM UTC
This is my first W.I.P. post on Aeroscale.
I wanted to share with you the (slow) progress I'm making on Academy's 1/35 Pave Hawk.
Besides using Eduard's PE and Cobra Co's resin sets I made some scratch work.
Pilot (modified Nemrod figure), just have to add a PE microphone

Seats

Side bulkheads (scratch built)

Lower interior (spinal board is scratch built and backpacks are resin)

Roof

Instrument panel


Comments and criticism are welcome.
Thanks for looking.
Klaus
----------------------------------
Don't worry about the world coming to an end today. It is already tomorrow in Australia. (C.Schulz)
Flying is learning how to throw yourself at the ground and miss. (D.Adams)
Florida, United States
Joined: May 16, 2002
KitMaker: 17,694 posts
AeroScale: 1,728 posts
Posted: Monday, November 17, 2008 - 02:37 AM UTC
Looking great Klaus. Keep the pics coming.
Field Artillery --- The KING of BATTLE!!!
"People sleep peaceably in their beds at night only because rough men stand ready to do violence on their behalf." -- George Orwell
Showcase
Colorado, United States
Joined: January 20, 2005
KitMaker: 7,219 posts
AeroScale: 101 posts
Posted: Friday, November 21, 2008 - 05:17 AM UTC
Klaus, that's coming along nicely. How are you treating the door frames? I know the Eduard PE has the crescent shaped pieces but found the detail wasn't deep enough. Any thoughts?
A strong man stands up for himself; A stronger man stands up for others.
Admit nothing. Deny everything. Make counter-accusations.
He is not Khan who calls himself Khan. Afghan proverb

#065
Missouri, United States
Joined: March 30, 2002
KitMaker: 2,605 posts
AeroScale: 91 posts
Posted: Friday, November 21, 2008 - 08:14 AM UTC
How did you replicate the LCD displays? How did you get the text image replicated on them?
The project looks fantastic so far. I look forward to watching this progress. I have a UH-60 DAP and a PaveHawk in my stash.
IPMS # 41155
Current Campaigns:
Florida, United States
Joined: May 16, 2002
KitMaker: 17,694 posts
AeroScale: 1,728 posts
Posted: Friday, November 21, 2008 - 05:42 PM UTC
Quoted Text
How are you treating the door frames? I know the Eduard PE has the crescent shaped pieces but found the detail wasn't deep enough. Any thoughts?
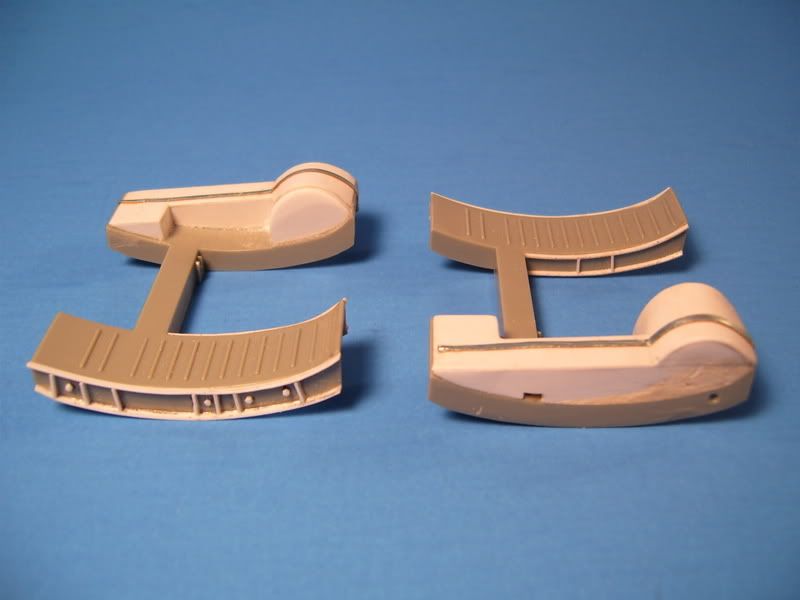
I mastered the door frames and gunners bulkheads for Cobra Company, well, he bought them off me after I made them anyways. I used strips of 0.020 sheet styrene and hex rod to detail mine out. You can see the originals below. Chris at Cobra Compant took these and added the section under the opening and a few other details and now offers them as part of his MH/HH-60 Upgrade ki
Hope that helps.
Field Artillery --- The KING of BATTLE!!!
"People sleep peaceably in their beds at night only because rough men stand ready to do violence on their behalf." -- George Orwell
Showcase
Roma, Italy
Joined: March 10, 2006
KitMaker: 302 posts
AeroScale: 112 posts
Posted: Saturday, November 22, 2008 - 12:35 AM UTC
Thanks to all for looking and commenting!
As for your question Robert, if you want depth you'll have to go with Cobra's resin parts. I had my side bulkheads already done that's why I didn't use Cobra's.
I tried to make the detail come out by using more contrast in the painting:

Brent the IP is part of Eduard's colored photo etch so I did nothing with it. But I would have done something like I did with the pilots notes: use a veeeeery rine brush.
Klaus
----------------------------------
Don't worry about the world coming to an end today. It is already tomorrow in Australia. (C.Schulz)
Flying is learning how to throw yourself at the ground and miss. (D.Adams)
Roma, Italy
Joined: March 10, 2006
KitMaker: 302 posts
AeroScale: 112 posts
Posted: Sunday, November 30, 2008 - 05:17 AM UTC
Today's update sets a milestone in my build: the fuselage halves are toghether!
Added microphone to the pilot's helmet:

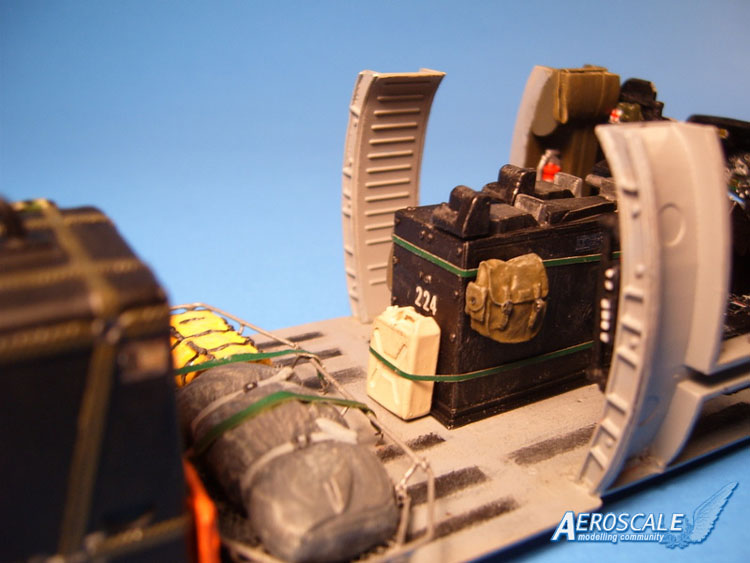
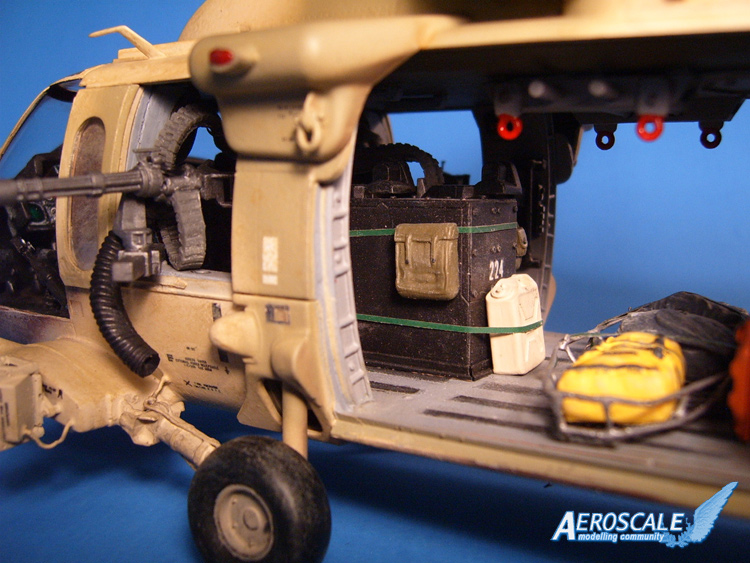
An overview of the interior; the wires are for the minigun and the ammo chutes were a pain in the ... to install:

Eventually the two halves are together!

Installed winshield and dry fitting:

After taking this picture I realized that I forgot to install the rear wheel!!!
Now I have to come up with a smart idea on how to install it without separating the fuselage halves!
Klaus
----------------------------------
Don't worry about the world coming to an end today. It is already tomorrow in Australia. (C.Schulz)
Flying is learning how to throw yourself at the ground and miss. (D.Adams)
Florida, United States
Joined: May 16, 2002
KitMaker: 17,694 posts
AeroScale: 1,728 posts
Posted: Monday, December 01, 2008 - 03:32 AM UTC
Coning along great Klaus. I have sealed them up w/out installing the rear landing gear as well. Just cut the pins off and it will slide right in where it is supposed to, no real issue. Keep up the good work.
Field Artillery --- The KING of BATTLE!!!
"People sleep peaceably in their beds at night only because rough men stand ready to do violence on their behalf." -- George Orwell
Showcase
Roma, Italy
Joined: March 10, 2006
KitMaker: 302 posts
AeroScale: 112 posts
Posted: Wednesday, December 03, 2008 - 09:06 PM UTC
Thanks for looking and the suggesting a solution, Gino.
Alas I have adopted a different approach: make a scetch of the wheel well, enlarce the hole, open the guides, install the gear and close the well with a sheet plastc copy of the cover.
Guess you'll understand better once I post pics of the "surgery".
Klaus
----------------------------------
Don't worry about the world coming to an end today. It is already tomorrow in Australia. (C.Schulz)
Flying is learning how to throw yourself at the ground and miss. (D.Adams)
Roma, Italy
Joined: March 10, 2006
KitMaker: 302 posts
AeroScale: 112 posts
Posted: Tuesday, December 09, 2008 - 07:30 PM UTC
Before this weeks update let me just state that:
this kit sucks!! 
There is not one part that fits with it's counterpart! Oh how I whis this kit was done by Tamiya or Hasegawa!
I guess I'll start working on the Black Hawk I have in my stash, only in a few years, once I have cooled down my spirits.
Now to the update:
Trimmed the exhaust covers (left before right after the treatment):

Added Cobra Co's plume detectors to the front gears:

Assembled the HIRSS and placed it on the cover:

Assembled painted and polished the Miniguns:

Performed the "surgery" on the tail gear: enlarged the hole and opened the pins:

Klaus
----------------------------------
Don't worry about the world coming to an end today. It is already tomorrow in Australia. (C.Schulz)
Flying is learning how to throw yourself at the ground and miss. (D.Adams)
Florida, United States
Joined: May 16, 2002
KitMaker: 17,694 posts
AeroScale: 1,728 posts
Posted: Tuesday, December 09, 2008 - 08:32 PM UTC
Looking good so far. Keep plugging away at it. It will turn out great.
Field Artillery --- The KING of BATTLE!!!
"People sleep peaceably in their beds at night only because rough men stand ready to do violence on their behalf." -- George Orwell
Showcase
Roma, Italy
Joined: March 10, 2006
KitMaker: 302 posts
AeroScale: 112 posts
Posted: Wednesday, December 10, 2008 - 08:04 AM UTC
Thanks for the encouragement Gino.
I defintively won't give up; it's just a little frustration for the slow progress.
Klaus
----------------------------------
Don't worry about the world coming to an end today. It is already tomorrow in Australia. (C.Schulz)
Flying is learning how to throw yourself at the ground and miss. (D.Adams)
Roma, Italy
Joined: March 10, 2006
KitMaker: 302 posts
AeroScale: 112 posts
Posted: Saturday, December 27, 2008 - 05:23 AM UTC
I think I never used that much putty on just one model!
Here's what I'm talking about:

This is the result of the "surgery" of the tail wheel:

And eventually and overall view of the Pave Hawk:

Next I will be adding the photoetch and tiny plastic parts, but I'm afraid this will be one of the last updates, if not THE last one for this year.
Klaus
----------------------------------
Don't worry about the world coming to an end today. It is already tomorrow in Australia. (C.Schulz)
Flying is learning how to throw yourself at the ground and miss. (D.Adams)
Florida, United States
Joined: May 16, 2002
KitMaker: 17,694 posts
AeroScale: 1,728 posts
Posted: Saturday, December 27, 2008 - 06:38 PM UTC
Its looking great Klaus. Keep plugging away buddy. It will come out looking awesome. They take some TLC, but the Academy H-60s can come out great.
Field Artillery --- The KING of BATTLE!!!
"People sleep peaceably in their beds at night only because rough men stand ready to do violence on their behalf." -- George Orwell
Showcase
Roma, Italy
Joined: March 10, 2006
KitMaker: 302 posts
AeroScale: 112 posts
Posted: Monday, December 29, 2008 - 07:21 PM UTC
Thanks Gino!
Currently I'm pretty frustrated at the thought that I have an MH-60L in my stash, too. Almost every bit of this model has some tweaks to it!
I'm just glad that I'm almost done with the plastic parts and "only" have to add the PE before painting.
I got Italeri's 1/48 Pave Hawk for Christmas and I'll convert it to an MH-60K. I just hope that this models fittings are better!
Klaus
----------------------------------
Don't worry about the world coming to an end today. It is already tomorrow in Australia. (C.Schulz)
Flying is learning how to throw yourself at the ground and miss. (D.Adams)
Roma, Italy
Joined: March 10, 2006
KitMaker: 302 posts
AeroScale: 112 posts
Posted: Thursday, February 05, 2009 - 07:46 PM UTC
After more than a month here's an update on my "work".
I scratch-built the IR-emitter on the nose, added a bar on the starboard side, completed adding photoetch bits and prepared the bird for painting.
(I've been told that the bar is placed there to prevent the rope on the winch to fray on the sharp edge of the cabin door and break.)
Now to the pictures:


Klaus
----------------------------------
Don't worry about the world coming to an end today. It is already tomorrow in Australia. (C.Schulz)
Flying is learning how to throw yourself at the ground and miss. (D.Adams)
Florida, United States
Joined: May 16, 2002
KitMaker: 17,694 posts
AeroScale: 1,728 posts
Posted: Thursday, February 05, 2009 - 08:04 PM UTC
Looking great. She's coming together. Can't wait to see it painted.
Field Artillery --- The KING of BATTLE!!!
"People sleep peaceably in their beds at night only because rough men stand ready to do violence on their behalf." -- George Orwell
Showcase
Rhode Island, United States
Joined: August 03, 2005
KitMaker: 21 posts
AeroScale: 20 posts
Posted: Friday, February 06, 2009 - 02:41 PM UTC
Hi Klaus,
Looks good Klaus. Nice job.
Ted.
Florida, United States
Joined: August 23, 2005
KitMaker: 90 posts
AeroScale: 12 posts
Posted: Friday, February 06, 2009 - 03:22 PM UTC
That is correct, our Acft are modified with the strip so the strip takes the abuse instead of the side of the aircraft in the event of cable contact during hoist operations

The only thing necessary for the triumph of evil is for good men to do nothing. - Edmund Burk
Roma, Italy
Joined: March 10, 2006
KitMaker: 302 posts
AeroScale: 112 posts
Posted: Monday, February 09, 2009 - 06:45 PM UTC
Thanks Gino and Ted and thank you Chris for confirming the info I had on the "side-bar".
In these days I primed and pre shaded the aircraft. I will post pictures in the next days.
Klaus
----------------------------------
Don't worry about the world coming to an end today. It is already tomorrow in Australia. (C.Schulz)
Flying is learning how to throw yourself at the ground and miss. (D.Adams)
Roma, Italy
Joined: March 10, 2006
KitMaker: 302 posts
AeroScale: 112 posts
Posted: Wednesday, February 11, 2009 - 07:22 PM UTC
Here are the promised pictures:
First I "primed" the glass parts with black ... voilà a Pave-Kebab

Then the whole thing was primed in white

And eventually pre-shaded


Klaus
----------------------------------
Don't worry about the world coming to an end today. It is already tomorrow in Australia. (C.Schulz)
Flying is learning how to throw yourself at the ground and miss. (D.Adams)
Roma, Italy
Joined: March 10, 2006
KitMaker: 302 posts
AeroScale: 112 posts
Posted: Monday, February 16, 2009 - 07:23 PM UTC
BUT last week end I started spraying free-hand (without masking): the gray came out decently even though in some spots it was darker, but the light green was a complete mess since it made blotches.
And besides both colors covered completely the preshading ...
So I decided that I'll remove the colors and the preshading (wasted time!!!) and use a different technique: apply a uniform layer of grey, then add the two green tones using masks and eventually do some subtle post shading.
I'm back to where I was two weeks ago (more or less)!
Klaus
----------------------------------
Don't worry about the world coming to an end today. It is already tomorrow in Australia. (C.Schulz)
Flying is learning how to throw yourself at the ground and miss. (D.Adams)
Roma, Italy
Joined: March 10, 2006
KitMaker: 302 posts
AeroScale: 112 posts
Posted: Monday, March 09, 2009 - 07:57 PM UTC
Here I am again!
After days of thinking and one sleepless nigth I decided how to proceed: grey base paint (sprayed on), apply the two green tones with a brush and then contour the areas by air-brush to give it that faded sprayed-on look.
Currently I completed step two, and here's how it looks:
Gray base

Brushed on greens

Klaus
----------------------------------
Don't worry about the world coming to an end today. It is already tomorrow in Australia. (C.Schulz)
Flying is learning how to throw yourself at the ground and miss. (D.Adams)
Roma, Italy
Joined: March 10, 2006
KitMaker: 302 posts
AeroScale: 112 posts
Posted: Monday, March 30, 2009 - 07:29 PM UTC
Here I am again with an update on my work, for those who are patitent enough to keep up with my slooooow pace.
I went over the greens with the airbrush, clar coated and panneled the aircraft. Here's how it turned out:


Klaus
----------------------------------
Don't worry about the world coming to an end today. It is already tomorrow in Australia. (C.Schulz)
Flying is learning how to throw yourself at the ground and miss. (D.Adams)
Florida, United States
Joined: May 16, 2002
KitMaker: 17,694 posts
AeroScale: 1,728 posts
Posted: Monday, March 30, 2009 - 09:47 PM UTC
She's turning out great Avus. Waiting on decals and weathering to finish her off. Keep up the great work.
Field Artillery --- The KING of BATTLE!!!
"People sleep peaceably in their beds at night only because rough men stand ready to do violence on their behalf." -- George Orwell
Showcase