_GOTOBOTTOM
Early Aviation
Discuss World War I and the early years of aviation thru 1934.
Next on the Bench - 1/48 Roden SE.5a
BradCancian
_VISITCOMMUNITY
Queensland, Australia
Joined: August 30, 2006
KitMaker: 285 posts
AeroScale: 281 posts
Posted: Tuesday, January 06, 2009 - 05:01 PM UTC
finishing my Sopwith Snipe project, I needed something a little more "out of the box" without so many modifications; ie a simple build. So I closed my eyes and grasped for the first thing on the shelf in the "not as hard as a Blue Max kit" pile and grabbed the Roden SE.5a (Hispano Suiza) in 1/48 scale. This kit has been reveiwed many times and is a very good represenation of the type with lots of detail and optional extras.

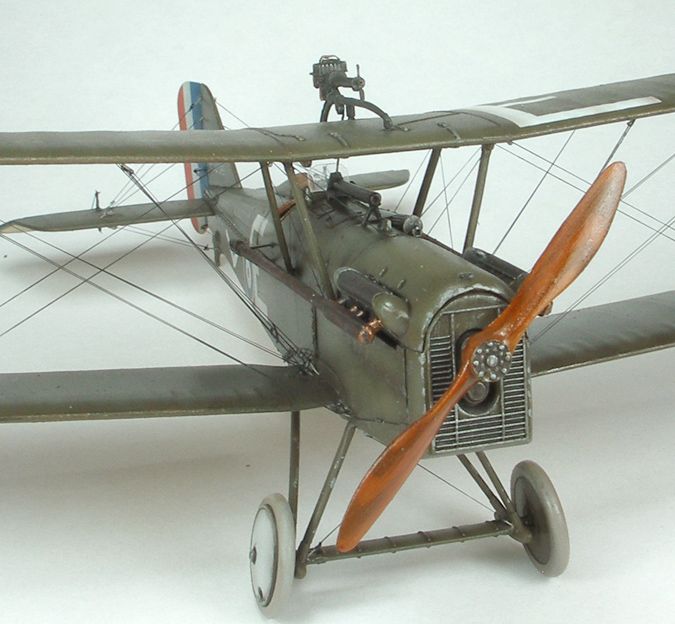
I have decided to keep this one relatively simple without too many modifications. That said, I did feel that I needed to add some minor additions. Whilst the Roden kit is very nice, there are some obvious omissions around the engine compartment. Firstly, there is a gap between the supplied engine cylider heads and side cowls which leads to a see through effect straight through the engine compartment - this needs to be blanked off. Also, there is a large access / ventillation hole under the belly of the SE.5 behind the engine. This hole is about 2/3 the size of the cockpit opening, and other than a rear bulkhead, there is no detail supplied forward of said bulkhead. This means that you can look into this hole and see straight through into nothingness. Finally, the ventillation holes on the lower side of the cowl are moulded as long depressions, and should (from what I can see) be open. Sigh, so much for a straight OOB build!

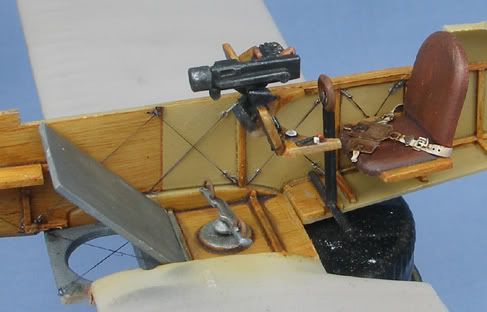
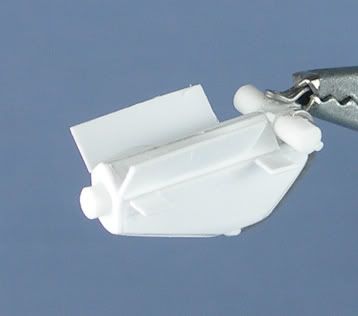
So, I have decided to scratch up a few rough pieces to fill in this large hole. I added some basic engine bearers to both fuselage halves:


I have also roughly scratch built the lower part of what looks vaugely like an inline V engine (noting that only the bottom will really be seen), including some angled pieces to blank off the see though effect uder the cyliner heads.


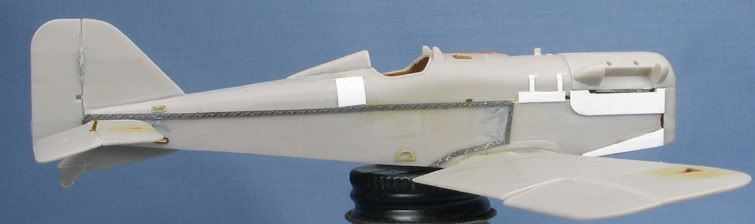
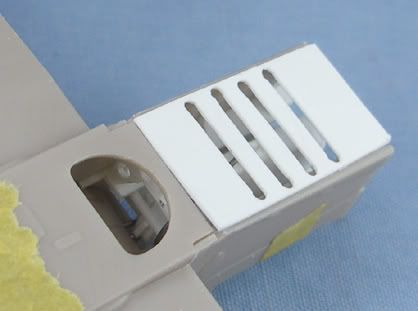
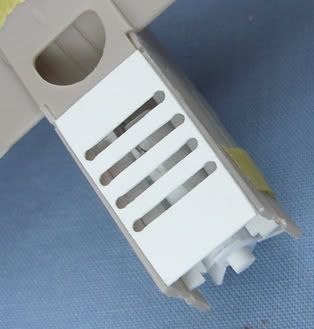
I will paint the engine a murkey dark metallic colour to hide its simplicity. This should be passable when viewed from below (hopefully without to much scrutiny!), and is at least an improvement over the empty space that would otherwise be there! I also scratch built the lower cowling from sheet styrene with the proper cutouts (anyone know if there were any adjustable flaps on the other sides of these cutouts to reguate engine ventilation?)


BC
MerlinV
_VISITCOMMUNITY
Victoria, Australia
Joined: November 26, 2006
KitMaker: 608 posts
AeroScale: 602 posts
Posted: Tuesday, January 06, 2009 - 05:13 PM UTC
Great Brad.

I look forward to seeing just how much you can restrain your self with this one.

Did you know that Kariya do a Hisso/Wolseley Viper in 1/48? I picked up a couple at Expo last year.

Like what you've done so far though and I reckon that your mock engine will fix things nicely.

Cheers,

Hugh
thegirl
_VISITCOMMUNITY
Alberta, Canada
Joined: January 19, 2008
KitMaker: 6,743 posts
AeroScale: 6,151 posts
Posted: Tuesday, January 06, 2009 - 05:55 PM UTC
I will be taking notes on this one for when I do the one sitting in the stash .

Your builds are always a pleasure to watch Brad
Repainted
_VISITCOMMUNITY
Östergötland, Sweden
Joined: April 04, 2006
KitMaker: 1,058 posts
AeroScale: 1,004 posts
Posted: Tuesday, January 06, 2009 - 11:06 PM UTC
This will be just another BC-standard, that´s my guess. just love the stuff you create Brad.


Larsa Q
JackFlash
_VISITCOMMUNITY
Colorado, United States
Joined: January 25, 2004
KitMaker: 11,669 posts
AeroScale: 11,011 posts
Posted: Wednesday, January 07, 2009 - 12:24 AM UTC
Cool more of Brad's secrets. Model On!
JackFlash
_VISITCOMMUNITY
Colorado, United States
Joined: January 25, 2004
KitMaker: 11,669 posts
AeroScale: 11,011 posts
Posted: Monday, January 12, 2009 - 12:14 PM UTC
Brad the chin pan is the type seen on the Hisso motors are you doing the geared 200 -220hp Hisso?
JackFlash
_VISITCOMMUNITY
Colorado, United States
Joined: January 25, 2004
KitMaker: 11,669 posts
AeroScale: 11,011 posts
Posted: Monday, January 12, 2009 - 12:23 PM UTC

Quoted Text

". . . I also scratch built the lower cowling from sheet styrene with the proper cutouts (anyone know if there were any adjustable flaps on the other sides of these cutouts to reguate engine ventilation?"


Aeroscale member Steve Hatter came up with this for his research on a 1/32 scale build here at Aeroscale. It does reflect the Hisso type.
BradCancian
_VISITCOMMUNITY
Queensland, Australia
Joined: August 30, 2006
KitMaker: 285 posts
AeroScale: 281 posts
Posted: Saturday, January 24, 2009 - 04:22 PM UTC
Interior now has some paint. I added some lap belts (Eduard), a cocking handle for the vickers, replaced the rudder bar foot straps, and added rigging. Weathing was kept to a minimum as I will be going for a relatively clean build.


BC
thegirl
_VISITCOMMUNITY
Alberta, Canada
Joined: January 19, 2008
KitMaker: 6,743 posts
AeroScale: 6,151 posts
Posted: Saturday, January 24, 2009 - 10:42 PM UTC
Coming along very nicely Brad !
JackFlash
_VISITCOMMUNITY
Colorado, United States
Joined: January 25, 2004
KitMaker: 11,669 posts
AeroScale: 11,011 posts
Posted: Sunday, January 25, 2009 - 02:11 PM UTC
Greetings Brad Excellent work as usual. I realyy like the light wood stain you went with. Subtle contrasts. Model On!
BradCancian
_VISITCOMMUNITY
Queensland, Australia
Joined: August 30, 2006
KitMaker: 285 posts
AeroScale: 281 posts
Posted: Friday, January 30, 2009 - 12:24 AM UTC
More slow progress. As you can see I added some extra detail where I felt the Roden detail was a little soft.


I have also taken the fun step of hollowing out the pulley inspection windows.


BC
thegirl
_VISITCOMMUNITY
Alberta, Canada
Joined: January 19, 2008
KitMaker: 6,743 posts
AeroScale: 6,151 posts
Posted: Friday, January 30, 2009 - 12:39 PM UTC
Looking mighty fine so far Brad . Very brave of placing the controlhorns on now . I would have broken them off and the carpet monster getting them in the end .
BradCancian
_VISITCOMMUNITY
Queensland, Australia
Joined: August 30, 2006
KitMaker: 285 posts
AeroScale: 281 posts
Posted: Saturday, October 31, 2009 - 01:06 AM UTC
Having just moved house, and finishing the last of my university work for this year, I have managed to get the smell of paint and glue back into my nostrils again. Thought I would pick up this project again and try and finish it off

I finally settled on some markings. I decided to paint her in the markings of 2/Lt. G C Logan of A flight, 2 Squadron, Australian Flying Corps. This aircraft was bought on charge with 2AFC on 5 January 1918 and lost 21 February 1918 when "Lt. Logan in B/619 left Aero. at 11.35 a.m. on Patrol and was last seen going towards the line. Pilot and machine missing. Struck off." The aircraft was downed by anti-aircraft fire, though Logan made a landing, nosed the aircraft over, and was made a POW. Here she is with some paint and decals on (still looking a little shiny from the gloss coat).


Markings are a mixture of paint, roden decals and pegasus serials, which were a PAIN to put on because they were so fragile, plus they are not that crisp (please, please, PLEASE someone do a GOOD set of serial number decals for RFC aircraft.... please!!!)

Next is flat coat, then the top wing can go on.

Feedback always welcomed.

BC
NickZour
_VISITCOMMUNITY
Attica, Greece / Ελλάδα
Joined: May 01, 2008
KitMaker: 1,437 posts
AeroScale: 1,241 posts
Posted: Saturday, October 31, 2009 - 02:27 AM UTC
Wooooow looks great!!

especialy the cockpit!!!!

Cheers Nick
thegirl
_VISITCOMMUNITY
Alberta, Canada
Joined: January 19, 2008
KitMaker: 6,743 posts
AeroScale: 6,151 posts
Posted: Saturday, October 31, 2009 - 02:41 AM UTC
Brad , great to see you back on with this project

Splendid work us usual .

Cheers mate !
CaptainA
_VISITCOMMUNITY
Indiana, United States
Joined: May 14, 2007
KitMaker: 3,117 posts
AeroScale: 2,270 posts
Posted: Saturday, October 31, 2009 - 06:20 AM UTC
Looks great. Almost finished, we are wondering what may be next.
BradCancian
_VISITCOMMUNITY
Queensland, Australia
Joined: August 30, 2006
KitMaker: 285 posts
AeroScale: 281 posts
Posted: Thursday, November 05, 2009 - 12:34 AM UTC
Finished (and before anyone asks, yes the upper wing code is painted the correct way up)


All comments and feedback welcome.

BC
JackFlash
_VISITCOMMUNITY
Colorado, United States
Joined: January 25, 2004
KitMaker: 11,669 posts
AeroScale: 11,011 posts
Posted: Thursday, November 05, 2009 - 01:16 AM UTC
Nicely Done Brad! I loved all of the detail alterations.
thegirl
_VISITCOMMUNITY
Alberta, Canada
Joined: January 19, 2008
KitMaker: 6,743 posts
AeroScale: 6,151 posts
Posted: Thursday, November 05, 2009 - 01:32 AM UTC
Very nicely done indeed !

Your attention to the details is top notch Brad . Seeing your work is great encouragement and inspirational to us all !

Cheers
Mecenas
Joined: December 23, 2007
KitMaker: 1,596 posts
AeroScale: 1,275 posts
Posted: Thursday, November 05, 2009 - 01:37 AM UTC
Great model! I wish I could weather my models half good as you do it.
Kitboy
_VISITCOMMUNITY
Gelderland, Netherlands
Joined: July 20, 2006
KitMaker: 258 posts
AeroScale: 256 posts
Posted: Thursday, November 05, 2009 - 02:33 AM UTC
Stunning result!

Cheers, Nico
Bristol
_VISITCOMMUNITY
United Kingdom
Joined: November 04, 2009
KitMaker: 31 posts
AeroScale: 30 posts
Posted: Thursday, November 05, 2009 - 11:29 AM UTC
All of the above seconded Brad---but as I mentioned over at aerodrome---your wheels are a bit 'Sopwithy'----either by mistake as the S.E. did'nt use a split axle---or a weakness in the plastic..this is not to be taken as criticism--just pointing out for future builders....

Regards,
Dave.
 _GOTOTOP