Early Aviation
Discuss World War I and the early years of aviation thru 1934.
Albi DIII OAW (Roden 1/32) by kornbeef
JackFlash
_VISITCOMMUNITY
Colorado, United States
Joined: January 25, 2004
KitMaker: 11,669 posts
AeroScale: 11,011 posts
Posted: Saturday, July 25, 2009 - 05:45 PM UTC

Quoted Text

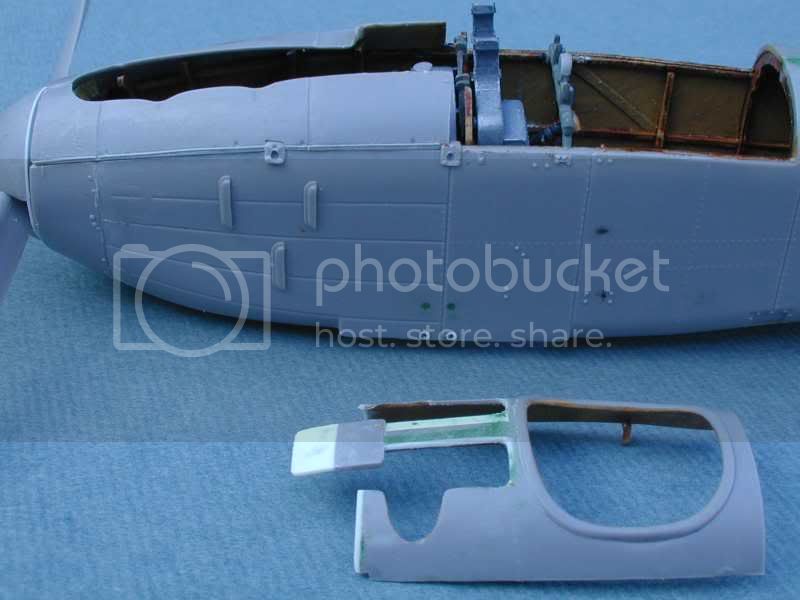
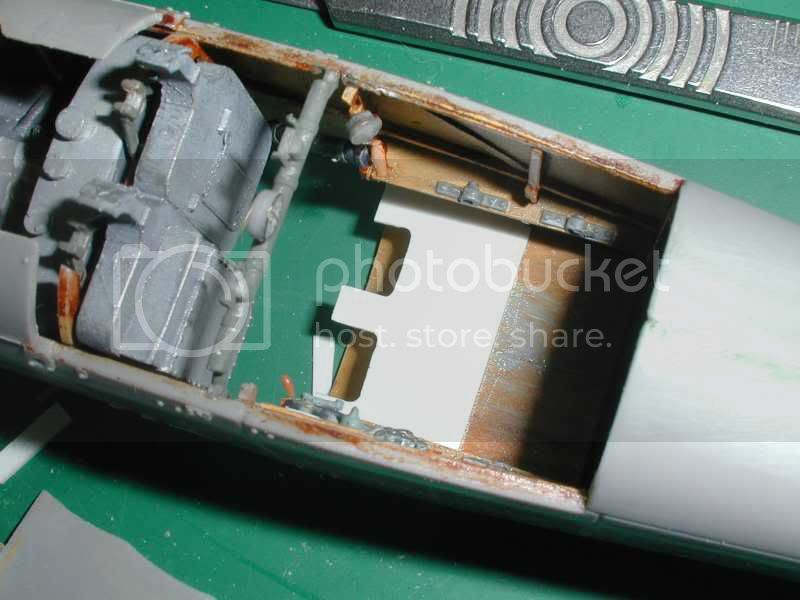
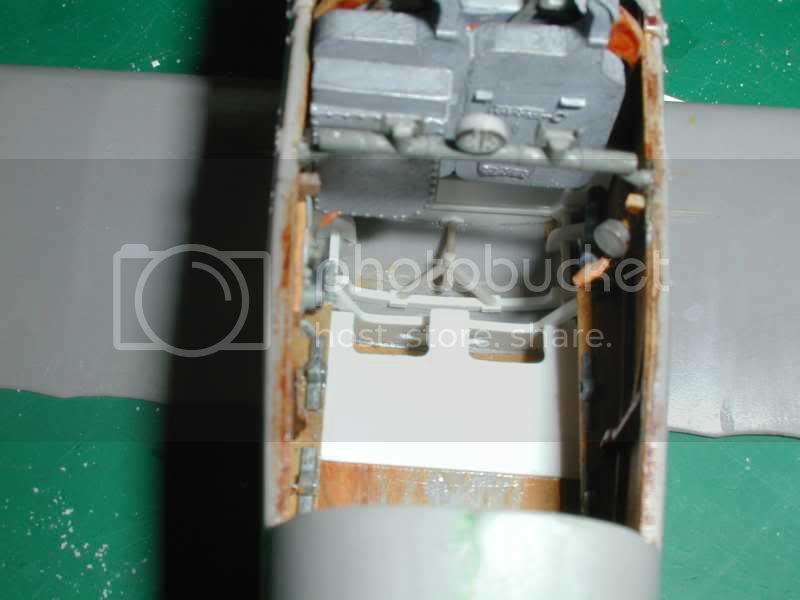
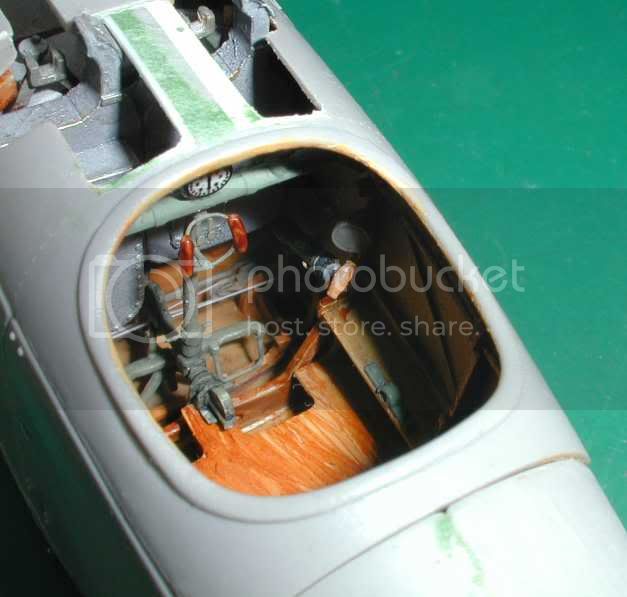
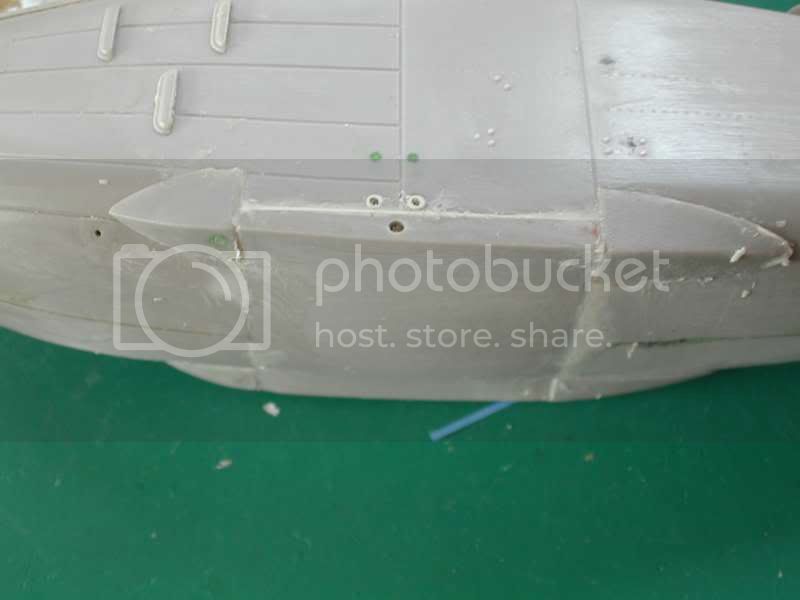
Believe it or not I'm still working on this.....picked it back up a few days ago.

I am looking for a nice simple but clourful scheme, for a early batch plane with doped not lozenged fabric wings, the reason being I am not impressed with the schemes chose by Roden apart from the candystripe which is over daunting.

What Lozenge I have managed to source leaves a lot to be desired. I tried the battleaxe and when on did look quite good colourwise but it is clear and shows every flaw and air bubble and is rather thick and lifts easy. Techmods colours seem too out and strong to ghost over to tone down the lower but the upper seems bearable colourwise.

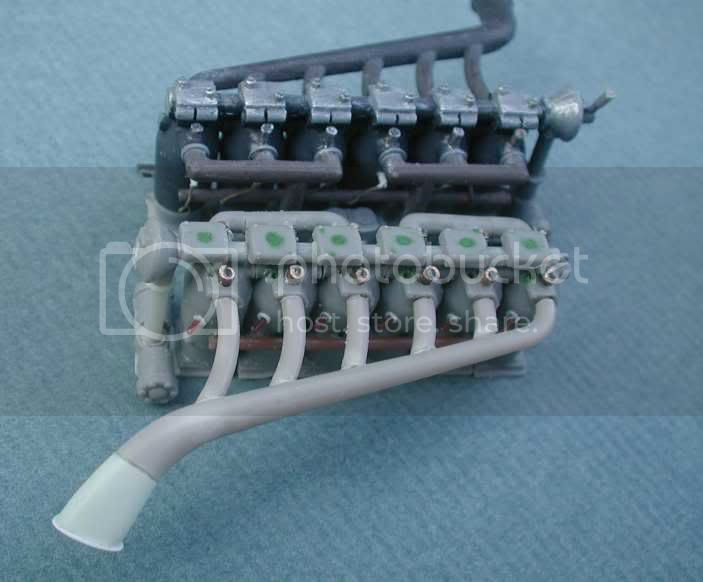
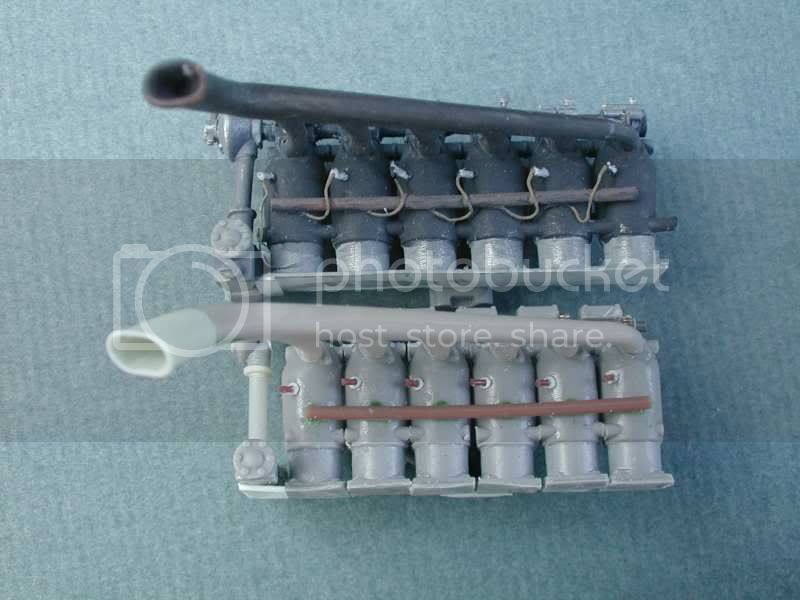
I had thought of Paul Strahles red and blue 2385/17 but there seems some confusion as to whether the lower wing surfaces were painted over pale blue or loz....... I would like to do this scheme so any info would be greatly appreciated.... I am already modding a new cylinder block after Stephen pointed out the (OAW) used the later engine like the D.V did.

Someone help and I'll post progress pics I promise...LOL


Here is abit of fun. Here is Straele's D.V 4594/17.


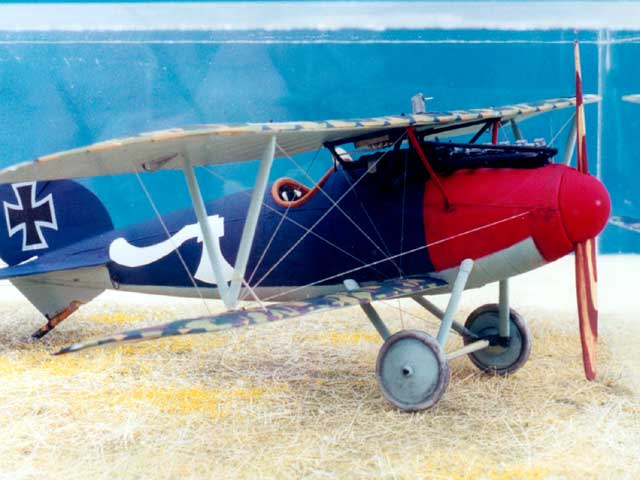
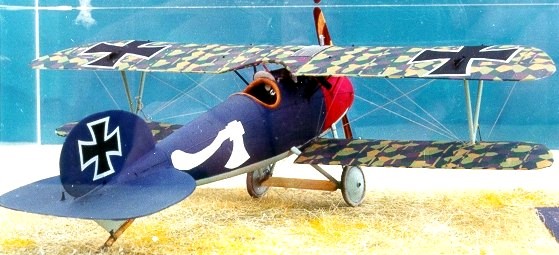
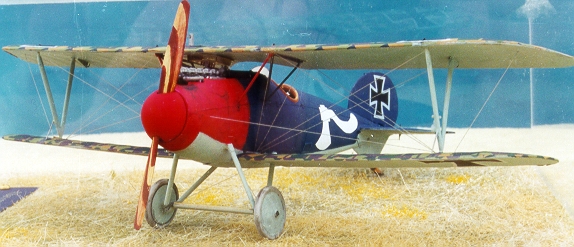
When he took over Jasta 57 as commander lt. blue became part of the unit identifier covering the rear of the fuselage upto the areas near the cockpit. (This does not include the horizontal tail units) They flew Alb. D.III (OAW) types like Keith is building. Now only some of the OAW had their wings and tail planes done in the two toned upper and lt. blue undersurfaces. The rest were done in 5 colour camouflage. Straehle's D. 2385/17 fell into the 5 colour lozenge with lt. blue rib tapes. According to photo evidence this machine later carried the May 1918 thick type Balkan crosses and possibly a red band around the fuselage behind the cockpit. Straehle's own combat reports say that the underside of the wings was later painted lt. blue.

See cross & Cockade USA Vol. 23, #1, 1982, p.87.
Kornbeef
_VISITCOMMUNITY
England - South East, United Kingdom
Joined: November 06, 2005
KitMaker: 1,667 posts
AeroScale: 1,551 posts
Posted: Monday, August 03, 2009 - 12:44 AM UTC
well a small update.

Colour schem is still very much up in the air for me, I have even contemplated the boxart red/white candystripe, I'm kinda waiting to see what Stephen hinted about Lozenge comes to fruition befor I get the main build to the buttoned up and ready for the wings stage.


this is pretty much how far I got on the fuselage, I chopped the cowlings !/ to enable me to line the front up around the spinner easier. 2/ cos the part fit was awful. 3/ so I could still work inside the cockpit and make progres with the engine.


front on view, hopefully showing the work spent thinning the nose/spinner to give the small gap between. prop/spinner and cylinder assy are not fixed but sitting loose. So any alignment issues will be sorted.


above view, now anyone built this kit may have noticed the coaming/cowls below the upper wing were out... mainly I believe because the engine is a little too long. this is the in progres shot of what I have done to correct this to closer to what Windsock datafiles show it to be.


the NEW engine cylinder assembly in progress, rocker arms and rocker box studs to add along with wiring and pipework. you might think an odd way to do things but it does mean I can complete the fuselage first fully before fitting. the other assembly is the one I had detailed before Stephen kindly told me it was the wrong one...Windsock can make mistakes, I took one pic from their DIII datafie as ref.


this shot shows how much I had to shorten the block by to get it closer to the size on the datafile plans.

Anyway thats her so far

One query though, and I would love some input guys and girls..here goes... Rudderbar cables, go from the arm to the pulleys at either side of the cockpit , that much I worked out bu where do they go from there???
I only have the datafile special with the sketches in and no photos to work from so do they run back from those outer pulleys directly or use another pulleyset to run closer to the centreline of the A/C? the DV set up is simpler & different, that much I gathered.

Any help, any comments greatly appreciated as always
guitarlute101
_VISITCOMMUNITY
West Virginia, United States
Joined: December 18, 2006
KitMaker: 1,121 posts
AeroScale: 1,063 posts
Posted: Monday, August 03, 2009 - 01:40 AM UTC
Keith,

Very nice. You've put a lot of work into it and it shows. Keep up the good work.

mark
thegirl
_VISITCOMMUNITY
Alberta, Canada
Joined: January 19, 2008
KitMaker: 6,743 posts
AeroScale: 6,151 posts
Posted: Monday, August 03, 2009 - 02:20 AM UTC
Very nice Keith ! You have put a lot of time and energy into this build , well done !!!

As for your question , I went through my ref's and came up empty handed . However ; I did come across some what of plans in Scale Aircraft Drawings Vol 1 . But they are very incorrect . I can tell you that from the rudder bar which you know already runs done the side . There is another pully at fromer G or H then from there to the control surfaces .

Wish i could help you out more Keith , but that's all I have for now .

Now I could be half righ or half wrong depending how you look at such things !
Kornbeef
_VISITCOMMUNITY
England - South East, United Kingdom
Joined: November 06, 2005
KitMaker: 1,667 posts
AeroScale: 1,551 posts
Posted: Monday, August 03, 2009 - 05:25 AM UTC
Thanks Mark, much appreciated.

Terri I know what you mean...half right or wrong, I already fell foul of that with the engine LOL

O know not much will show once the coaming is secured but if I am going to the effort of doing it I would like it rightish. I may peer int the DI and see how much is visible and decide from there. In the Albi fighters datafile P12 it shows the outer ones but then on the sketch below theres the double pulley that looks like it sits over a former as you said so I wondered if the cabled went out tp the pulley then back to that before they went back to the rudder. More interogation I think

thanks for the input hough it helps me think...which at my age is a good thing.

Keith
JackFlash
_VISITCOMMUNITY
Colorado, United States
Joined: January 25, 2004
KitMaker: 11,669 posts
AeroScale: 11,011 posts
Posted: Monday, August 03, 2009 - 05:30 PM UTC
See now it really was not that bad was it? I see you got a bit of information on the rudder cables and etc.
Kornbeef
_VISITCOMMUNITY
England - South East, United Kingdom
Joined: November 06, 2005
KitMaker: 1,667 posts
AeroScale: 1,551 posts
Posted: Monday, August 03, 2009 - 07:07 PM UTC
True Stephen, but as always I got conflicting info about cable routing.

Doug over on *the aerodrome* informs me the OAW should have its cables routed as in the DV. hopefully he is going to pass a little ino my way to show the layout. As Teri says her info is taken from a source she knows to be wrong so I'll wait and see for the moment. I have plenty to keep these old fingers amused till then.

LOL

Keith
Kornbeef
_VISITCOMMUNITY
England - South East, United Kingdom
Joined: November 06, 2005
KitMaker: 1,667 posts
AeroScale: 1,551 posts
Posted: Wednesday, August 05, 2009 - 04:18 AM UTC
Got my controls info......seems to me the controls are completely wrong, if so then every DIII kit I have seen is wrong and the Windsock files too. The control setup apparently and if anyone hasnt seen Koloman's DII DIII and DII oeflag??replica builds on the aerodrome I suggest you do and be prepared to spend some time there

He has a DIII half built, I see no reason to doubt what he has done, he has taken great pain in all his work to get it original as possible. More to the point the controls layout is more like that of the DV which makes sense as the single lower wingspar etc of the DIII puts the controls out of line. Doug over on the aerodrome also sent me working sketches from his build and a pic of the oeflag DIII with cables run to give me an idea.

Curiosity and cats comes to mind, why didnt I just stick the lower wings on before I say...lol

Could it be that Every manufacturor has the kit set up wrong? from what I see it is yes and I have started to rip the internal members off my cockpit floor to rebuild this part....I'm so glad I have the DII by Encore sitting at the side...I have a nice detailed joystick for it now...LOL
JackFlash
_VISITCOMMUNITY
Colorado, United States
Joined: January 25, 2004
KitMaker: 11,669 posts
AeroScale: 11,011 posts
Posted: Wednesday, August 05, 2009 - 10:17 AM UTC
Greetings Keith,

There were two type of Albatros D. control columns. One fit the Alb. D.III and D.Va this employed pulleys located near the floor for the ailerons. The rudder cables traveled from the lower pivot attached to the bottom of the control column. These went straight back to rudder. The other was the D.V and it had a large central pulley for the ailerons (Traveling up through top wing). It also employed the same pivot for the rudder cables. Eduard provided the pulleys as PE in their 80xx series kits and in their aftermarket PE. If you have seen the NASM book (p.92) on the Alb. D.Va 7161/17 Stropp it will have images that will help.
Kornbeef
_VISITCOMMUNITY
England - South East, United Kingdom
Joined: November 06, 2005
KitMaker: 1,667 posts
AeroScale: 1,551 posts
Posted: Wednesday, August 05, 2009 - 12:41 PM UTC
I only wish I knew this before I had detailed and painted all the parts.....Lives and learns...no t

is starting to think armour is much easier....noooooo LOL
Kornbeef
_VISITCOMMUNITY
England - South East, United Kingdom
Joined: November 06, 2005
KitMaker: 1,667 posts
AeroScale: 1,551 posts
Posted: Thursday, August 06, 2009 - 07:11 AM UTC
So with trusty scalpel and newly aquired pix and sketch in hand he ventured forth into the late morning air. Unuasually warm in the hangar I sortied out to commandeer the end of the kitchen counter, my usuall brightly lit clear decalling area.

SWMBO loitered in the sun observing the goings on with the occasional swoop to fly by on reccie. grumbling chatter scattered around the sheets of plasticard and glue bottle but the attack was half hearted and the skies were soon clear for a while, though I knew that the ever vigilant SWMBO would return better armed and more insistant.

Now to reality......

started with this........


After my hunt for cables and pulley details.....and much fiddling she now looks like this


I didnt want to/darn't even contemplate breaking her open any more than I had to so this was the best option I could think of.
cut the former at 7 below the seat mounting, cut back the floor, I had to score and crack it out to remove it as It needed the centre section extending a little, I decided once repainted the joint under the seat wont show to any extent if at all. I made most the new formers by copying around the DII parts to get the basic shapes. though the actual shape id very different to the Diii pix so all the cutouts etc were worked out from pix and by eye and for once it all seems to line up fairly well. still some basic suports and stringers to add and the rudderbar to make pulleys etc too, theres a few things moved that I am not sure if I should.
Magneto appaerently sits like the DV and a compass to scratch.....all because I wanted to run cables. :-)


thegirl
_VISITCOMMUNITY
Alberta, Canada
Joined: January 19, 2008
KitMaker: 6,743 posts
AeroScale: 6,151 posts
Posted: Friday, August 07, 2009 - 01:49 AM UTC
You do one thing and there is something else that needs to be redone But it doesn't end there next thing you know ams really kicks in with the loss of a few hairs !

Looking good Keith , just go with what feels right to you .


Keith must try OOB , Keith must try OOB , Keith must try OOB ( click heels together three times )
Kornbeef
_VISITCOMMUNITY
England - South East, United Kingdom
Joined: November 06, 2005
KitMaker: 1,667 posts
AeroScale: 1,551 posts
Posted: Friday, August 07, 2009 - 04:16 AM UTC
guitarlute101
_VISITCOMMUNITY
West Virginia, United States
Joined: December 18, 2006
KitMaker: 1,121 posts
AeroScale: 1,063 posts
Posted: Friday, August 07, 2009 - 04:31 AM UTC
Keith,

My hat's off to you for re-doing the cockpit an control cables. That was some major surgury. I hope you will post your findings on the control cable routing so that we may benefit from your stress and frustration.


BTW, armor is not easier.....

(whispering in a faint voice)....

they count bolts over there


You have my admiration, my friend.

Mark
Kornbeef
_VISITCOMMUNITY
England - South East, United Kingdom
Joined: November 06, 2005
KitMaker: 1,667 posts
AeroScale: 1,551 posts
Posted: Sunday, August 09, 2009 - 09:42 PM UTC
Hokay a leeeetle progress made here. I've added a couple of stringers the pulleysets and basecoated the wood. This is attempt 2 on the control column ade from plastic rod and tube, the first attempt I made in pieces and they all looked good until I started putting the pieces together and they were way overscale. it is still a little overscale in thickness and I'm pondering at the moment whether I can live with it. it is only popped on at the moment to check and for the pics.

I still have the rudderbar, the upper column and parts to make, and how the cables actually exit the fuselage into the wings seems a mystery yet to work out but at this scale tucked away where they are it isnt one I need worry over too much.


As I said the wood is basecoated so that is next on the agenda then the rudder and control column. the beauty of chopping the kit like this is you can work on sections as a unit. I can wre up everything almost except the rudder and airleron cables that run over the wood floor beneath the seat to the rear, simple. (note missing wings.....dont ask, late at night ideas seem more practical than when you wake in the morning and think "What the Dicken's was I thinking?")
thegirl
_VISITCOMMUNITY
Alberta, Canada
Joined: January 19, 2008
KitMaker: 6,743 posts
AeroScale: 6,151 posts
Posted: Monday, August 10, 2009 - 01:58 AM UTC
Like waking up this morning and saying " what the dickens " Keith has made progress !!!

Looks good Keith , doesn't seem out of scale to me . What does seem to be out of scale is that thumb in the pic's all the time which left it's mark on the ammo container

How about trying this all in 48 scale !
Grenadier37
_VISITCOMMUNITY
Texas, United States
Joined: June 02, 2008
KitMaker: 232 posts
AeroScale: 155 posts
Posted: Monday, August 10, 2009 - 06:39 AM UTC
Ummmm did Terri actually use the phrase, "what the dickens" in a sentence?

Really nice work Kieth.
gajouette
_VISITCOMMUNITY
Texas, United States
Joined: February 01, 2007
KitMaker: 365 posts
AeroScale: 356 posts
Posted: Tuesday, August 11, 2009 - 10:40 AM UTC
Excellent attention to details my friend.Keep up the beautiful work.
Regards,
Gregory Jouette
thegirl
_VISITCOMMUNITY
Alberta, Canada
Joined: January 19, 2008
KitMaker: 6,743 posts
AeroScale: 6,151 posts
Posted: Monday, August 17, 2009 - 01:33 AM UTC
How's the AMS coming with the build ?
Kornbeef
_VISITCOMMUNITY
England - South East, United Kingdom
Joined: November 06, 2005
KitMaker: 1,667 posts
AeroScale: 1,551 posts
Posted: Wednesday, August 19, 2009 - 04:31 AM UTC
it's coming on just nicely thankee, slow at the moment but getting there
thegirl
_VISITCOMMUNITY
Alberta, Canada
Joined: January 19, 2008
KitMaker: 6,743 posts
AeroScale: 6,151 posts
Posted: Wednesday, August 19, 2009 - 01:05 PM UTC
Well , thankee ............................super Keith , progress pic's would be great of what you have gotten done so far . As to what people are saying if I understand correctly . Windsock data files are wrong then , which really throws a curve in my plan on building the OAW bird .

So Lot's of of ref pic's would really help out , well with in reason . I have Tom's Model Works D.III in the stash with a very nice resin engine in the stash as well . Every thing else will be made from scratch .

I;m looking forward to your progress
Kornbeef
_VISITCOMMUNITY
England - South East, United Kingdom
Joined: November 06, 2005
KitMaker: 1,667 posts
AeroScale: 1,551 posts
Posted: Wednesday, August 19, 2009 - 07:15 PM UTC
Terri

Yes from what I've heard and seen Windsock are wrong, not just for the OAW but Albatros's own DII too though I am only going on what others, far more educated than myself have said and using Koloman's excellent replica builds as reference too.

Daylight hours are a little tight for me but I will try and get some snaps done shortly and post them.

I can of course send you what pics I have but most of them are from Koloman's work over on *the aerodrome*

K
Kornbeef
_VISITCOMMUNITY
England - South East, United Kingdom
Joined: November 06, 2005
KitMaker: 1,667 posts
AeroScale: 1,551 posts
Posted: Thursday, August 20, 2009 - 05:51 AM UTC
okies...tiny update guys and girls

One almost finished almost completely scratched column. A tad thick and has some details to add along with the trigger mechanisms and the cables. the hand grip is the Part of Poland offering and the grips are thickened and rounded using seveal applications of PVA before painting.


Okay...in the next pics the column isnt actually in place, a lot of work still to be done, rudder cables to be run back from the outer pulleys over the wooden floor beneath the seat supports. I will add these when I add the column and fit the elevator cables too. the floor has to be finished yet, grained and kleared. the coaming too is just popped into place. Looking in it does make me wonder about my sanity when you can see so little for so much effort...LOL


Okay so once I get the column done, the wiring and cables in, the belts fitted and the seat in I guess I can fix the coaming in place and set about preppingg the fuselage for paint.
The lower wings are cut off and will be fixed using brass rod mountings and pins. Touch wood they fit after all this surgery or the DIII OAW may find itself on a railcar diorama....hmmmmm now theres an idea!
A little major surgery swearing, adsing, filing and filling to get the butchered cockpit floor to sit something like right.


Now.....rocker valves anyone?

Tks for looking. all comments accepted...lol
thegirl
_VISITCOMMUNITY
Alberta, Canada
Joined: January 19, 2008
KitMaker: 6,743 posts
AeroScale: 6,151 posts
Posted: Friday, August 21, 2009 - 01:31 AM UTC
Well what can I say Keith , she looks fantastic so far !!! On a small note though shouldn't the boot straps be pointing up on the rudder bar and not down ? Or am I seeing things wrong .
Kornbeef
_VISITCOMMUNITY
England - South East, United Kingdom
Joined: November 06, 2005
KitMaker: 1,667 posts
AeroScale: 1,551 posts
Posted: Friday, August 21, 2009 - 04:24 AM UTC
Stirrups/bootstraps, a good point Terri but on the ref pics I have they are welded to the bar and point down, I suppose the pilots heels rested in them as opposed to over the top, These are shown as per Kolomans build and seeing his work I expect they are right, though I have seen other pics of A/C of other marks with them up or even hinged as in the DV...but its a fair point that could cause some debate.