


I want to take a second to thank Darwin (yardbird78) for his contributions of info, pics and personal knowledge of the subject of this thread. He has been a great help in making sure I got the few details I tried to add to the build correct and has helped in making sure I had markings to complete the project with by providing an out of production sheet from his personal stash. He has also passed along a very treasured piece of memorabilia that has direct connections to one of the nations greatest technological accomplishments, a small piece of history and his own life. I'll share it with the viewers of the thread when the project is complete. Thanks Darwin, for your help on this project and for your service to the nation!
While I'm at it I'd like to thank Bruce (neptune48) for his contributions to the build also. He has been a great help in providing bits of info he has accumulated in his own research and has been a set of eyes for me hundreds of miles away at Pima, spying on the spyplane there. Thanks Bruce! Some of those photos were priceless!
Matt Swan, who most know simply as Swanny, was kind enough to provide me with the opportunity to obtain a very rare set of Meteor Productions Cutting Edge decals for this build, and even gave me a choice of tail numbers! Once I made up my mind, 17980, also known as NASA's #844 later in it's life, was the airframe I dedicated the project to. Matt not only provided me with the tail numbers and art (the only thing the CE sheet provides, along with some stencils) but he also sent two partial sheets of decals that could be of assistance to complete a hi viz version of the plane that includes misc stencils and insignia.
These three gentlemen have helped greatly to make the completed project what it will be and I hope my efforts in building it give the plane justice as well as make these fellows and everyone else who offered tips and bits proud to be associated with it. It's people like these that make this hobby, and the country for that matter, a much better place to live in. I'd like to buy'em all a cold one! Thanks guys!
Lots of putty and sanding in this one but most of that is covered in the build thread found in the link. http://cs.finescale.com/forums/1074259/ShowPost.aspx
Here, I'll cover small stuff and paint. And speaking of paint, who knew that a good looking finish with black paint was such a PITA!

The base coat is Model Master flat black from a rattle can. This is over Tamiya gray fine primer, also from a can. This is followed by a Future clear coat.

Originally this was to prep for decals and weather/shading was to follow. I changed my mind and used Tamiya XF-53 to add shading and panel line enhancement over the clear. Once the shading was done the clear was repeated.

Once the decals were applied, gray was sprayed on first along the panel lines, then post it notes were used to shade side by side panels to add variation to the boring black skin.

This was followed by streaks from front to rear and from top to bottom of the entire airframe. The result was a very faint cross weave patch work across the entire plane but not so stark to look consistant.

Next came a general over spary of Tamiya XF-1 flat black to blend everything together. A few spots where I got to trigger happy with the gray were gone over a bit heavier with black and in the end the black tied everything together nicely.

Once I was happy with the look of the basic airframe color the plane was cleared ance again to seal up the decals. This was followed by a flat coat of PolyScale clear flat. The upper side was done first but when I switched to the underside I ran out of product and switched to my back up bottle of the PS flat.

The product looked very different and was thicker than previous bottles I've used. When dry the surface looked frosted instead of simply flat. I again used XF-1 mixed about 30/70 and over coated the entire airframe, concentrating on particularly frosty areas. This helped tone down the frost on the pumpkin look and gave the plane a more sun faded look. Lucky me.

The decals are a mix of sheets and the stencilling, primarily on the underside, is a bit of guess work, as I could not confirm the instruction sheet placement with ref pics. Some didn't fit according to how the instructions wanted so I guesstimated.

True Details resin in the form of cockpit/seats and front wheels were used. All of which required massive mods to get them to resemble the actual prototype. I'll not use the sets again on my next Oxcart family build, look to the build thread to find out why.

The landing gear and wheel bays were enitrely scratch built, the only kit part used being the main struts themselves, albeit with major modifications.

The next kit will get some corrections that I found the kits needs during this build. One of those is the pregnant look of the belly. The main gear doors should be perpendicular to the main struts but the belly makes them tilt forward. Not good.

I'll try to do a better job with the refueling door on the nest one, also. The door on this kit was added after the paint so I didn't want to get to carried away with installing it. It stands proud of the fuse a bit.

I added detail to the canopys and tried to thicken them up a little. The real thing is much more substantial than the kit part, which is missing all but the most feable attempt at detail.

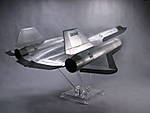
The "base" is my very quick answer to not having a base large enough for this monster and is nothing more than a small dining table coated with textured paint and some faint lines. I plan to add to the table over time to make it look better but was in a hurry today.

And there you have it. I started this thing January 12 and completed it today, a week before the contest. I feel like I chould have taken more time on certain aspects of the kit but I could feel the love for the project beginning to dwindle so on many occasions had to just let good enough alone. Comments are welcome and please do let me know what you think of it, all tips and critisism welcome, especially the paint. After looking at it for so long I've gotten used to it so really can't objectively judge if I accomplished making it look real enough or not.
Finally, as promised before, here is a piece of history that I'll forever treasure. It has a history linked to the Oxcart program and was told to me as follows;
"In 1968, Lockheed had 500 of these made up and offered them to the troops at Beale for $10 apiece, on an advanced reservation basis. That was a lot of money in those days, especially for a young airman with a family. Each person was allowed only one cup. I ordered mine and got a co-worker who didn't want his to order one for me. Most of the troops didn't order them, because they thought that price to be too expensive. It probably was, but then, I am a sucker for mementos. My two cups have been gathering dust in the kitchen cabinet for 40 years, so I thought you might enjoy having one of them."

The above words were given to my by Darwin, aka yardbird78. This was his kind gift to me, he says as a "trophy" for the build. While I doubt the build is trophy worthy, it humbles me greatly to think someone out there thinks that highly of the project and the effort put into it. Again, thank you, Darwin, for your help, without which the project would not be completed. As long as I possess the model it will be accompanied by the cup!

Here are a couple of shots of the underside of the model. These were made in the spray booth that I had to press into service to paint the beast. Photo quality is not to great here and even the outdoor shots I'm not to happy with. Some day I'll buckle down and learn how to take pics. In one of the above pics the cab of the truck actually made it into the shot. What an amature!


In closing an astute reader may have noticed I made mention to another build of a subject of the SR-71 family. I'll confirm it's true. I've acquired the Testors YF-12A in 1/48th and a set of resin after burner cans for it. Sometime in the future there will be another of the Oxcart family added to the case to accompany this plane, an early version of the YF-12A in the black and NMF scheme. I'd start on it today but other things need to be done first. Maybe this fall.
Thanks for looking. Happy modeling to all. And remember, it's only a hobby!


