Hi,
You can read on page 1 of the instruction sheet:
“It is well evident that you have not between hands a model of at ‘ACCUTAMYGAWA’, out investments, technologies, and structures are not comparable so for tools that boxes them, instruction notices, etc… With regard to our prices, they are in the decent proportion of our investments and our quantities of sale. On the other hand, we probably will be the only one for quite and while offering a model kit of this plane.”
It's true....
you can read previews here:
Hi Tech 1/48 AEG IV
As usual I begin with the cockpit where everything or almost is to make.
The walls of the cockpit (all the wall) are sanded to make them smooth. The roof is made finer and the leather bourrelets are taken away.
The floor will be glued at the same level as the second line of structure (engraved outside the airframe). Small pieces of plastic are glued together to support floor.
The wall behind the seat of the pilot was emptied. It is easier to set it up.
The seat of the pilot is put down on the reservoir but shows of the cockpit. It must not.
I cut a little the reservoir.
The sides of the seat are little high (I believe...). I took away the bottom, taken away 1mm in the seat and glued together a new bottom.
Now it's Ok:
A+
Early Aviation
Discuss World War I and the early years of aviation thru 1934.
Hosted by Jim Starkweather
AEG GIV HI-Tech 1/48
Louis
Bas-Rhin, France
Joined: May 21, 2006
KitMaker: 472 posts
AeroScale: 471 posts
Joined: May 21, 2006
KitMaker: 472 posts
AeroScale: 471 posts
Posted: Sunday, March 15, 2009 - 10:37 AM UTC
Louis
Bas-Rhin, France
Joined: May 21, 2006
KitMaker: 472 posts
AeroScale: 471 posts
Joined: May 21, 2006
KitMaker: 472 posts
AeroScale: 471 posts
Posted: Monday, March 16, 2009 - 09:37 AM UTC
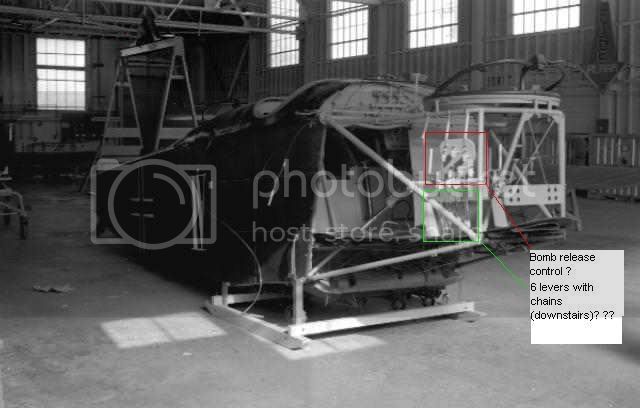
Inside, wall between the pilot and the rear gunner must be made. I'm using tools to copy forms (from Do-it-yourself shops)
Small piece of plastic are glued behind the openig and brass thread is glued on them:
A+
Small piece of plastic are glued behind the openig and brass thread is glued on them:
A+
lespauljames
England - South West, United Kingdom
Joined: January 06, 2007
KitMaker: 3,661 posts
AeroScale: 369 posts
Joined: January 06, 2007
KitMaker: 3,661 posts
AeroScale: 369 posts
Posted: Monday, March 16, 2009 - 10:37 AM UTC
the base kit looks a dog,
good luck with the build, looks tricky so far
modelguy2
Ohio, United States
Joined: March 09, 2002
KitMaker: 818 posts
AeroScale: 137 posts
Joined: March 09, 2002
KitMaker: 818 posts
AeroScale: 137 posts
Posted: Monday, March 16, 2009 - 11:18 AM UTC
Don't worry Louis when you get yours finished it will look better than mine I'm sure! I used strut stock and re-made all of the struts as well.
Mike T
Mike T
Kalt
Mendoza, Argentina
Joined: June 14, 2006
KitMaker: 222 posts
AeroScale: 219 posts
Joined: June 14, 2006
KitMaker: 222 posts
AeroScale: 219 posts
Posted: Monday, March 16, 2009 - 07:10 PM UTC
Looking good, Louis ! but you will need a lot of patience with this one....
thegirl
Alberta, Canada
Joined: January 19, 2008
KitMaker: 6,743 posts
AeroScale: 6,151 posts
Joined: January 19, 2008
KitMaker: 6,743 posts
AeroScale: 6,151 posts
Posted: Sunday, March 22, 2009 - 12:38 PM UTC
Can't believed I missed this one . I have never build any of their kits and look farward to veiwing your progress .
Louis
Bas-Rhin, France
Joined: May 21, 2006
KitMaker: 472 posts
AeroScale: 471 posts
Joined: May 21, 2006
KitMaker: 472 posts
AeroScale: 471 posts
Posted: Sunday, April 19, 2009 - 09:43 AM UTC
Hi,
A+
A+
Louis
Bas-Rhin, France
Joined: May 21, 2006
KitMaker: 472 posts
AeroScale: 471 posts
Joined: May 21, 2006
KitMaker: 472 posts
AeroScale: 471 posts
Posted: Monday, April 20, 2009 - 03:58 AM UTC