_GOTOBOTTOM
Early Aviation
Discuss World War I and the early years of aviation thru 1934.
1:72 Hansa-Brandenburg W.29 build
old-dragon
_VISITCOMMUNITY
Illinois, United States
Joined: August 30, 2005
KitMaker: 3,289 posts
AeroScale: 289 posts
Posted: Friday, May 15, 2009 - 04:01 AM UTC
Hi folks, this is my 1st airplane build in a loooooong time, so chime in with any good or bad thoughts for my ego or future reference-
-Here we have the engine/cowling shot..it's small so I can only highlight and detail so much-

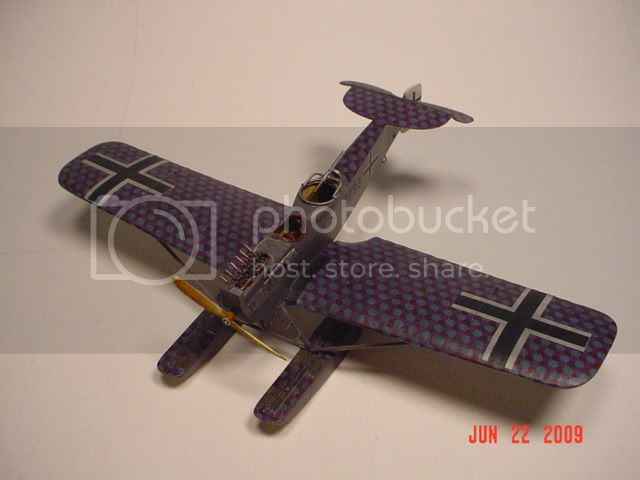
-Here we have the two cockpits - yeah, alittle retouch on the rear cockpit area has been issued / I saw a seam still.

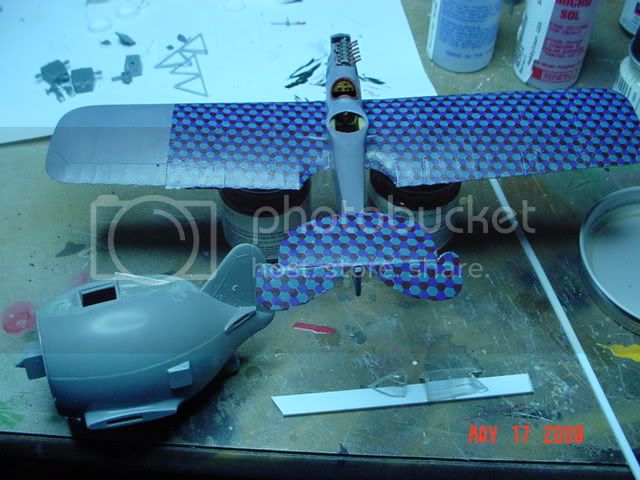
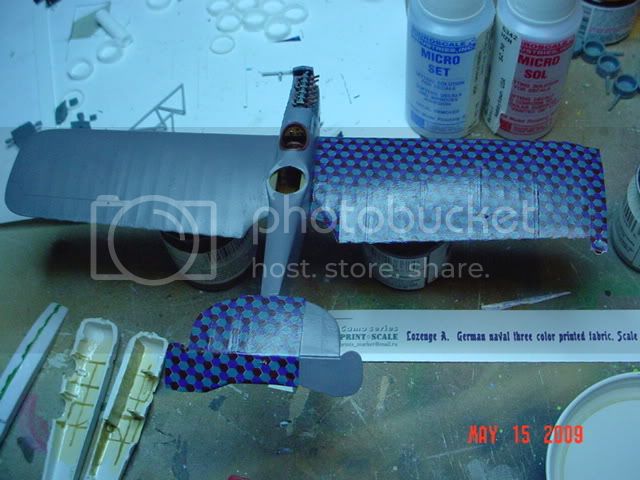
-Here's the right wing done and the stab started-

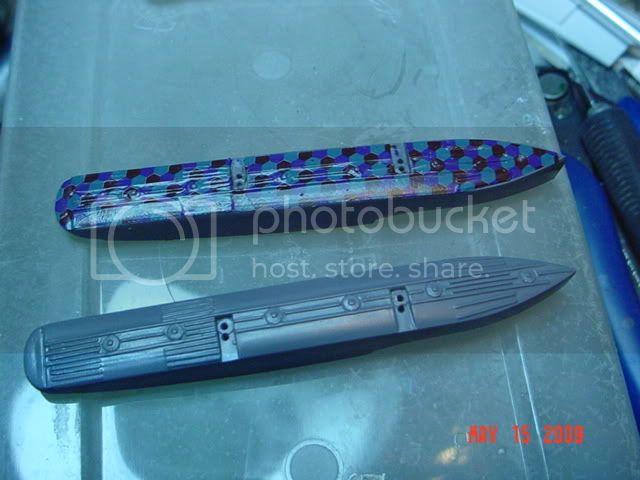
-Here we have one of the floats done in naval lozenge...lots of solvaset to get it to settle in!

I have some smoke and clear colored .05 line/thread to rig with later...what's a good color for the control lines?
old-dragon
_VISITCOMMUNITY
Illinois, United States
Joined: August 30, 2005
KitMaker: 3,289 posts
AeroScale: 289 posts
Posted: Friday, May 15, 2009 - 04:05 AM UTC
Oh, please note pics 2 and 3...is it usual to have the lozenge overlay noticable? Did I need to trim better between lozenge sections{side to side}, or is this normal? I'm finishing the plane in a coat of flat which I hope will hide the seams...well, that's my hope!
..and yeah, I know about the chip in the wing in pic 1..I was going to get that before I lozenged
that side...
BTW- the kit in question{yeah, some of you may wish to know that...I'm new here remember} it's a 1/72 Eastern Express kit...the other one is a future pic/post of an 1/72 Amodel MY-1 russian float plane...that one will take some work!
Kornbeef
_VISITCOMMUNITY
England - South East, United Kingdom
Joined: November 06, 2005
KitMaker: 1,667 posts
AeroScale: 1,551 posts
Posted: Friday, May 15, 2009 - 04:31 AM UTC
Bob.

Usually when I lay lozenge I butt join panel to panel not overlay them, I may be wrong of course but I'm sure one of the more enlightened here will confirm it for you.

Either way a mighty fine looking build especially for a first....you didnt shy away and pick something relatively easy. Sometimes the best way to learn.


Keith
thegirl
_VISITCOMMUNITY
Alberta, Canada
Joined: January 19, 2008
KitMaker: 6,743 posts
AeroScale: 6,151 posts
Posted: Friday, May 15, 2009 - 05:44 AM UTC
Looking really well so far Bob ! As Keith said , butt joinning the lozenge would have been better , but your over lap isn't all that bad . Continue on with the rest so both sides match . Butt joining gives it a better scale appearence . Naval lozenge was applied different then land base aircraft .so no worries .

Your colour for the fuselage is good as well , I would have lighten it a little more for the scale effect . Did you mix this yourself ? I like it though has a nice warm feeling to it which adds to the build !!!

For the rigging lines ( controls ) it is really up to you . Some guys would use the clear while others will use the latter , me it would be latter . I just like the effect of the smoke better .

All in all this is a great subject for your first , not to complicated , but yet challenges your skills at the same time . Keep the pic's coming Bob ......................
JackFlash
_VISITCOMMUNITY
Colorado, United States
Joined: January 25, 2004
KitMaker: 11,669 posts
AeroScale: 11,011 posts
Posted: Friday, May 15, 2009 - 09:45 AM UTC
Which kit is this?
MerlinV
_VISITCOMMUNITY
Victoria, Australia
Joined: November 26, 2006
KitMaker: 608 posts
AeroScale: 602 posts
Posted: Friday, May 15, 2009 - 05:10 PM UTC
It is Eastern Express' reboxing of the Roden kit. Frankly, I am amazed that the decals are laying down as well as they are.

I must build mine one day.

Cheers,

Hugh
B24Liberator
_VISITCOMMUNITY
Minnesota, United States
Joined: November 07, 2008
KitMaker: 134 posts
AeroScale: 113 posts
Posted: Saturday, May 16, 2009 - 12:02 AM UTC

Great Going so far!

Makes me wish I would have kept that kit, rather than sell it off..! Like an old penny I'm sure I'm bound to find another!
old-dragon
_VISITCOMMUNITY
Illinois, United States
Joined: August 30, 2005
KitMaker: 3,289 posts
AeroScale: 289 posts
Posted: Saturday, May 16, 2009 - 08:21 AM UTC

Quoted Text

Looking really well so far Bob ! As Keith said , butt joinning the lozenge would have been better , but your over lap isn't all that bad . Continue on with the rest so both sides match . Butt joining gives it a better scale appearence . Naval lozenge was applied different then land base aircraft .so no worries .

Your colour for the fuselage is good as well , I would have lighten it a little more for the scale effect . Did you mix this yourself ? I like it though has a nice warm feeling to it which adds to the build !!!

For the rigging lines ( controls ) it is really up to you . Some guys would use the clear while others will use the latter , me it would be latter . I just like the effect of the smoke better .

All in all this is a great subject for your first , not to complicated , but yet challenges your skills at the same time . Keep the pic's coming Bob ......................


Thanks for the input on the comtrol lines...smoke it is! As for the "overlap"...my bad I guess{read - ROOKIE}...the way that lozenge decal is printed there's no way to butt together without alot of trimming...and I did consider doing that...but didn't. Next time I guess!...maybe better decals next time too.
Oh yeah, I chose modelmaster RLM 75 1/2 Grauviolett...I like the slight purple color with the lozenge color...it's still a medium gray, just alittle more purple.
old-dragon
_VISITCOMMUNITY
Illinois, United States
Joined: August 30, 2005
KitMaker: 3,289 posts
AeroScale: 289 posts
Posted: Saturday, May 16, 2009 - 08:25 AM UTC
Now here's a question folks..anyone chime in here...is it a regular thing to have to trim the sides/ends of the lozenge decals to get the pattern to match?! In this particular decal/pattern butting together would have yielded one lone wide row between each strip...if not trimmed. That's why I overlaid them.
old-dragon
_VISITCOMMUNITY
Illinois, United States
Joined: August 30, 2005
KitMaker: 3,289 posts
AeroScale: 289 posts
Posted: Saturday, May 16, 2009 - 08:35 AM UTC

Quoted Text

Bob. Either way a mighty fine looking build especially for a first....you didnt shy away and pick something relatively easy. Sometimes the best way to learn. Keith


Thanks! I flipped a coin to see which kit got the dubious honors...this one won. The "other" plane shown will be the "real challenge"{ 1/72 Amodel MY-1 russian floatplane}...I've seen far less flash and fit problems in old AMT truck/trailer kits!!!
Starting the hard way is an old trait for me...eons ago while my friends bought and started target shooting with 22cal pistols, my dumb butt went out and bought a used 44 magnum...
old-dragon
_VISITCOMMUNITY
Illinois, United States
Joined: August 30, 2005
KitMaker: 3,289 posts
AeroScale: 289 posts
Posted: Saturday, May 16, 2009 - 08:40 AM UTC

Quoted Text

It is Eastern Express' reboxing of the Roden kit. Frankly, I am amazed that the decals are laying down as well as they are.

I must build mine one day.

Cheers,

Hugh


It's really a nice lil kit....minimal flash, decent fit{now don't go comparing it to modern day kits!} and I'm using aftermarket decals so I can do the top of the floats...kit supplied decals don't offer float top decals and are considerably lighter in color. Only gripe and an easy fix, is no windshield for the pilot...he does sit very low, but it should have a short one in the kit. I have .005 clear sheet stock........
Kornbeef
_VISITCOMMUNITY
England - South East, United Kingdom
Joined: November 06, 2005
KitMaker: 1,667 posts
AeroScale: 1,551 posts
Posted: Saturday, May 16, 2009 - 10:54 AM UTC
Bob

Ref the trimming of loz...I tend to trim the very edge off each length if theyre unevenly printed and besides it gets that last bit of carrier out of the way, as for lining up the pattern I dont think all the manufacturers really worried overly, some did. but laying lengths in turn you could approximate a regular pattern easily enough with out excessiv loss. I cut each length of decal into a slightly larger than needed length *if I think there is plenty*. I'll try to post pics of my LVG wing lozenge tomorrow so you can see, or look at Guitarlutes LVG build here to see too.
thegirl
_VISITCOMMUNITY
Alberta, Canada
Joined: January 19, 2008
KitMaker: 6,743 posts
AeroScale: 6,151 posts
Posted: Saturday, May 16, 2009 - 01:01 PM UTC
That's it Bob pick our brains ..........We do it to others as well and it's one of the best tools we have . In re: to the over lay and since you already started it was best to continue on the way you where . Naval lozenge wasn't sectioned at all . The wings are cover in one solid piece of fabric . Have to take in to account that this are sea going planes and the salt would have done damaged to the clear dope which was applied , like putting a nail in a can of coke , next day no more nail ! So having any join in the lozenge would have giving the salt water to work it's way in , opening the seem . Not good for the aricraft . Have a look at the lozenge on a Albatros W-4 wings , all one piece and no rib tapes . same with the W-12 the pattern was consistent with no breaks . Keith is correct about land base aircraft the pattern did.'t line up when the bolts of fabric were laid bside each other and there was over lap . The over lap would be where the ribs are, the rib taping laid over top hiding it . now I could be wrong about all this and just like to do a lot of typing , but from what I have read on naval lozenge this is the info I have .

You are doing a fantastic job on this build , very impressive so far . And thanks for the brain picking it's nice have that here in the froms gives us a chance to say the things we learn and add to info we already know . Just one more thing ...............keep the pic's and questions coming !!!!
old-dragon
_VISITCOMMUNITY
Illinois, United States
Joined: August 30, 2005
KitMaker: 3,289 posts
AeroScale: 289 posts
Posted: Saturday, May 16, 2009 - 11:29 PM UTC

Quoted Text

Bob

Ref the trimming of loz...I tend to trim the very edge off each length if theyre unevenly printed and besides it gets that last bit of carrier out of the way, as for lining up the pattern I dont think all the manufacturers really worried overly, some did. but laying lengths in turn you could approximate a regular pattern easily enough with out excessiv loss. I cut each length of decal into a slightly larger than needed length *if I think there is plenty*. I'll try to post pics of my LVG wing lozenge tomorrow so you can see, or look at Guitarlutes LVG build here to see too.


Yeah, I'd like to see that when you get a chance...here or in a new thread.
old-dragon
_VISITCOMMUNITY
Illinois, United States
Joined: August 30, 2005
KitMaker: 3,289 posts
AeroScale: 289 posts
Posted: Saturday, May 16, 2009 - 11:31 PM UTC

Quoted Text

That's it Bob pick our brains ..........We do it to others as well and it's one of the best tools we have . In re: to the over lay and since you already started it was best to continue on the way you where . Naval lozenge wasn't sectioned at all . The wings are cover in one solid piece of fabric . Have to take in to account that this are sea going planes and the salt would have done damaged to the clear dope which was applied , like putting a nail in a can of coke , next day no more nail ! So having any join in the lozenge would have giving the salt water to work it's way in , opening the seem . Not good for the aricraft . Have a look at the lozenge on a Albatros W-4 wings , all one piece and no rib tapes . same with the W-12 the pattern was consistent with no breaks . Keith is correct about land base aircraft the pattern did.'t line up when the bolts of fabric were laid bside each other and there was over lap . The over lap would be where the ribs are, the rib taping laid over top hiding it . now I could be wrong about all this and just like to do a lot of typing , but from what I have read on naval lozenge this is the info I have .

You are doing a fantastic job on this build , very impressive so far . And thanks for the brain picking it's nice have that here in the froms gives us a chance to say the things we learn and add to info we already know . Just one more thing ...............keep the pic's and questions coming !!!!


Good thing to know for the "W4"...
I just laid another panel on the other wingand the stab is done, but it's off to work{blah!}...back this afternoon....
thegirl
_VISITCOMMUNITY
Alberta, Canada
Joined: January 19, 2008
KitMaker: 6,743 posts
AeroScale: 6,151 posts
Posted: Sunday, May 17, 2009 - 05:59 AM UTC
Hey Bob , I didn't think I was correct on some of the info on the lozenge so I went and did some looking or at least on the W-29 . I came across some info the the lozenge was applied at a 45 degree angle . in bolts , 5 on each wing . I'm not sure if this is correct as well . another sources says --( the fabric was applied with the length of bolt running cord wise ( bolts of fabric match precisely . rid tapes where dyed blue to match or strips of lozenge match to the pattern as well . I haven't seen this in any photo's on the subject . So if the lozenge was applied chord-wise and match this would show as one piece of fabric in photo's .

I'll shut up now
old-dragon
_VISITCOMMUNITY
Illinois, United States
Joined: August 30, 2005
KitMaker: 3,289 posts
AeroScale: 289 posts
Posted: Sunday, May 17, 2009 - 11:37 AM UTC

Quoted Text

Hey Bob , I didn't think I was correct on some of the info on the lozenge so I went and did some looking or at least on the W-29 . I came across some info the the lozenge was applied at a 45 degree angle . in bolts , 5 on each wing . I'm not sure if this is correct as well . another sources says --( the fabric was applied with the length of bolt running cord wise ( bolts of fabric match precisely . rid tapes where dyed blue to match or strips of lozenge match to the pattern as well . I haven't seen this in any photo's on the subject . So if the lozenge was applied chord-wise and match this would show as one piece of fabric in photo's .

I'll shut up now


Maybe I can cheat and say the "overlap" is color matched rib tape.....
old-dragon
_VISITCOMMUNITY
Illinois, United States
Joined: August 30, 2005
KitMaker: 3,289 posts
AeroScale: 289 posts
Posted: Sunday, May 17, 2009 - 12:49 PM UTC
Latest Progress, lil, but some movement...
old-dragon
_VISITCOMMUNITY
Illinois, United States
Joined: August 30, 2005
KitMaker: 3,289 posts
AeroScale: 289 posts
Posted: Monday, June 22, 2009 - 03:27 AM UTC
I'm calling this one done. The only thing I can't confirm is cross rigging between the two floats since I saw one pic of it and two that didn't have it...if I ever find out for sure there's supposed to be cross riggin there, I'll add it later.
Comments welcome...good or bad, since this is my 1st finished aircraft since my early twenties...I can use the guidance for future builds if you've got anything to toss at me...


mvfrog
_VISITCOMMUNITY
California, United States
Joined: August 25, 2008
KitMaker: 369 posts
AeroScale: 104 posts
Posted: Monday, June 22, 2009 - 03:39 AM UTC
I think this is a beautiful build. I particularly like the attention you showed on the propeller and the details on the hub, Very nice work. Thanks for the photos,

Matt
JackFlash
_VISITCOMMUNITY
Colorado, United States
Joined: January 25, 2004
KitMaker: 11,669 posts
AeroScale: 11,011 posts
Posted: Monday, June 22, 2009 - 05:39 AM UTC
Nicely done! Thanks for posting it here.
thegirl
_VISITCOMMUNITY
Alberta, Canada
Joined: January 19, 2008
KitMaker: 6,743 posts
AeroScale: 6,151 posts
Posted: Monday, June 22, 2009 - 02:00 PM UTC
Very nice done Bob !

As far as the rigging wires on the floats , If I remember correct did have any . Just for the control surface's . With the configuration on the struts this would have been very soild construction . If I can prove it other wise I will let you know ......................

Thanks for sharing
 _GOTOTOP