Found an old article I cobbled together about building this model. Hope y'all don't mind a lot of text:
The Sikorsky S-38 took to land like a duck, and took to water like a legless pig, but no airplane did both mediums nearly as well. Essentially a boat-shaped amphibian with retractable wheels, the S-38 was one of the pioneer aircraft of the early '30s, carrying passengers comfortably above water, and explorers above trackless jungles.
After fleeing Russia after the Revolution, Igor Sikorsky set up shop in the United States, determined to build large passenger-carrying aircraft. He saw that the future lay in civil aviation. First, however, the public had to be sold on airframe reliability.
He came up with a design called S-36, which combined the safety factor of twin engines, the strength of twin wings and the spaciousness and landing capability of an amphibious hull. The most famous S-36 was Dawn, which crashed while trying to fly the Atlantic in 1927. He sold four more, not enough to keep his new company solvent, and decided on a redesign.
The result was the S-38, rolled out in May, 1928. "It was tested, and we very quickly realized that we had a really excellent machine on our hands,' said Sikorsky. Both the Navy and Pan Am, always interested in waterplanes, made orders and the future of Sikorsky Aviation Corporation was assured.
This one aircraft almost certainly saved Sikorsky Aircraft. "It was this modest airplane which actually completed the peaceful conquest of nearly all of South America," said Sikorsky.
"The first series of ships were sold out quickly; a second series was started and also sold out in a very short time. Soon afterward, the company found itself with more business than it could handle," wrote Sikorsky. The profits allowed Sikorsky to build a modern plant in Stratford, Conn., complete with labs and wind tunnel. The company is still based there.
The basic design concept was carried on in the S-39, S-40 and S-41.
One typical user of the S-38 was Inter-Island Airways, later to become Hawaiian Airlines. Two planes were dedicated in August,1929, and another two were purchased in 1931.
Inter-Island faced the challenge of moving passengers and light cargo around the Hawaiian Islands, an area in which week-long voyages by cargo ship were not uncommon. The S-38 cut that time to a couple of hours, and provided spectacular views to boot.
For the first time, mail and newspapers were distributed among the islands on a same-day basis, and those passengers that could afford the fare could tour the entire chain quickly and comfortably.
Capt. Charles I. "Sam' Elliott was Inter-Island's first employee and chief pilot, and became an enthusiastic champion of the "flying tadpole," as the plane was called.
Capt. Basil L. Rowe flew Pan Am S-38s deep into Central and South America. "Flying for airlines wasn't the drab experience I had expected,' he said. "In most of the places we went into, aviation was entirely new. Most of the people had never seen an airplane.
"It was a big event. Officials of the town would be out on a boat at the mouth of the muddy, silt-laden rivers that riled the water far out to sea. I would come in with a flourish, starting up the flamingos from the jungle shore, take the town officials up for a hop and there would be a big local holiday."
Vern Carstens was pilot for Martin and Osa Johnson, the famous husband-and-wife explorer/filmmakers who made the first wildlife documentaries. In a S-38 painted in zebra stripes and a S-39 marked in giraffe spots, Carstens and the Johnsons explored uncharted areas of Africa and Borneo. "It's true they were slow and probably clumsy-looking, but they had a great deal of utility that would make them very useful in bush operations today,' said Carstens.
The S-38 was a sesquiplane rather than a true biplane, which meant the lower wings were more useful as bracing points than lifting surfaces. The tail surfaces, major lifting surface and engines were suspended high above the water, and the tail control surfaces were mounted on a twin-boom arrangement that kept them square in the slipstream.
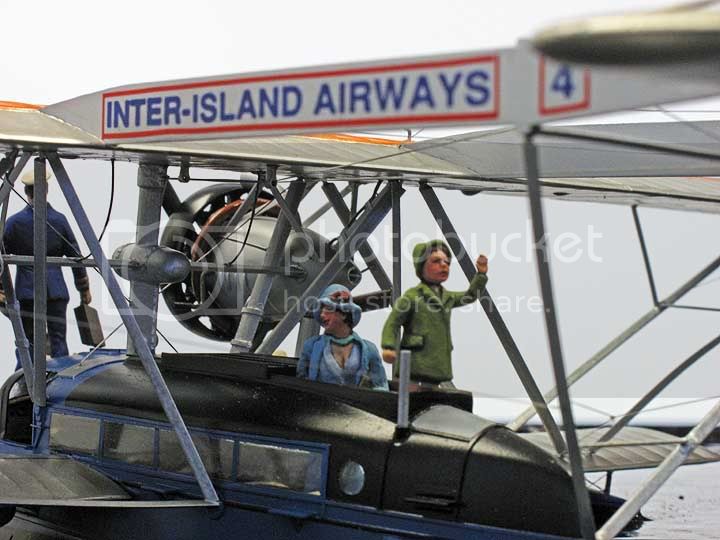
The hull was divided into six watertight compartments, and each float into three sections, a handy feature when ploughing through untested waters. Entry for crew and passenger was through the top, as there were no doors to warp and leak on the outside. The forward fuselage, which held cargo, had sliding hatches on top, as well as an entrance to the cockpit directly in front of the copilot/flight engineer. Passengers climbed on steps on the rear of the fuselage and down into the eight-seat cabin via a folding stepladder.
The engines were generally two Pratt and Whitney 410 hp Wasps. The total load was 9900 pounds, and the engines together needed only 300 hp to maintain level flight.
The S-38 was capable of taking off, cruising at 90 mph and landing on one engine. Taxiing on one engine was aided by lowering one wheel into the water, which would act as a keel.
"With a load, you sat so low in the water that the props kicked up so much spray over the windshield that, for the first part of the take-off, until you got on the step, you had no forward vision at all," said Elliott. "After getting on the step, vision was OK, and you went into the air like a scared jackrabbit."
After two years in the African wild, Carstens appreciated the planes's simple maintenance. "It was easy to service, and unless it had been water of a corrosive nature, all that needed to be done was drain the bilges and floats and open the hatches so the interior would dry out ... all the wing struts were open on the end for draining and ventilation, and the hull was of such sound construction that even under rough water conditions there was very little seepage."
There were two main types of S-38, called S-38A and -B, the main external difference between them being a sloped windshield on the S-38B. Some S-38As were retrofitted with this windshield. On later models, a modest cowl ring was attached to the engine cylinders. Army versions were designated C-6, and Navy/Marine birds were PS-2 and RS-2.
The exact number of S-38s built is unknown, but thought to be about 133. None of these aerial pioneers still exist. The four planes of Inter-Island wound up in the Kailua dump after 15 years of service without an accident or a delayed flight, a record Hawaiian Airlines would be hard-pressed to duplicate today.
The S-38 is one cool plane, no doubt about it. Id always admired its angular, pugnacious ugliness. If there had been a model available, Id have built it in a second.
Then I got my chance. The Hawaii Maritime Center, then under construction, wanted to put together a display of flying boats. They had a finite amount of money, donated by the son of aviation designer Wellwood Beall, for the construction of a model as large as possible of the Boeing 314. The Boeing was a giant flying boat that formed the basis of most of the worlds transoceanic air traffic prior to World War II and is often mistakenly called the China Clipper, which was actually a Martin design.
I was more interested in the Sikorsky because of its long record of Hawaiian service, and, frankly, because Id read Osa Johnsons I Married Adventure as a kid and the S-38 epitomized the adventure and romance of flying in the 30s.
So, in the way these things go, we compromised. I was to build both planes.
The museum head had a vague notion of the Boeing model big enough for kids to climb into, or at least with open side so they could move dolls around inside. This was an impossible dream, as the structural integrity of the thing with open sides would be too weak to take much abuse.
We settled on a 1/24 scale Boeing 314 a wingspan of six and a half feet in a flying attitude, and a 1/48 Sikorsky in a diorama setting.
The two models were built simultaneously and finished about the same time, but the diorama aspects of the S-38 took about four more months.
The Boeing plans were drawn on a Macintosh computer and printed out at the required scale, and construction was relatively normal, being primarily of styrene templates, surfboard foam bread-and-buttered together and the whole thing covered with Fiberglas cloth and resin. All materials were of inert materials because the original museum plans called for an open-air structure on the waterfront, and I was afraid wood would swell and flex over time, destroying the model from within.
The resulting model weighed more than 50 pounds. I wasnt able to help myself and put some scale figures aboard anyway, looking out of the windows directly at the museum visitors. One pair was of a honeymoon couple, complete with lipstick smears!
And thats enough said about the Boeing, this is the story of the Sikorsky model. It was difficult finding correct plans for the S-38, but the 1/48 plans from the Smithsonian came closest, and I was able to make corrections from a fairly large photo collection built up from various archives.
Early on, I realized that the water in the diorama might cause trouble, perhaps even destroying the model in the process of setting. The only way around that was to build two models of the S-38 simultaneously, and that called for a kit.
But, damn it, there were no kits available. This was before Esoterics 1/72 version, which in any case was too small for the museum display.
I decided to make my own, and began carving out the hull, floats and nacelles out of basswood. Planks of 1/8-inch basswood were glued together with Elmers that had food coloring mixed in; the resulting dark interface between the boards gave a topographic contour line for carving, guaranteeing each side was equally shaped. When done, the surfaces were doped and sanded to a smooth finish.
Wings and tailplanes were shaped from R/C model plywood, the lines of the thin veneers also serving to keep the shapes even. These were then covered with .005 styrene, with the ribs pressed into the underside of the sheet by ballpoint pen. Spacing was determined by computer printout.
In the meantime, Tom Harrison of Cupertino became interested in the project. I had admired his line of World War I vacforms for some time, and he agreed to produce the model and market it. An ideal situation, as Im a builder, not a businessman.
After mailing off the main parts, we this was now a cooperative venture had to figure out how best to produce the detail parts. To us garage-industry types, there are three options; etched brass, cast resin, and cast metal.
As much as I like the fine detail of etched brass, there werent enough suitable parts on the S-38 to justify the expense. As for resin, after building up the interior floor and control panel, we discovered that they wouldnt vacform cleanly, so detail was added to each and cast out of resin.
This gave us two resin parts of decent clarity, requiring very little scratch-building on the interior (more on that later). The rest of the detail parts props, engines, exhausts, wheels, skid, control column, stairs, etc. were cast out of metal, yielding a surprisingly heavy bag of parts.
If we were to do it all over again, it would perhaps be better to cast the wheels and engines out of resin, simply for weight considerations, and the floats, nacelles, and vertical rudders out of resin as well, to simplify building and increase the fineness of detail. But thats post-game quarterbacking.
Even though Id carved the masters, I was still at ground zero in building the model when all the parts arrived. These were test shots as well, with some rough edges.
Its a complex plane, but the model went together just like any other vacform kit. Toms engineering actually made it smoother than most vacforms Id built in the past.
Heres how it went together, edited directly from the instruction sheet:
MODEL PLANS:
None of the plans available for the S-38 proved to be accurate after matching them up against photographs of the real thing. However, the two sheets of 1/48 plans available for two dollars from the Smithsonian plans service are better than most, and we suggest you send for them.
Our major gripes with this set of plans are in the wing rib layout and the shape of the underside of the hull. We suspect that the outline of the nacelle "power eggs" might be more accurate than the kit parts, being more tapered.
The thing to remember about the S-38 is that these planes were essentially custom-built, and differed in many details and interior layout. Collect as many photographs as possible of the particular bird you wish to build and proceed from there. This particular kit gives parts for a generic airliner, complete with standard-issue 1930s pilot figure. In addition to these Xeroxed instructions is a sheet of laser-printed templates that also has a key drawing for strut location. The reason is that Xeroxes vary in reproduction size, while a laser printing is accurate within 1/300 of an inch.
All photographs are courtesy Burl Burlingame Airchive, Hawaii.
These instructions assume that the builder has had some experience in the heartbreak of building vac-form kits, so the usual advice of carefully sanding and fitting each part is dispensed with here. Like most other model with struts, we find the S-38 is easiest to build by completing subassemblies, painting and then sticking the whole mess together.
THE POWER EGGS
Glue together normally and then cut the end off some S-38s had a tapered device attached on the end that completed the curve. Ream out the fore-and-aft panel lines into a wider cross-section and add .10 by .20 Evergreen strip upright in the groove. Clean out cooling vents with an X-Acto. Cut out nacelle template and align along top seam, marking off strut attachment points. Adventurous modelers should try digging out the attachment points to make it appear as if the strut runs into the egg's interior.
Align by making a brace, by placing double-sticky transparent tape on locating holes area beneath wing, marking off holes for power egg struts with pencil and then transferring tape to a flat piece of plastic. Put plastic strips just outside the markings, so that when the struts are placed in the correct place on the sticky tape, they wont slide outward.
All of these struts were attached to the same wing spar, so they should line up.
Add a fuel line and drill hole for metal air intake these intakes varied in length, so if the the bird youre building has a shorter intake, just slide it back into the egg. Also drill holes for the two outer arms on the metal carburetor vent, beneath the egg, and glue into position. This part may require some clean-up, and the main vent portion between the arms shortened to fit the egg curve. Engine cranks may be scratch-built and added to egg, but this was plugged in only just prior to starting the engines. Otherwise, just drill a hole for the crank plug. Drill another hole underneath for attaching gear strut.
In most cases, youll want to spray both units an overall aluminum color at this point. This was the Sikorsky factory finish.
THE WINGS, BOOMS AND TAIL
The lower wings go together fairly easily. Remember to sand so theres a sharp trailing edge and square off the wing root. Drill holes in wing root to match those in the root template on the fuselage side, just behind the cockpit. It should be noted here that the lower wings are not flush to the fuselage when attached, so dont worry about puttying them into place.
Sand the upper wing halves also so there is a sharp trailing edge. Clean out the wing fold grooves that frame the wing fuel tank, and the slots for the tail booms and the ailerons. Epoxy balsa or a piece of coat-hanger wire inside the wings to prevent later warping or flexing.
At this point youll notice that the lower half of the main wing is slightly shorter than the top piece. This is because the wing tips are slightly fluted when viewed from the side. Glue the leading and trailing edge first, then flex the tip of the lower wing up into the upper lip of the top half and glue into place.
Glue together upper and lower tail halves together just like the wings, as well as the rudder sides. The teardrop-shaped fairing on the horizontal tail surface, housing the rudder control crank, didnt exist on all S-38s; remove it if yours didnt. Clean out slots in the tail to accept the rudder posts. There are two ways to attach rudders to tail. You can assemble rudders, then cut in half and reassemble through the slot. Or and this method looks better detach rudders from the rudder post, glue post inside slot, putty seam normally and then reattach rudders after filing a nice rounded curve to the joining edge. This way, the rudders can be set slightly askew. On the real bird, the elevators droop slightly when the plane is at rest.
With the wings and tail unit completed, attach one to the other using booms. Make sure everything is nicely squared. The angle of the tail units attachment to the boom can vary slightly, as this is how the plane achieved trim. Once this is set, glue struts into place. Run two pieces of brass wire into holes on the leading edge of the rudder post. This is the trim actuating rod.
The entire structure, thus completed, will also cry out for a coat of aluminum paint at this point.
FUSELAGE AND FLOATS
The floats are the easiest part of the construction. Sand em down, glue em together and toss em aside.
The fuselage is the most difficult. Take your time, as a single mistake here will ruin your chances for a normal social life, perhaps forever.
The single hardest part of building this S-38 is attaching the side windows, simple though they seem. Install them before the fuselage sides are detached from the backing sheet, as it will help give the structure rigidity and prevent the sides from warping and flexing during installation.
Cut out window slots, glue in windows, putty and sand smooth. Cut a circular hole behind the main windows and repeat with the porthole-style windows. These portholes are not marked on the fuselage side as not all S-38s had them, or they had a triangular-shaped window in the same location. Its a good idea to polish all the windows out before proceeding with the rest of the model.
Some modelers may prefer gluing in a a piece of plain, clear plastic, flexed slightly to fit the fuselage curve, then polished out and with window frames added last, of colored decal material. This latter method actually gives superior results and was used on the completed model pictured in these instructions.
While doing the windows, beef up the sharp edges of the float lines from inside, using urethane foam, cyanoacrylate glue, putty, whatever. These are quite delicate as this is where the plastic is thinnest. Take care as not to melt the plastic when applying the more caustic fillers.
In the forward half of the top hatch, above the passenger compartment, fill the space with plastic strip on each side so that the forward compartment ceiling will be smooth. Add a bead of cyanoacrylate around edges of this hatch, as this area will undergo some major reshaping later and needs more bulk.
Now, go ahead and detach fuselage halves from the backing material and sand down. If there are roughly molded areas around the edge, fill with plastic or cyanoacrylate so the mating surfaces will have something to grip the raised rough part can be sanded away after the fuselage is glued together.
Cut away the cockpit portion, leaving just enough excess so it can be sanded flush later.
Clean up the two resin parts and attach. The back of the bulkhead/instrument panel part can be sanded down so that the doorway is open. Sand down the two plastic bulkheads and attach behind cockpit seats and at end of passenger compartment. Note that the cockpit bulkhead is open add two diagonal braces of plastic rod across the back, from upper corners and meeting in the center, on the deck.
Make passenger seat backs of Evergreen strip. At this point you might want to add the metal control column, which is a throw-over type attaching to the square depression on the control pedestal. Add a hydraulic pump of plastic or brass rod in the round mount on the floor on engineers side. Glue metal folding ladder to rear bulkhead. Add other parts as you see fit. Adding these parts after fuselage is painted is possible, but damn near impossible after attaching wings take it from personal experience!
Interior colors are your best guesstimate. Controls are clearly gloss black, and seats in cockpit are probably leather-colored.
Some filing might be necessary to make interior assembly fit fuselage halves. Once this is accomplished, the easiest method of assembly is to place assembly loosely between fuselage halves and glue fuselage together. Once the fuselage has set, rattle assembly into place and glue with drops of cyanoacrylate on the end of a needle.
Sand fuselage seams as smooth as possible. The top entry hatch will need to be squared off with a file, and then sanded down nearly flush with fuselage, which explains all the beefing up done earlier. This will also open up the rear half of the hatch. Add a hatch cover of sheet styrene, open or closed to your preference.
Add canopy over cockpit, aligning and gluing rear end first and then the front. Fair into fuselage with white glue. The canopy is one of the nicest parts on the model, the molding being farmed out to Falcon of New Zealand.
Now, using .010 X .020 Evergreen strip, add panel lines and trim to fuselage and floats. This was purposely left off the master parts as adding it later has a finer, cleaner appearance. It actually isnt difficult and can be completed in an hour or so by using a ruling pen and liquid cement. Glue strips that are too long into place, let dry, and then carefully trim off excess.
Add other detail, such as hatches on forward part of hull, steps, walkways, strut bases and retractable handhold next to the passenger exit. File rear end of hull until it matches width of metal tailskid, then glue skid into place. The metal bow bumper is optional, as not many S-38s carried them. If you do use it, the part will need shaping with needle-nose pliers and careful filing to match the plane youre building.
The walkway areas in front of cockpit, atop passenger cabin and in steps area on rear fuselage seem from photos to be made of non-skid material. Drill deeper holes in the wing root template and glue a brass rod into place on each side. Later, the lower wings will slide onto the rods, but in the meantime the rods make a convenient handhold for painting the fuselage. Note that the lower wing has a slight dihedral of 1 degree.
Weve never seen an S-38 that wasnt black below the fuselage and float waterlines, but there may have been exceptions.
As for the rest of it, check your references. Good luck!
ENGINES AND EXHAUSTS
Clean up metal engine, propeller and exhaust castings. Note that while the engines and props are identical, the exhaust collector rings are handed the main pipe should wind up on the lower outside side of each power egg. Due to molding limitations, the individual pipes on each ring need to be bent in slightly to match the exhaust ports on each cylinder head. Use a pair of needle-nose pliers and patience. When done, put the ring pipes down on sandpaper and sand until even.
The cowl ring was a late addition to the S-38 and not all planes carried them. If your plane did not, file off the ring and let the engines fly naked.
With the ring glued into place behind the engine, test fit to power eggs. Glue aluminum tube to main exhaust pipe, and bend with pliers until tube lies next to power egg.
The engine front generally matched the color of the power egg, while the cowl ring matched the planes trim colors. The props are polished metal go ahead and polish the model part with a nail buffer while the rear of the blades were flat black or maroon.
PUTTING IT ALL TOGETHER
Some modelers build jigs to make sure everything lines up, others just use the ol Mk. I Eyeball to make sure it goes together. Whatever your method, we find the following sequence works for us.
* Start off by preparing struts and glue lower wings into place.
* Glue power eggs into place beneath main wing. Make sure that eggs are far enough back so that the wing struts can pass cleanly through the angled egg struts. Note that the nacelles (and engines) arent exactly parallel to wing they should tilt upward at 2 and half degrees.
* Glue metal main strut to location beneath main wing, then attach to power eggs via a bracing strut. (If youre going to rig the model, pre-drill the holes prior to this step.)
* Attach struts to the underside of wing/tail structure and at the junction of the booms.
* Heres the fiddly part. Glue main strut to fuselage, just behind the canopy piece, and glue joint of struts from the booms to top of metal tailskid part. When the glue sets, and if all the pieces are aligned, the model can be handled without falling apart. But its still rather delicate the more struts you add, the stronger it gets.
* Add the rest of the struts.
FINAL DETAILS
Using the plan on the laser sheet, attach float struts, and then to lower wing. (Hey, you riggers out there, add the rigging between the float struts before they are attached to wing. Once again, personal experience talking.)
Make control horns from scrap plastic, fuel inlet pipes from wire, and check to see what kind of lights and pitot tube your S-38 is carrying. Add rudder control crank, making sure it matches the angle of the rudders.
Drill hole in ends of gear struts and add brass wire. One end goes into underside of power eggs, the other into an aluminum tube strut.
Attach metal or plastic wheels to metal landing gear, than attach both to fuselage plates. Add hydraulic line made of fine wire. Some S-38s had wire-frame wheels. Modify the plastic wheels and use a commercially available etched-metal spoke set.
Since this particular model was going to be displayed in a water environment, the wheels were retracted. I used the metal wheels, which were quite heavy. Next time, Ill use the plastic ones.
Add control lines, aerials and rigging as per drawing. Note that the control lines all enter the top of the main wing strut. Do necessary touch-up, decals or weathering. Glue on engines and props.
All of the above was made easier by using Contrail strut-shaped sprue, which Tom includes in the kits.
THE INTER-ISLAND BIRD
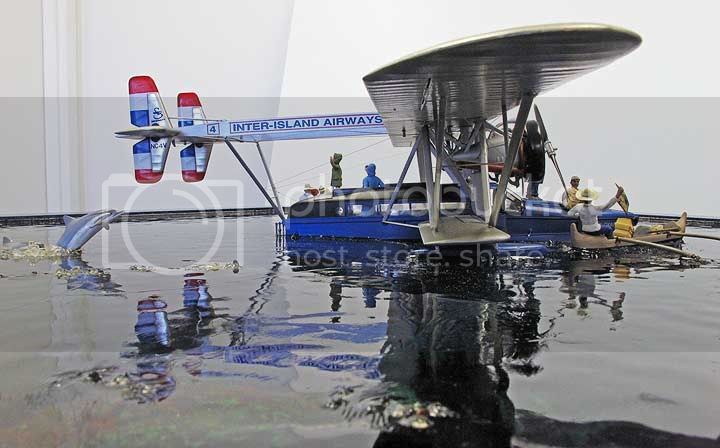
There are no records of how the Hawaiian airliners were painted. After intense study of the photos of the Inter-Island Airways birds, comparing them to other airlines of the period, knowing Sikorskys factory finishes, and a fair amount of guesstimation, I concluded Inter-Island painted their planes with a deep blue fuselage and red, white and blue striped tails.
The top of the cabin was a dark color, which could have either been a midnight blue or black. I took the chance Inter-Island didnt want to stock extra paint and painted the cabin top black, like the area below the waterline.
The stripes on the tail varied, so I chose the mid-30s as my time frame and stuck to it. At that point, Inter-Island had all four of its planes and were doing a booming business. I chose plane #4, Molokai, simply because there were more photos of that plane than any of the others.
The wings and tail surfaces were painted with aluminum Metalizer and then covered with Bare-Metal foil. This had the proper appearance but made it difficult to glue anything to the surface. I must have reapplied the power eggs four times.
By 1940, Inter-Island had bigger, roomier planes S-43s and the S-38s were relegated to cargo hauling. At that point the cabins were stripped, the nice picture windows were replaced with portholes and the birds given a utilitarian coat of overall aluminum color. Pretty dull.
I managed to fix the date even more exactly and played a little joke in the process. One of the most important things the S-38s did was haul newspapers to the neighbor islands. Using microfilm of the real newspaper, I contact-printed the Jan. 11, 1935, issue of the Honolulu Star-Bulletin onto photographic paper, then had it veloxed down to 1/48 scale. (Note, newspapers then were approximately two inches wider and deeper than they are today.)
The veloxes were then peeled, plastic emulsion away from paper backing, yielding an exact reproduction of a newspaper on very thin film. It was then soaked in coffee to dull the whiteness, folded, trimmed and placed into a figures hand.
If you can get close enough, the paper can be read. The joke? That particular issue headlined Earharts flight; Amelia Makes Oakland, Ending Hop From Hawaii. My oldest daughter is named Amelia.
Four of these were constructed and then multiple Xeroxes made and tied together to form newspaper bundles. Only the top newspaper in each bundle is clear enough to read.
The aircraft markings were a combination of stock decal colors and numbers and a press-type Sikorsky logo I had made.
With the airplane model completed, and its back-up waiting in the wings in case disaster struck, it was time to build the diorama. After consulting with the exhibit designers and taking careful measurements of the display case, I had the museum people construct a Plexiglas box that would slide down into the niche inside the case. Its better to have the museums build such things, because it guarantees it will fit into place later on. This box was about 2-foot square and 5 inches deep.
I asked that the box be made of half-inch plex, but when I got it, it was made of 3/8-inch. The outside dimensions were the same, so I shrugged and went ahead which turned out later to be a mistake.
The plan was to make a lagoon setting, with the plane nestled in deep water within a reef. This is exaggerated reality, but we wanted to drive home the tropical setting. The only way to match real water, I decided, was to pour resin.
A 1/48 paper cutout of the plane was placed in the bottom of the box and places for likely reef formation drawn in. The box by now had a nice smooth coat of blue lacquer paint on its exterior, both to match the hull color of the model and the signage of the exhibit area, and also to suggest blue ocean through the plex sides of the box.
The volcanic reef rocks were made of chunks of large-cell Styrofoam. Lacquer thinner in a Zip Kicker spray bottle was sprayed directly onto the Styrofoam, which ate away at the cells until the surface was rough and pitted. The idea was also to displace the heavy volume of resin with light foam.
The Styrofoam was then painted with poster paint, a mix of black and white that matched the gray of dry lava rock I didnt want it too dark. The reef was then Elmerd to the plex box bottom and dry-brushed with bright reddish-browns and greens to suggest algae growth.
Water-based poster colors were used because enamel paints would dissolve under the caustic resins. The poster paint also protected the Styrofoam rocks from the same fate, or so I thought. So much resin was eventually used that Im convinced the Styrofoam dissolved completely, leaving the shell of poster paint behind like a chemical fossil.
The proper color of the sandy bottom worried me for awhile, and then solved in the simplest way possible. The first layer of resin poured in the bottom of the box, smoothing it out to a depth of about 1/4 inch, had real, dried sand dumped into it. After setting, the excess sand was shaken out.
The next layer had some bottom debris added, including kitchen-herb seaweed and an anchor and line running up to where the nose of the S-38 would be. The line was made of carpet thread, stiffened with cyanoacrylate.
Succeeding layers of casting resin were poured in quarter-inch increments. The resin was colored with standard resin dye, using a combination of deep blue and ocean blue, the latter being a bit too green. The amount of dye was lessened as the resin crept nearer to the top, giving an illusion of depth. Near the bottom, it took something like 60 drops of dye per cup of resin.
Each layer was given a complete day to set. The water actually took about a month to pour, stunk up the house and in the end consumed six gallons of casting resin, making the box weigh a ton.
But that was the least of my worries. When the resin was halfway up, I noticed that the sides of the box were bowing in. As the resin set, it pulled the sides inward, infinitesimally, so gradually that I hadnt noticed until it was already bowed.
Greasing the box sides, so the resin wouldnt pull on them, didnt help. In desperation, the bow was disguised by rimming the top edge with additional plex strips, like a window frame, and repainting the exterior.
This had the unexpected side benefit of giving something like a handle on the outside of the now-heavy and awkward box, and of improving the looks of the completed installation. Ill do it that way from now on, as well as use thicker plex for the box!
As the water filled the lagoon, the various elements were arranged. Id already decided to match as closely as possible two classic photographs of the Inter-Island birds, one showing newspaper delivery and the other showing passenger off-loading, both into outrigger canoes.
A canoe half was cobbled up and vac-formed (and what the hell, we threw the canoe parts into the Toms Modelworks kit as an unexpected and unexplained bonus). The outriggers were made of heat-formed sprue, and the little canoes were lashed together using carpet thread, matching the lashings on the real craft.
The real things were also rather dully painted during the 30s, natural-wood above the waterline and black below, the outrigger floats being black as well. Acrylic paint was used for the black and the base color of the wood, because I hoped itd be more impervious to the caustic resin, and the above-water sections were woodenized using oil paints applied streakily.
The two canoes were placed by the starboard bow and the port quarter of the S-38, leaving the port bow unobstructed. This was on purpose, because thats the angle most people prefer to photograph airplanes from.
Since I also wanted to show how passengers disembarked and how the forward cargo hatches worked, figures were placed in these areas. I also wanted to leave the cockpit open, so the pilot figure is shown standing on the bow walkway.
The pilot was sculpted as a generic pilot figure of the '30s, and included in the model kit as a metal casting. The rest of the figures, nine in all, were patched together using old Aurora WWI figures, model railroad figures, some Monogram heads and hands, and a fair amount of sawing, puttying and pasting-on of aluminum foil.
It would have been fun to have a real Hawaiian look to the diorama, but photos of the real thing show the passengers to be conservatively dressed haoles and the outrigger crews to be rather glum locals in a uniform of a bulky white shirt, jeans and straw hat. Not a lei or ukulele in the lot! I couldnt help myself, and carved bare feet on the outrigger crews. All figures were painted with oils.
Around this point the display design changed and the S-38 case was moved away from the wall, becoming a walk-around exhibit. Usually, design changes this late in the game are disastrous, but this one opened up the starboard rear of the diorama.
Still wanting to make the diorama more Hawaiian-looking, I toyed with the idea of putting a net fisherman here, or coin-diving kids swimming, or a guy paddling one of those monstrous, skegless redwood surfboards of the era.
None of these had the proper element of surprise that was needed to shift the focal point of the diorama when viewed from that direction. Sea life was the answer. Four porpoises were located in the proper scale epoxy-cast sculptures from Waikikis tourist hell and their snouts filed into an approximation of the Hawaiian bottlenose dolphin, who are friendly performers in many anchorages.
Assuming porpoise camouflage hasnt changed since the 30s, they were painted with enamels and oils. Since they were deeper than everything else, they were the first to be placed in the resin. When the resin reached the proper altitude, the lowest porpoise was suspended right on it, using a clothespin attached to a coat hanger to keep the right position. The next layer of resin cemented it to the spot, and the next porpoise was maneuvered into place.
To keep the resin from attacking the paint on the porpoises, they were covered in a coat of Krazy glue. It looked terrible at first, but the coat of cyanoacrylate cant be seen when covered up with resin.
By this point, there was very little dye in the resin. When a new layer began to turn rubbery, a toothpick with just the barest hint of off-white enamel paint on the tip was swirled into the settling resin behind the porpoise fins. The idea was to show the bubbling cavitation as the animals splashed through the water, and it worked out fairly well, even though it was nerve-wracking to do.
By the time the resin level had reached three-fourths of an inch from the top, it was time to insert the S-38. While the plane was propped up so the waterline was absolutely level, a piece of thin, clear plex, about an inch square, was white-glued to the bottom. When dry, it kept the bird on an even keel.
The area below the waterline also got a protective coating of Krazy Glue.
The plane was placed in the lagoon, positioned minutely, and another layer of resin poured. We were committed from that point on. If the thing screwed up, there was the back-up model. I also had visions of razorsawing the plane out of the resin at the waterline and transplanting it to a nice, safe plaster base.
As the resin crept up the sides, the canoes were added and the anchor line secured to the S-38 bow. Pouring the resin became trickier with so many elements to avoid.
The last level was the trickiest. To get the water to be fairly calm, with a slight ripple, the resin was carefully measured and an absolute minimum of catalyst was added. This was thoroughly mixed. Then, just before pouring, a few great squirts of catalyst were pumped into the mixture and lightly swirled.
The resin was poured into place, and the unequally mixed resin set unevenly, creating ripples. When it turned rubbery, breaking waves and splashes were added by manipulating with a toothpick.
This was allowed to set hard for a couple of days, covered to prevent dust, and then the slightly sticky surface was neutralized by painting with Future floor acrylic.
The last of the figures were added, and any touch-ups were taken care of. The Krazy glue coatings, which were experimental, protected the plastic and paint from the corrosive effects of the casting resin, and turned invisible under water, as did the small square of Plexiglas beneath the hull. With light directly above, the effect is very similar to a Hawaiian lagoon on a sunny day. The anchor can be made out on the bottom if you look hard enough.
Driving the model to the Hawaii Maritime Center, setting it into the case and adjusting the lighting turned out to be so easy it was anticlimactic. Ive been told the display is a favorite of schoolchildren, because the waterline is set at the eye level of a six-year-old.
Now, Ive got the half-done backup S-38 to deal with. Maybe Ill reread I Married Adventure its just been re-released and paint it up like Martin and Osa Johnsons explorer aircraft, with zebra-striped fuselage and floats. And surround it with a hundred Zulus, and lions and tigers and bears...