_GOTOBOTTOM
Early Aviation
Discuss World War I and the early years of aviation thru 1934.
WNW GB 2009 - 10 Bristol F2B - James F
Jamo_kiwi
_VISITCOMMUNITY
Wellington, New Zealand
Joined: November 04, 2008
KitMaker: 123 posts
AeroScale: 122 posts
Posted: Wednesday, October 07, 2009 - 11:07 PM UTC
Its time to make a start on the group build. I'm doing the Biff as a cut-away on one side to show -off the gorgeous interior detail to the max.


So far I have had a go at weaving my own pilot seat using thin copper wire with the kit item as a shape pattern. I'm reasonably happy for a first effort but will probably make another based on the experience gained.


The fuselage has been cut away carefully, to leave the metal stitching frames. Talk about flimsy! I'm hoping once the fuselage is closed up it will become a bit more rigid. There was a strong sense of "oh boy I hope this exposed thing works because there is no going back now" as the razor saw bit into the plastic. The thickness of the fuselage side is the unknown factor here - more on this later.


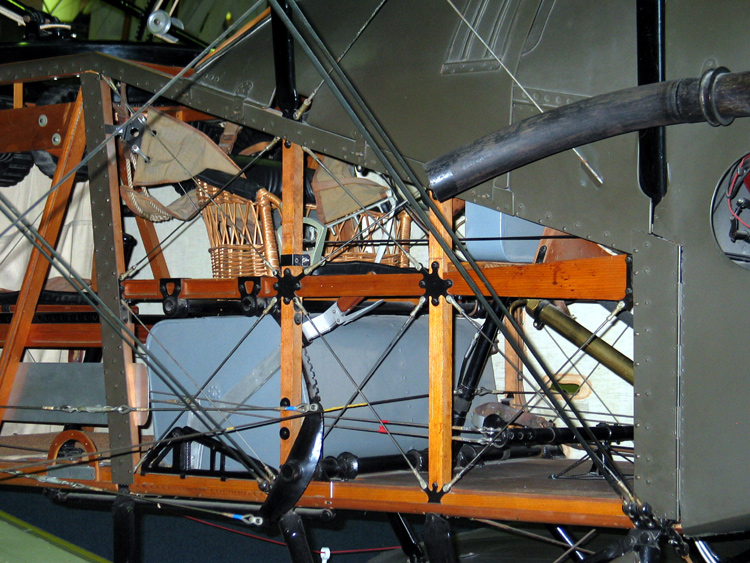
I'm using the restored F2B from the RAF Museum as a guide, although I have come to see that some of the fittings reflect a post-war F2B not the wartime version. This was a challenge for my WNW LVG build as well, given that some of the Shuttleworth aircraft is not original.

In terms of references, so far I have Vol 1 of the Datafile Special (which wasn't as much help as I had hoped), Chaz Bowyer's Bristol F.2B King of Two Seaters (which is little use for modellers but has an interesting and fairly comprehensive service history) and best of all was Rowan Baylis' walkaround photos available right here on Aeroscale:

http://photos.kitmaker.net/showgallery.php/cat/19336

Superb photos Rowan! I will paste in some of these to this thread as I go, to show how the kit can be made more accurate in places.

Does anyone have Vol 2 of the Bristol F2B Datafile Special? How useful is it for modellers - especially regarding internal details?

Happy Modelling
James
thegirl
_VISITCOMMUNITY
Alberta, Canada
Joined: January 19, 2008
KitMaker: 6,743 posts
AeroScale: 6,151 posts
Posted: Thursday, October 08, 2009 - 03:35 PM UTC
Hello James !

I really like your detailing with the seat . What gauge of copper wire did you use ?
JackFlash
_VISITCOMMUNITY
Colorado, United States
Joined: January 25, 2004
KitMaker: 11,669 posts
AeroScale: 11,011 posts
Posted: Thursday, October 08, 2009 - 04:44 PM UTC

Quoted Text

Its time to make a start on the group build. I'm doing the Biff as a cut-away on one side to show -off the gorgeous interior detail to the max. . ."

The fuselage has been cut away carefully, to leave the metal stitching frames. Talk about flimsy! I'm hoping once the fuselage is closed up it will become a bit more rigid. There was a strong sense of "oh boy I hope this exposed thing works because there is no going back now" as the razor saw bit into the plastic. The thickness of the fuselage side is the unknown factor here - more on this later.


http://photos.kitmaker.net/showgallery.php/cat/19336

Happy Modelling
James


James please put a bug in Richard's ear on the cutaways. That kind of display always is a stunner. If they provided an aftermarket fuselage with the outer skin off (at least partially) just think of all the beauty that could be exposed for regular viewing.
Jamo_kiwi
_VISITCOMMUNITY
Wellington, New Zealand
Joined: November 04, 2008
KitMaker: 123 posts
AeroScale: 122 posts
Posted: Thursday, October 08, 2009 - 09:52 PM UTC

Quoted Text

Hello James !

I really like your detailing with the seat . What gauge of copper wire did you use ?


Hi Terri
I've had the copper wire for a long time - I think it came from a motor originally. Any electronic shop will sell electrical wire you can strip the plastic off and get some very thin gauge stuff. I also went to a handcraft shop and bought a reel of beading wire made by Crown Fox size #34 (24 yards) which is about the same gauge as the copper wire. I will try that for the second seat.

As my interior will be more visible than most I am doing a bit of research to determine what details could be added for extra realism.

Looking at the F2B at the RAF Museum you can see the screen behind the observers cockpit has holes in it for control wires to pass through. The holes have leather reinforcing panels around them:


This photo taken by Rob Leigh shows the scrren from the Shuttleworth machine which is only half height, so no need for any holes:


I wonder if the pockets on the screen were used for Lewis drums as there was room for seven drums elsewhere (6 on the brackets and one on the gun). Maybe maps or a flare pistol would have been more likely?

There is a handle on the right hand side of the fuel tank for adjusting the incidence of the elevator. In the kit it is quite simplified, which is fine for viewing from above but needs to be seperated from the notched bracket as per this photo from Rowan Baylis:


There is also a black support bracket which holds the control lever, mounted on the lower longeron.

The observers seat was capable of sliding fore/aft on the black runners, and was also capable of being flipped upwards out of the way when the Lewis MG was in action. I have drilled out the holes along the black strip so that they're visible from the 'other side'.

The mounting 'pyramid' under the rudder bar can be thinned considerably. Also, the mounting bracket for the brass reservoir (for the Constantinesco interrupter gear) is quite different to the kit item. Normally this wouldn't be visible, but for my 'opened up' build I'll have a go at making a new one. A PE set would really be the answer!


Happy Modelling
James
CaptainA
_VISITCOMMUNITY
Indiana, United States
Joined: May 14, 2007
KitMaker: 3,117 posts
AeroScale: 2,270 posts
Posted: Friday, October 09, 2009 - 01:55 AM UTC
It looks like you will get a real good opportunity to practice your rigging.
Jamo_kiwi
_VISITCOMMUNITY
Wellington, New Zealand
Joined: November 04, 2008
KitMaker: 123 posts
AeroScale: 122 posts
Posted: Sunday, October 11, 2009 - 08:32 PM UTC
I've had a second try at weaving my own wicker seat, moving a bit further up the learning curve. What I didn't get right with the first try (seat in the middle) was the 'X' crossover between the upper and lower sections. Also the second one has more dense weaving which I did by squeezing the rows together with tweezers after each thread.

As pictured, I used #34 gauge beading wire, which proved to be soft enough to weave easily. There are two vertical wires in each hole - make them too long and trim when finished. These verticals seperate half way up and join with adjacent wires to make the X. Leather padding is Tamiya epoxy putty rolled out into a thin sausage and plonked on top of the weaving (it still needs a bit of sanding).

I still have to replicate the fine weaving up the front supports - thinking of using dental floss for this. Colour will be the brighter wicker seen in the Wingnuts photo not the 90 year old colour of the Hendon seat.


thegirl
_VISITCOMMUNITY
Alberta, Canada
Joined: January 19, 2008
KitMaker: 6,743 posts
AeroScale: 6,151 posts
Posted: Monday, November 02, 2009 - 02:28 AM UTC
Wow , love your seat's James ! Very well done .
Torchy
#047
_VISITCOMMUNITY
England - East Anglia, United Kingdom
Joined: September 13, 2005
KitMaker: 2,016 posts
AeroScale: 475 posts
Posted: Monday, November 02, 2009 - 02:30 AM UTC
Fantastic work James,love the seat
I use that crown fox beading wire on model ships,superb stuff.
I love cutaway models ,I will follow this build with added interest
Andy
NickZour
_VISITCOMMUNITY
Attica, Greece / Ελλάδα
Joined: May 01, 2008
KitMaker: 1,437 posts
AeroScale: 1,241 posts
Posted: Tuesday, November 10, 2009 - 06:44 AM UTC
Question 1: Can you please show me the F.2B campaign link ??

Question 2: Can my Bristol F.2B be in the campaign ??

Cheers Nick
JackFlash
_VISITCOMMUNITY
Colorado, United States
Joined: January 25, 2004
KitMaker: 11,669 posts
AeroScale: 11,011 posts
Posted: Tuesday, November 10, 2009 - 10:20 AM UTC

Quoted Text

Question 1: Can you please show me the F.2B campaign link ??

Question 2: Can my Bristol F.2B be in the campaign ??

Cheers Nick


I don't think there is a Bristol Campaign just the WNW Campaign.
NickZour
_VISITCOMMUNITY
Attica, Greece / Ελλάδα
Joined: May 01, 2008
KitMaker: 1,437 posts
AeroScale: 1,241 posts
Posted: Tuesday, November 10, 2009 - 07:08 PM UTC
Sorry but what is the WNW Campaign ???

Cheers Nick
JackFlash
_VISITCOMMUNITY
Colorado, United States
Joined: January 25, 2004
KitMaker: 11,669 posts
AeroScale: 11,011 posts
Posted: Tuesday, November 10, 2009 - 07:28 PM UTC
Here you go Nick.

Click Here.
 _GOTOTOP