_GOTOBOTTOM
Cold War (1950-1974)
Discuss the aircraft modeling subjects during the Cold War period.
Hosted by Tim Hatton
Trumpeter Westland Wyvern S.4
Emeritus
_VISITCOMMUNITY
Uusimaa, Finland
Joined: March 30, 2004
KitMaker: 2,845 posts
AeroScale: 1,564 posts
Posted: Thursday, October 08, 2009 - 04:47 AM UTC
With the stripes in the skies campaign over without me getting much done, here's the build thread instead. Just thinking someone(s?) might find my ramblings and the occasional posts even remotely interesting.

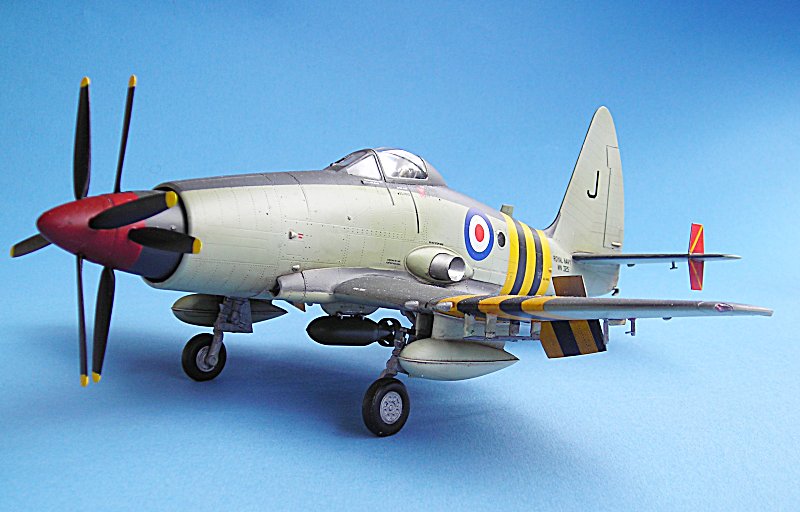
So, it's Trumpeter's 1:48 scale Westland Wyvern S.4 (late) kit, enhanced using Eduard's interior PE set, Pavla's resin ejection seat and the occasional self-made improvement.


First, what you've seen already if you watched the campaign thread. Not that much so I'll just go through them briefly here again.

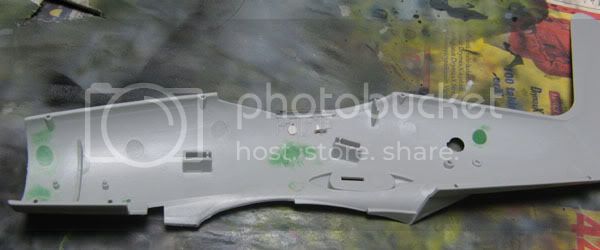
Pin ejector marks filled, cockpit sidewall PE parts attached. In retrospect, the time used filling and sanding those marks was pretty much wasted, as none of them are visible on the finished model.


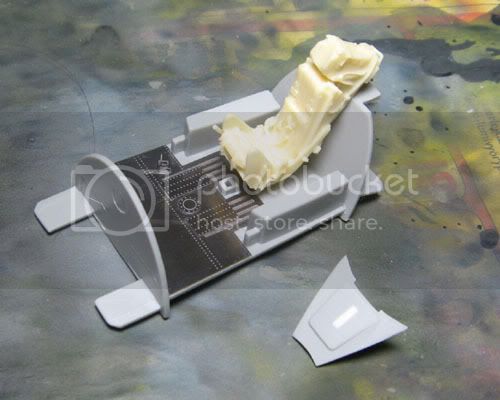
Cockpit construction underway, seat being dryfitted. Unpainted PE parts glued in place.


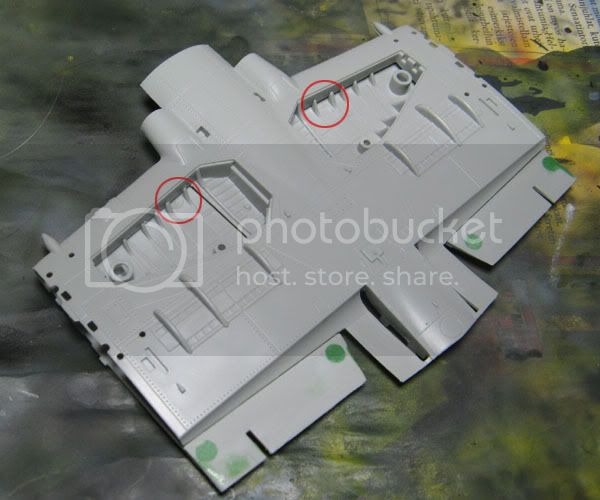
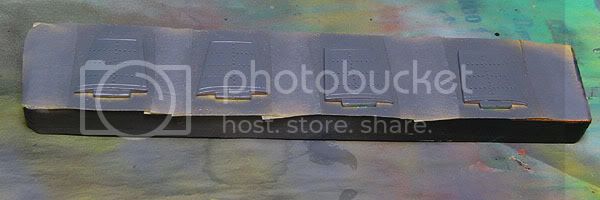
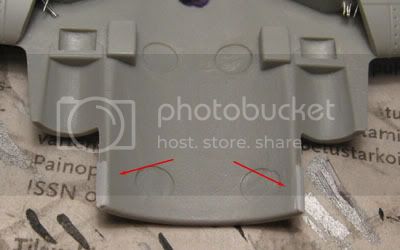
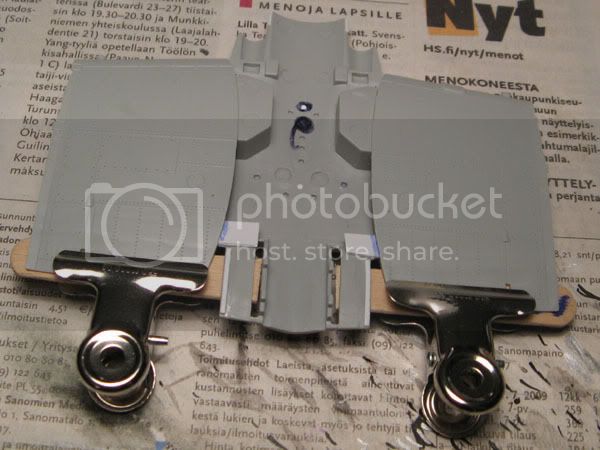
More ejector marks to be filled under the landing flaps and one idiotically placed in each main gear well (circled). The latter were filled with milliput because the area would have been almost impossible fill and then sand using regular putty.


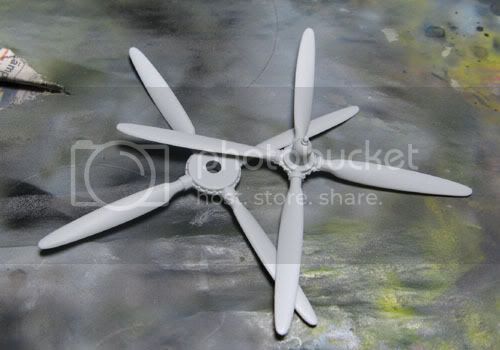
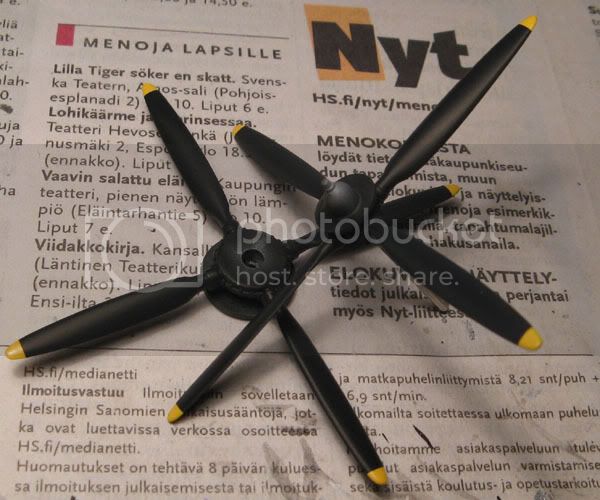
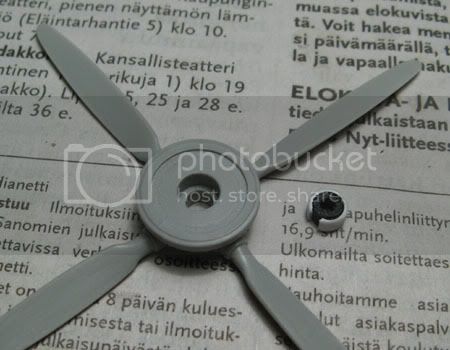
One of the mistakes repeated from the 1:72 scale kit, the prop blades were of the broader type used on the prototype. Shown in the pic after sanding to a more accurate shape.


And now on to the newer stuff.

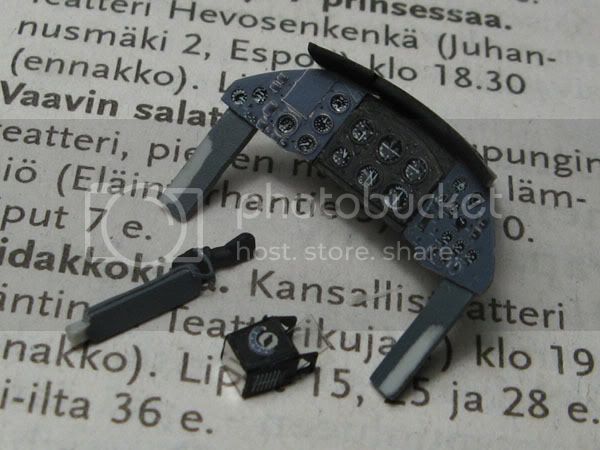
The gunsight is all PE (well, apart from the acetate sheet glass, of course). Eduard's instruction point out to use a film part for the glass, but there's none provided, as the instruments are pre-painted on the parts, and someone must have forgotten the gunsight. So I used some left-over film from my parts box. The length of the glass is pure guesswork though. I hope I got it about right. The control stick received a piece of wire, replacing the flat PE part.

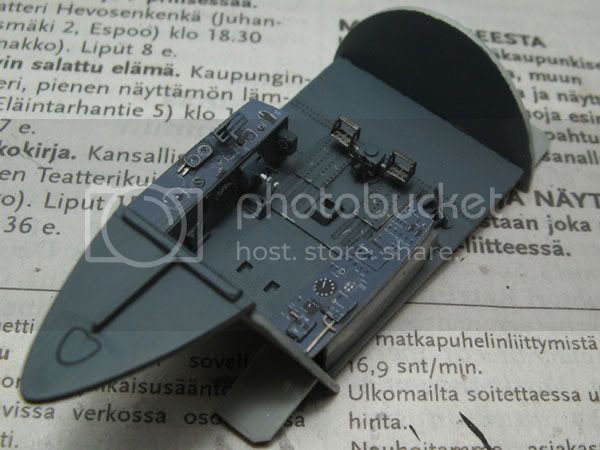
Because Eduard had somehow decided on a dark grey cockpit interior color for the prepainted PE parts, I went for the easier (and inaccurate) way of just coping with that and painting the rest to more or less match the color of the PE. I settled for Xtracrylics' extra dark sea grey, which was a pretty good match for the prepainted color. A better match than the photos suggest, they look more different in the pics for some reason.


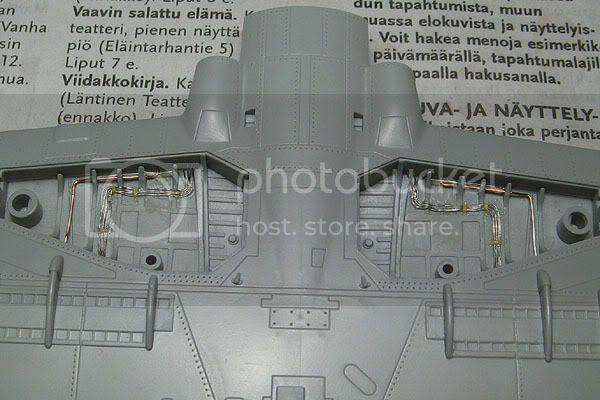
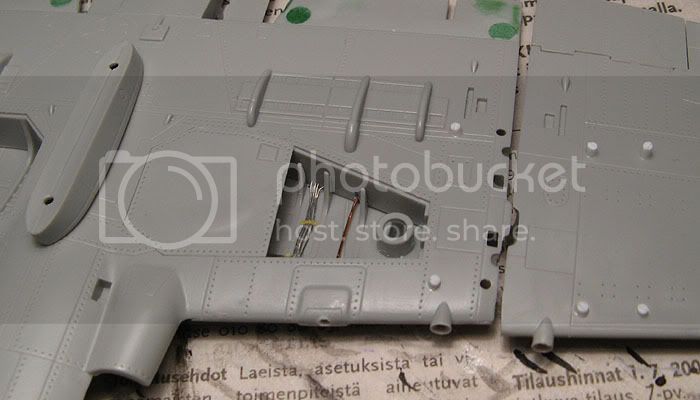
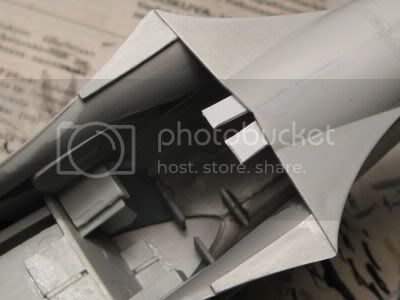
The main gear well just screamed for some detailing, so I added some wiring following photos of the prototype I found (let's hope they didn't differ much in the production version... ), keeping it down to reasonable level as the wheel well isn't that hugely visible in the finished model with the inner gear doors closed (the instructions inaccurately point them to be assembled open, another error carried over from the smaller scale kit).


After putting the wings together, I'm wondering how to attach the outer folding sections sturdily... On the 1:72 version the two small spars and butt joints of the wings themselves were strong enough, but I doubt they'll be enough this time in 1:48... Of course, I first thought about gluing styrene sheet to the insides of the wing halves to get more gluing surface, but it turned out only one side are of the same thickness. Also using those blanking plates might have been a bad choice, as leaving them off would have made it possible to install proper supports inside the wing. Well, I think I'll think of something. Suggestions are also welcome of course.


Those lovely contra-rotating props! This time Trumpeter included a gimmicky option of having the propellers rotate in opposite directions like on the real McCoy. Or actually the geared system seemed to be the primary option, with the simple non-rotating option seemingly just thrown in at the last moment, consisting of simply replacing the back part of the inner prop assembly with a simple plastic part that was just supposed to be glued on.
While the geared props actually worked surprisingly well, I didn't want to use that option because the assembly didn't fit in tightly enough, resulting in slightly drooping appareance, and also because it was impossible to be fitted in place after painting.
Because I didn't want that and still be able to move the propellers if I wanted to, I had to get creative. In the end it wasn't that hard to pull off, but I really would have appreciated a simple solution with rubber grommets to have been included in the kit like so many manufacturers already do.

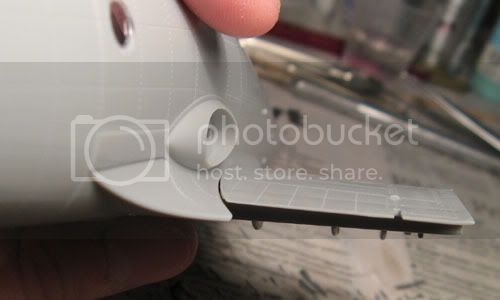
The outer prop was easy, the hexagonal metal axel fitting snugly in place with a bit of super glue. Then I just had to install grommets left over from some Hasegawa kit in the other prop and inside the engine cowling. The first was easy, just leaving off an unseen plastic part left a hole where I could drop in a grommet inserted inside a piece of styrene tubing cut open. A piece of styrene sheet glued over the opening held the grommet inside.


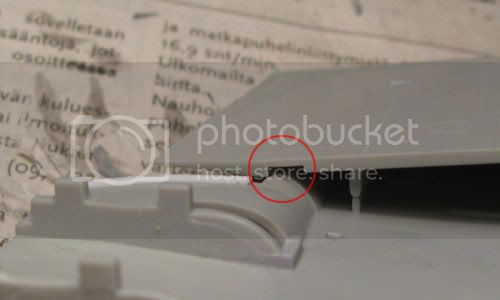
The engine cowling was next. As the two parts going between the cowling halves were to be used with the gear system, they were moulded in a different kind of plastic like the gears themselves (ABS? Who knows?), apparently to be able to withstand the spinning of the props without melting or deforming, they couldn't be glued with regular styrene cement (I doubt CA would stick either), I cut a donut shape from styrene sheet to hold a grommet inside a piece of styrene tube in place without glue.

(note the styrene sheet now covering the hole behind the rear prop, holding the grommet inside)
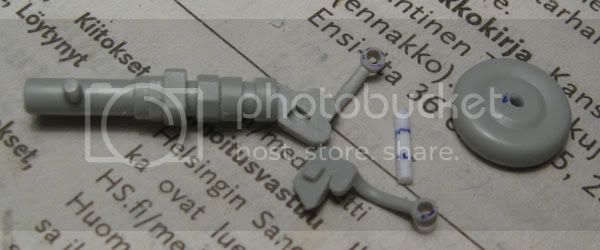
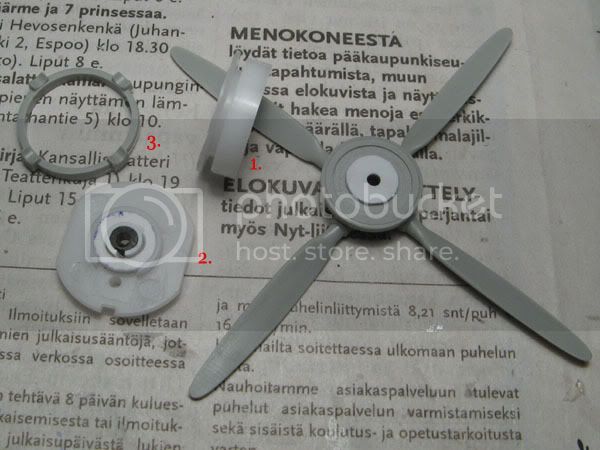
According to the numbers in the pic:
1) As I wanted to be able to install the props after painting, I cut off the front portion of that gear-associated part that also acts as the back plate of the rear spinner when using the gears. Now it just holds the grommet in place.
2) Another grommet is installed in gear housing, centered by a styrene donut shape and some more sliced tubing.
3) The rear spinner back part of the gearless option was used.


That's it for this time. Hope you didn't fall asleep as. Sorry for that, I probably should have started this thread a bit earlier.

LongKnife
_VISITCOMMUNITY
Jönköping, Sweden
Joined: April 25, 2006
KitMaker: 831 posts
AeroScale: 688 posts
Posted: Thursday, October 08, 2009 - 05:03 AM UTC
Nope, Eetu. Didn't fall asleep. I'm just impressed by what you achieve in 1:72. Just unbelievable from time to time. I'll be back here again, so don't drop the thread.

Tony (Who tend to fumble even in 48)
Emeritus
_VISITCOMMUNITY
Uusimaa, Finland
Joined: March 30, 2004
KitMaker: 2,845 posts
AeroScale: 1,564 posts
Posted: Thursday, October 08, 2009 - 06:09 AM UTC
Thanks! And good to hear that wasn't too long an opening post.
I probably should have put it in the thread subject line to make it clearer. This one's 1:48 scale, not 1:72.


Ps. Oh, I managed to completely forgot one photo, so here it is:

Nothing grand, just the tail wheel mount and the wheel itself modified to accept a tighter fitting single axel. Hopefully this will make it a big more robust to withstand the handling, since the tail gear must be trapped between the fuselage halves when they are glued together.
alpha_tango
_VISITCOMMUNITY
Germany
Joined: September 07, 2005
KitMaker: 5,609 posts
AeroScale: 5,231 posts
Posted: Thursday, October 08, 2009 - 06:32 AM UTC
Hi Eetu

Nice start ... did a Suez bird from the kit, but I had to modify it to an earlier variant to make it fit the c&m (there was an article in MAI that was helpful) though I did not all modifications .. here is a link (in case you can read German )

http://www.ipmsdeutschland.de/Flugzeuge/Arndt/Korea-Vietnam/Westland_Wyvern_Suez.html


(BTW my kit is oob except for the mentioned mods and as the bird is pretty huge you see some distortion due to the camera settings - my bad)

I do not intend to take over your thread .. just a bit of motivation

cheers

Steffen
Emeritus
_VISITCOMMUNITY
Uusimaa, Finland
Joined: March 30, 2004
KitMaker: 2,845 posts
AeroScale: 1,564 posts
Posted: Thursday, October 08, 2009 - 09:03 AM UTC

Quoted Text

Hi Eetu

ice start ... did a Suez bird from th ekit, but I had to modify it to an earlier variant to make it fit the c&m (there was an article in MAI that was helpful) though I did not all modifications .. here is a link (in case you can read German )

http://www.ipmsdeutschland.de/Flugzeuge/Arndt/Korea-Vietnam/Westland_Wyvern_Suez.html

I do not intend to take over your thread .. just a bit of motivation


Oh, no worries about any takeovers. There's a subtle difference between offering useful information and a takeover on a virtual conversation medium. I feel providing a link to an article is the first kind, posting the same material here over many many replies would definately be the latter kind!

But back to topic, thanks for the link! Unfortunately I don't speak any German. Well, in that very probably case that the brief vocabulary of "commando comics German" (I don't if that's a thing of just the Finnish versions or not) doesn't count... But there's always google translate! While it didn't produce an anywhere near flawless translation, it left very, if any, to be guessed.
Looks like I've made almost exactly the same observations about the kit:
- gimmicky prop assembly
- very nice cockpit way to attach the cockpit module
- shoddy outer wing mounting

Very nice model btw!
PanzerMike
_VISITCOMMUNITY
Hamilton, New Zealand
Joined: May 09, 2007
KitMaker: 298 posts
AeroScale: 120 posts
Posted: Monday, October 12, 2009 - 11:21 AM UTC
Man i really love these planes , they look so tough and different. I was wondering if i should buy this kit and even though it has a few glitches by the looks of things im still going to get one.
Emeritus
_VISITCOMMUNITY
Uusimaa, Finland
Joined: March 30, 2004
KitMaker: 2,845 posts
AeroScale: 1,564 posts
Posted: Tuesday, October 13, 2009 - 12:48 AM UTC
Me too. I've seen it being refered to as one of the ugliest planes ever flown, but I disagree. Sure, it's not sleek and pretty in the tradional sense, like the Spitfire for example, but it has its own brutish charm.

Sure, there's a few glitches here and there left around from the 1:72 scale version, they're easy to correct when you're aware of them. About the only thing the Classic Airframes kit seems to be superior in, judging from reviews, is the nice-looking resin interior. But of course there's aftermarket solutions out there to help with that.

The most obvious ones this Trumpeter kit that I'm aware of are:
- paddle-bladed props, probably from using the prototype for reference - should be slimmer, more pointed, kit parts easily sanded to shape
- instructions tell to fold wingtips when folding wings - wingtips on production aircraft didn't fold
- instructions point inner main gear doors to be posed open with landing gear down - they should be closed, they only opened when the gear was retracting and extending. Again easily fixed, cut off mounting tabs and glue shut.
Also, I would have appreciated all the wing external store locator holes to be partially pre-drilled from the back like on the fuselage underside. They're not that hard to fill if you're not using all the ordnance, though.

The folks at Trumpeter must have listened to customer feedback, as there's also a bunch of most welcome improvements over the 1:72 scale kit: Instead of the clear part instrument panel through which the acetate sheet gauges hardly show, there's a proper PE instrument panel. PE seat belts are also nice to have in a kit. The stabilizers' lack of dihedral issue has also been fixed and a spar added between the fuselage halves to attach them more robustly.

Like the 1:72 scale kit, the decal sheet includes the prop blade stencils (#11), but they aren't mentioned anywhere in the instructions. This quarterscale kit adds a shark mouth (#23), also not mentioned. According to this review of a cutting edge decal sheet for the CA kit, it goes to the drop tanks carried by 813 NAS.

Emeritus
_VISITCOMMUNITY
Uusimaa, Finland
Joined: March 30, 2004
KitMaker: 2,845 posts
AeroScale: 1,564 posts
Posted: Thursday, October 15, 2009 - 03:37 AM UTC
I've been making some progress, so it's time for another update.


Fuselage assembled. Quite huge for a 1:48 single-seat prop plane. Everything that went between the halves fitted really well, as did the fuselage halves themselves. But for some reason, some panel lines on the upper nose seam didn't want to meet up flawlessly, so they'll need some extra attention, as does the surface detail that is bound to get lost with sanding the seam.


The canopy parts are otherwise great, but I couldn't help scratching my head, amazed how Trumpeter repeated this absolutely annoying way of placing the sprue connector to the clear portion of the windscreen side, instead of the frame a mere few millimeters away...

Nearly impossible to remove cleanly, and with the hard and brittle plastic used, I ended up with a slight depression where the sprue connector was. I managed to get the problem area looking pretty good after sanding and polishing, followed by a dip in Future, but a small ugly dent remained. I really wish this issue had been fixed from the 1:72 scale kit.


When I getting ready to apply the stripe decals to the stabiliser finlets, I noticed the insides of them should be dark sea grey, not red. Back to painting then!

After a quick airbrushing, I was able to apply the decals.

The decals included the red area as well, but as I went for a bit darker maroon color for the spinners, I painted the finlets with that same color and cut off the red portions from the decals.


"Third time's the charm", the expression seemed apply to propellers as well.

There, finally painted, with yellow tips and all, ready for a couple of coats of Future and decals.

The first time was when I had both props painted black and I got the smart idea of brushing on a single coat of Microscale's gloss instead of two or three coats of Future. Turned out to be a bad idea! To be precise, it wasn't the gloss but the water I used for dipping my brush into. It had been sitting on my workbench for a few days and had some dust and an occasional hair in it, which of course found their way onto the prop blades. In a bit of panic I grabbed some of that hefty thinner I had around, the kind that smells like felt tipped markers. That ate away through the paint and primer, into the plastic itself, leaving a slightly uneven texture. No big harm done, all it took was drying overnight, then some careful sanding and another blast of primer.

The second time I had both props painted black and futured, and found myself thinking, "now shouldn't those props have yellow tips...? D'oh!". As it's a pretty much doomed idea trying to cover black with yellow, I sanded away the black from the tips to get a lighter color to spray the yellow on. With my usual luck, that didn't work perfectly, the sanding leaving visible steps between the color. This time I used Xtracrylics' thinner, which got rid of the paint without attacking the plastic.

This third (and hopefully last! ) time I blasted yet another coat of primer on the props, painted the tips yellow, masked them with tape, and sprayed the black.
NickZour
_VISITCOMMUNITY
Attica, Greece / Ελλάδα
Joined: May 01, 2008
KitMaker: 1,437 posts
AeroScale: 1,241 posts
Posted: Thursday, October 15, 2009 - 05:50 AM UTC
It's very nice

Keep going

Cheers Nick
PanzerMike
_VISITCOMMUNITY
Hamilton, New Zealand
Joined: May 09, 2007
KitMaker: 298 posts
AeroScale: 120 posts
Posted: Thursday, October 15, 2009 - 01:12 PM UTC
Thanks for the info on the kits glitches there Eetu. It will be a big help when i buy one in future.I deal with a Chinese gentleman that imports Trumpeter and HobbyBoss at a good price so i will talk to him about getting one of these. As for these being ugly planes - each to his own , i happen to think modern jets and some better known props to be boring but i keep that to myself. I like the strange and different X planes that came at the end or just after WW2. I was just reading the history of these planes and they had a bad rep for accidents and killing pilots during launch off carriers. Anyway keep up this fine build
Emeritus
_VISITCOMMUNITY
Uusimaa, Finland
Joined: March 30, 2004
KitMaker: 2,845 posts
AeroScale: 1,564 posts
Posted: Sunday, October 18, 2009 - 09:49 PM UTC
Made some more progress, so it's time for another update.
Nothing that major this time, though. I almost thought I had ran into and wrestled all the quirks of this kit by now, but a few decided to pop up.

Starting with the easiest ones:

As I was planning to hang two bombs on the wings and the drop tank on the fuselage hard point, I drilled out the locator holes for the tank and filled all the unused rocket locator holes. Dryfitting the drop tank pylon revealed a bad fit. It seems the person(s) designing the tank and pylon didn't have the rest of the kit to dryfit it to, since the drop tank fits nicely to the pylon, but the pylon doesn't match the subtle curves of the fuselage undeside. It's flat instead, leaving a big ugly gap on both sides. Looks like some sanding, filing and/or puttying is required if I'm to use that tank.
The inner maing gear door is being dryfitted in the accurate closed position, showing a very nice fit. Also notice the opened, drilled-out cannon fairings ready for the brass tube cannon barrels and the gun camera opening, filled with styrene rod and drilled open to achieve a circular hole.

After checking the fit of the wing to the fuselage, I glued in some styrene sheet to improve the fit on the front and to create more gluing surface to the rear.


And saving the trickiest for the last, in my sample there seems to be a problem with the fuselage wing root lining up with the wing.

None of the reviews and build reports I've read about this kit mentioned this kind of issues, so I didn't know to expect anything like this, especially as there wasn't any issues in the wing fit on the 1:72 scale kit I've built a few years ago.
Somehow the trailing edges of the wings don't curve down enough to match the fuselage wing fillet. That clearly needs clamping to solve, but I haven't figured out yet how to pull it off, as there isn't much to glue to inside the wing.

The wing halves glue together at the leading edge and by those two bulkheads inside, wing halves not meeting at trailing edge area (circled in pic) and the shape of the cavity looks hard for inserting styrene sheet to make a decent gluing surface to hold the upper wing in the needed position. The wing-to-fuselage gluing surface isn't any easier, being quite narrow to count on to hold the upper wing.
Any suggestions and ideas for solving this issu are naturally welcome.
I was thinking about filling the inside of the trailing edge area with something (two-part exoxy, milliput...?), then clamping to the right shape letting the filling set.

That's it for this time.
alpha_tango
_VISITCOMMUNITY
Germany
Joined: September 07, 2005
KitMaker: 5,609 posts
AeroScale: 5,231 posts
Posted: Sunday, October 18, 2009 - 10:50 PM UTC
Hi Eetu

Very nice progress!! i think many people will appreciate this thread when they want to build their Wyvern!

Well, sadly I cannot help you as my model was just fun oob with some minor adjustments. The greates mistake was not to glue the inner and outer wingparts together when I could(I did not want to fold it) this fit was really bad and as stated I used 2part epoxy to nail the outer wings to the airframe.

Are you going to build a Suez machine? ... I searched a bit on the weapons load out. Again too bad I do not remember all of it. But one piece of info was that they flew the first run with 2 tanks and one bomb (as on my machine) and the 2nd with 3 bombs. no rockets carried but the launchers were installed (again I tried to replicate this after a picture) ... just a thought. I would sand/file a groove in the pylon to make it fit ....

keep up the good work and don't let it beat you!

all the best

Steffen
Emeritus
_VISITCOMMUNITY
Uusimaa, Finland
Joined: March 30, 2004
KitMaker: 2,845 posts
AeroScale: 1,564 posts
Posted: Monday, October 19, 2009 - 01:35 AM UTC
Thanks.

Yep, I'm going for a Suez-striped plane. That's a good one to know about the weapon loads. Perhaps I'll hang 3 bombs on it if I can't get the drop tank pylon to fit. I would have probably thought about filing a groove to make it fit as well, but there already is somewhat of a groove-like depression in the bottom of the pylon. What's tricky is about half the pylon's length resting on a flat portion of the plane's belly, the front half is on top of a slight bulge (not visible in the photo). I think I'll have to clip off the locator pins and try some sanding and filing.

The rocket rails were attached anyway? Bummer, I just got them filled and sanded smooth. Not a big chore to drill them open again though. I'll have to see if I could make the launch rails look half-decent if I remove the rockets.
NickZour
_VISITCOMMUNITY
Attica, Greece / Ελλάδα
Joined: May 01, 2008
KitMaker: 1,437 posts
AeroScale: 1,241 posts
Posted: Tuesday, October 20, 2009 - 02:48 AM UTC
Keep going on this typical British, ugly (very ugly ) aircraft

Looks very nice until now

Cheers Nick
Emeritus
_VISITCOMMUNITY
Uusimaa, Finland
Joined: March 30, 2004
KitMaker: 2,845 posts
AeroScale: 1,564 posts
Posted: Saturday, October 24, 2009 - 09:55 AM UTC
I've been somewhat semi-busyish (now is that even a word? Busyish) and made some progress worth showing.

Third time was the charm. I got the props done. Well, painted and assembled at least. Any weathering and the final future/flat base coat I'll put on at the same time with the rest of the plane.

The prop blade decals were placed after looking at some photos and deciding that the 6mm width of Tamiya masking tape was just right(-looking) as the distance between the decal and the spinner. I wonder why trumpeter did same thing as with the 1:72 kit, including the decals but nowhere mentioning where they belonged. Someone at least remembered the yellow arrow decals that go to the main wheel tire sidewalls.

After some pondering I figured out the wing trailing edges forced to t he correct position with clamps and a popsicle stick place under the wing. I tried that out, gluing styrene sheet inside the wing halves in an attempt to get the correct shape to hold.

No luck. After trimming the styrene sheet to allow the fuselage to fit correctly on the wing, I couldn't see any difference in the the trailing edge posture.
After some cursing, cutting with a hobby on the left side, and frantic pulling with tweezers, I managed to get the styrene sheet slivers out. So, back to square one in that issue.
PanzerMike
_VISITCOMMUNITY
Hamilton, New Zealand
Joined: May 09, 2007
KitMaker: 298 posts
AeroScale: 120 posts
Posted: Saturday, October 24, 2009 - 11:17 AM UTC
Hang in there i am sure you will fix the wings somehow
VonCuda
_VISITCOMMUNITY
North Carolina, United States
Joined: November 28, 2005
KitMaker: 2,216 posts
AeroScale: 1,080 posts
Posted: Wednesday, October 28, 2009 - 01:07 PM UTC
Eetu, I just bought this kit a few weeks ago. Was thinking of building it with wings folded. Any thoughts on that? And, thanks for going into such detail on this build. It's a big help.

Hermon
Emeritus
_VISITCOMMUNITY
Uusimaa, Finland
Joined: March 30, 2004
KitMaker: 2,845 posts
AeroScale: 1,564 posts
Posted: Thursday, October 29, 2009 - 12:16 AM UTC
well, I'd guess the fit of the pegs that go between the inner and outer wing section is similar to the unfolded ones: quite tight. When dryfitting the "unfolded" pegs to see how they held the wing, I had to trim the pegs slightly to make them fit to the holes in the wing sections. Go slow with the trimming and check the fit frequently to get a nice snug fit.
If you want to and have some references at hand, the wing fold area could also benefit from some additional detailing.

Other than that, I don't think there should be any funny stuff to watch out for. As I mentioned earlier, be sure to glue the wingtips unfolded as they didn't fold on the production aircraft.

 _GOTOTOP