

Early Aviation
Discuss World War I and the early years of aviation thru 1934.
Discuss World War I and the early years of aviation thru 1934.
Hosted by Jim Starkweather
WNW GB 2009 - 10 LVG C.VI Torchy

thegirl

Joined: January 19, 2008
KitMaker: 6,743 posts
AeroScale: 6,151 posts
Posted: Monday, January 04, 2010 - 03:22 PM UTC
Very impressive with the wood ! You are doing one very fine job on the build . Like Carl said .....I love it !
guitarlute101

Joined: December 18, 2006
KitMaker: 1,121 posts
AeroScale: 1,063 posts
Posted: Monday, January 04, 2010 - 04:21 PM UTC
Looking great, Andy.
Mark

FigureMad

Joined: May 09, 2006
KitMaker: 118 posts
AeroScale: 89 posts
Posted: Monday, January 04, 2010 - 09:35 PM UTC
I am impressed wither every bodies version of this kit so far, but your added extras are pushing the boat out, way beyond what I would expect for a kit build, Great work .......
Dave
Dave

Torchy

#047

Joined: September 13, 2005
KitMaker: 2,016 posts
AeroScale: 475 posts

Posted: Wednesday, January 13, 2010 - 11:05 PM UTC
Hi wingnutters
Many thanks for the great comments
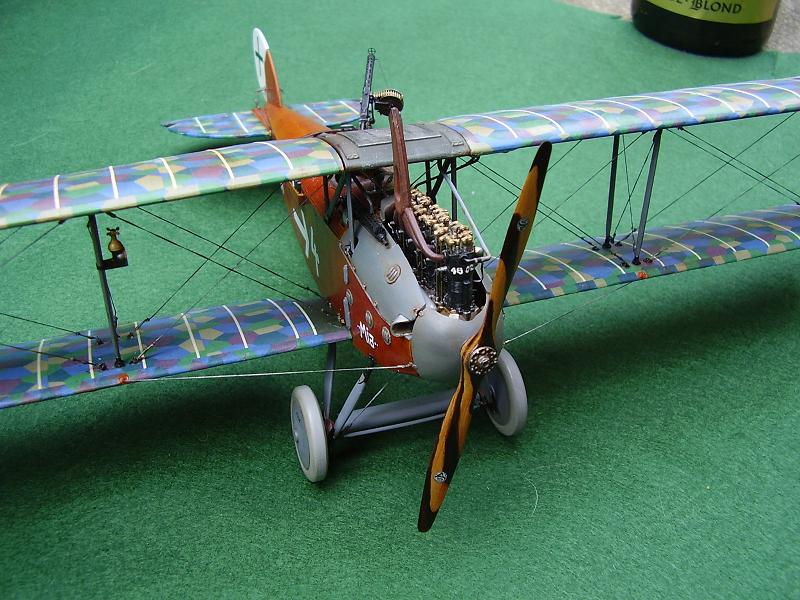
A wee update,engines done with ht leads and some extra plumbing,


I've gone out on a limb here ,but I think part A14 is an oil tank/cooler aswell as an airfilter/inlet,thats why I've added a pipe and a filler cap(with spillage)
Sorry for the poor pics but a new camera is on its way
Thanks for looking
Andy
Many thanks for the great comments
A wee update,engines done with ht leads and some extra plumbing,
I've gone out on a limb here ,but I think part A14 is an oil tank/cooler aswell as an airfilter/inlet,thats why I've added a pipe and a filler cap(with spillage)
Sorry for the poor pics
but a new camera is on its way Thanks for looking
Andy

thegirl
Joined: January 19, 2008
KitMaker: 6,743 posts
AeroScale: 6,151 posts
Posted: Thursday, January 14, 2010 - 01:30 AM UTC
Looking most excellent so far Torchy ! How are you finding the build so far ?

JackFlash
Joined: January 25, 2004
KitMaker: 11,669 posts
AeroScale: 11,011 posts
Posted: Thursday, January 14, 2010 - 05:39 AM UTC
Just for information purposes the wraps around the intake pipes are fabric loaded with asbestos.

Mgunns
Joined: December 12, 2008
KitMaker: 1,423 posts
AeroScale: 1,319 posts

Posted: Thursday, January 14, 2010 - 07:06 AM UTC
Quoted Text
Just for information purposes the wraps around the intake pipes are fabric loaded with asbestos.
Ensure you wear a respirator Torchy. No need to invite mesothelioma into your life over a model.

Sorry I couldn't resist.
thegirl
Joined: January 19, 2008
KitMaker: 6,743 posts
AeroScale: 6,151 posts
Posted: Saturday, January 16, 2010 - 01:50 AM UTC
Nice one Mark ! 
Mgunns
Joined: December 12, 2008
KitMaker: 1,423 posts
AeroScale: 1,319 posts
Posted: Sunday, January 17, 2010 - 03:44 AM UTC
Quoted Text
Just for information purposes the wraps around the intake pipes are fabric loaded with asbestos.
I was reading a rebuild on the engine at another website, and apparently the wrapping on the intake helped keep the air at a constant temperature. Apparently the air intake was warmed by going through the engine and the wrapping on the intake manifold prevented it from crystalizing, thereby ensuring efficient combustion.
Check out www.mikerlewis.com

Dwaynewilly
Joined: December 15, 2006
KitMaker: 365 posts
AeroScale: 344 posts
Posted: Sunday, January 17, 2010 - 07:28 AM UTC
Andy,
Excellent build! Love that engine and the wood grain. This one will be special.
Regards, Dwayne
Excellent build! Love that engine and the wood grain. This one will be special.
Regards, Dwayne
Torchy
#047
Joined: September 13, 2005
KitMaker: 2,016 posts
AeroScale: 475 posts
Posted: Friday, April 16, 2010 - 07:21 AM UTC
Good God,has it been this long since I updated this build!
Bloody loz,what a pain NEVER AGAIN, till the next time 
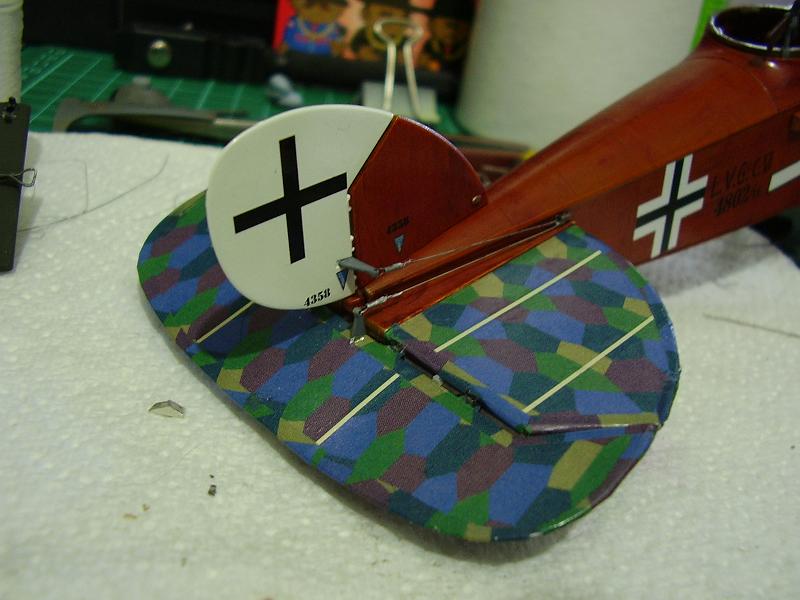
It was the leading edges(I did the trailing edges too,dont know if this is correct or not some soures vary,too late now !!) that took the time.
gun barrels are from toms as I had no joy from other suppliers,Toms are top notch ,now I have sussed out how to anneal brass to make it roll to form the cooling jackets.
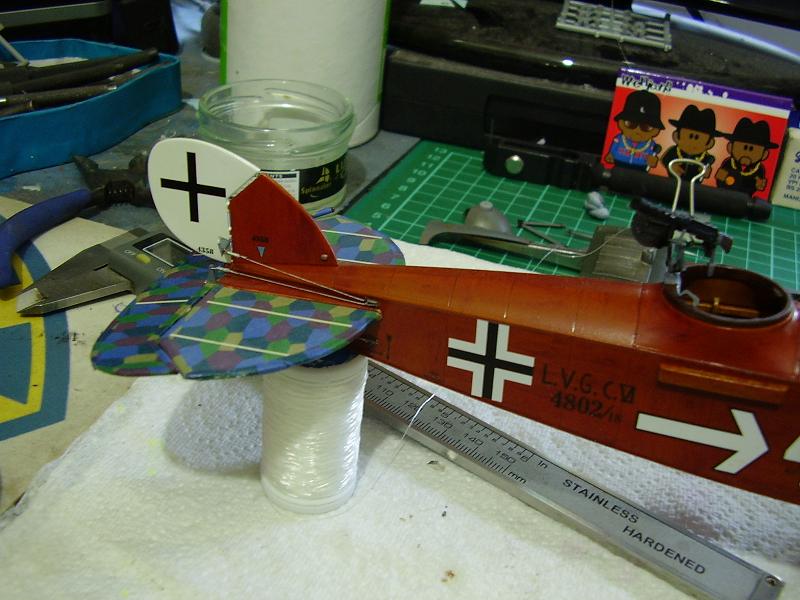
The cables for the tail assembly are 3lb fishing line with hypodemic tube,the under cart rigging is knitting elastic (EZline) and the same for the inner strutting(I'm experementing!!!)
hope you like


More (a lot ) sooner
Andy
Bloody loz,what a pain
NEVER AGAIN, till the next time It was the leading edges(I did the trailing edges too,dont know if this is correct or not some soures vary,too late now !!) that took the time.
gun barrels are from toms as I had no joy from other suppliers,Toms are top notch
,now I have sussed out how to anneal brass to make it roll to form the cooling jackets.The cables for the tail assembly are 3lb fishing line with hypodemic tube,the under cart rigging is knitting elastic (EZline) and the same for the inner strutting(I'm experementing!!!)
hope you like
More (a lot ) sooner
Andy
Mgunns
Joined: December 12, 2008
KitMaker: 1,423 posts
AeroScale: 1,319 posts
Posted: Friday, April 16, 2010 - 08:56 AM UTC
 Moving along there Torcy! I know what you mean about the lozenge. I might pull mine out and start on that on a casual basis. I am going to do my second one in the same markings as yours but change the names to reflect my fiance'. I like the color of the fuselage. What did you use for that?
Best
Mark
Torchy
#047
Joined: September 13, 2005
KitMaker: 2,016 posts
AeroScale: 475 posts
Posted: Friday, April 16, 2010 - 09:19 AM UTC
Quoted Text
. I like the color of the fuselage. What did you use for that?
Thanks Mark
look at the 1st page of this post for the paints usedAndy
Torchy
#047
Joined: September 13, 2005
KitMaker: 2,016 posts
AeroScale: 475 posts
Posted: Sunday, May 02, 2010 - 05:45 AM UTC
Hi Wingnutters
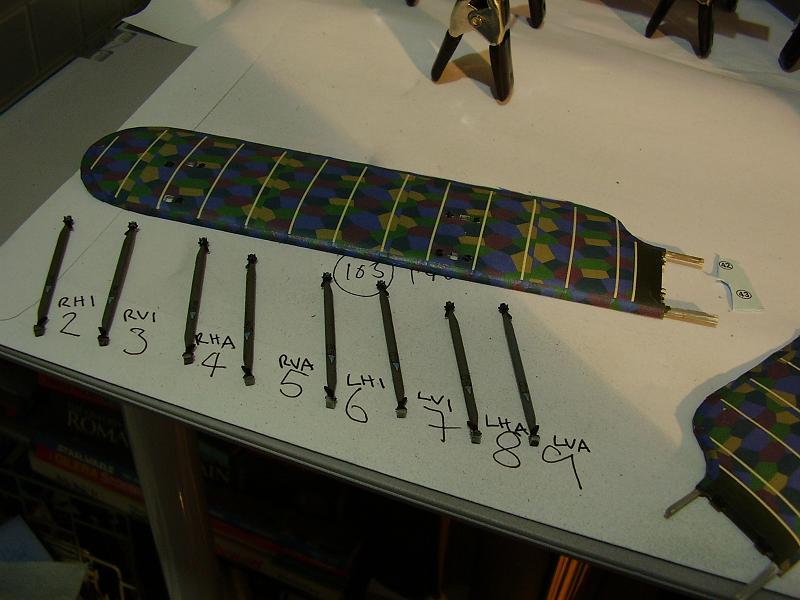
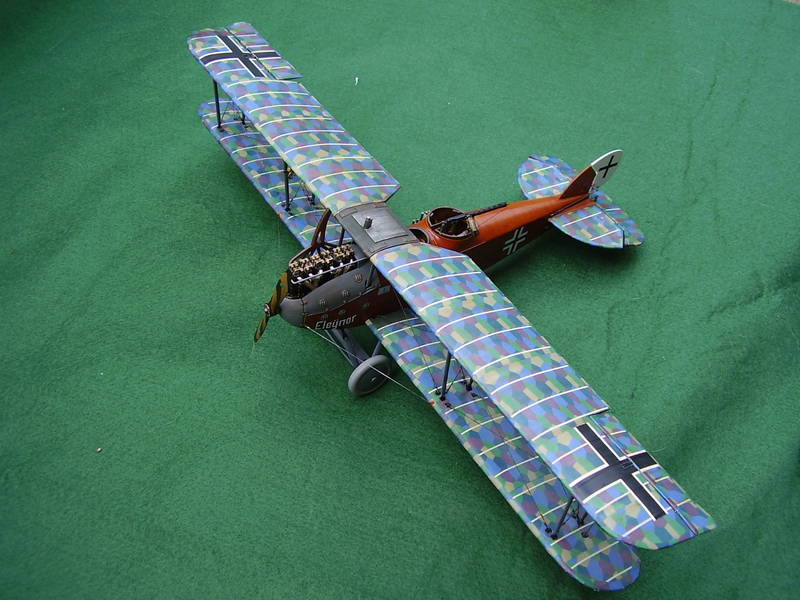
Eleynor is finished,at last!!,I really have loved this build,the loz and the tapes got a tad tiresome but the results are worth all that work
I did the rigging using "knitting-in elastic",200m for £1.79 from John Lewis,I used a mixture of hypodermic tube,Eduard wire stretchers(32230)and 0.15mm wire for the turn buckles.
The prop was done with Faber castell 4 PITT sepia pens over a Tamiya XF 49 base,I'm not really happy with the prop and I may try my hand at a real wooden one( any spare prop decals for a swap with other LVG decals?)
Hope you like.....


Thanks for looking
Andy
Eleynor is finished,at last!!,I really have loved this build,the loz and the tapes got a tad tiresome but the results are worth all that work
I did the rigging using "knitting-in elastic",200m for £1.79 from John Lewis
,I used a mixture of hypodermic tube,Eduard wire stretchers(32230)and 0.15mm wire for the turn buckles.The prop was done with Faber castell 4 PITT sepia pens over a Tamiya XF 49 base,I'm not really happy with the prop and I may try my hand at a real wooden one( any spare prop decals for a swap with other LVG decals?)
Hope you like.....
Thanks for looking
Andy

warreni

Joined: August 14, 2007
KitMaker: 5,926 posts
AeroScale: 2,201 posts

Posted: Sunday, May 02, 2010 - 06:22 AM UTC
Well done that man! A fine job there. I am still worried about doing the woodgrain effect when I come to build mine.
I just started the Junkers J.1 but alas the second part I clipped off the sprue is warped.. I suppose things can only get better from here..
I just started the Junkers J.1 but alas the second part I clipped off the sprue is warped..
I suppose things can only get better from here..Mgunns
Joined: December 12, 2008
KitMaker: 1,423 posts
AeroScale: 1,319 posts
Posted: Monday, May 03, 2010 - 02:49 AM UTC
Lookin Good Andy:I know what you mean about the prop and using pens. I am on the Encore DII and not sure I like the results or not. I still like the effect though.
Best
Mark
thegirl
Joined: January 19, 2008
KitMaker: 6,743 posts
AeroScale: 6,151 posts
Posted: Monday, May 03, 2010 - 03:28 AM UTC
Very nicely done Torchy ! I love your rigging
I haven't tried using the pencil method yet , but it does look very convincing .
I haven't tried using the pencil method yet , but it does look very convincing .
 |

WEB HOSTING BY


Copyright ©2021 AeroScale and Kitmaker Network, a subsidiary of Silver Star Enterprises
All Rights Reserved. Please read our Conditions of Use and Privacy Policy.
All Rights Reserved. Please read our Conditions of Use and Privacy Policy.