

Hi Guys and girls.
Building my Camel vs Fokker Dr.I and am almost at the paint it stage.
I don't want any glaring Faux paux so any info would be appreciated.
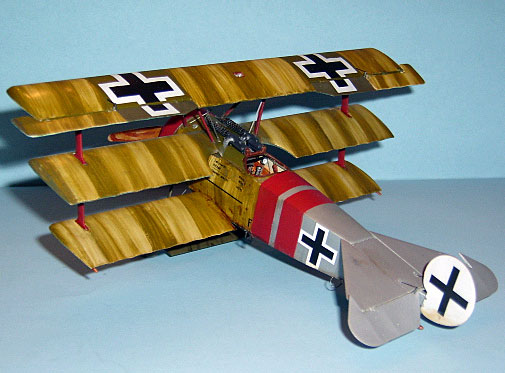
I''m building her as Robert Greim's 521/17 Silver tail and red bands. The only info I have are the two pics in the Jagdstaffeln book.
Any fiurther info would be appreciated
i.e:
was the wing streaking camo angled of straight...I know most were at a 15 or so degree angle?
Was the Undercarriage wing all olive or blue under?
Lower wing cross fields...unbleached or overpainte?
Any other plane specific info gladly taken
Cheers Keith
Early Aviation
Discuss World War I and the early years of aviation thru 1934.
Discuss World War I and the early years of aviation thru 1934.
Hosted by Jim Starkweather
Dr.I 521/17 Paint help!

Kornbeef

Joined: November 06, 2005
KitMaker: 1,667 posts
AeroScale: 1,551 posts

Posted: Wednesday, November 25, 2009 - 08:39 PM UTC

thegirl

Joined: January 19, 2008
KitMaker: 6,743 posts
AeroScale: 6,151 posts
Posted: Thursday, November 26, 2009 - 02:09 AM UTC
Hello there Keith !
For the streaking camo yes it should at a 15 degree angle , however , though . I have seen folks do it straight as well which I don't believe is really all that correct . All pic's in the windsock show this to be at an angle . Go back and have a look at Stephens build reviews on this subject , all at slight angles . Only the fuaelage sides would be straight up and down .
Colour for the axle wing was painted olive green ( dark olive green ) and light blue on the lower part . This was stander right from the factory and there is no streaking on this part .
With oil and grime from the engine yes , but no camo .
For the national markings on the lower wing , Will have to look into the ref's I have when I get home some time today . If my early morning memory severs me well here it is a case of profile you are doing . some with , some with out . for the most part it would not have the white field on the lower wings .
hope this helps you out in some way there keith

JackFlash

Joined: January 25, 2004
KitMaker: 11,669 posts
AeroScale: 11,011 posts
Posted: Thursday, November 26, 2009 - 04:07 AM UTC
Quoted Text
Hello there Keith ! . . . Go back and have a look at Stephens build reviews on this subject , all at slight angles . . .
Thank you Terri! Here is a bit of fun from my 1:32 Roden kit review. Modeler and Aeroscale member Rick Geisler (RAGIII) is this scheme.
For those building the Roden kit.
Kornbeef
Joined: November 06, 2005
KitMaker: 1,667 posts
AeroScale: 1,551 posts
Posted: Thursday, November 26, 2009 - 05:27 AM UTC
Nothing definate up to now then?
Thats the baby yes Stephen.... if mine turns out half as good I'll be more than happy.
Terri from what pics I've seen the odd A/c does have straight back to front streaking.
Page 31 & 76 Jagdstaffeln 146/17 seems very in line with the ribs.
As they say, theres always an exception that proves the rule
thegirl
Joined: January 19, 2008
KitMaker: 6,743 posts
AeroScale: 6,151 posts
Posted: Thursday, November 26, 2009 - 01:16 PM UTC
You are welcome Stephen !
Keith , never fails does it ! Looking forward to your progress on the streaking .
Keith , never fails does it ! Looking forward to your progress on the streaking .
Kornbeef
Joined: November 06, 2005
KitMaker: 1,667 posts
AeroScale: 1,551 posts
Posted: Thursday, November 26, 2009 - 06:26 PM UTC
Had my first go last night, a dismal failure and ended up in the washing up bowl being soaked off, thank goodness for acrylics LOL
Will try over the weekend, I may have to resort to the old oils I think.
K
Will try over the weekend, I may have to resort to the old oils I think.
K

CaptainA
Joined: May 14, 2007
KitMaker: 3,117 posts
AeroScale: 2,270 posts
Posted: Friday, November 27, 2009 - 09:13 AM UTC
From what I can remember from researching info, the wing streaking was two ribs to the left. That is, a streak that starts at the front on one of the ribs, will end at the back, two ribs to the left. Most of the profiles I have seen, seem to bear this out. I really don't think any went straight from front to back.


RAGIII
Joined: June 19, 2007
KitMaker: 604 posts
AeroScale: 600 posts
Posted: Friday, November 27, 2009 - 02:34 PM UTC
Quoted Text
Had my first go last night, a dismal failure and ended up in the washing up bowl being soaked off, thank goodness for acrylics LOL
Will try over the weekend, I may have to resort to the old oils I think.
K
Oils work for me

That being said have fun!
RAGIII
Kornbeef
Joined: November 06, 2005
KitMaker: 1,667 posts
AeroScale: 1,551 posts
Posted: Saturday, November 28, 2009 - 05:05 AM UTC
Okay, first coat of oils are on and she looks a lot better for it...not perfect but better, I have to let them dry now and then recoat with a thin coat to balance them out a little I think.
I may have the streaking a little to definate....over painting will subdue it I think?

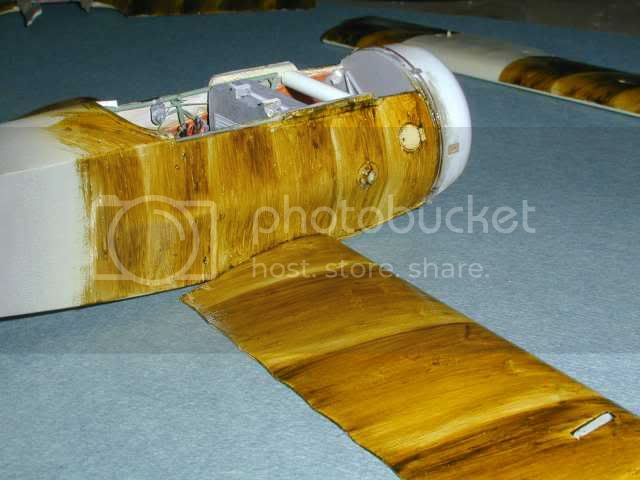
The pics come out quite pale...the colour is darker and more olive...Damn flash
Keith
I may have the streaking a little to definate....over painting will subdue it I think?
The pics come out quite pale...the colour is darker and more olive...Damn flash
Keith
CaptainA
Joined: May 14, 2007
KitMaker: 3,117 posts
AeroScale: 2,270 posts
Posted: Saturday, November 28, 2009 - 06:09 AM UTC
Make sure all is how you want it, then pack it up in a box and stick it in the closet for at least a week. That will allow it to dry, rather than attract dust, hairs and finger prints.
Trust me.
I also paint up an unused piece in the same manner and store it together. When I check it after a week, I touch the spare piece to see if it is dry. Prevents those Aaaaarghh moments.
Trust me.
I also paint up an unused piece in the same manner and store it together. When I check it after a week, I touch the spare piece to see if it is dry. Prevents those Aaaaarghh moments.
JackFlash
Joined: January 25, 2004
KitMaker: 11,669 posts
AeroScale: 11,011 posts
Posted: Saturday, November 28, 2009 - 07:20 AM UTC
Quoted Text
Make sure all is how you want it, then pack it up in a box and stick it in the closet for at least a week. That will allow it to dry, rather than attract dust, hairs and finger prints.
Trust me.
I also paint up an unused piece in the same manner and store it together. When I check it after a week, I touch the spare piece to see if it is dry. Prevents those Aaaaarghh moments.
Bears repeating so It is .
Kornbeef
Joined: November 06, 2005
KitMaker: 1,667 posts
AeroScale: 1,551 posts
Posted: Saturday, November 28, 2009 - 07:24 AM UTC
I listened the first time..Its boxed out the way
Kornbeef
Joined: November 06, 2005
KitMaker: 1,667 posts
AeroScale: 1,551 posts
Posted: Wednesday, December 02, 2009 - 12:33 AM UTC
Paint is dry...moving on now

Mgunns
Joined: December 12, 2008
KitMaker: 1,423 posts
AeroScale: 1,319 posts

Posted: Wednesday, December 02, 2009 - 03:28 AM UTC
The streaking looks good. It is very subjective as to how it looks. The main thing is once the model is done, the sum of the parts always seems to look better than the parts just lying adrift on the work bench. I am looking forward to seeing the finished product. May just motivate me to do another in the same scheme. I like it. 
Kornbeef
Joined: November 06, 2005
KitMaker: 1,667 posts
AeroScale: 1,551 posts
Posted: Wednesday, December 02, 2009 - 10:53 PM UTC
okay I'm happyish with the streaking now, a little overspray of olive blended her in quite well.
Next question........Light blue or turquoise underside? and what colour mix does anyone recommend for the turquoise.....if thats the colour of choice
Am I right to assume the later Jagdstaffeln book is right indicating pale blue undersides?
Keith
Next question........Light blue or turquoise underside? and what colour mix does anyone recommend for the turquoise.....if thats the colour of choice
Am I right to assume the later Jagdstaffeln book is right indicating pale blue undersides?
Keith
JackFlash
Joined: January 25, 2004
KitMaker: 11,669 posts
AeroScale: 11,011 posts
Posted: Thursday, December 03, 2009 - 08:57 AM UTC
The lt.blue I use is a mix. Try a flat, very lt. blue with only a drop of medium green. The torquoise is an interpretation of the the lt.blue Some experts say there was a sealing varnish over the paint others say it was an antifugisidhal ib the paint mix itself. I think is was the mist from the castor oil exhaust that soaked the paint.
Click here.
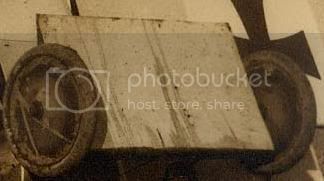
This is a 400 series axial wing. The 500 was narrower from front to back.
Also remember there are some slight differences in the 500 series Fok. Dr.I types. Two things as a note; Dr.I's from 500 up had the short chord axial wing and the lower portion on the rudder was green. The cause for shortening was ground contact damage to the axle wing's with the original and early F.I/Dr.I 800mm cord design. That's why Fokker shortened the Dr.I cord design in later production, to avoid trailing edge ground damage. Photos show this damage, and the various field modifications made of tubular support frames to help support the vulnerable trailing edge of the earlier 800mm cord design. Photos also clearly show the visible difference between the early and late Dr.I axle wing cord dimension designs. It is usually easy to see which Dr.I airframes had the early 800mm vs (500 series)late 670mm axle wings.
Click here.
This is a 400 series axial wing. The 500 was narrower from front to back.
Also remember there are some slight differences in the 500 series Fok. Dr.I types. Two things as a note; Dr.I's from 500 up had the short chord axial wing and the lower portion on the rudder was green. The cause for shortening was ground contact damage to the axle wing's with the original and early F.I/Dr.I 800mm cord design. That's why Fokker shortened the Dr.I cord design in later production, to avoid trailing edge ground damage. Photos show this damage, and the various field modifications made of tubular support frames to help support the vulnerable trailing edge of the earlier 800mm cord design. Photos also clearly show the visible difference between the early and late Dr.I axle wing cord dimension designs. It is usually easy to see which Dr.I airframes had the early 800mm vs (500 series)late 670mm axle wings.
CaptainA
Joined: May 14, 2007
KitMaker: 3,117 posts
AeroScale: 2,270 posts
Posted: Thursday, December 03, 2009 - 11:58 AM UTC
Quoted Text
I am looking forward to seeing the finished product. May just motivate me to do another in the same scheme. I like it.
Ditto. I had my little Fokker out also. There are so many builds I am dying to do, and so little time in a day. But I think it looks great. Just be sure the paint is hard dried. The top surface might be dry, and the bottom not. This might result in it scratching or denting of the painted surface.
 |

WEB HOSTING BY


Copyright ©2021 AeroScale and Kitmaker Network, a subsidiary of Silver Star Enterprises
All Rights Reserved. Please read our Conditions of Use and Privacy Policy.
All Rights Reserved. Please read our Conditions of Use and Privacy Policy.