1:32 Tamiya Spitfire Mk.IX
Merlin
 Senior Editor
#017
United Kingdom
Joined: June 11, 2003
KitMaker: 17,582 posts
AeroScale: 12,795 posts
Posted: Wednesday, December 09, 2009 - 07:19 AM UTC
Hi Jean-Luc
Pheww! I was starting to worry that I'd imagined it!
All the best
Rowan

BEWARE OF THE FEW...
As I grow older, I regret to say that a detestable habit of thinking seems to be getting a hold of me. - H. Rider Haggard
Pennsylvania, United States
Joined: December 09, 2003
KitMaker: 880 posts
AeroScale: 654 posts
Posted: Wednesday, December 09, 2009 - 08:54 AM UTC
Rowan, how did you get the nice flush finish where the ejector pin marks were? Could you take us through a step by step? Thanks for posting the photos, I'll be following along like everyone else. Your photography looks good by the way. Wingman out.
WATCH OUT THE WOLFPACK IS COMING!
WOLF#8
Merlin
Senior Editor #017
United Kingdom
Joined: June 11, 2003
KitMaker: 17,582 posts
AeroScale: 12,795 posts
Posted: Wednesday, December 09, 2009 - 11:34 AM UTC
Quoted Text
Rowan, how did you get the nice flush finish where the ejector pin marks were? Could you take us through a step by step? Thanks for posting the photos, I'll be following along like everyone else. Your photography looks good by the way. Wingman out.
Hi Mike
It's probably the oldest trick in the book, and something I normally do using gloss enamel paint. This time I've used Mr. Surfacer to speed things along a bit.
Straight from the pot (or at least my pot...), Mr. Surfacer is a bit thick and gloopy, so I've mixed it 1:1 or 1:2 with Isopropyl Alcohol. This makes a quick-drying "paint-like" filler that can be applied with a fine brush or a cocktail stick.
For ejector pin marks you just add a drop of the stuff and let it flow to rim. It might take two applications and, ideally, you want to get the filler just proud of the surrounding surface. It dries pretty quickly - but make sure it is dry, because it shrinks. Then it's just a question of swiping over it with a fine sanding stick to level it.
All the best
Rowan
BEWARE OF THE FEW...
As I grow older, I regret to say that a detestable habit of thinking seems to be getting a hold of me. - H. Rider Haggard
Merlin
Senior Editor #017
United Kingdom
Joined: June 11, 2003
KitMaker: 17,582 posts
AeroScale: 12,795 posts
Posted: Wednesday, December 09, 2009 - 12:44 PM UTC
Hi again
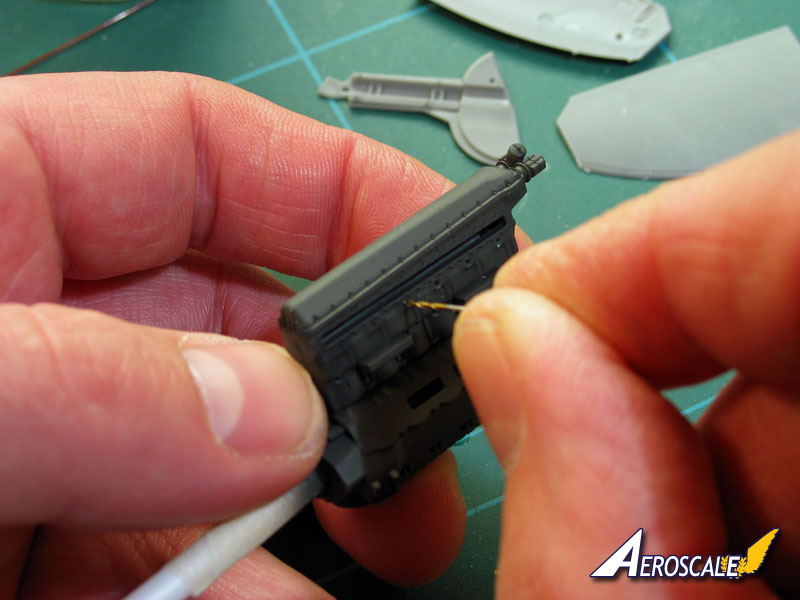
Ok - this will please Terri, I've used the old WW1 rigging technique of stretching Q-Tips over a candle to tackle the joystick wiring. The real thing involves thin "stalks" that go through adapters to thicker flexible cables - cue the Q-Tips:
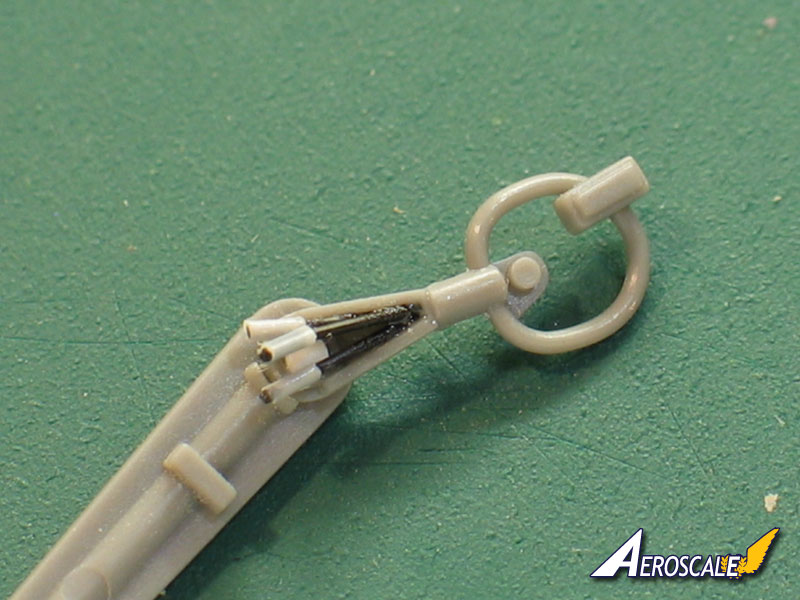
This is still at a rough and ready stage, but it's gone off to join its friends for a base-coat of WEM Colourcoats Grey-Green before more work.
Tonight has been all about pins and hinges. I think Jean-Luc gave them a miss, but I thought I'd better use them for our build.
They seem OK - if a bit loose. The elevators will definitely droop (which is correct for a parked Spit):
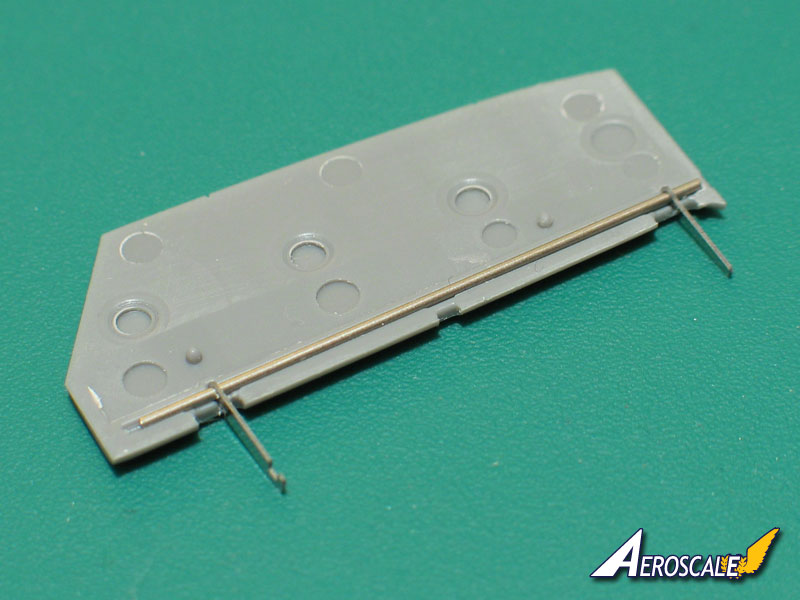
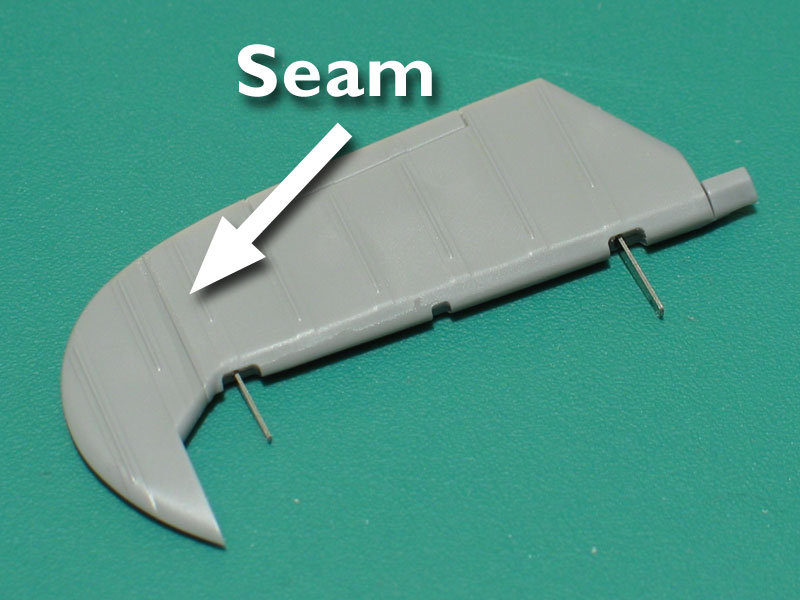
What concerns me more is the seam on the underside. It seems a bit mean of Tamiya to do this for the sake of two parts on such a prestige kit:
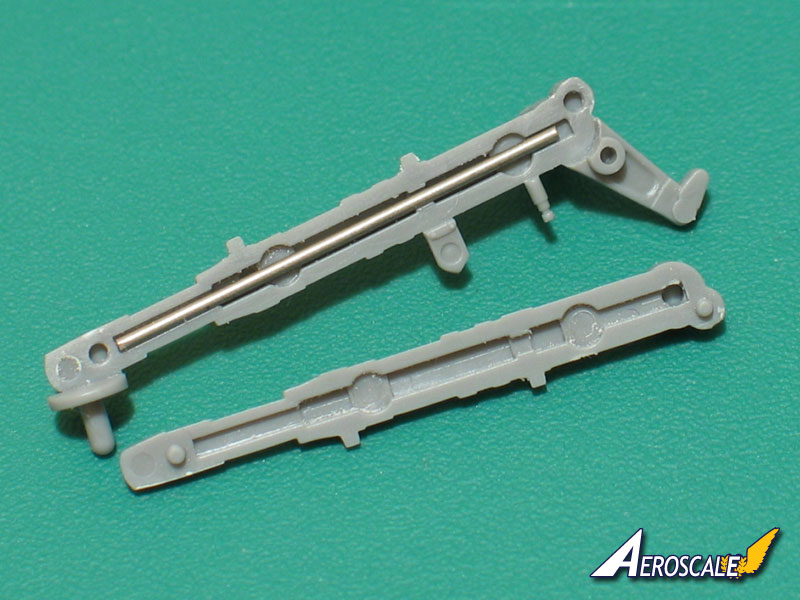
And pins again. The secret of how Tamiya managed to get the gear legs down to correct scale thickness - rather than mould them like tree trunks, they've learned a trick from resin producers and added metal reinforcements.
All the best
Rowan
BEWARE OF THE FEW...
As I grow older, I regret to say that a detestable habit of thinking seems to be getting a hold of me. - H. Rider Haggard
Alberta, Canada
Joined: January 19, 2008
KitMaker: 6,743 posts
AeroScale: 6,151 posts
Posted: Wednesday, December 09, 2009 - 01:44 PM UTC
Yes Rowan , I'm very pleased ! I can go to bed happy tonight

You just have to love the q-tip method . It has so many different applications where it can be applied to . Works great for spark plug leads as well .
Merlin
Senior Editor #017
United Kingdom
Joined: June 11, 2003
KitMaker: 17,582 posts
AeroScale: 12,795 posts
Posted: Saturday, December 12, 2009 - 06:34 AM UTC
Hi there
I've been tinkering away - rather scatter-gun effect on various parts of the kit - and I do promise to have some pics to show some proper progress soon.

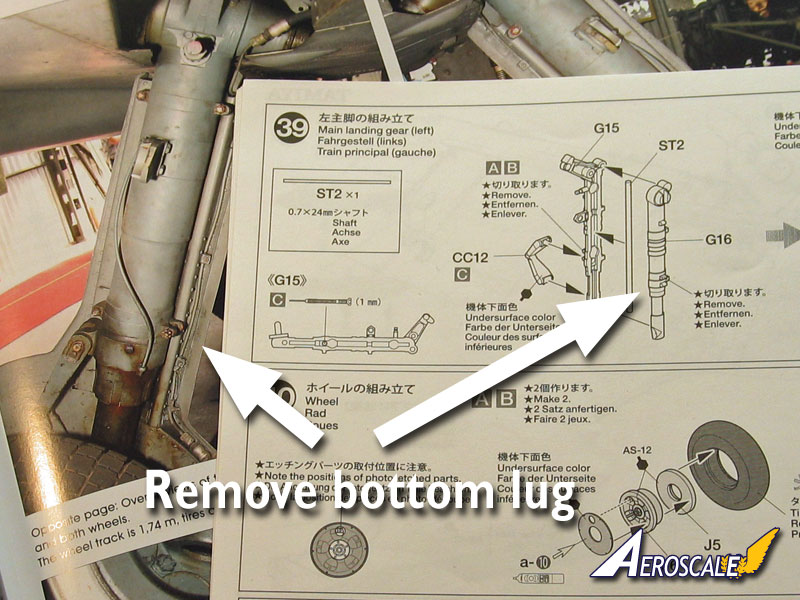
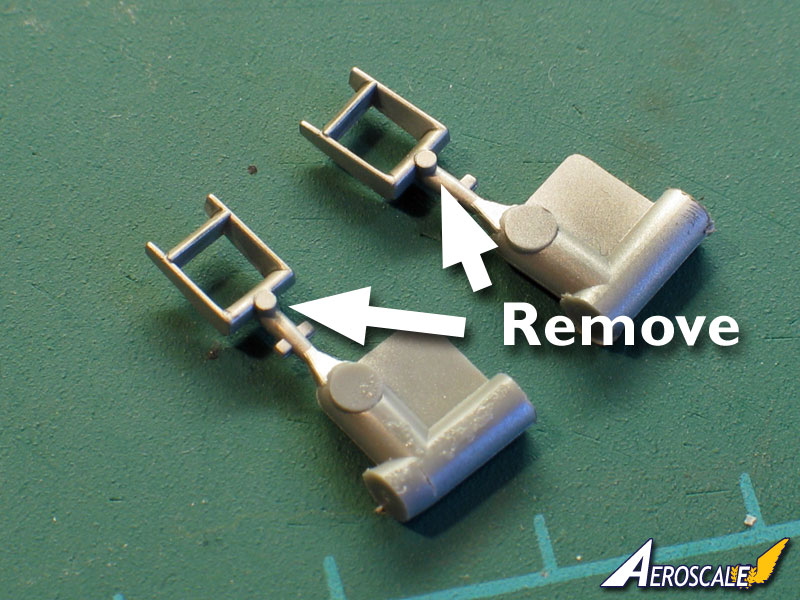
Meanwhile, I think I've found a small error in the instructions; I'm going for the strengthened main gear with oleo scissors and Tamiya seem to indicate to remove the top one of two lugs. My refs show it in place - it's the lower one that should go:
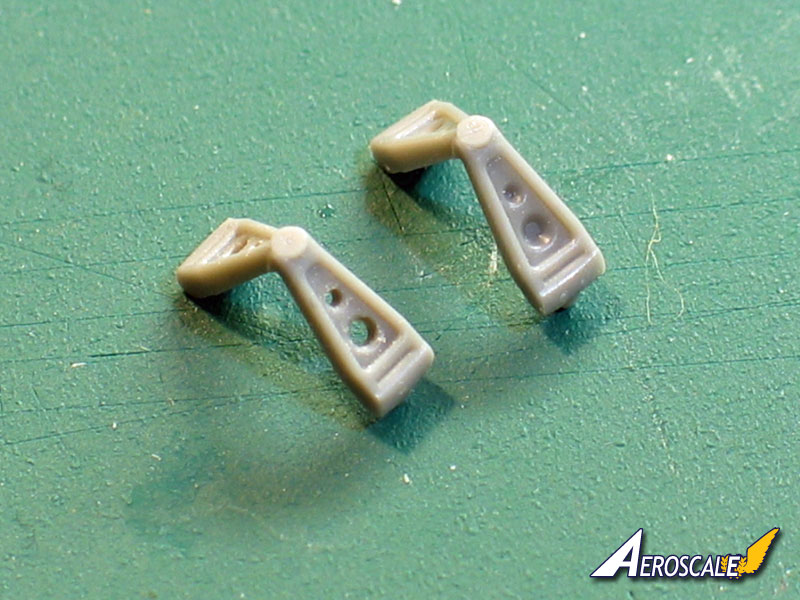
With the scissors themselves, their appearance can be improved by drilling out the holes:
More soon.
All the best
Rowan
BEWARE OF THE FEW...
As I grow older, I regret to say that a detestable habit of thinking seems to be getting a hold of me. - H. Rider Haggard
Merlin
Senior Editor #017
United Kingdom
Joined: June 11, 2003
KitMaker: 17,582 posts
AeroScale: 12,795 posts
Posted: Sunday, December 13, 2009 - 04:48 AM UTC
Hi there
I'm not intending to go crazy on the engine - it's so nicely detailed OOB, there's no need - but one obvious extra that I think will be worthwhile is an ignition harness. Tamiya include a fair amount of other pipework, so adding a few of the most obvious cables should give a really nice busy look.
All the best
Rowan
BEWARE OF THE FEW...
As I grow older, I regret to say that a detestable habit of thinking seems to be getting a hold of me. - H. Rider Haggard
Merlin
Senior Editor #017
United Kingdom
Joined: June 11, 2003
KitMaker: 17,582 posts
AeroScale: 12,795 posts
Posted: Sunday, December 13, 2009 - 07:19 AM UTC
Hi again
Well, the basics of the engined are together:

Obviously, there's a lot more to do - more parts to add and shading and highlighting to bring it to life a bit - but I think it's going to look pretty decent.
All the best
Rowan
BEWARE OF THE FEW...
As I grow older, I regret to say that a detestable habit of thinking seems to be getting a hold of me. - H. Rider Haggard
AussieReg
Associate Editor #007
Victoria, Australia
Joined: June 09, 2009
KitMaker: 8,156 posts
AeroScale: 3,756 posts
Posted: Sunday, December 13, 2009 - 08:23 AM UTC
Hey Rowan, great work so far,it's looking real good. What paint did you use on the engine, I really like the colour and texture there ??
Cheers, D
ON the bench
Revell 1/24 '53 Corvette (building as '54)
Revell 1/24 BMW 507 Coupe and Cabrio
Italeri 1/48 Me262 B-1a/U1 Nightfighter
Monogram 1/24 '57 Chevy Nomad
Dragon 1/350 USS Frank Knox DD-742
Moselle, France
Joined: May 15, 2005
KitMaker: 5,653 posts
AeroScale: 4,347 posts
Posted: Sunday, December 13, 2009 - 09:08 AM UTC
Quoted Text
What paint did you use on the engine, I really like the colour and texture there ??
This is exactely what I wanted to ask. It looks indeed very nice...

Jean-Luc

Better think one hour and build five minutes...
Than think five minutes and build an hour!
Merlin
Senior Editor #017
United Kingdom
Joined: June 11, 2003
KitMaker: 17,582 posts
AeroScale: 12,795 posts
Posted: Sunday, December 13, 2009 - 12:34 PM UTC
Hi there
It's Xtracolor Tyre Black, which gives a good "scale black", but I'm going to work on it a bit more to try to get closer to the original finish.
All the best
Rowan
BEWARE OF THE FEW...
As I grow older, I regret to say that a detestable habit of thinking seems to be getting a hold of me. - H. Rider Haggard
Florida, United States
Joined: January 26, 2002
KitMaker: 1,560 posts
AeroScale: 750 posts
Posted: Sunday, December 13, 2009 - 01:51 PM UTC
Joined: December 23, 2007
KitMaker: 1,596 posts
AeroScale: 1,275 posts
Posted: Sunday, December 13, 2009 - 07:36 PM UTC
Merlin, please do not exagerate. "Any more real and you would be eating fumes" - as one of the ads says.
Merlin
Senior Editor #017
United Kingdom
Joined: June 11, 2003
KitMaker: 17,582 posts
AeroScale: 12,795 posts
Posted: Sunday, December 13, 2009 - 08:47 PM UTC
Thanks all
But the paint at the moment is looking a bit too matte and dark grey (although it does look darker in real life than in the photo), while the real thing was gloss black. I wan't to try to get a "scale effect", so I won't go for either full gloss or full black, but it doesn't look quite right to my eyes yet.
All the best
Rowan
BEWARE OF THE FEW...
As I grow older, I regret to say that a detestable habit of thinking seems to be getting a hold of me. - H. Rider Haggard
AussieReg
Associate Editor #007
Victoria, Australia
Joined: June 09, 2009
KitMaker: 8,156 posts
AeroScale: 3,756 posts
Posted: Sunday, December 13, 2009 - 10:58 PM UTC
Thanks Rowan. I've found a fair scale black is a 50/50 mix of Tamiya Flat Black and Red Brown. I will see if i can dredge up a photo later, but give that a try sometime.
Cheers, D
ON the bench
Revell 1/24 '53 Corvette (building as '54)
Revell 1/24 BMW 507 Coupe and Cabrio
Italeri 1/48 Me262 B-1a/U1 Nightfighter
Monogram 1/24 '57 Chevy Nomad
Dragon 1/350 USS Frank Knox DD-742
Merlin
Senior Editor #017
United Kingdom
Joined: June 11, 2003
KitMaker: 17,582 posts
AeroScale: 12,795 posts
Posted: Sunday, December 13, 2009 - 11:44 PM UTC
Cheers Damian
I've dusted on a light coat of thinned Humbrol satin black which has given a nice sheen and made it slightly darker - I think it's a reasonable base to do some weathering to.
All the best
Rowan
BEWARE OF THE FEW...
As I grow older, I regret to say that a detestable habit of thinking seems to be getting a hold of me. - H. Rider Haggard
Merlin
Senior Editor #017
United Kingdom
Joined: June 11, 2003
KitMaker: 17,582 posts
AeroScale: 12,795 posts
Posted: Monday, December 14, 2009 - 09:19 AM UTC
Hi again
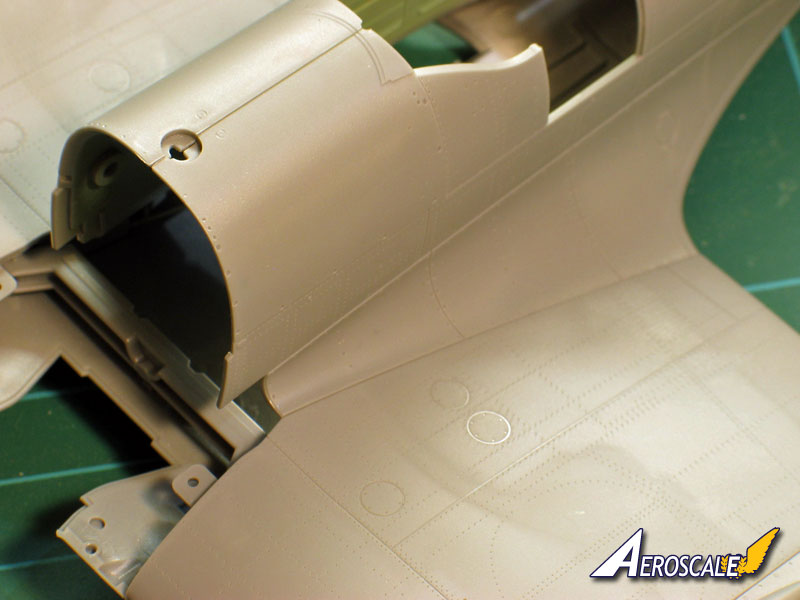
Well, I thought a bit of quick progress would be nice, so I knocked together the wings tonight:

I have to say, they've gone together like a dream! Tamiya's engineering is outrageously good. I clipped together the empty fuselage halves and checked the wing-roots - the fit is basically perfect:
So... the next big thing to do is to go back to where I started and have some fun putting the cockpit together.
All the best
Rowan
BEWARE OF THE FEW...
As I grow older, I regret to say that a detestable habit of thinking seems to be getting a hold of me. - H. Rider Haggard
Attica, Greece / Ελλάδα
Joined: May 01, 2008
KitMaker: 1,437 posts
AeroScale: 1,241 posts
Posted: Monday, December 14, 2009 - 11:00 AM UTC
Wellington, New Zealand
Joined: March 15, 2005
KitMaker: 169 posts
AeroScale: 132 posts
Posted: Tuesday, December 15, 2009 - 08:00 AM UTC
Looking good Rowen! Your way ahead of me
Merlin
Senior Editor #017
United Kingdom
Joined: June 11, 2003
KitMaker: 17,582 posts
AeroScale: 12,795 posts
Posted: Tuesday, December 15, 2009 - 09:03 AM UTC
Cheers Nick and David
As regards being way ahead - well, it's not often I'm accused of that! LOL! but looks could be deceiving... I've jumped about a lot, so there's plenty to go back and fill in.
All the best
Rowan
BEWARE OF THE FEW...
As I grow older, I regret to say that a detestable habit of thinking seems to be getting a hold of me. - H. Rider Haggard
Merlin
Senior Editor #017
United Kingdom
Joined: June 11, 2003
KitMaker: 17,582 posts
AeroScale: 12,795 posts
Posted: Saturday, January 09, 2010 - 03:53 AM UTC
Hi again
It's been a while, but I'm back underway!
My target is to try to complete the cockpit over the next few days. I've got the basics painted and ready to fit, and I'll probably add a bit of the more obvious wiring that's missing in the kit:
Those pesky ejector-pin marks again! These two were so obvious, I managed to miss them before painting the rudder pedals! They'll have to go, because the circular lugs are nowhere to be seen on the real thing. I'll simulate the grips on the pedals too:
Much more anon.
All the best
Rowan
BEWARE OF THE FEW...
As I grow older, I regret to say that a detestable habit of thinking seems to be getting a hold of me. - H. Rider Haggard
Attica, Greece / Ελλάδα
Joined: May 01, 2008
KitMaker: 1,437 posts
AeroScale: 1,241 posts
Posted: Saturday, January 09, 2010 - 04:12 AM UTC
And they only complaining about eduard

LOOK where are that pinmarks!!
And there are a lot of pinmarks in the cockpit sides
And that kit supposed to be "the best"!!!
In my eduard's brisfish (2005 mold
) There are only 2 pinmarks in the side of the cockpit 1-1
Keep going!

Cheers Nick
California, United States
Joined: November 28, 2007
KitMaker: 817 posts
AeroScale: 729 posts
Posted: Saturday, January 09, 2010 - 04:29 AM UTC
Very nice, Rowan! Glad to see you'll be wiring up that tasty engine- cheers!
chuk
[url]http://chukw.blogspot.com/[/url]
Merlin
Senior Editor #017
United Kingdom
Joined: June 11, 2003
KitMaker: 17,582 posts
AeroScale: 12,795 posts
Posted: Saturday, January 09, 2010 - 08:58 AM UTC
Quoted Text
Glad to see you'll be wiring up that tasty engine- cheers! chuk
Hi Chuck
Well, I'll certainly be adding some of it - it's too good an opportunity to miss.
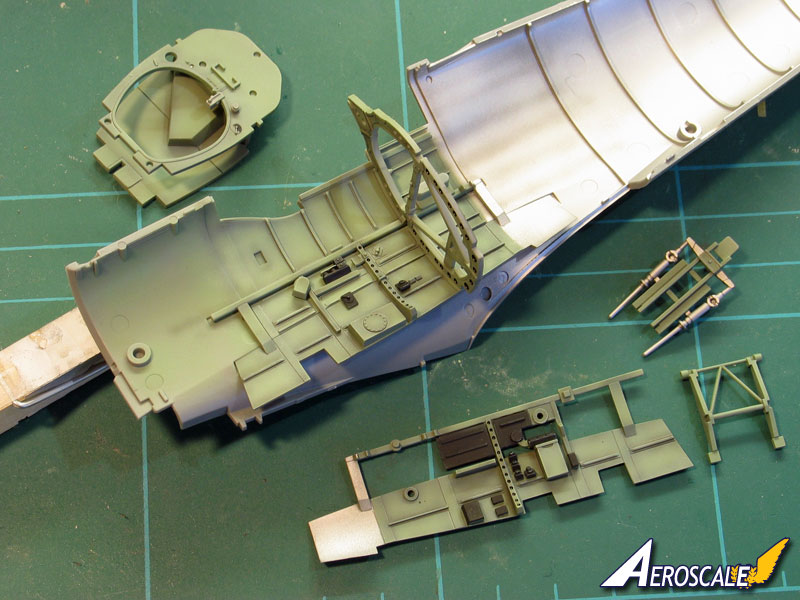
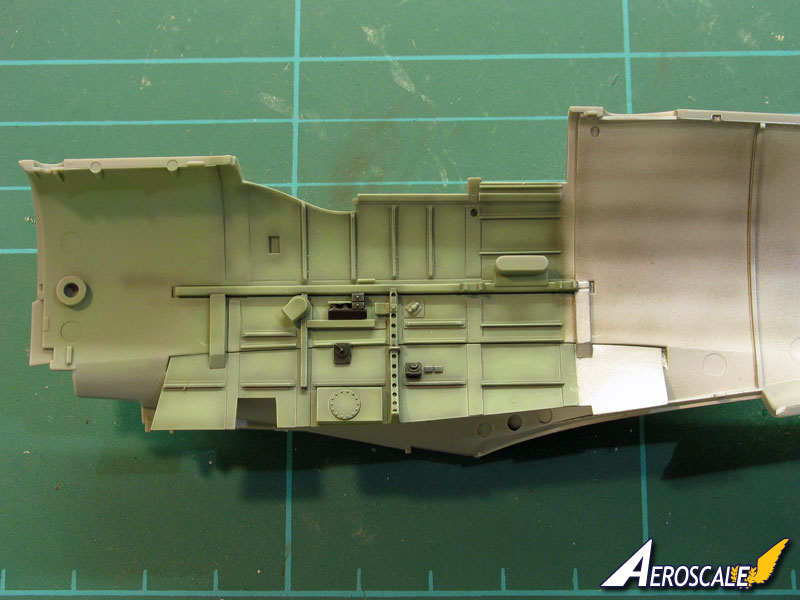
Staying with the wiring theme, the instructions suggest building the cockpit as a complete assembly before adding it to the fuselage. That certainly will work, as you can see from the partial dry fit here:
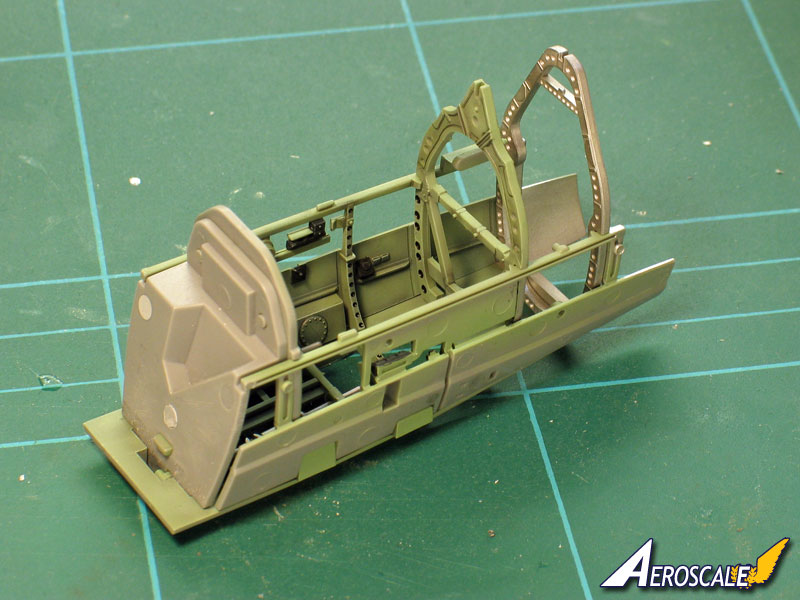
But doing it that way will make adding the cockpit wiring much harder, because some of it crosses the join between the kit's fuselage side and lower cockpit sidewall. So, I've broken away from the recommended assembly sequence and cemented the sidewalls to the fuselage prior to adding the details and finishing weathering:
All the best
Rowan
BEWARE OF THE FEW...
As I grow older, I regret to say that a detestable habit of thinking seems to be getting a hold of me. - H. Rider Haggard
United States
Joined: August 12, 2007
KitMaker: 153 posts
AeroScale: 139 posts
Posted: Sunday, January 10, 2010 - 02:16 AM UTC
Hi Rowan, your cockpit looks excellent. From looking at the pics, I'm assuming you did some shading with an airbrush--did you follow that up with drybrushing, or what process did you use? Did you also use a wash? I'll be watching this build with interest.
Regards;
Automaton
Not everything that counts can be counted, and not everything that can be counted counts. (Albert Einstein)