_GOTOBOTTOM
Rotary Wing
Discuss helicopters and other rotary wing aircraft from any era.
1:35 Aussie Hind Gunship
grubbyfingers
_VISITCOMMUNITY
Victoria, Australia
Joined: September 07, 2007
KitMaker: 404 posts
AeroScale: 339 posts
Posted: Friday, February 05, 2010 - 06:15 PM UTC
Hi Guys,

I started this project last year, but made precious little progress.

In honor of the re-start, I thought I'd give it new thread.

Grubby.

[size=200] 1:35 Aussie Mi-24K “Kangaroo” Build[/size]

I was fortunate enough to be given this mammoth kit as a leaving present from my last job. I can only think they were really happy to see me go! I've been researching colour and marking schemes since. I found many schemes, but none that I found attractive. I'm a visual kinda guy and I knew I wouldn't be able to do the kit, and the thought behind the present, justice if my heart wasn't in it.

Then the final flight of the Australian Army Hueys was announced and it got me thinking: What if the Tiger hadn't been selected as a replacement, but we bought some Mi-24s instead? Bingo. All the pieces fell into place and the decision was made. I'd build the Mi-24 as a second-generation Bushranger gunship. The colour scheme would be taken directly from the Army Black Hawk and the weapons and some of the systems would be Westernised. A name for this beast? Looking at the shape, it just had to be "Kangaroo".


Mi-24K "Kangaroo" colour scheme

[size=150]The Kit[/size]
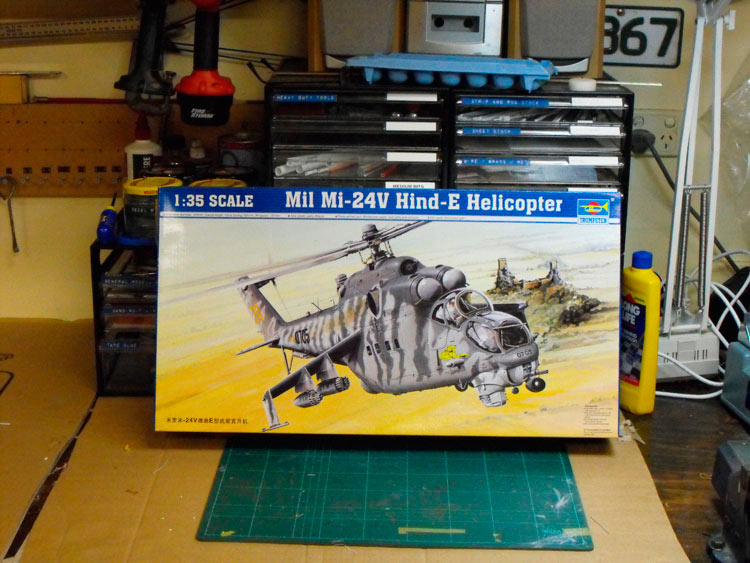


I'm sure most of you would be aware of the existence of this kit. It caused quite a stir when it was released in 2005 and has proven very popular with many examples appearing in model comps and website builds.

Cybermodeler's review can be found here: http://www.cybermodeler.com/hobby/kits/tru/kit_tru_5103.shtml

There are pics of the sprues etc there, so I won't reproduce them here.

There's also a build thread in the Large Scale Planes forum where one guy has really gone to town to correct the small errors in the kit's shape. More power to him! You can see his work here: http://forum.largescaleplanes.com/index.php?showtopic=22818&hl=hind.

My point of view is that the kit is close enough to keep me VERY happy, and seeing as I'm doing a "What-if?" build anyway, it hardly seems relevant.

[size=150]Modifications[/size]

So, time to raid the spares box and see what I have lying around to Westernise this Rhino. The R.A.A.F/Army. Bushranger Huey gunships had seven-tube rocket pods and 7.62mm miniguns on the racks and two pairs of M60s on pintle mounts. In keeping with the spirit of the original, I'm thinking guns and rockets as primary weapons are the go. A pair of floor-mounted Miniguns poking out the doors would be nice. I can get these from the Dragon UH-1N kit, along with their ammo bin.
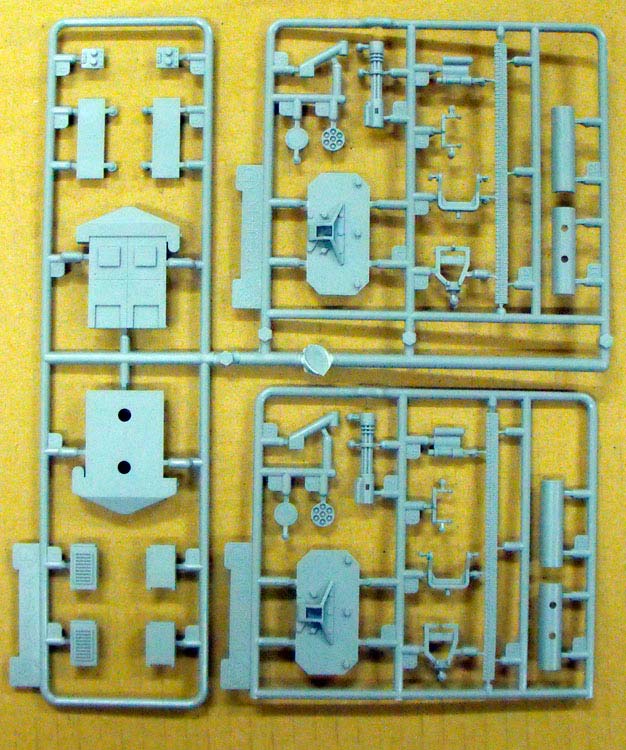


Under the wings, a pair of 19 tube launchers from the Black Hawk DAP kit and the canon pods from the Hind should work well. For the wingtips, what could be better than a full complement of four Hellfires under each tip. These are from the MRC AH-1W.
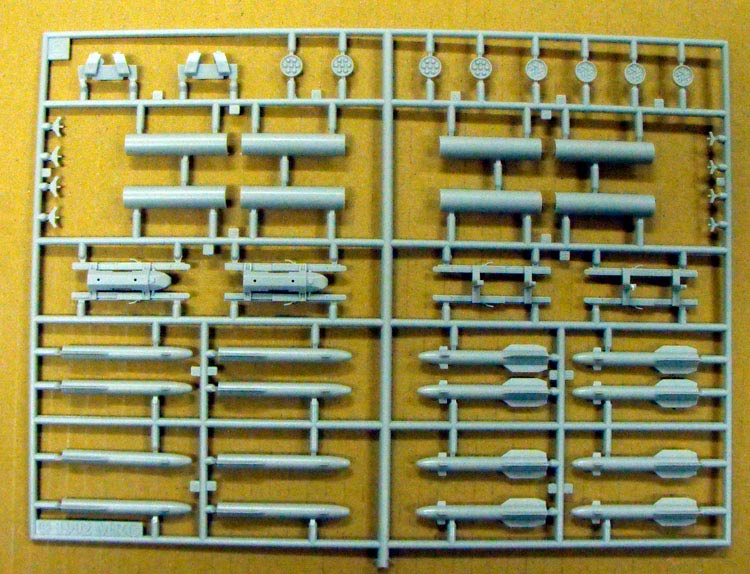


For defense against air attack a pair of Sidewinders mounted over the wings, or on the outer ends, will be added too. I can scrounge these from a Revell 1:32 Phantom II I have in Pandora's Box (the Stash cupboard).

Under the nose, replacing the Russian gun with a Bushmaster chain gun would seem most appropriate. I may have to scratch that one up, based on the Tiger unit. Or see if I can get one from an Apache. An internal fuel tank, ala DAP Black Hawk, would be good too. That particular part is way too wide for the Hind, so I'll use something else.

The list of intended mods includes:
- Refuelling Probe from DAP Black Hawk
- Internal fuel tank in cabin
- Miniguns firing out cabin doors
- 14-tube rocket launchers, cannon pods, Hellfire missiles and Sidewinders on, under and around the wings
- Bushmaster chain gun under nose
- IR beacon from AH-1W
- Aerial suite as per the ADF Tigers
- Other bits and pieces like steps, tie-downs, Black Hawk seats, cabin interior walls etc.

[size=150]The Build Begins[/size]

First thing is to plan where all the different new bits are going to fit in the interior. So the fuselage and main interior bits are dry assembled so the real planning can begin (Has horrible thought: What if none of this stuff actually fits?) ... We shall see!
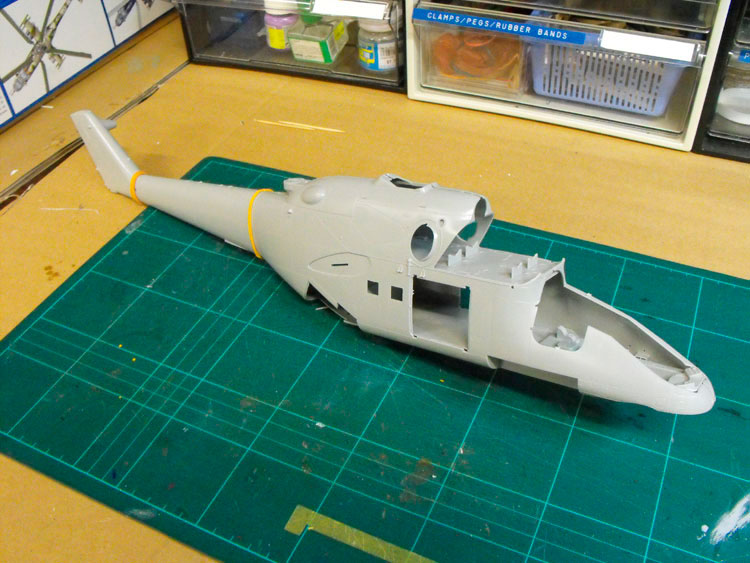


I've snipped off a few of the critical interior parts and put them together in a bit of a dry run to see if the whole thing will actually fit.


It looks like I can shorten the Blackhawk fuel tank back to the outside straps and that should then fit within the fuselage. That's good. The ammo bins sit nicely in front of the tank, that's good too. I can see the ammo belts being run along the ceiling and dropping down to the guns. I found the minigun base plates from the Dragon UH-1N were very large, and that the Black Hawk had similar mounts, but considerably smaller.

With space at a premium, the smaller ones have been dropped in with some Black Hawk seats behind. It is all looking a bit squishy. I may need to shorten the squabs on the gunner's seats. I'll decide that once the guns are positioned. It appears that sometimes the gunners didn't have seats and stood or crouched behind the miniguns. The miniguns and seats may need to be slid backward so they match up with the door openings. This would also facilitate access to the avionics area.


The kit cabin floor is simply flat plastic and looks rather dull. I thought about different ways to introduce some texture without adding too much thickness. I dug out a floor from an unbuilt Tamiya M113 APC kit. The size and texture were just what I was looking for, but simply glueing this over the original floor would add about 10 scale cm to the height of the floor. I could cut the M113 part into the Mi-24 floor, replacing a section of the kit floor, but then I lose the M113 interior. Then I thought of making a rubbing of the M113 floor using that wonderful thin aluminium sheet you get in the top of drink powder tins like Milo or coffee.
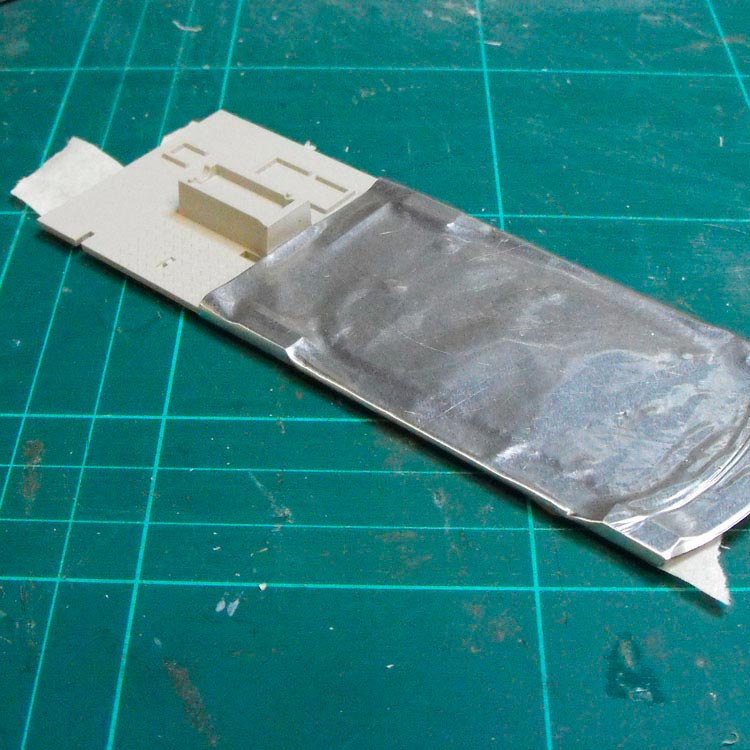


One of these sheets was stretched over the donor floor part and secured at the back with masking tape.


The aluminium was then rubbed down over the surface detail of the M113 floor with a cotton bud to transfer the detail onto the metal.
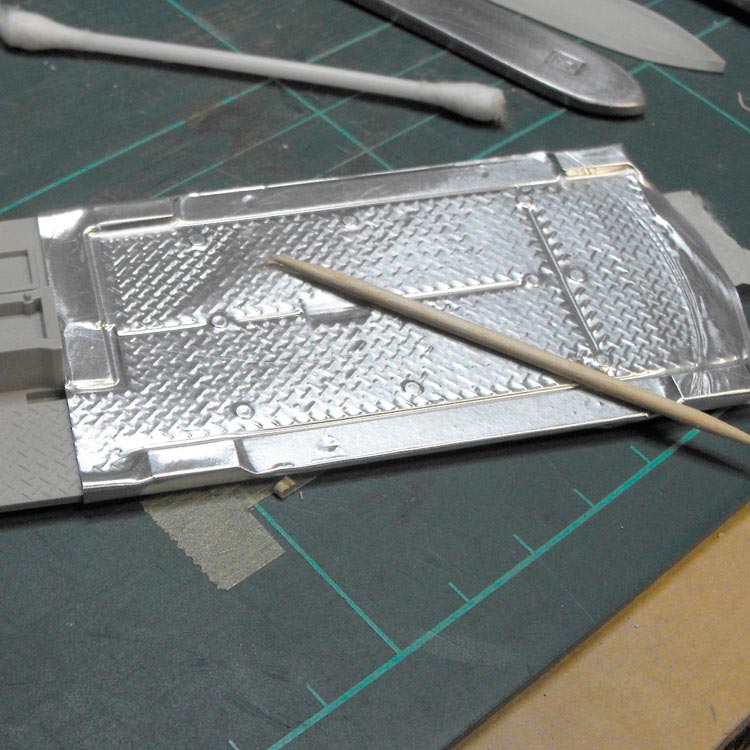


I then used a toothpick to bring up more detail and push the metal right into the recesses and crevices.
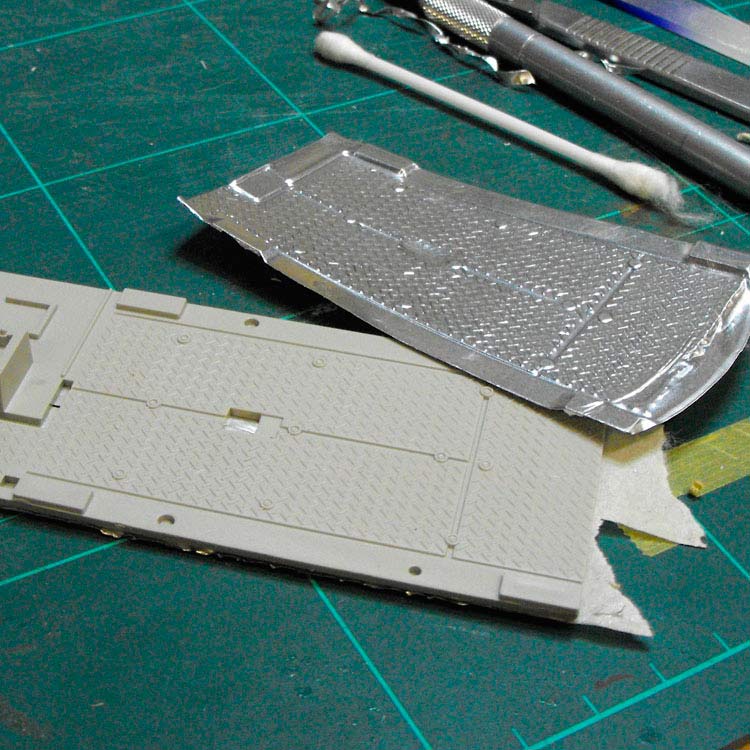


Once I was happy I'd got most of the detail I wanted, I trimmed the aluminium away from the donor floor.


This metal relief was then glued to the helicopter floor and we ended up with a helo floor now with texture. Here it is with the trimmed down fuel tank in place on the floor. Notice that I have reversed the rear bulkhead so the moulded-on detail doesn't interfere with the positioning of the fuel tank. The bulkhead will be all but invisible behind the tank, so the detail won't be missed. You can see here I have bent up a rectangle of scale expanded mesh to act as a walkway in the avionics bay.


The straps on the tank proved to be ideal guides to cut down the tank. Shown is the tank top and front with the edges removed. The tank will now fit snugly inside the fuselage. It even actually fits through the side door.
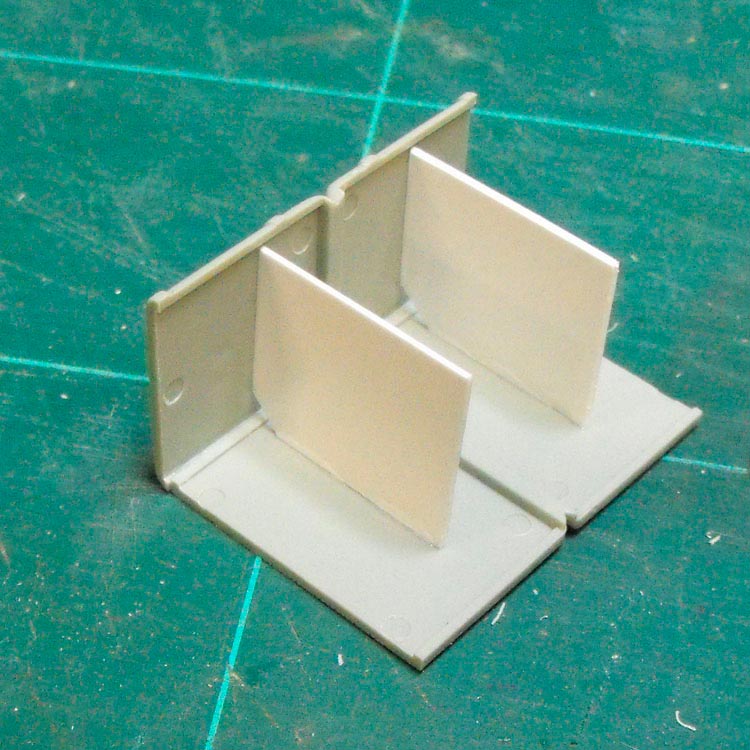


The tank top and front were glued together with some braces from scrap sheet styrene to ensure they sat at 90°.
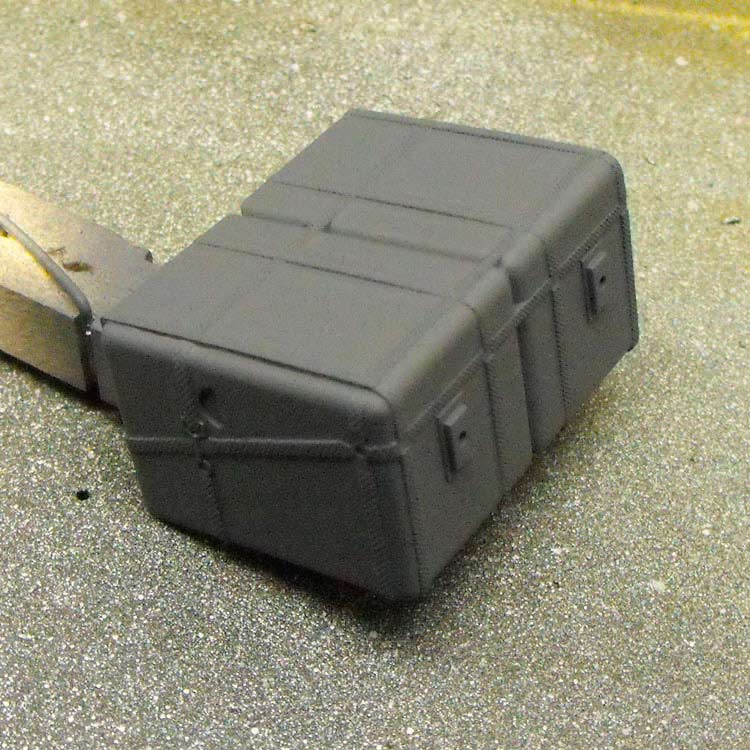


The tank was then sprayed with a dark matt grey.


Pre-shading was added in the form of dark airbrushed stripes of black
around the strapping.


And the strapping itself was picked out by hand with a nice contrasting brown colour.

At this point in the build a three month break occurred while we moved house and got Christmas out of the way. I have now finally set up a dedicated space for modelling and I can get a fix whenever I want!! Bliss!!

Anyhow ... back to the build. There is a large gap between the cockpit and the cabin that is supposed to be an avionics bay, but Trumpeter have left it empty even though you can see it from either end. Who knows. So I decided to fill it in with something that might be loosely interpreted as banks of avionics.


Bits of plastic card were cut to shape, scored to make separate panels and drilled for handles.


D-handles were bent up out of fuse wire and a few extra squares and leads and things added for interest.


After glueing together a fair bit of the cockpit, I dropped everything together in a dry run to see how it was all coming together prior to painting.


There’s not much space left once the fuel tank, ammo, guns and seats are in place!

Next job: Painting the cockpit and cabin.
Blueheeler
_VISITCOMMUNITY
New South Wales, Australia
Joined: March 18, 2008
KitMaker: 347 posts
AeroScale: 223 posts
Posted: Friday, February 05, 2010 - 09:44 PM UTC
Good to see you back on here Graeme; was only doing a search for the blog last night to see how you were going with it. Cant wait to see more!
grubbyfingers
_VISITCOMMUNITY
Victoria, Australia
Joined: September 07, 2007
KitMaker: 404 posts
AeroScale: 339 posts
Posted: Sunday, February 07, 2010 - 05:25 PM UTC

... and here we go.


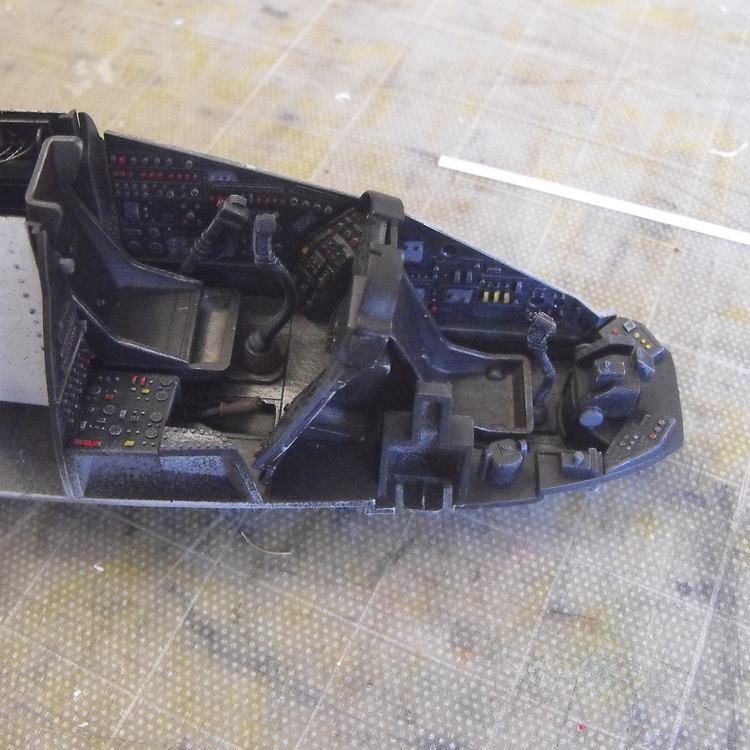
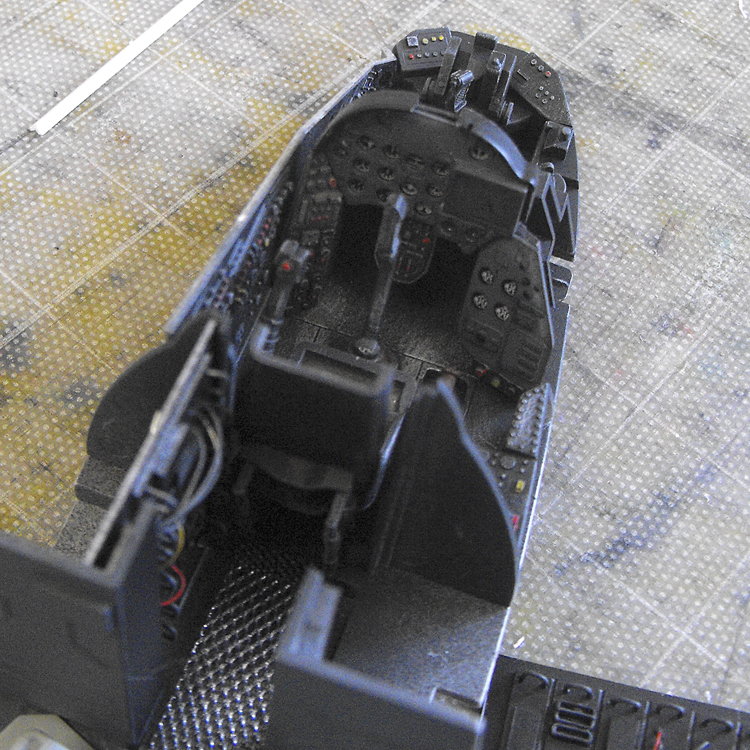
Painting the Cockpit

I have heard good things about the Citadel acrylic paints you get at the wargaming shops, so I thought I'd give them a try. They'd want to be good at $6 a throw! I've used Tamiya acrylics before and I must admit I've had some trouble with them adhering. I'm prepared to admit that the problem may be my surface preparation, so I will bear that in mind.


I gave all the cockpit subassemblies and parts a spray with Windex (another new thing I'm trialling) and left them to sit for a few hours. I then rinsed off the Windex under cold water and left them to dry.


Modelling Tip: I use a cheap strainer from Kmart to hold the small parts while I spray them with Windex and then rinse them off. This makes it pretty unlikely I'll lose one, and I don't need to handle them whaile I wash them.


Modelling Tip: Use Windex to wash parts. I've been told it is a spray on, leave, rinse off affair.


With the parts now washed and dried, I set about airbrushing them. I wanted the cockpit to be NVG capable, so I sprayed the entire interior with Citadel Death Black or something. Note that I deliberately didn't use an undercoat to test adhesion. I also sprayed the cabin in a medium grey, along with two of the instrument panels.


Having done this, I hand-brushed some details and gave the black surfaces a dry-brush with the same medium grey. I scuffed up the floor and corners with a silver pencil, and highlighted edges and buttons by dancing a white pencil all over the raised detail, much like dry-brushing.


My impression of the Citadel paints so far is quite good. They are all matt, and do give a really nice finish. They are more brushable than Tamiya acrylics, but no where near as friendly as enamels. They appear to airbrush quite well, though I did have some trouble with clogging and uneven spray. I'd be inclined to put that down to me being unused to spraying much at all, let alone acrylics!


Adhesion was a mixed bag. Some spots I couldn't budge the paint with a thumbnail, other spots it disappeared with a minimum of handling. I would be inclined to put this down to my surface prep as the bits that did stick, stuck well.


Cushions and harnesses are still to be added, along with some other details. This cockpit is OOB.


AussieReg
Staff MemberAssociate Editor
AUTOMODELER
#007
_VISITCOMMUNITY
Victoria, Australia
Joined: June 09, 2009
KitMaker: 8,156 posts
AeroScale: 3,756 posts
Posted: Sunday, February 07, 2010 - 07:38 PM UTC
Looking great Graeme, I'm glad you revived this thread !!

P.S. I still owe you a beer !!

Cheers, D
HeavyArty
_VISITCOMMUNITY
Florida, United States
Joined: May 16, 2002
KitMaker: 17,694 posts
AeroScale: 1,728 posts
Posted: Sunday, February 07, 2010 - 11:48 PM UTC
She is looking awesome Graeme. Good to see this one back. I love the cabin and cockpit details. Can't wait to see the fuselage on and some paint.
grubbyfingers
_VISITCOMMUNITY
Victoria, Australia
Joined: September 07, 2007
KitMaker: 404 posts
AeroScale: 339 posts
Posted: Sunday, February 14, 2010 - 10:53 PM UTC

Cushions are attached, painted and weathered. Here we have my first ever use of photo etch. Little suckers, aren't they! It took me 2 hours to thread six seatbelts with paper. How do people do this in 1:48 scale? I was tearing my hair out at this size. Anyway, overall I'm happy with my first venture into PE and I won't hesitate to use it in the future. Which is just as well as you can't really avoid it these days.


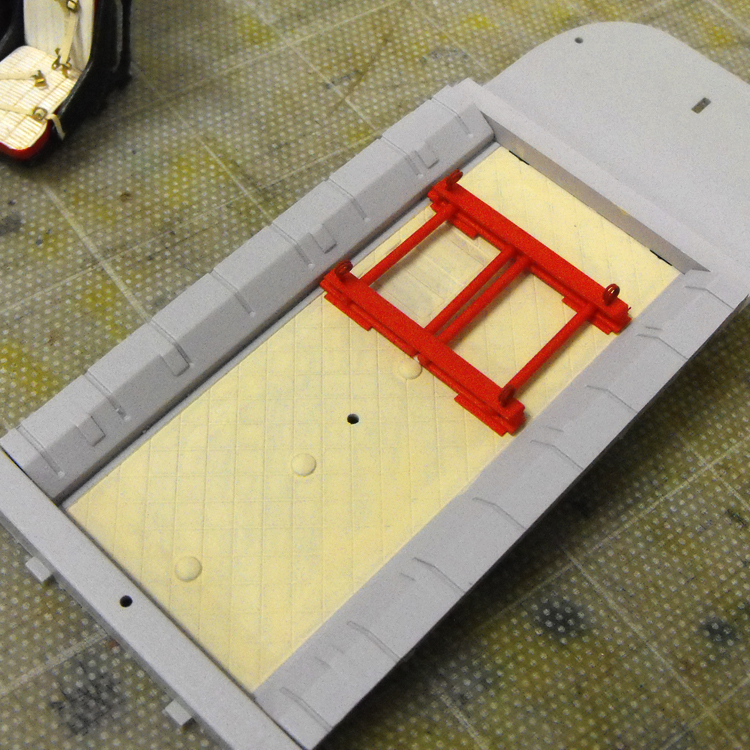
The ceiling was assembled and painted and the roof rack for the seat mounts and the fastrope attachment points was painted. Still some painting to go on these and then they'll be dirtied up a bit.


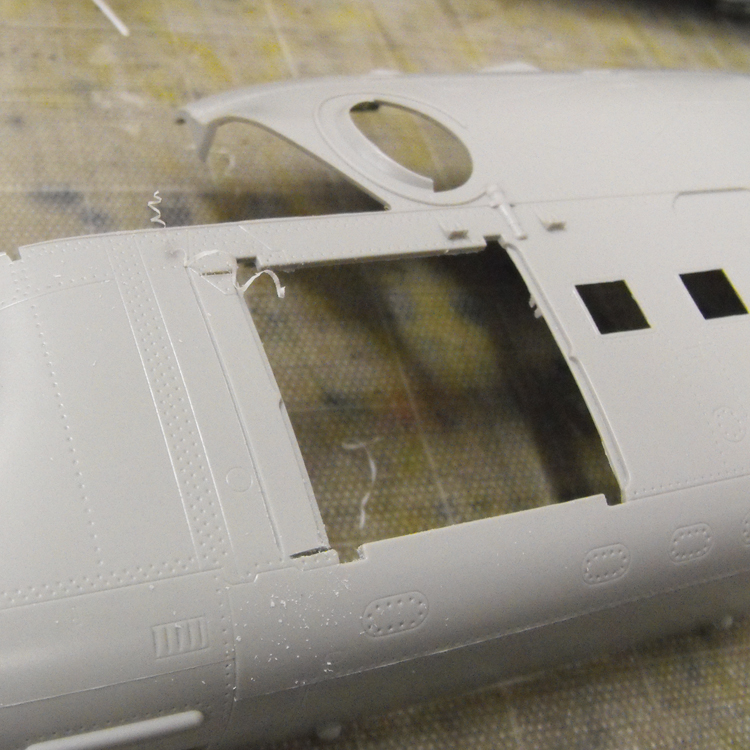
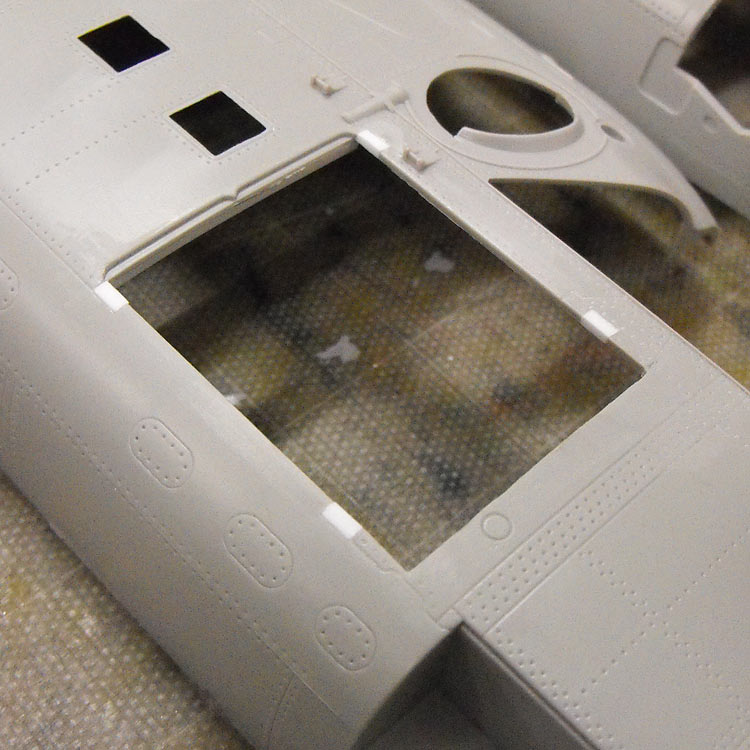
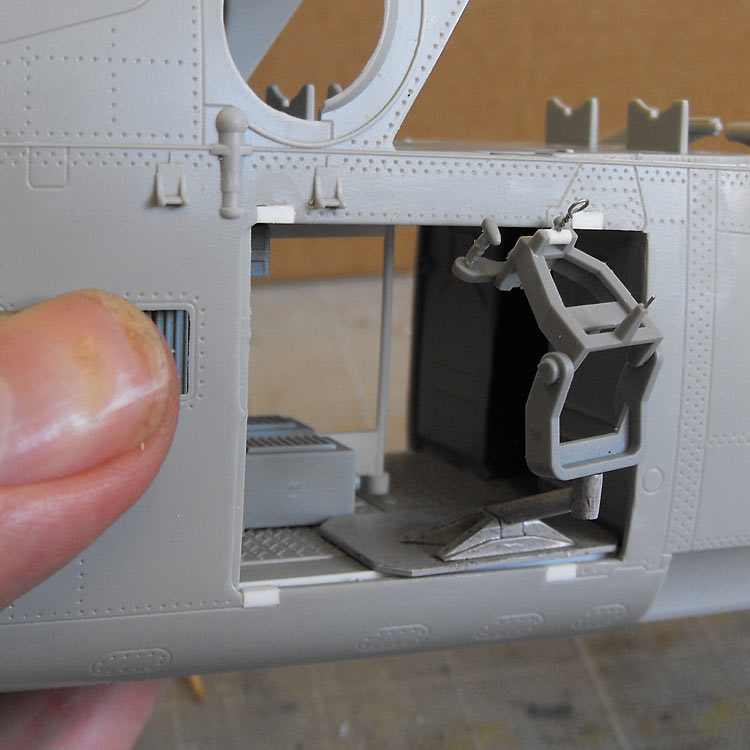
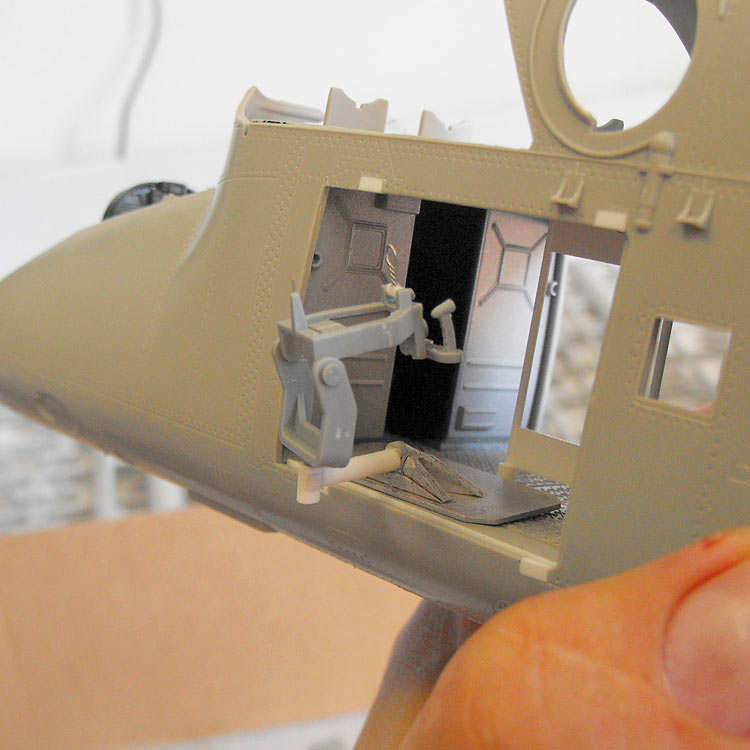
The pic above shows cutting and scribing of the port door to enlarge it. I moved the avionics bay wall toward the nose to give me a bit more space in the cabin to fit the gun bases. This means eliminating the doors entirely, both upper and lower. I will add a blast shield on the forward edge to ease the draft a bit for the poor gunners.


This pic shows the forward edge of the door and the relationship with the moved bulkheads.


To get rid of the big hinge holes I cut off sections of rectangular styrene and glued them in place. These will be cut back and sanded smooth.

grubbyfingers
_VISITCOMMUNITY
Victoria, Australia
Joined: September 07, 2007
KitMaker: 404 posts
AeroScale: 339 posts
Posted: Saturday, March 13, 2010 - 07:23 PM UTC
Hi Guys,

I'm back with another progress report.

Grubby.

To get rid of the big hinge holes I cut off sections of rectangular styrene and glued them in place. These will be cut back and sanded smooth.

Like this:


After going to all that trouble with the foil and making an impression of the APC floor, I ended up unsatisfied with the result. When it was nice and shiny, all the detail showed up really well. Once it was painted and weathered, the detail looked a lot softer. I tried making another impression on a second piece of foil, but got the same result. Probably something to do with the mirror finish of the foil accentuating the detail.


In the end I pulled off the foil and cut the ends off the APC floor and used that as the floor of the cabin as-is. I'll probably never build the APC kit anyway.


I sanded down a couple of raised bits on the APC floor.


I cut the original floor off the assembled interior and glued the APC floor in its place. It is interesting to note that the floor of the Hind cabin is almost exactly the same size as the M113 floor. I added a small angle section to each side to widen it by about half a millimetre and all was good!


Inside the painted roof I added the seat frame attachment and the fast-rope frame with loops for the ropes. I'll hang the ammo belts for the miniguns off the rear ones. The Black Hawk gunners' seats are seen in the foreground.


I added some internal framing just rear of the door to make it look a bit more like a Hind inside. The pencil line shows the extent of the rear cabin. The long range fuel tank fits snug up against the rear part of the wall, so I didn't add any framing there.
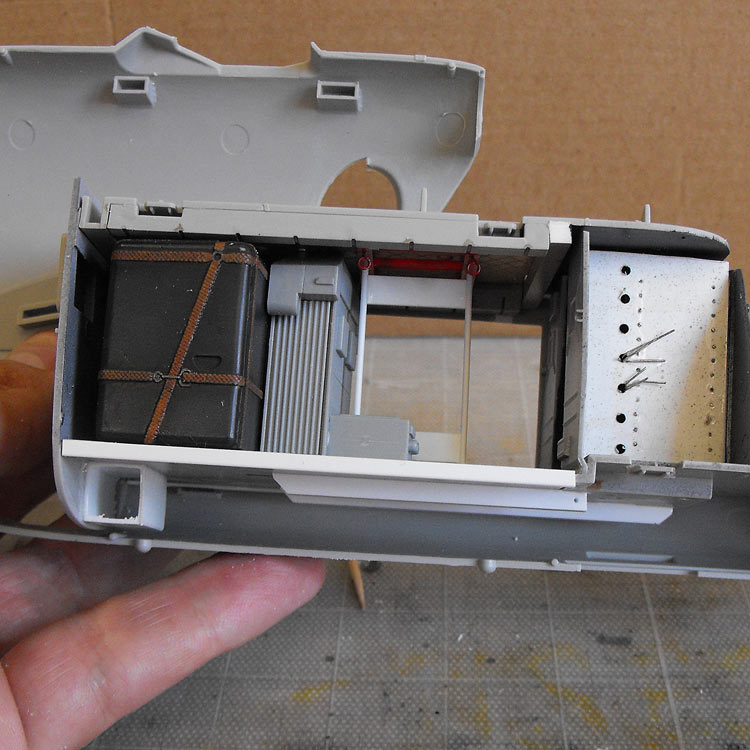


I did a dry run of the interior to see how it was all coming together. There's not going to be much room to move! You can see some bracing under the floor to strengthen the butt-join between the new and old floor. You can also see the outside edge of the angle section added to the outer edges of the new floor. You'd have some fun if you were ground crew and trying to get the ammo bins and fuel tank out!


Next I turned back to the miniguns. I added some rear sights from twisted fuse wire.


Another dry run showed up a rather serious problem: With the standard gun mounts, you can't swing the guns down below about 15°. Not much use for suppressive fire.


The solution was to cut the original arms off and build some new ones out of styrene tube that stick straight out, rather than up at an angle.


grimmo
_VISITCOMMUNITY
Queensland, Australia
Joined: January 17, 2006
KitMaker: 752 posts
AeroScale: 10 posts
Posted: Saturday, March 13, 2010 - 07:57 PM UTC
Awesome job Graheme! Been following your build on the other site, glad to see it here too!

Do you want the rest of your M113 kit?

Cheers!
HeavyArty
_VISITCOMMUNITY
Florida, United States
Joined: May 16, 2002
KitMaker: 17,694 posts
AeroScale: 1,728 posts
Posted: Sunday, March 14, 2010 - 03:03 AM UTC
Looking great. The interior came together well. Good dolution to the gunmount issue as well.
grubbyfingers
_VISITCOMMUNITY
Victoria, Australia
Joined: September 07, 2007
KitMaker: 404 posts
AeroScale: 339 posts
Posted: Sunday, April 04, 2010 - 04:34 PM UTC


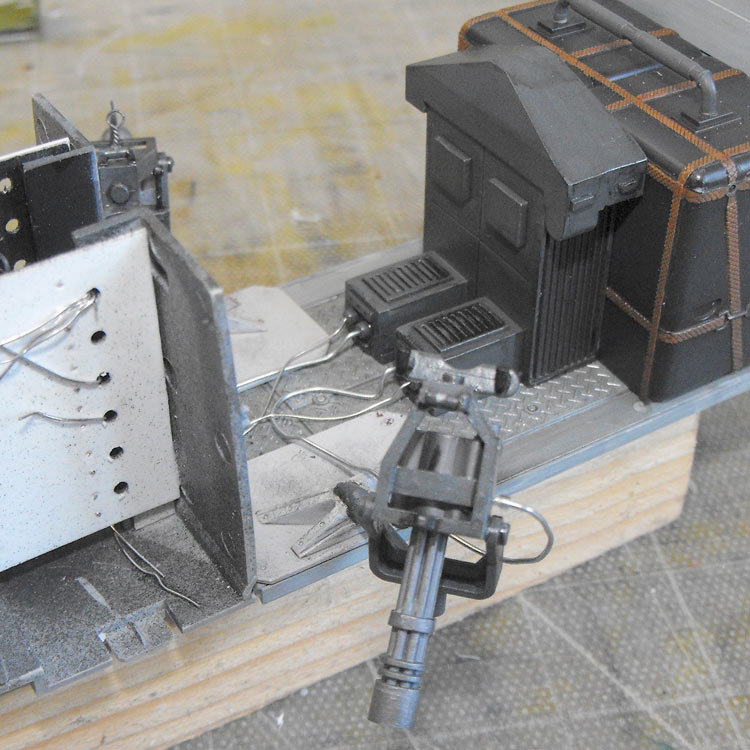
A bit more painting and glueing later and we have this. The guns are now mounted and painted, the ammo bin is painted and some fusewire plumbing has been added for power to the ammo feed and guns.


I've run the electrical supply into the avionics bay. Seems logical! A small length of insulation cover was added to the gun cable where it joins the gunmount to give the impression of a plug.


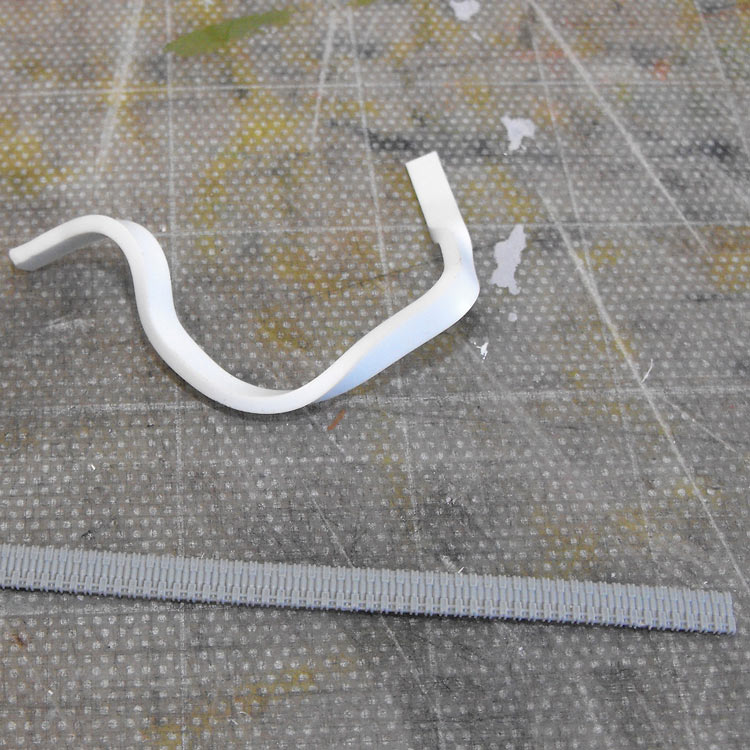
The ammo feed belt that comes with the Dragon UH-1N kit is a stunning piece of moulding. The surface detail is just superb. Trouble is that it is a stiff bit of styrene with no hope of bending in three dimensions the way a real feed belt does. I heated and bent a piece of styrene strip to see if it was a feasible proposition to do it to the kit part. The result, seen here, is a singularly uninspiring one. It looks worse in real life than it does in the photo. It would have been so much better if Dragon had supplied this piece as a flexible vinyl part. So ... what to do?


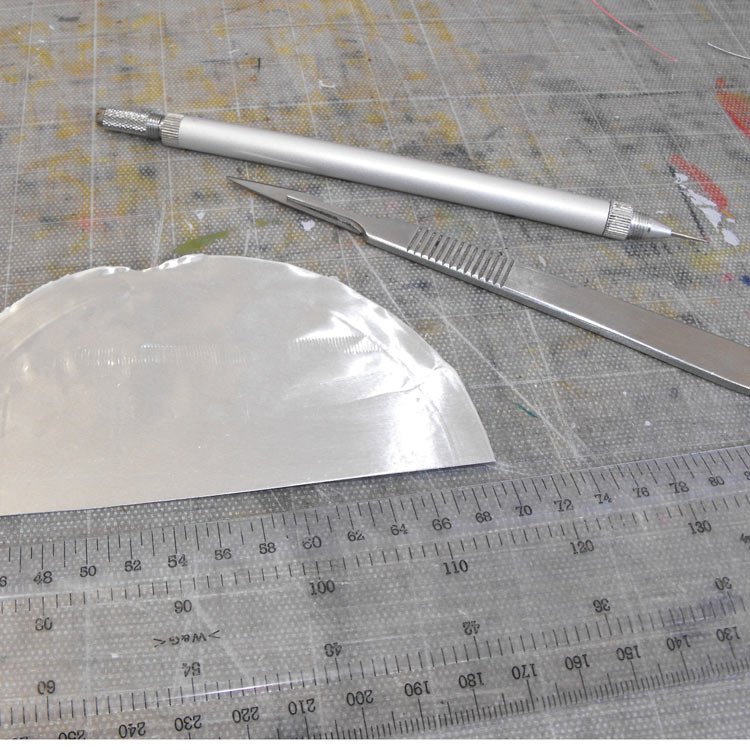
How about using metal? Worth a try. I grabbed a piece of the Modeller's Staple: Milo lid foil, and went to work with a scalpel and a rule.


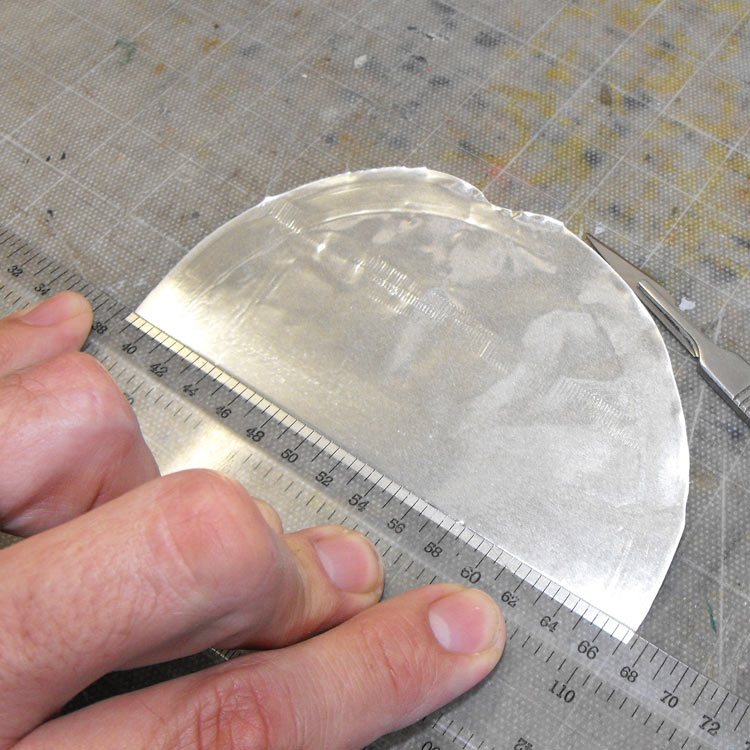
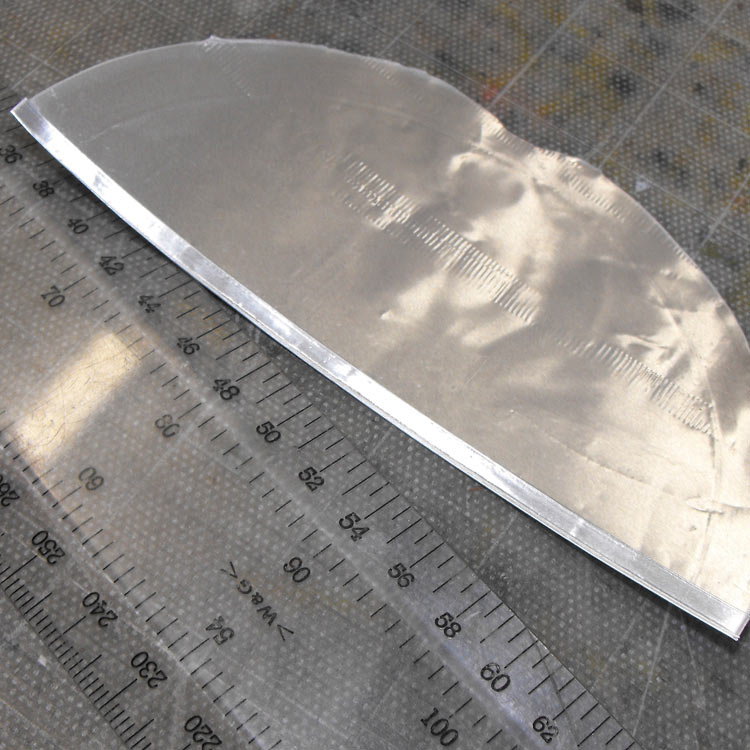
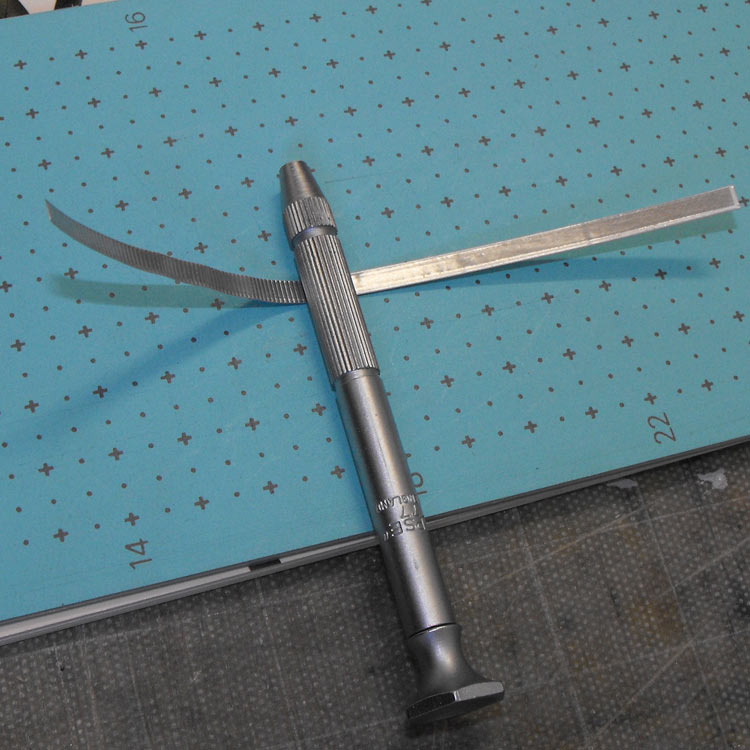
Using the width of the kit part as a guide, I placed the ruler on the foil and scored the foil with the pointed tool you see in the previous photo. This is a round-ended tool, not as sharp as it looks. It creases the foil nicely, rather than piercing it and tearing it.


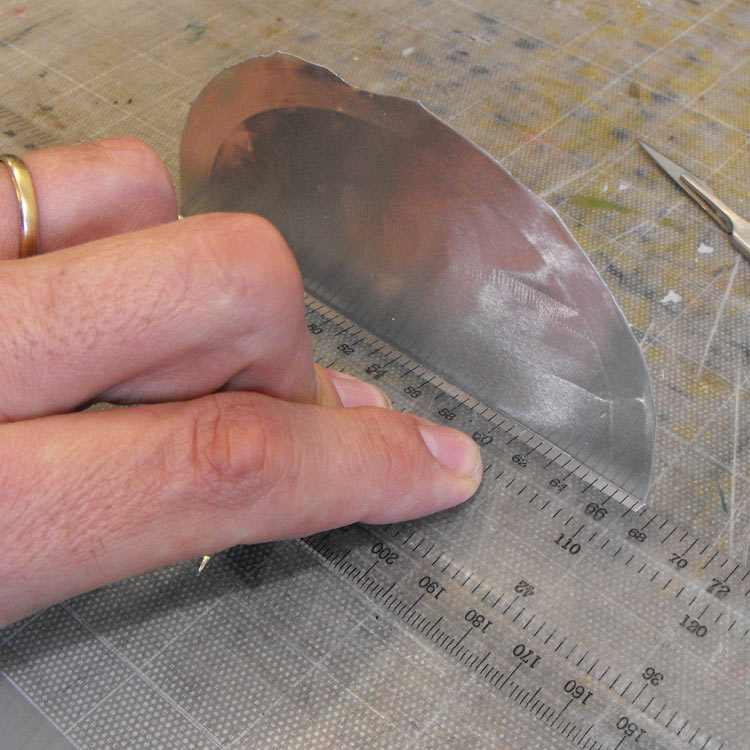
Still holding the ruler in place, I carefully (like you ever do anything in modelling that you don't do carefully!) folded the foil up and over on itself.


I then rolled the fold flat with a metal tube.


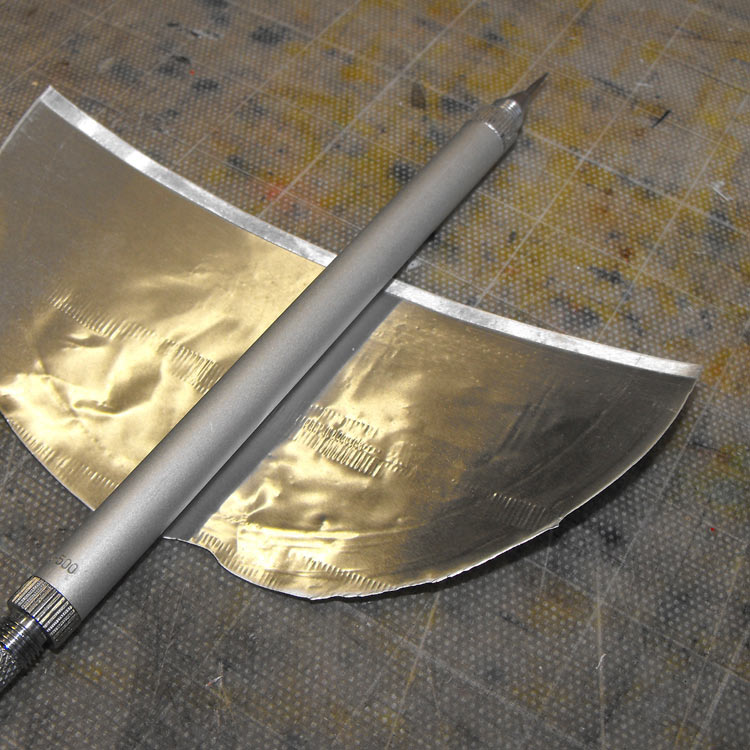
I then repeated the process so I ended up with three layers of foil. This approximated the thickness of the kit part.


Again, the fold was rolled flat with the metal tube.


Aluminium being as soft as it is, the resulting folded piece does not have a dead-straight edge. Therefore, you can't just run the scalpel along the ruler edge to trim it away from the sheet. t's not very clear in the photo, but what I did here was use the ruler to clamp down on the foil strip, with the edge of the ruler a bit back from the edge of the folds. I then lightly ran the scalpel along the edge of the folded strip several times until the base metal was cut through.


This was again rolled flat with the metal tube.


To add some approximation of the belt detail, I rolled a the knurled shaft of a jeweller's screwdriver over it. I used a brand new, very clean cutting mat with no lumps or bumps for this, and pressed quite hard. In fact I pressed hard enough that and indication of the ridging even appeared on the other side.


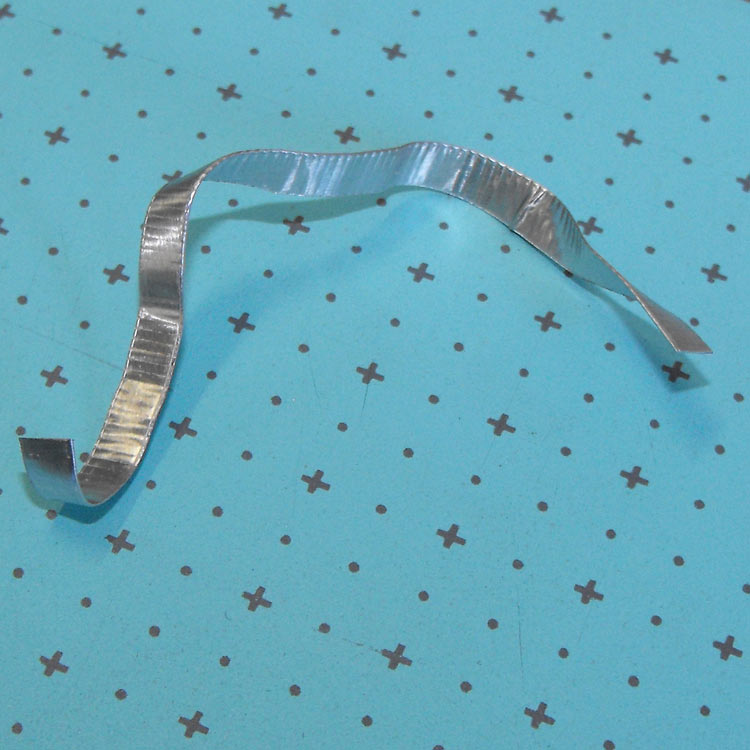
So, we end up with a strip of alloy that looks a bit like a feed belt. The beauty is that it is in alloy and is therefore quite flexible.


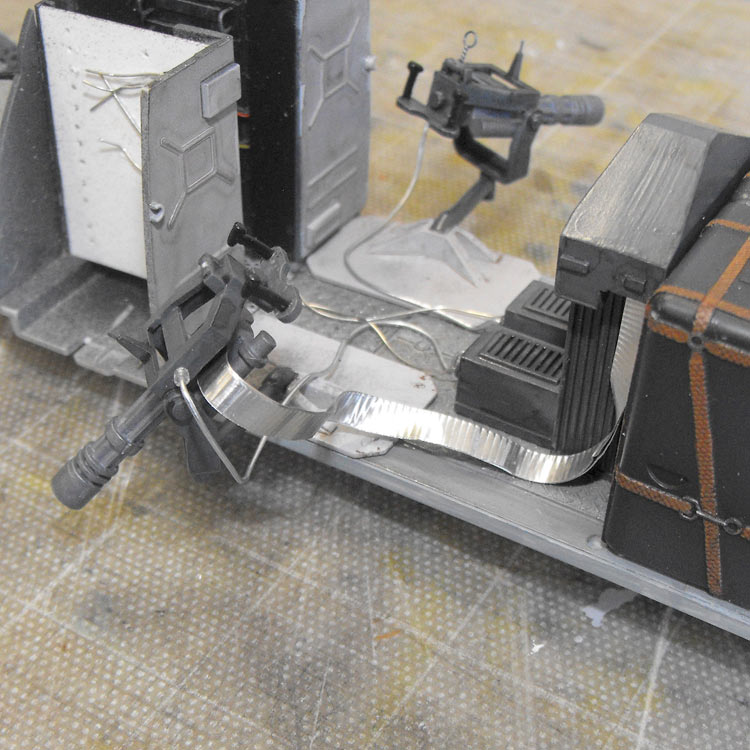
It was then bent with finger pressure into a shape that fits from the ammo bin to the gun.


Like this.
AussieReg
Staff MemberAssociate Editor
AUTOMODELER
#007
_VISITCOMMUNITY
Victoria, Australia
Joined: June 09, 2009
KitMaker: 8,156 posts
AeroScale: 3,756 posts
Posted: Sunday, April 04, 2010 - 06:43 PM UTC
Superb Graeme, a stroke of genius in you !!

This build is coming together really well, it will be a striking addition to the display cabinet.

Cheers, D
MARPAT
_VISITCOMMUNITY
Northern Territory, Australia
Joined: April 14, 2007
KitMaker: 206 posts
AeroScale: 37 posts
Posted: Saturday, April 10, 2010 - 01:26 AM UTC
Looks Awesome...
seb43
_VISITCOMMUNITY
Paris, France
Joined: August 30, 2005
KitMaker: 2,315 posts
AeroScale: 17 posts
Posted: Saturday, April 10, 2010 - 03:23 PM UTC
Really Great Build Graeme
I love the idea of What If.
Congrats
seb
AussieReg
Staff MemberAssociate Editor
AUTOMODELER
#007
_VISITCOMMUNITY
Victoria, Australia
Joined: June 09, 2009
KitMaker: 8,156 posts
AeroScale: 3,756 posts
Posted: Tuesday, August 24, 2010 - 01:46 AM UTC
Graeme, I'm starting to lose sleep, where have you gone on this build ????
grubbyfingers
_VISITCOMMUNITY
Victoria, Australia
Joined: September 07, 2007
KitMaker: 404 posts
AeroScale: 339 posts
Posted: Tuesday, August 24, 2010 - 10:59 AM UTC
Hi Damien, It's back in the box at the moment, I'm focussing on the Diamond Reo build.

Don't fret, though, it'll be back!

Graeme.

AussieReg
Staff MemberAssociate Editor
AUTOMODELER
#007
_VISITCOMMUNITY
Victoria, Australia
Joined: June 09, 2009
KitMaker: 8,156 posts
AeroScale: 3,756 posts
Posted: Friday, January 21, 2011 - 11:21 AM UTC
Ok, I need to find an emoticon with a grumpy face, folded arms and tapping its foot in frustration !!

WHERE ARE YOU GRUBBBBBYYYYYYyyyyyyyy..............??
grubbyfingers
_VISITCOMMUNITY
Victoria, Australia
Joined: September 07, 2007
KitMaker: 404 posts
AeroScale: 339 posts
Posted: Friday, January 21, 2011 - 11:37 AM UTC
Hi Damien,

It's still in the box. I'll bring it out again sometime!

So many models, so little time!!!

Grubby.
FlyboyShane
_VISITCOMMUNITY
Cape Province, South Africa
Joined: April 15, 2011
KitMaker: 13 posts
AeroScale: 8 posts
Posted: Saturday, April 23, 2011 - 03:46 AM UTC
Hi Grubby
Looks like an awesome build! I like the large scales & really like what i see what you have done with this Hunchback from hell! Would love to see some more of your work on this machine. I hope to get me the same kit & do it some justice! Hope to see some more on this ASAP!
Buckeye198
_VISITCOMMUNITY
Ohio, United States
Joined: May 02, 2010
KitMaker: 596 posts
AeroScale: 197 posts
Posted: Friday, June 24, 2011 - 07:01 PM UTC
PLEASE post more shots from this build!! You are a mad modeling genius, my friend!
AussieReg
Staff MemberAssociate Editor
AUTOMODELER
#007
_VISITCOMMUNITY
Victoria, Australia
Joined: June 09, 2009
KitMaker: 8,156 posts
AeroScale: 3,756 posts
Posted: Friday, April 27, 2012 - 09:44 PM UTC
 _GOTOTOP