

Awestruck by the detail in the WNW kits, I ordered all four of thr first release and just started the J.1. It's my first plastic kit. I usually build large scale (3 to 7ft) R/C sailing ships.
I'll start with a repost of progress already reported on another site.
Some notes:
Added a small electric motor inside the plastic engine block to spin the prop.
Added a brass axle and main struts to better support the heavy model.
Used brass pins to better support ailerons.
Went over the top with weathering attempt on lower wing surfaces (see pics).
Seems I've way over-highlighted a rib structure along the rivet lines. Now considering whether to strip and repaint before moving on. Will WNW sell just a replacement decal sheet? Or, might I beg spare under-wing crosses for scheme E if someone has unused ones?
Critique much appreciated. I need to learn much as possible on this build before the next ones.
Pics include work completed to date.
http://gallery.kitmaker.net/showgallery.php/cat/25412
Early Aviation
Discuss World War I and the early years of aviation thru 1934.
Discuss World War I and the early years of aviation thru 1934.
Hosted by Jim Starkweather
WNW GB 2009 -10 Junkers J.I Dan

DanLas

Joined: February 22, 2010
KitMaker: 10 posts
AeroScale: 9 posts
Posted: Monday, February 22, 2010 - 04:22 AM UTC

Mgunns
Joined: December 12, 2008
KitMaker: 1,423 posts
AeroScale: 1,319 posts

Posted: Monday, February 22, 2010 - 06:23 AM UTC
 I saw your pics on the "Drome". I like the weathering on the underside of the wings and I like your weathering on the engine. Your interior work is really nice as well. I am in the final throes of the LVG, and this is on my short list to do. At first I thought it was ugly, but it sort of grew on me. Keep posting your progress.
Best
Mark

CaptainA
Joined: May 14, 2007
KitMaker: 3,117 posts
AeroScale: 2,270 posts
Posted: Monday, February 22, 2010 - 07:40 AM UTC
I don't think the weathering is overdone at all. I actually think it could use a few mud splatters above the wheels. It really looks fantastic.


JackFlash
Joined: January 25, 2004
KitMaker: 11,669 posts
AeroScale: 11,011 posts
Posted: Monday, February 22, 2010 - 05:08 PM UTC
Welcome to the GB Dan. Post some images here for goodness sakes.

thegirl

Joined: January 19, 2008
KitMaker: 6,743 posts
AeroScale: 6,151 posts
Posted: Tuesday, February 23, 2010 - 01:16 AM UTC
Hi Dan , welcome to the site and the GB . Nice to see you make your way over here 
Excellent build so far . Been following this on the drome with keen interest !
Like Stephen has said , post some pic's !
Excellent build so far . Been following this on the drome with keen interest !
Like Stephen has said , post some pic's !
DanLas
Joined: February 22, 2010
KitMaker: 10 posts
AeroScale: 9 posts
Posted: Tuesday, February 23, 2010 - 02:40 AM UTC
Thanks for the welcome. I'll get a bit more done and some more pics posted in a couple of weeks. Traveling til then.
Decided to add slight weathering to blend the crosses into the surronding wing undersurface weathering and then move on with the build. The rivet pattern "gridlines" will stay....
May take the MG parts on the road with me. Have PE parts for it. Considering a double gun rig per some referece pics.
Have read many methods for airbrushing camo patterns. Any advice on a favorite method?
Thanks all.

gajouette
Joined: February 01, 2007
KitMaker: 365 posts
AeroScale: 356 posts

Posted: Tuesday, February 23, 2010 - 11:34 AM UTC
Dan,
I too have been following this build over at the Drome.Outstanding project my friend.Your weathering (Not Over Done IMHO)and attention to details is very impressive.I'll be looking forward to the next update welcome to this forum.
Regards,
Gregory Jouette
I too have been following this build over at the Drome.Outstanding project my friend.Your weathering (Not Over Done IMHO)and attention to details is very impressive.I'll be looking forward to the next update welcome to this forum.
Regards,
Gregory Jouette
DanLas
Joined: February 22, 2010
KitMaker: 10 posts
AeroScale: 9 posts
Posted: Wednesday, February 24, 2010 - 06:10 AM UTC
A quick pic of a couple more parts finished before I leave for a week.
The buckle bodies are 0.5mm OD wire insulation, the eyes are twisted 34ga (0.19mm)nichrome wire.
My first prop! ...grain is watercolor - easily washed off (...many times til I got te hang of it). Still can't figure out how to do the prop lamination effect (even after reading the how-to's).
Engine hoods have working hinges added.

RAGIII
Joined: June 19, 2007
KitMaker: 604 posts
AeroScale: 600 posts
Posted: Wednesday, February 24, 2010 - 07:16 AM UTC
Superb work!
RAGIII
RAGIII
DanLas
Joined: February 22, 2010
KitMaker: 10 posts
AeroScale: 9 posts
Posted: Tuesday, March 02, 2010 - 05:02 AM UTC
PE parts for this kit?????
I have the rolled PE mg barrels already, but are there any additional PE or other upgrade parts available for this model?
I tried the Eduard site, but can't get the search function to work at all for some reason.
Any help appreciated.
Thank you,
Dan
RagIII - thank you.
I have the rolled PE mg barrels already, but are there any additional PE or other upgrade parts available for this model?
I tried the Eduard site, but can't get the search function to work at all for some reason.
Any help appreciated.
Thank you,
Dan
RagIII - thank you.
CaptainA
Joined: May 14, 2007
KitMaker: 3,117 posts
AeroScale: 2,270 posts
Posted: Tuesday, March 02, 2010 - 08:54 AM UTC
Eduard has released PE for the SE 5a. I have not heard of anything for the other WNW kits yet.
DanLas
Joined: February 22, 2010
KitMaker: 10 posts
AeroScale: 9 posts
Posted: Monday, March 15, 2010 - 06:39 PM UTC
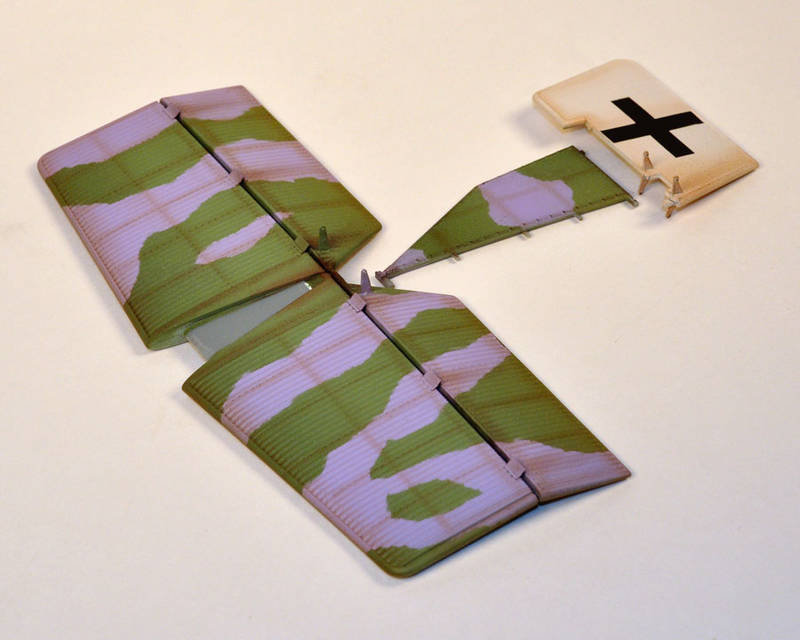
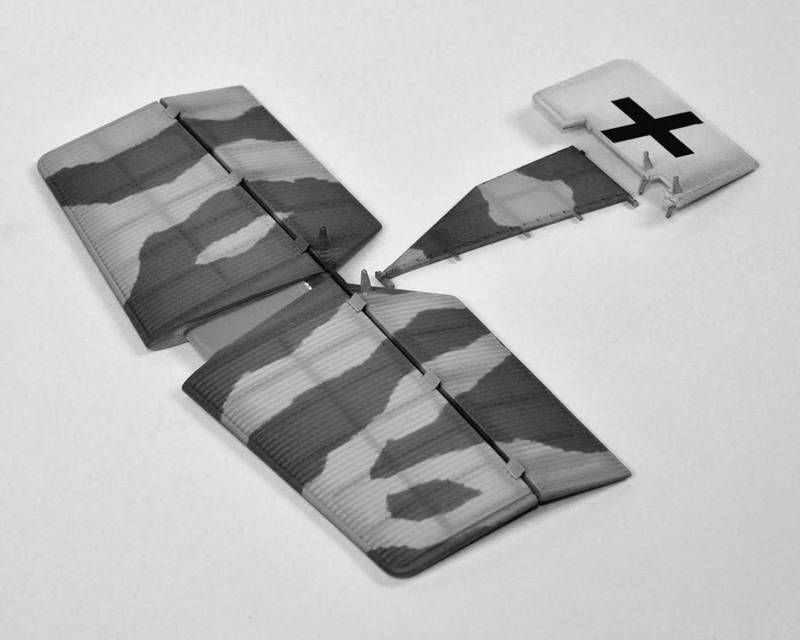
Some progress on exploring color and airbrushing camo pattern.
Challenges...
One - get the colors to look "right" on the model
Two - get the colors in the pics on the computer to look like the model
Three - figure out how best to post pics here...
Here are a few camo pics. Shows my first shot at "mauve". Not the "light blueish pink" that is suppposedly the correct color. Next pics show the much lighter second attempt at "mauve".
In one pic, combined with the weathering, it looks like neon mauve.
But the pic lies... actually seeing the parts, teh weathering and rivet highlight is barely seen. The digital camera seems to really amplify the color differences.
Seems that the desaturated shot should have he green and mauve closer together, bt the contrast seems huge. Maybe the green needs to be lighter...
Camo was done by masking with torn edge blue masking tape, a tip given to me by Mike Taylor. Thank you MrKit!
The camo masking was done with torn edge masking tape ( I used the blue 3M tape), a tip from Mike Taylor. Thank you, Mr. Kit!!!

 [/url]
Challenges...
One - get the colors to look "right" on the model
Two - get the colors in the pics on the computer to look like the model
Three - figure out how best to post pics here...
Here are a few camo pics. Shows my first shot at "mauve". Not the "light blueish pink" that is suppposedly the correct color. Next pics show the much lighter second attempt at "mauve".
In one pic, combined with the weathering, it looks like neon mauve.
But the pic lies... actually seeing the parts, teh weathering and rivet highlight is barely seen. The digital camera seems to really amplify the color differences.
Seems that the desaturated shot should have he green and mauve closer together, bt the contrast seems huge. Maybe the green needs to be lighter...
Camo was done by masking with torn edge blue masking tape, a tip given to me by Mike Taylor. Thank you MrKit!
The camo masking was done with torn edge masking tape ( I used the blue 3M tape), a tip from Mike Taylor. Thank you, Mr. Kit!!!
[/url]
Pulpinator

Joined: March 25, 2007
KitMaker: 78 posts
AeroScale: 53 posts
Posted: Monday, March 15, 2010 - 08:58 PM UTC
Hi!
I like your weathering a lot, looks great!
/Hans
I like your weathering a lot, looks great!
/Hans
Mgunns
Joined: December 12, 2008
KitMaker: 1,423 posts
AeroScale: 1,319 posts
Posted: Tuesday, March 16, 2010 - 12:27 AM UTC
Can't see the pictures.

edoardo

Joined: November 30, 2007
KitMaker: 642 posts
AeroScale: 382 posts
Posted: Tuesday, March 16, 2010 - 01:37 AM UTC
Quoted Text
Can't see the pictures.
me too...
DanLas
Joined: February 22, 2010
KitMaker: 10 posts
AeroScale: 9 posts
Posted: Tuesday, March 16, 2010 - 01:52 AM UTC
Sorry about the pictures. The thumbnails don't show, but if you click on the "X" the pictures will show. I can't figure out why I can't get the picture posting to work right. I'll try again.
Removed by original poster on 03/16/10 - 13:58:30 (GMT).
DanLas
Joined: February 22, 2010
KitMaker: 10 posts
AeroScale: 9 posts
Posted: Tuesday, March 16, 2010 - 02:03 AM UTC
Sorry - I just can't get a pic or even thumbnail to show up. So here's a link to the pics...
http://gallery.kitmaker.net/showphoto.php/photo/335143
http://gallery.kitmaker.net/showphoto.php/photo/335143
Mgunns
Joined: December 12, 2008
KitMaker: 1,423 posts
AeroScale: 1,319 posts
Posted: Tuesday, March 16, 2010 - 03:34 AM UTC
I did see the pictures, so which one are you going to go with. I like the weathering highlighting the rivet detail.
I don't think you can post a link to kitmaker on this site, as it is a kitmaker site. You have to put them in photo bucket. (That's what I ended up doing) I could post them off Aerodrome, but then there were cookies involved. Photo bucket is so much easier.
I am watching your build and progress as this is my next project I am pretty sure. Looks good so far.
edoardo
Joined: November 30, 2007
KitMaker: 642 posts
AeroScale: 382 posts
Posted: Tuesday, March 16, 2010 - 04:12 AM UTC
ok I can see now!!
and what a sight!
You did a very good job on weathering. I like the prop also! very well done!
and what a sight!
You did a very good job on weathering. I like the prop also! very well done!
JackFlash
Joined: January 25, 2004
KitMaker: 11,669 posts
AeroScale: 11,011 posts
Posted: Tuesday, March 16, 2010 - 07:57 AM UTC
Quoted Text
Sorry - I just can't get a pic or even thumbnail to show up. So here's a link to the pics. . .
http://gallery.kitmaker.net/showphoto.php/photo/335143
Links repaired. Enjoy!
gajouette
Joined: February 01, 2007
KitMaker: 365 posts
AeroScale: 356 posts
Posted: Tuesday, March 16, 2010 - 11:27 AM UTC
Dan,
The ol'Junker is looking great.I like the colors,nice and sun faded.Keep up the outstanding work my friend,looking forward to seeing what's next.
Regards,
Gregory Jouette
The ol'Junker is looking great.I like the colors,nice and sun faded.Keep up the outstanding work my friend,looking forward to seeing what's next.
Regards,
Gregory Jouette
DanLas
Joined: February 22, 2010
KitMaker: 10 posts
AeroScale: 9 posts
Posted: Tuesday, March 16, 2010 - 03:47 PM UTC
Ahhh.... pictures! Thank you Stephen.
Thanks all for the kind feedback.
I'm anxious to finish to see how all the individually painted parts come together. After assembly I plan to do an overall very light finish weatheing to tie it all together. I don't think I'll go as far as attempting to distress the aluminum skin (unless of course someone has an idea to throw out as how to do it...)
I'm going with the light mauve and lightened green colors (third pic).
I'm still amazed at how different the pics look vs actual appearance. I think I need to check the contrast and saturation settings on my camera....
thegirl
Joined: January 19, 2008
KitMaker: 6,743 posts
AeroScale: 6,151 posts
Posted: Wednesday, March 17, 2010 - 01:11 AM UTC
Very nice effect with the weathering so far , looks super ! Looking forward on more progress .
Love the prop !
Love the prop !
 |

WEB HOSTING BY


Copyright ©2021 AeroScale and Kitmaker Network, a subsidiary of Silver Star Enterprises
All Rights Reserved. Please read our Conditions of Use and Privacy Policy.
All Rights Reserved. Please read our Conditions of Use and Privacy Policy.