WNW 2009-10 Alb D.V - Rowan
Merlin
 Senior Editor
#017
United Kingdom
Joined: June 11, 2003
KitMaker: 17,582 posts
AeroScale: 12,795 posts
Posted: Sunday, April 18, 2010 - 11:21 PM UTC
Hi there
Time to make a proper start, and the first job is some boring prep-work. The inside of the fuselage halves, and the faces of the formers have quite a few ejector-pin marks:

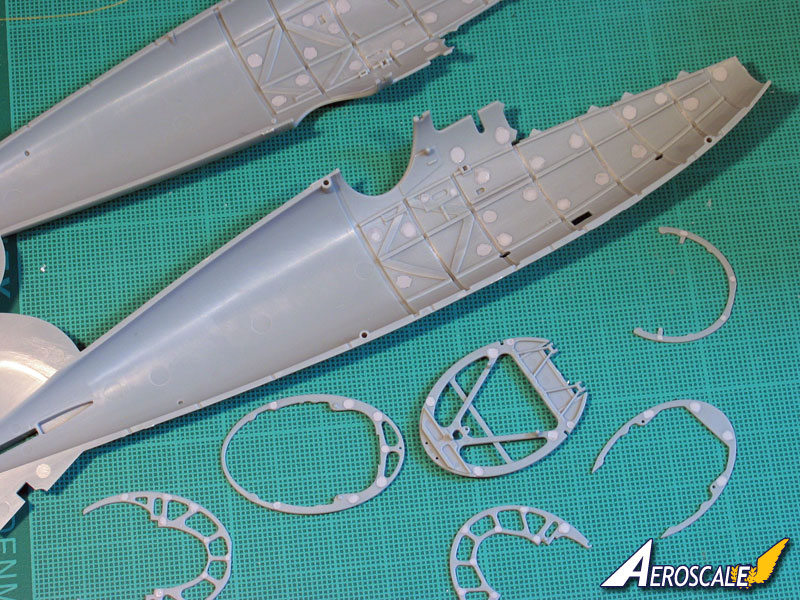
I'm not sure how much the wood-grain finish will disguise them - or maybe even highlight them - so I've filled them with Mr. Surfaces. I can already see in the second pic that I've missed a couple, so it's time for a second pass.

All the best
Rowan

BEWARE OF THE FEW...
As I grow older, I regret to say that a detestable habit of thinking seems to be getting a hold of me. - H. Rider Haggard
Indiana, United States
Joined: May 14, 2007
KitMaker: 3,117 posts
AeroScale: 2,270 posts
Posted: Monday, April 19, 2010 - 12:59 AM UTC
None of the divots behind the pilots seat will show. Welcome to the build.
"Treat 'em Rough", Current Builds--Wingnut Rumpler
I am frequently seen with blood shot eyes from staying up past my nap time to get the right colour scheme on my latest WWI model?
Merlin
Senior Editor #017
United Kingdom
Joined: June 11, 2003
KitMaker: 17,582 posts
AeroScale: 12,795 posts
Posted: Monday, April 19, 2010 - 01:33 AM UTC
Cheers Carl
To be fair to Wingnuts, I think most of the pin marks will be safely out of sight once the fuselage is closed up - but it's better to be safe than sorry. The other thing I'll do at this early stage is to polish the exterior of the fuselage a bit to lessen the slightly textured finish.
All the best
Rowan
BEWARE OF THE FEW...
As I grow older, I regret to say that a detestable habit of thinking seems to be getting a hold of me. - H. Rider Haggard
Alberta, Canada
Joined: January 19, 2008
KitMaker: 6,743 posts
AeroScale: 6,151 posts
Posted: Monday, April 19, 2010 - 03:20 AM UTC
Nice to see you part of the GB Rowan and look forward to your project

England - South East, United Kingdom
Joined: November 06, 2005
KitMaker: 1,667 posts
AeroScale: 1,551 posts
Posted: Monday, April 19, 2010 - 03:43 AM UTC
Rowan reference the ejector pin marks the only ones that really show are on the cockpit sides, the inner faces of the upper engine bay & the main former with the gun mounts.(the aggravating beggers between said mounts) but that said a lot of those are hidden if you are building her cowls on.
Looking at your attention to things so far I see great things ahead.
Welcome to the WNW GB, NOW get on with it
cheers Keith
Still can't cure the AMS even with sausage finger implants & olde eyes.
Merlin
Senior Editor #017
United Kingdom
Joined: June 11, 2003
KitMaker: 17,582 posts
AeroScale: 12,795 posts
Posted: Monday, April 19, 2010 - 04:20 AM UTC
Cheers Terri and Keith
Yes, the awkward marks on the main former were the ones I missed in the first pass - they're duly filled now.
All the best
Rowan
BEWARE OF THE FEW...
As I grow older, I regret to say that a detestable habit of thinking seems to be getting a hold of me. - H. Rider Haggard
Merlin
Senior Editor #017
United Kingdom
Joined: June 11, 2003
KitMaker: 17,582 posts
AeroScale: 12,795 posts
Posted: Thursday, April 22, 2010 - 09:24 AM UTC
Hi again
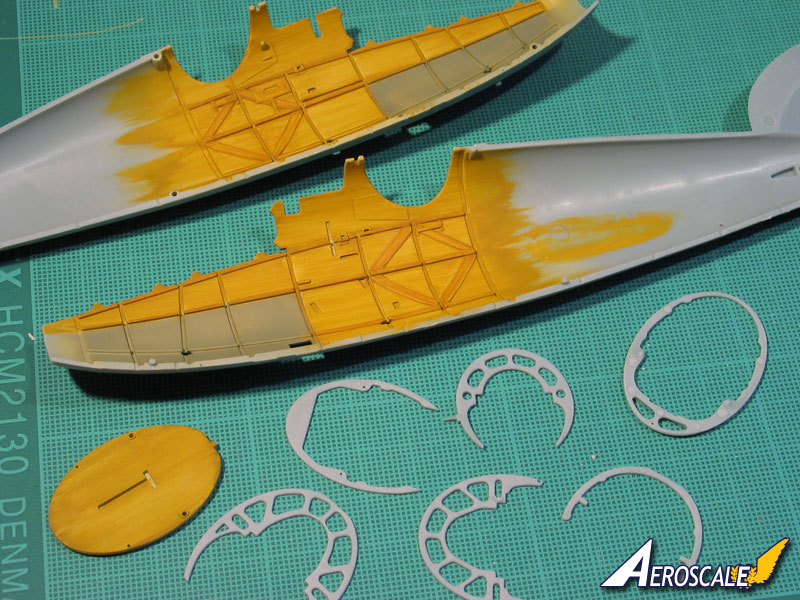
I've made a start on painting the interior. There's obviously a long way to go, but I've got the basics of the wood finish done and I've used WEM RLM 63 Colourcoat enamel (in effect, RLM 02) for the grey-green.

When I assembled the fuel tank I found a prominent seam and mould line. Considering the filler caps aren't very detailed compared with photos, and the seams were awkward to clean up, I thought it was just as simple to drill them out to be replaced later as to work around them:

All the best
Rowan
BEWARE OF THE FEW...
As I grow older, I regret to say that a detestable habit of thinking seems to be getting a hold of me. - H. Rider Haggard
England - South East, United Kingdom
Joined: November 06, 2005
KitMaker: 1,667 posts
AeroScale: 1,551 posts
Posted: Thursday, April 22, 2010 - 09:46 AM UTC
Nice
Ref the tank Rowan, note that both the end filler cap and the larger round projection are sleeved through the reserve tank to the main tank below, a nit pick I know but if you are going to the trouble of detailing them up you may as well go all the way .
Lovely work though so far I have to say.
Keith
Still can't cure the AMS even with sausage finger implants & olde eyes.
Merlin
Senior Editor #017
United Kingdom
Joined: June 11, 2003
KitMaker: 17,582 posts
AeroScale: 12,795 posts
Posted: Thursday, April 22, 2010 - 10:00 AM UTC
Cheer Keith
You're quite right - I hadn't picked up on the fact that the pipes go right through! I know no-one will ever see, but it's an added excuse for drilling holes!

All the best
Rowan
BEWARE OF THE FEW...
As I grow older, I regret to say that a detestable habit of thinking seems to be getting a hold of me. - H. Rider Haggard
Merlin
Senior Editor #017
United Kingdom
Joined: June 11, 2003
KitMaker: 17,582 posts
AeroScale: 12,795 posts
Posted: Saturday, May 01, 2010 - 04:35 AM UTC
Hi there
A pic just to show I am pottering along with the D.V between other projects
:
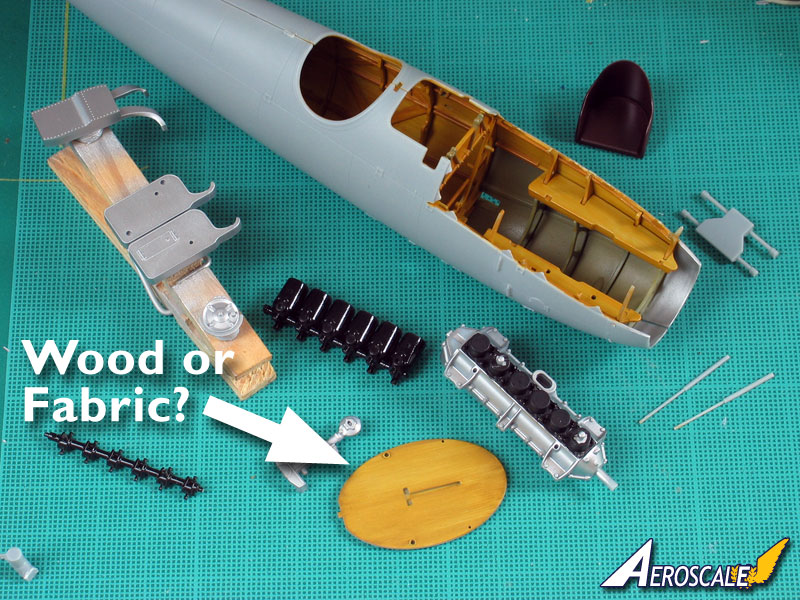
As you can see, I have a question regarding the screen behind the pilot's seat: was it wood or fabric? Wingnut's instructions say the former, while the TVAL D.Va has fabric (which seems more logical to allow access to the rear fusealage interior). Does anyone know which is correct for the original - or maybe it's both, depending on where and when the a/c was built?
Also, another question based on looking at the TVAL pics - should the pilots seat have a quilted cushion?
All the best
Rowan
BEWARE OF THE FEW...
As I grow older, I regret to say that a detestable habit of thinking seems to be getting a hold of me. - H. Rider Haggard
Colorado, United States
Joined: January 25, 2004
KitMaker: 11,669 posts
AeroScale: 11,011 posts
Posted: Saturday, May 01, 2010 - 06:22 AM UTC
Fabric in most cases. Wood when fabric was short and needed for the flying surfaces. Note the eliptical cut out in the bottom area.


"Albatros D.Va 5253/17 was flown by Ltn. Hans Sakowsky of Jasta 14. He was brought down and made a POW on 13 Nov.1917 in this machine by anti-aircraft fire. In the ensuing landing he wiped off its landing gear in a "pancake landing." It was given the British capture number G.90 it was repaired & displayed with other captured aircraft in the 'Agricultural Hall' in Islington. All of which had half of their coverings removed to display internal structures to public view for the price of 1 penny. Proceeds went to RAF hospital Fund."
Click here for more.Here is a build up of the Eduard PE for their 80xx series in 1:48.

". . .The most important thing is to know why you build and then get the most that you can out of building." via D.D.
Merlin
Senior Editor #017
United Kingdom
Joined: June 11, 2003
KitMaker: 17,582 posts
AeroScale: 12,795 posts
Posted: Saturday, May 01, 2010 - 07:02 AM UTC
Hi Stephen
Many thanks. I'll go for fabric if it was more common.
All the best
Rowan
BEWARE OF THE FEW...
As I grow older, I regret to say that a detestable habit of thinking seems to be getting a hold of me. - H. Rider Haggard
England - South East, United Kingdom
Joined: November 06, 2005
KitMaker: 1,667 posts
AeroScale: 1,551 posts
Posted: Saturday, May 01, 2010 - 07:22 AM UTC
Ref the cushion, All the pics I have seen....few that they are have shown a buttoned cushion and it seems the general concensus in other builds..non WNW to show buttoned so I buttoned mine.
Slow but steady progress....
Keith
Still can't cure the AMS even with sausage finger implants & olde eyes.
Colorado, United States
Joined: January 25, 2004
KitMaker: 11,669 posts
AeroScale: 11,011 posts
Posted: Saturday, May 01, 2010 - 07:42 AM UTC
Greetings Keith,
In reference to the seat cushion. Starting in early 1918 the seat cushion was usually replaced with a Heineke parachute pack.
". . .The most important thing is to know why you build and then get the most that you can out of building." via D.D.
Merlin
Senior Editor #017
United Kingdom
Joined: June 11, 2003
KitMaker: 17,582 posts
AeroScale: 12,795 posts
Posted: Saturday, May 01, 2010 - 07:47 AM UTC
Thanks again Keith and Stephen
I'll be doing my D.V as Ottomar Hagenmüller's 1917 a/c, so I guess I'd better dig out the Milliput...
All the best
Rowan
BEWARE OF THE FEW...
As I grow older, I regret to say that a detestable habit of thinking seems to be getting a hold of me. - H. Rider Haggard
Colorado, United States
Joined: January 25, 2004
KitMaker: 11,669 posts
AeroScale: 11,011 posts
Posted: Saturday, May 01, 2010 - 08:01 AM UTC
". . .The most important thing is to know why you build and then get the most that you can out of building." via D.D.
Merlin
Senior Editor #017
United Kingdom
Joined: June 11, 2003
KitMaker: 17,582 posts
AeroScale: 12,795 posts
Posted: Saturday, May 01, 2010 - 08:05 AM UTC
Hi again
Perfect! Thanks Stephen.
By the looks of it, I didn't get too bad a colour for the main part of the seat (totally by accident, I hasten to add!
) - I used WEM's Colourcoat WW2 French "Chocolat". It really does need a couple of seams added though...
All the best
Rowan
BEWARE OF THE FEW...
As I grow older, I regret to say that a detestable habit of thinking seems to be getting a hold of me. - H. Rider Haggard
England - South East, United Kingdom
Joined: November 06, 2005
KitMaker: 1,667 posts
AeroScale: 1,551 posts
Posted: Saturday, May 01, 2010 - 08:12 PM UTC
Nice pics Stephen, these are the ones I used from an earlier post when I did my first Albi.
Rowan, all I diid was cut out arouns the cushion and seperate the back from the base and detailed the plastic. I added the seams from stretched sprue and strip around the edge of the cushion.
K
Still can't cure the AMS even with sausage finger implants & olde eyes.
Alberta, Canada
Joined: January 19, 2008
KitMaker: 6,743 posts
AeroScale: 6,151 posts
Posted: Sunday, May 02, 2010 - 02:51 AM UTC
Nice job on the wood grainning Rowan !


