_GOTOBOTTOM
Modern (1975-today): USA
Modern aircraft of the United States.
Post shading info
Red4
_VISITCOMMUNITY
California, United States
Joined: April 01, 2002
KitMaker: 4,287 posts
AeroScale: 1,164 posts
Posted: Friday, May 14, 2010 - 07:09 PM UTC
Hello all. Recently while working on my Trumpeter SU-24 I was asked to relay how I did my post shading. I decided I would do a SBS article how I do it. My test subject is this..


The old Monogram 1/72 F-105G. The landing gear were smashed so I built it wheels up and will place it on a display base mounted on a clear acrylic rod.
At this point all of the assembly minus the weapons and nose cone have been completed.
The kit has been primered as well. That is all for this installment, I will pick up tomorrow after I have laid in the basic colors to the plane. I will shoot pics as I procede. Thanks for watching and following along. "Q"
Blueheeler
_VISITCOMMUNITY
New South Wales, Australia
Joined: March 18, 2008
KitMaker: 347 posts
AeroScale: 223 posts
Posted: Friday, May 14, 2010 - 10:06 PM UTC
Looking forward to this "Q". Am about to try and try it for the first time on a B-17 for the bombers campaign so would be nice to see it should be done!
Keeperofsouls2099
_VISITCOMMUNITY
Florida, United States
Joined: January 14, 2009
KitMaker: 2,798 posts
AeroScale: 2,443 posts
Posted: Saturday, May 15, 2010 - 06:59 AM UTC
Thanks Q this will be interesting to watch


Build On,
Justin
Red4
_VISITCOMMUNITY
California, United States
Joined: April 01, 2002
KitMaker: 4,287 posts
AeroScale: 1,164 posts
Posted: Saturday, May 15, 2010 - 05:18 PM UTC
I got the base colors painted this evening and the first round of post shading laid in. I decided to paint only one side to better illustrate things. My paint of choice for post shading is Humbrol Flat Black. I prefer Humbrol as the pigment is extremely fine and is less prone to clog my airbrush. It thins very well with lacquer thinner which aides in a nice even pattern when spraying. In my initial post I listed my thinner to paint ratio as about 9:1
Don't take this as exact, as I measure things using my
Mk/1-0 eyeball. I have just grown used to knowing how to read my paint, but the 9:1 is about right.
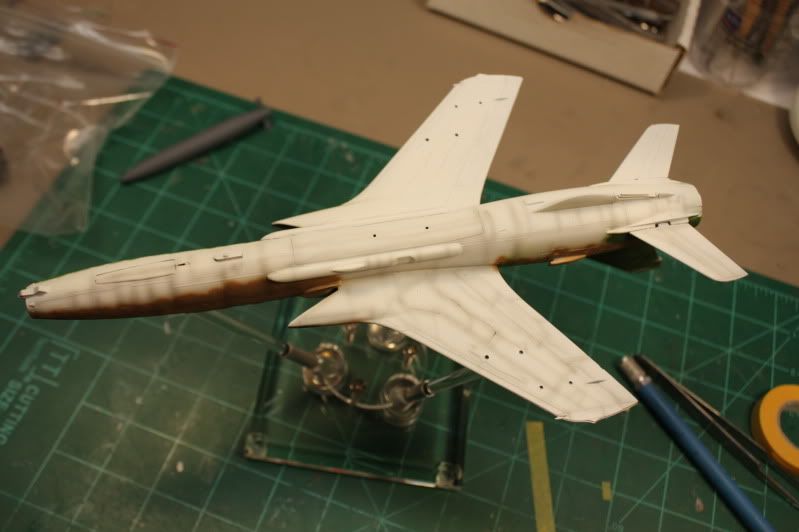
My shading color was mixed and ready to go so I gave it a few test squirts on a white 3x5 card to test the mixture. Everything was ready. I began at the front of the plane and made an initial pass on all of the panel lines that run top to bottom. Keep in mind this is an initial pass to see how the flow was going to look. A minor adjustment to neck the needle down a little finer and I was on my way. I continue making passes on all panel lines. This usually amounts to 3 or 4 passes, which might seem like a lot, but once I get into a flow, things move along quickly. After about pass #3 I could start to see a definite darkening. I intentionally made these darker so they would stand out in the photos. I can go back over them with the base colors to tone them down. The difference is really noticeable on the belly of the aircraft where it is flat white. I got a little over zealous at the back of the bomb bay and had a stray stripe get laid in... not a big deal as I can go back and cover this or simply work it into the rest of the weathering.
Once all of the post shading is laid in, I will go back over the entire plane and lighten some panels to represent faded panels. Most of these will be on the top of the spine, and wings as they catch the majority of the sunlight.
While this seems like a lot to do, it goes really quick once you get the hang of it. The key is to practice and make sure your paint is extremely thin. Too thick and you will be painting and not shading. Hope this was helpful. If you have any questions, feel free to PM me and I'll do my best to answer your questions. Thanks, "Q"
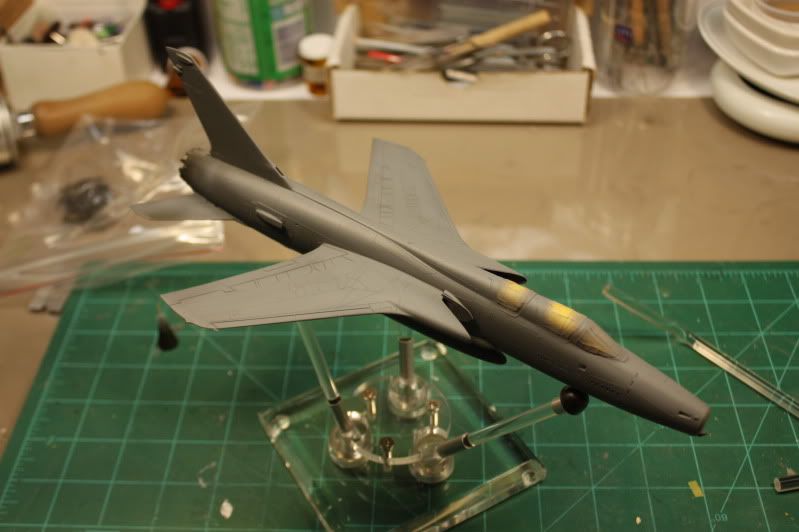
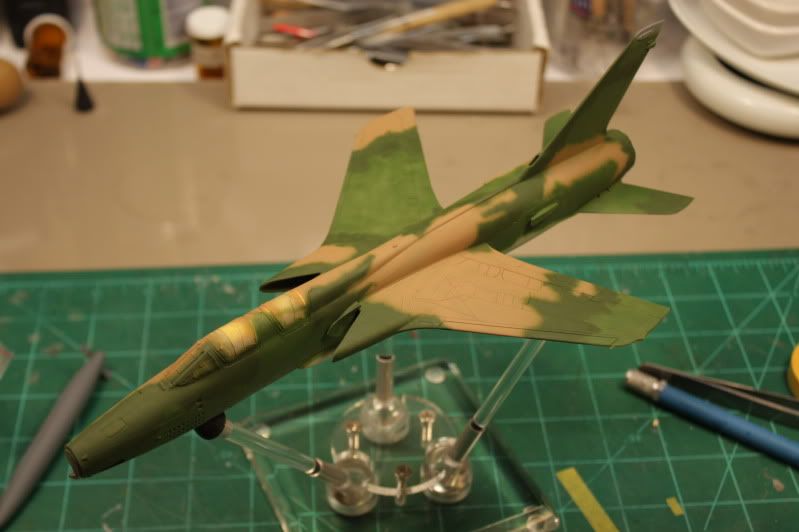
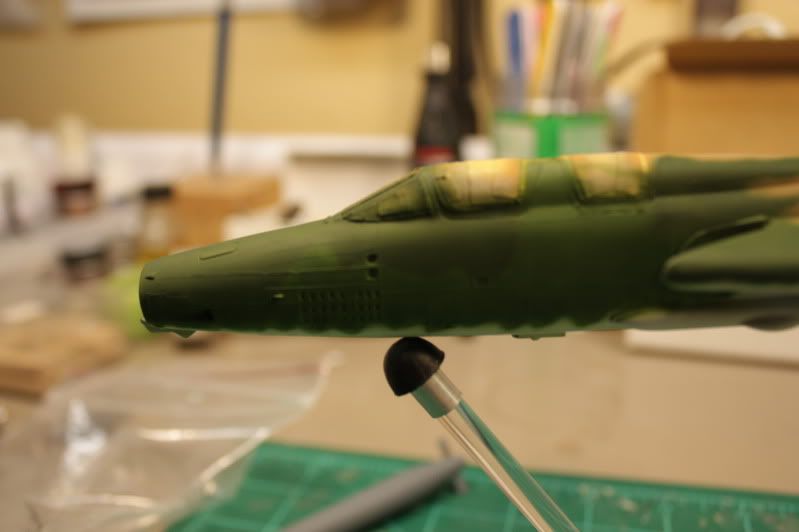
Inital colors added

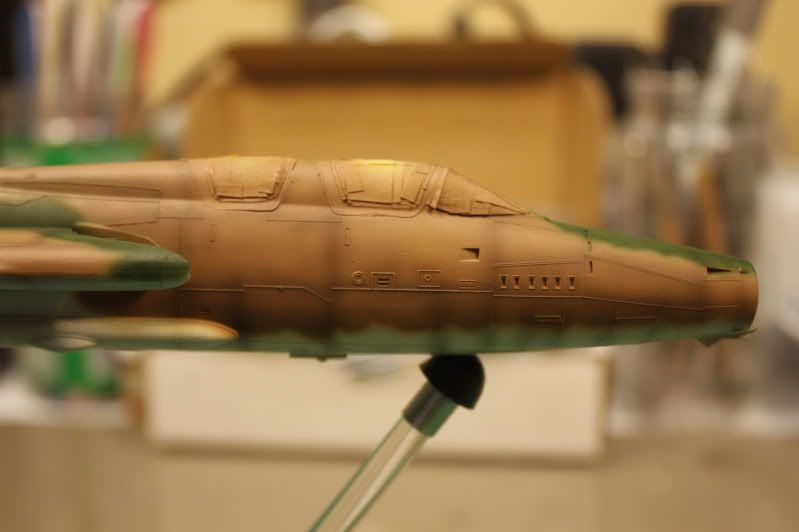
Shading is beginning to be more apparent

A little darker yet...

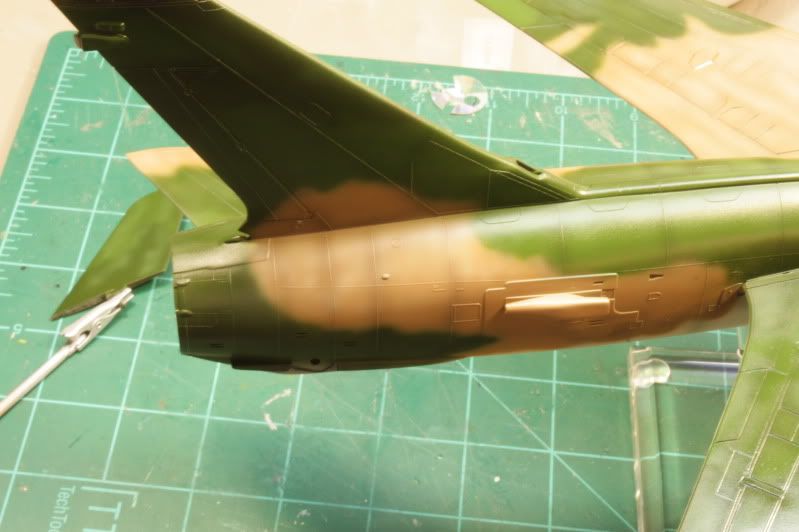
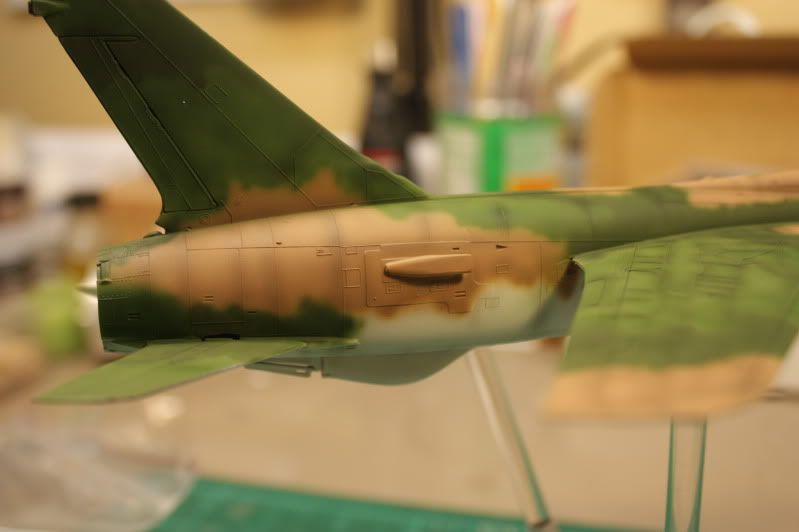
Some paint fading back here will add to the effect of engine heat...


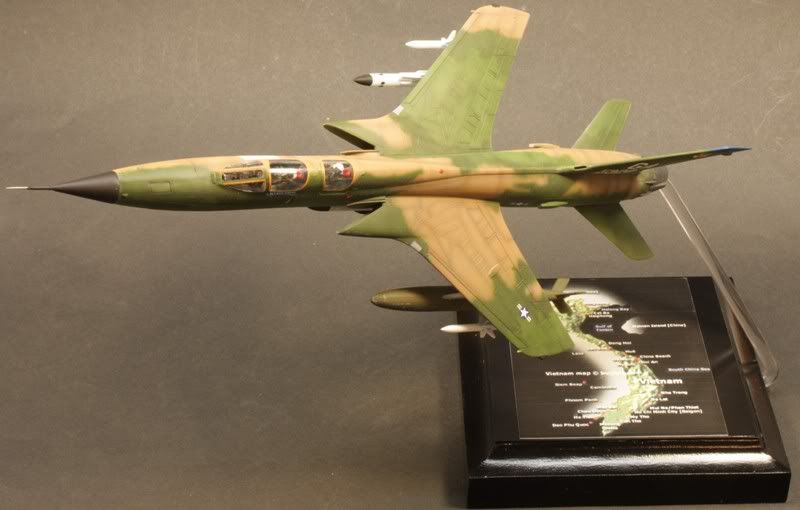
A little hard to see, but this side has been left alone. The greens kinda blend together a bit...

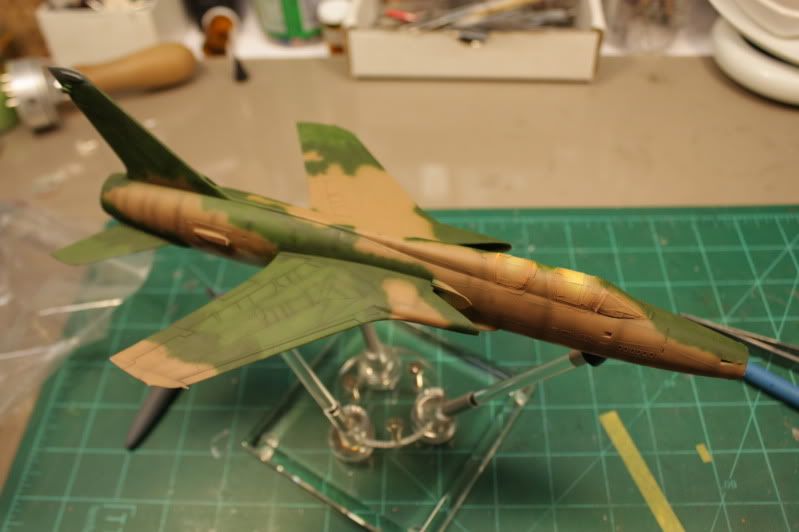
A stark difference between this and the other wing...Once I shade and fade this, the colors will really pop.

The belly really shows where all the panel lines are... Additinal weathering will really bring this area out...
AussieReg
Staff MemberAssociate Editor
AUTOMODELER
#007
_VISITCOMMUNITY
Victoria, Australia
Joined: June 09, 2009
KitMaker: 8,156 posts
AeroScale: 3,756 posts
Posted: Saturday, May 15, 2010 - 07:46 PM UTC
That's a really neat and informative post Matt, thanks. I will definitely be giving it a try in future.

A couple of quick questions, since you are basically spraying lightly tinted thinner, do you ever have any problems with the base coats "re-activating" ? I note you are using Lacquer Thinner for your post shading, do you use the same solvent for your base camo coats ??

Cheers, D
Red4
_VISITCOMMUNITY
California, United States
Joined: April 01, 2002
KitMaker: 4,287 posts
AeroScale: 1,164 posts
Posted: Sunday, May 16, 2010 - 03:19 AM UTC
Hi Damian,
Thanks for the kudos. I haven't had a problem with the lacquer thinner softening or lifting the paint underlying before, but I try to minimize handling as much as possible as I know it could happen as the lacquer thinner is "hot". The model is usually ready to be handled within about 5 minutes of post shading, most times even less. I also use lacquer thinner to cut/thin all my paints for painting. I have tried other thinners in the past, but have always come back to lacquer thinner. Diosol worked well, but has proven difficult to find over the years. I have friend who uses Xylene/xylol and has good results, but it is entirely too potent for me. It overwhelms my paint booth and I have a 1365-CFM exhasut fan if that is any indication.
Something else to note is that this techique can be used on armor builds as well. This is what I initially started off using it on. It graduated over to my aircraft at some point and have used ever since along with pin washes etc. Can never have too many tools in the tool box to draw on. Thanks again for the kind words.
"Q"
Red4
_VISITCOMMUNITY
California, United States
Joined: April 01, 2002
KitMaker: 4,287 posts
AeroScale: 1,164 posts
Posted: Thursday, May 20, 2010 - 07:53 AM UTC
One other note about post shading using this method... It can be used to geat effect on NMF models, but be really careful as metallics tend to lift really easy. I've learned that subtlety is the key when dealing with metallic finishes and using this post shading...especially when using lacquer thinner as the carrier. One could probably achieve the same or similar result using Tamiya smoke. I have never had good results shooting Tamiya colors though. However, Alclad makes a clear smoke... Will have to experiment with that one to see how it performs.
"Q"
VonCuda
_VISITCOMMUNITY
North Carolina, United States
Joined: November 28, 2005
KitMaker: 2,216 posts
AeroScale: 1,080 posts
Posted: Monday, May 24, 2010 - 06:20 AM UTC
This is exactly the info I was looking for in your SU-24 build. I've always done preshading but know that I know your technique I'm gonna give it a try in the future.
Question: Would Tamiya Smoke, thinned down give a similar effect? I've done that a few times for exhaust stains etc.


Hermon
jaypee
_VISITCOMMUNITY
Scotland, United Kingdom
Joined: February 07, 2008
KitMaker: 1,699 posts
AeroScale: 1,384 posts
Posted: Monday, May 24, 2010 - 06:53 AM UTC
How does lightening work on multi coloured camo like yours?
I've done it on a single colour one and it works great but stuck how to apply to something like this.

Thanks for doing this Matthew.
JP
Red4
_VISITCOMMUNITY
California, United States
Joined: April 01, 2002
KitMaker: 4,287 posts
AeroScale: 1,164 posts
Posted: Tuesday, May 25, 2010 - 04:21 AM UTC

Quoted Text

Would Tamiya Smoke, thinned down give a similar effect? I've done that a few times for exhaust stains etc.


Glad it helped Hermon. I imagine it could, I just never have tried it. Me and Tamiya colors don't get along for some reason... I have ued their clear red, blue, green and yellow effectively though for lights etc.


Quoted Text

How does lightening work on multi coloured camo like yours?


Hi JP,
I just lighten the particular color I am going to shoot and spray just the inner areas of the panel. If there are a lot of colors involved, it can get pretty involved. I have found that I can fake it sometimes using a light to medium gray that has been heavily thinned and get the same effect. Just have to practice to see what will work and what won't.
For lightening the colors I don't use white either, but a light gray. Any light color will work and it doesn't take a lot of it.I try to fade only those panels that would be indirect sunlight a lot. The tops of the wings, elevators and the spine usually. I will hit the rest of the a/c too, but a use a lighter hand here. Hope this helps. "Q"
jaypee
_VISITCOMMUNITY
Scotland, United Kingdom
Joined: February 07, 2008
KitMaker: 1,699 posts
AeroScale: 1,384 posts
Posted: Tuesday, May 25, 2010 - 05:25 AM UTC
I guess on a panel where there is a demarcation it doesn't matter to lighten so much. There is a lot going on visually in those panels so a mist of light grey is probably enough. I'll give it a try. Thanks Matthew you've given me food for thought.
Red4
_VISITCOMMUNITY
California, United States
Joined: April 01, 2002
KitMaker: 4,287 posts
AeroScale: 1,164 posts
Posted: Wednesday, May 26, 2010 - 02:44 AM UTC
Yep. This particular build is now complete. Here is what the fading came out like.

This is another F-105G that I am doing, only in 1/48 scale. You can see the fading more clearly on this set of pics.
Rear of fuselage...

Wings and spine...

I used a single shade of lightened green to fade the two different greens. I just used a lighter touch on some panels than others and it gives the effect of two seperate colors. Thin paint is easiest to work with as you can gradually build up the color to a level that looks good, then move to a different area, and using a lighter touch do the same thing, and achieve a totally different look to it. Hope this helps. "Q"
 _GOTOTOP