California, United States
Joined: April 01, 2002
KitMaker: 4,287 posts
AeroScale: 1,164 posts
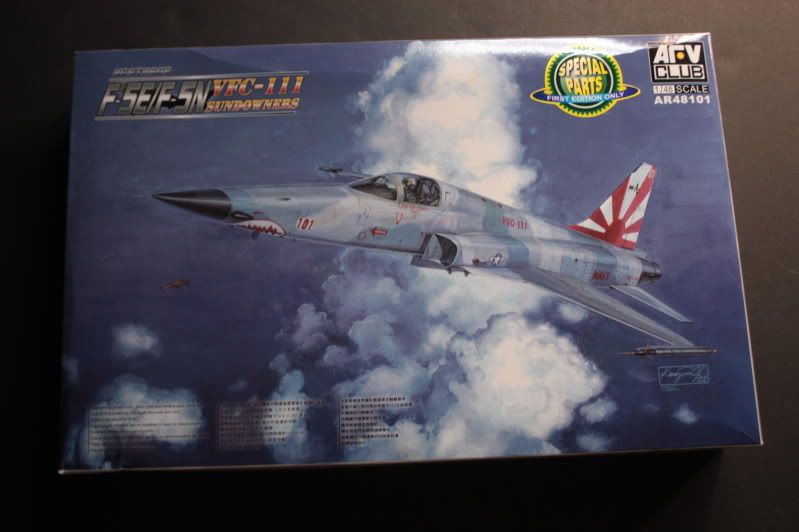
Posted: Thursday, July 15, 2010 - 08:02 AM UTC
"Don't fear the night, fear what hunts at night"
North Carolina, United States
Joined: November 28, 2005
KitMaker: 2,216 posts
AeroScale: 1,080 posts
Posted: Thursday, July 15, 2010 - 01:48 PM UTC
Damn man. Just when I start to get a little bench time again, you go and start another addictive full blown build review. Yeah, I'll be watching this one too.....like I have a choice?

Hermon

"Those who would give up Essential Liberty
to purchase a little Temporary Safety,
deserve neither Liberty nor Safety."
Benjamin Franklin
Germany
Joined: September 07, 2005
KitMaker: 5,609 posts
AeroScale: 5,231 posts
Posted: Thursday, July 15, 2010 - 06:33 PM UTC
Very nice start Matt!
I found the kit very good despite the very modular design (see Blog here). I am looking forward to the recce version, but until then I will follow you build

all the best
Steffen
DULCE ET DECORUM EST PRO HOBBY MORI
California, United States
Joined: April 01, 2002
KitMaker: 4,287 posts
AeroScale: 1,164 posts
Posted: Friday, July 16, 2010 - 04:51 AM UTC
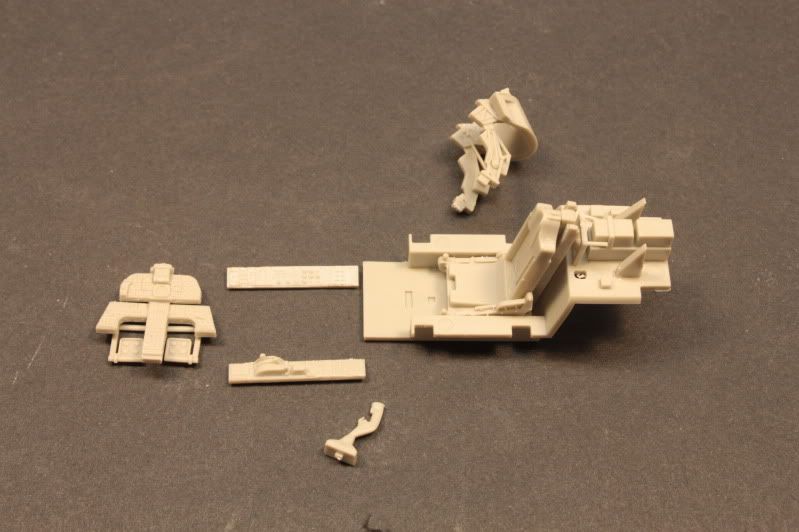
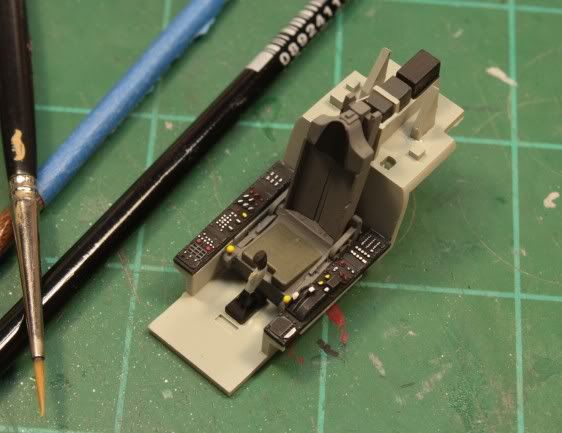
Thanks for the replies guys. Stayed up late last night so I didn't get the early start this morning that I was hoping for, but I got started none the less. Cockpit minus the instrument panel is painted and drying. Waiting for the aircraft gray to dry on the IP before painting it. With the IP painted and installed things should look really good as the detail is really well done and crisp. Painting consisted of Model Master Aircraft Gray for the majority of things with the seat being shot in Floquil Dark Sea Gray for some contrast and the consoles and head rest done with Humbrol #33 Flat Black. The seat cushion and all the knobs/dials were picked out using Vallejo Acrylics. Not alot since last time, but an update just the same. Looking forward to getting some assembly done. More to follow.

Thanks, "Q"
"Don't fear the night, fear what hunts at night"
California, United States
Joined: April 01, 2002
KitMaker: 4,287 posts
AeroScale: 1,164 posts
Posted: Friday, July 16, 2010 - 02:09 PM UTC
Here's the paint and installed instrument panel. Very nicely detailed and shows well under paint. Will be doing more tonight. Stay tuned....Thanks, "Q"

"Don't fear the night, fear what hunts at night"
AussieReg
 Associate Editor
#007
Victoria, Australia
Joined: June 09, 2009
KitMaker: 8,156 posts
AeroScale: 3,756 posts
Posted: Friday, July 16, 2010 - 02:17 PM UTC
Looking great so far Q, this will be another great thread to follow.
Quick question, do you ever have solvent issues using elastic bands ? Do they ever stick or melt ?
Cheers, D
ON the bench
Revell 1/24 '53 Corvette (building as '54)
Revell 1/24 BMW 507 Coupe and Cabrio
Italeri 1/48 Me262 B-1a/U1 Nightfighter
Monogram 1/24 '57 Chevy Nomad
Dragon 1/350 USS Frank Knox DD-742
North Carolina, United States
Joined: November 28, 2005
KitMaker: 2,216 posts
AeroScale: 1,080 posts
Posted: Friday, July 16, 2010 - 03:01 PM UTC
I'm diggin' it. Looks like a nice tight fit in the tub. So be honest Q, are you using some kind of NASA nano-tech stuff to paint those control panels and instrument panel? Outstanding.
Hermon
"Those who would give up Essential Liberty
to purchase a little Temporary Safety,
deserve neither Liberty nor Safety."
Benjamin Franklin
California, United States
Joined: April 01, 2002
KitMaker: 4,287 posts
AeroScale: 1,164 posts
Posted: Friday, July 16, 2010 - 04:13 PM UTC
Quoted Text
Quick question, do you ever have solvent issues using elastic bands ? Do they ever stick or melt ?
Hi Damian, Thanks for the kudos. When I use the bands, I usually wait about 10-15 seconds for the solvent to have evaporated then wrap them. I also try to use them in sections where there isn't any solvent. When I can't, I'll use 3M Blue Painters tape instead. Usually takes some fore thought when I do this. Sometimes I'm left holding the parts with just my fingers until things set up enough. Thanks again for the kudos.
Quoted Text
So be honest Q, are you using some kind of NASA nano-tech stuff to paint those control panels and instrument panel? Outstanding.
lol, no such nano-technology here. Mostly light applications of washes and pin point painting with Vallejo acrylics followed by a light dry brushing using oils. The detail in this kit is so well molded that it makes painting it a breeze. Glad you like it Hermon. "Q"
"Don't fear the night, fear what hunts at night"
Florida, United States
Joined: January 14, 2009
KitMaker: 2,798 posts
AeroScale: 2,443 posts
Posted: Friday, July 16, 2010 - 04:40 PM UTC
Wow love the instrument panel good job
"From time to time, the tree of liberty must be watered with the blood of
tyrants and patriots."
- Thomas Jefferson
IPMS#47611
California, United States
Joined: April 01, 2002
KitMaker: 4,287 posts
AeroScale: 1,164 posts
Posted: Saturday, July 17, 2010 - 01:41 AM UTC
Thanks Justin, much appreciated. I've been following along in the shadows with your Hawkeye build. Looks nice. "Q"
"Don't fear the night, fear what hunts at night"
Texas, United States
Joined: December 27, 2009
KitMaker: 71 posts
AeroScale: 69 posts
Posted: Saturday, July 17, 2010 - 05:12 AM UTC
Hi Q,
Awesome job!
I purchased AFV's sister release to your F-5E (kit number AR48102) at Squadron's open house a month or so ago and was floored by the amount of detail contained therein. Needless to say I was quite happy this magnificent aircraft received the attention she so rightfully deserves. Your build is inspiring me to move it up in the holding pattern.
Brilliant job so far!
Washington, United States
Joined: September 20, 2007
KitMaker: 861 posts
AeroScale: 111 posts
Posted: Saturday, July 17, 2010 - 01:11 PM UTC
Looking good, Q!
I'm a big fan of this airframe, but the new AFV Club kit has not made its way onto my shelves as of yet. Seeing the cockpit go together definitely makes me want to get my hands on one.
-YL
California, United States
Joined: April 01, 2002
KitMaker: 4,287 posts
AeroScale: 1,164 posts
Posted: Saturday, July 17, 2010 - 02:14 PM UTC
Thanks guys. The fit of the rest of the kit is equally good. I have only had to use a small amount of Mr. Surfacer on a couple small seams. Pics to follow on that. I got about 90% of the kit assembled today. I will be painting soon. Just need to get the remaining parts cleaned up and broken down into sub assemblies for painting. Pics to follow soon. I'm in the middle of casting some resin parts that are needed for something else.....like yesterday.
Back soon. "Q"
"Don't fear the night, fear what hunts at night"
California, United States
Joined: April 01, 2002
KitMaker: 4,287 posts
AeroScale: 1,164 posts
Posted: Sunday, July 18, 2010 - 05:04 AM UTC
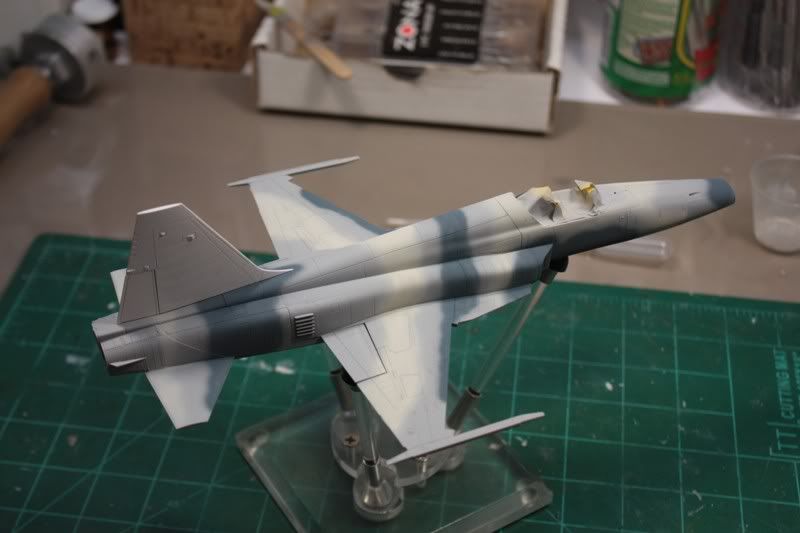
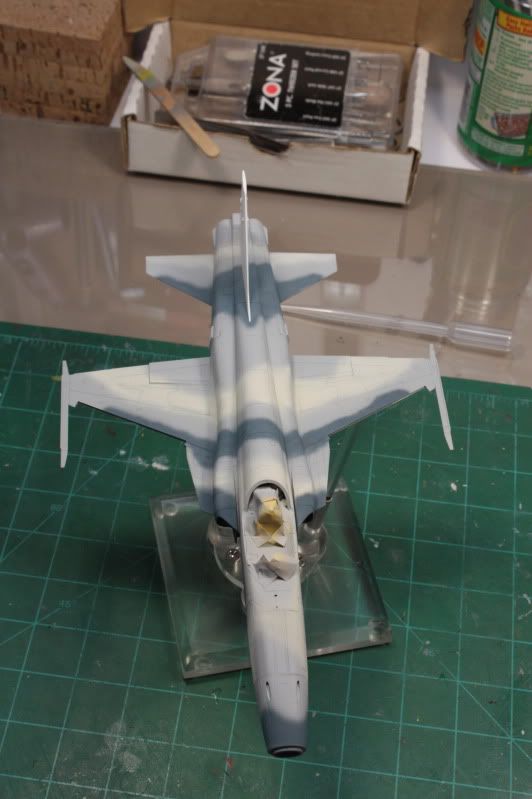
Well here is where it sits as of yeesterday. Still a ways to go yet, but not too much further. Looking forward to getting some paint on this one. More to follow soon.."Q"
Seam at rear most part of fuselage. Easy clean up with some Mr. Surfacer 500...
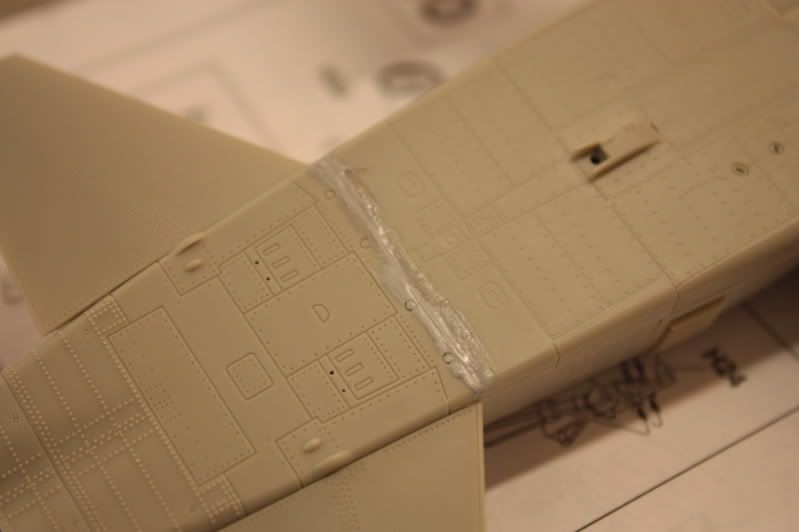
Everything tied together...tail is just sitting on there. Will get painted by itself, decaled then installed..

"Don't fear the night, fear what hunts at night"
California, United States
Joined: April 01, 2002
KitMaker: 4,287 posts
AeroScale: 1,164 posts
Posted: Thursday, July 22, 2010 - 11:06 AM UTC
"Don't fear the night, fear what hunts at night"
Florida, United States
Joined: June 03, 2003
KitMaker: 1,095 posts
AeroScale: 52 posts
Posted: Thursday, July 22, 2010 - 11:24 AM UTC
that looks awesome...have one sitting on my self as well, but alas, too many other projects that need finished first!!
ill have to live vicariously through you...
Andy
Fideli Certa Merces -- "to the faithful there is certain reward"
California, United States
Joined: April 01, 2002
KitMaker: 4,287 posts
AeroScale: 1,164 posts
Posted: Thursday, July 22, 2010 - 11:27 AM UTC
Thanks Andy. It really is a nice kit in every sense of the word. No major complaints from me. Thanks again for the kudos. "Q"
"Don't fear the night, fear what hunts at night"
#439
Washington, United States
Joined: November 05, 2005
KitMaker: 4,950 posts
AeroScale: 3,192 posts
Posted: Thursday, July 22, 2010 - 11:32 AM UTC
Looks Good. If I wasn't so far behind already, I'd consider poping out one of the F-5's in the stash myself.
Hanger Queens in Waiting:
Monogram 1/72 F8F-1
Corsair the Sky Pirate - 1/72 Ace A-7D
Century Series - Airfix 1/72 F-105G
Anti Shipping - Academy 1/72 PBJ-1D
Academy 1/72 F-84E
Florida, United States
Joined: January 14, 2009
KitMaker: 2,798 posts
AeroScale: 2,443 posts
Posted: Thursday, July 22, 2010 - 01:14 PM UTC
very impressive camo scheme good work
"From time to time, the tree of liberty must be watered with the blood of
tyrants and patriots."
- Thomas Jefferson
IPMS#47611
England - South East, United Kingdom
Joined: September 15, 2004
KitMaker: 4,728 posts
AeroScale: 1,351 posts
Posted: Thursday, July 22, 2010 - 02:50 PM UTC
Nice work Q
Makes me want to dig out my old Italeri F-5 and Wolfpack 'N' conversion.
On the bench...
Italeri A129 Mangusta
British Bulldog Spitfire theme build
California, United States
Joined: April 01, 2002
KitMaker: 4,287 posts
AeroScale: 1,164 posts
Posted: Thursday, July 22, 2010 - 03:36 PM UTC
"Don't fear the night, fear what hunts at night"
Washington, United States
Joined: September 20, 2007
KitMaker: 861 posts
AeroScale: 111 posts
Posted: Thursday, July 22, 2010 - 06:50 PM UTC
Looks great, Q. I LOVE the camo.
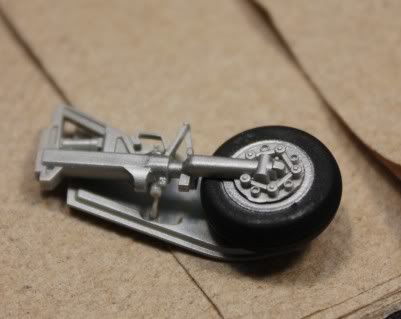
As for the landing gear, don't sweat it. I know of at least 2 others who did the exact same (upside down) thing.
-YL
Germany
Joined: September 07, 2005
KitMaker: 5,609 posts
AeroScale: 5,231 posts
Posted: Thursday, July 22, 2010 - 08:30 PM UTC
Cheers Matt
that was the only fiddly bit on my model too. I first attached these two to the u/c cover:

let it dry thoroughly and then together with the 3rd to the u/c (which I had already fixed to the a/c). BTW here is
my threadAnother nitpick: Did you forget to clean up teh mold seam on the u/c leg?
all the best
Steffen
DULCE ET DECORUM EST PRO HOBBY MORI
Taipei, Taiwan / 台灣
Joined: March 31, 2010
KitMaker: 29 posts
AeroScale: 28 posts
Posted: Friday, July 23, 2010 - 01:58 AM UTC
Another F-5 is issued.

#439
Washington, United States
Joined: November 05, 2005
KitMaker: 4,950 posts
AeroScale: 3,192 posts
Posted: Friday, July 23, 2010 - 10:14 AM UTC
Looks good Matt!
Quoted Text
Another nitpick: Did you forget to clean up teh mold seam on the u/c leg
Oh well, sometimes the gods have feet of clay..

Hanger Queens in Waiting:
Monogram 1/72 F8F-1
Corsair the Sky Pirate - 1/72 Ace A-7D
Century Series - Airfix 1/72 F-105G
Anti Shipping - Academy 1/72 PBJ-1D
Academy 1/72 F-84E