_GOTOBOTTOM
Pre-Flight Check
Constructive critique of your finished or in-progress photos.
Curtiss Hawk 75A, Special Hobby 1/32
CanDid
_VISITCOMMUNITY
Stockholm, Sweden
Joined: May 03, 2010
KitMaker: 123 posts
AeroScale: 98 posts
Posted: Thursday, September 09, 2010 - 09:53 AM UTC
Hallo

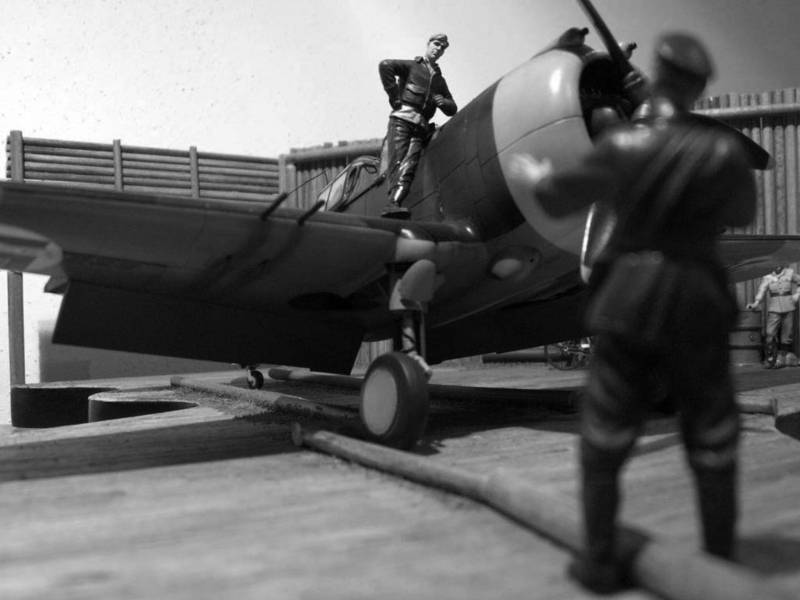
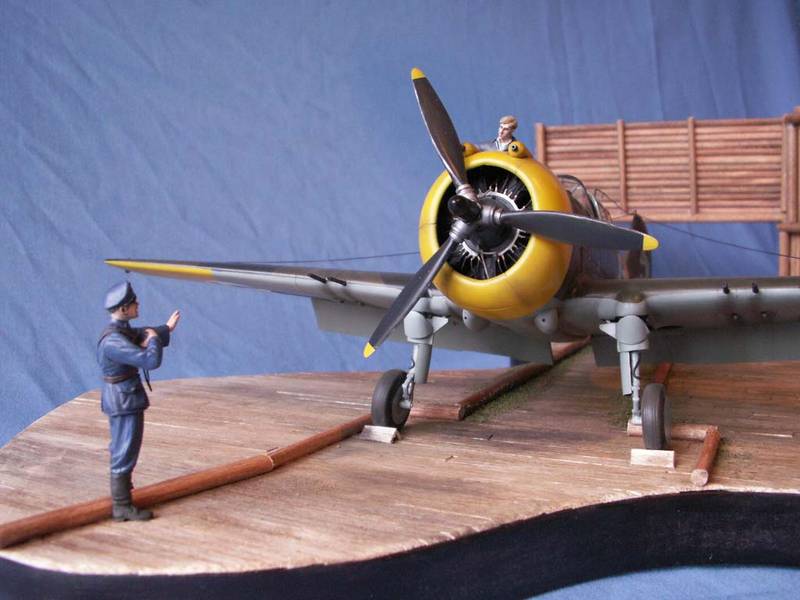
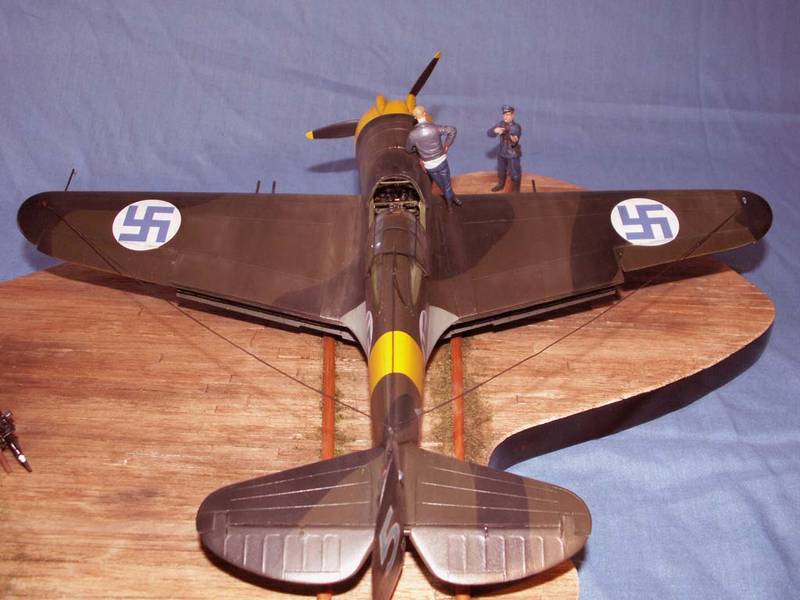
My latest build just finished.


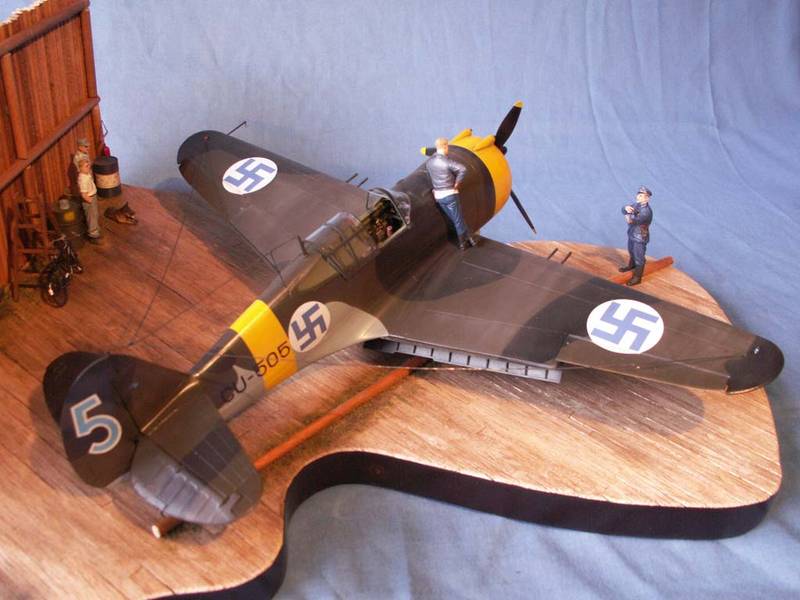
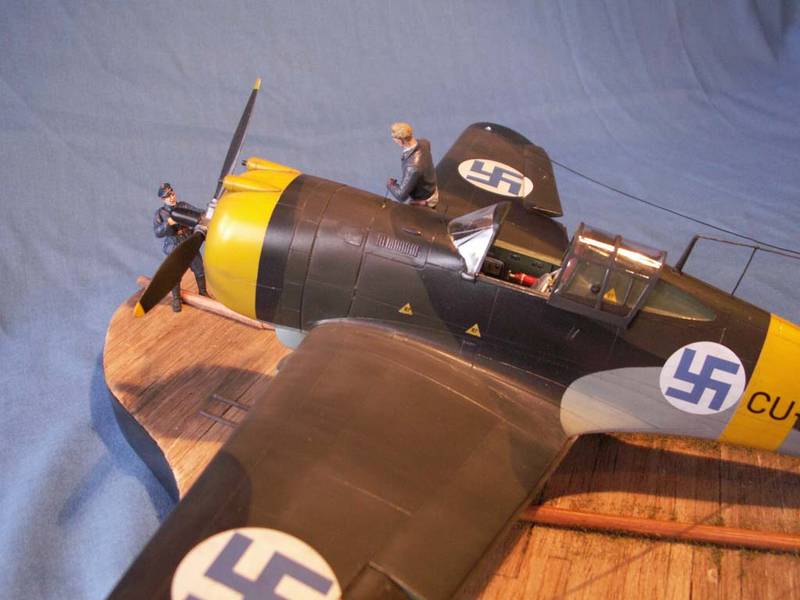
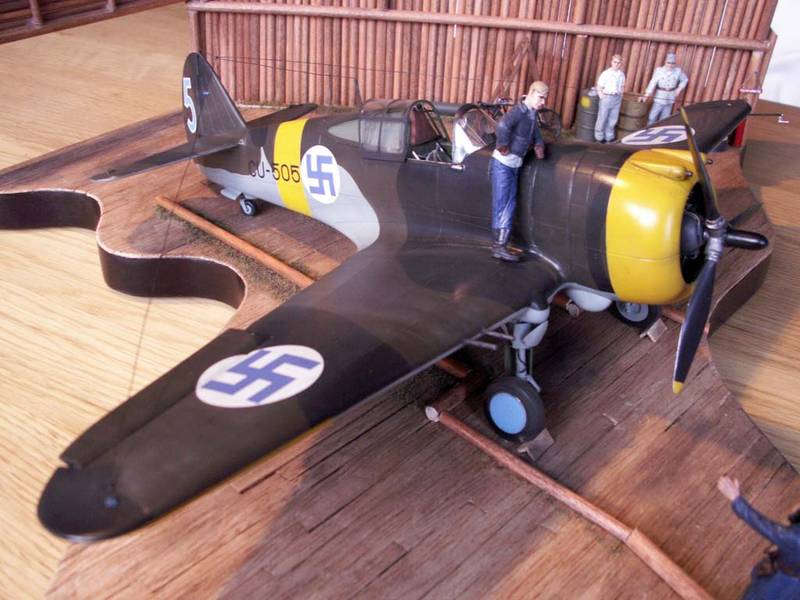
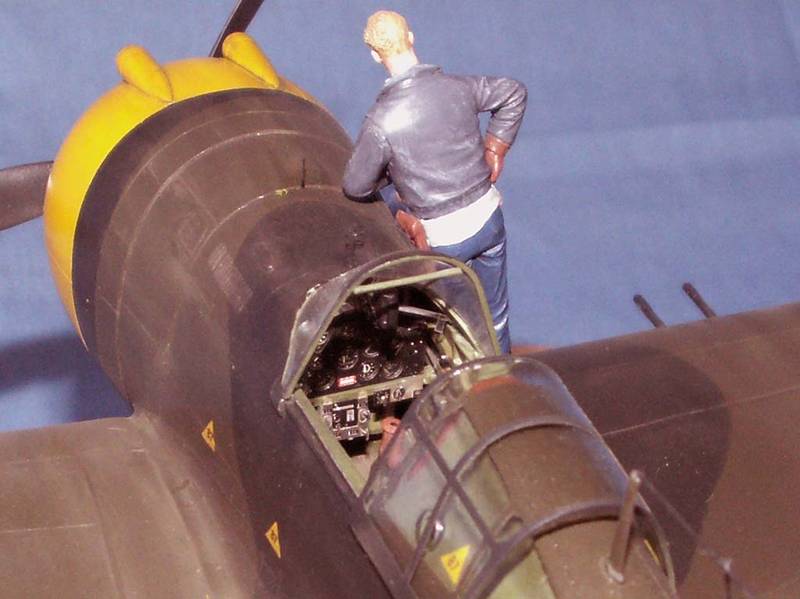
It is Special Hobby's 'Sussu over Finland' added with flaps from Eduard and some scratch built parts.


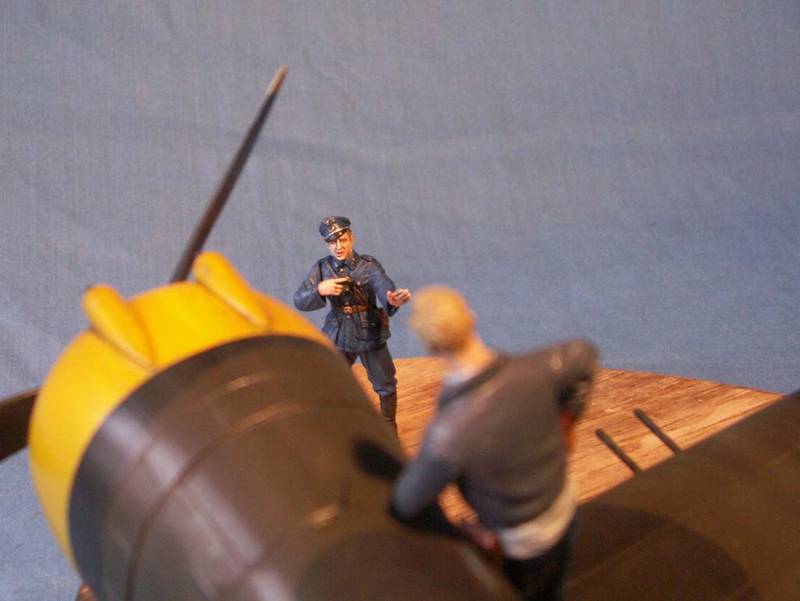
The pilot is from Legend Productions and the photographer is from Warrior. All figures has Hornet heads.


The decals is a mix from Techmod and FCM and Hasegawa.


The mechanics is YS Castings and Tamiya and the rest of the stuff is mainly from Tamiya and MiG.


Please comment
md72
#439
_VISITCOMMUNITY
Washington, United States
Joined: November 05, 2005
KitMaker: 4,950 posts
AeroScale: 3,192 posts
Posted: Thursday, September 09, 2010 - 10:13 AM UTC
looks good
Emeritus
_VISITCOMMUNITY
Uusimaa, Finland
Joined: March 30, 2004
KitMaker: 2,845 posts
AeroScale: 1,564 posts
Posted: Friday, September 10, 2010 - 07:55 AM UTC
Great work! I like the arrangement too. Could you post a photo or two more, that posing with the photographer and the pilot figure seems to be working nicely.
Are those figures all 1:32 btw?
CanDid
_VISITCOMMUNITY
Stockholm, Sweden
Joined: May 03, 2010
KitMaker: 123 posts
AeroScale: 98 posts
Posted: Friday, September 10, 2010 - 09:57 AM UTC
Thank's for the kind comments!

The scenery is inspired by the blast pens of Nurmoila (Finnish WWII Airbase). I enjoy making dios. In my opinion it makes the the kit come alive.


Regarding the figures I struggle with finding proper ones in the 1/32 scale (has anyone a tip for good manufacturer?). All of them are in the 35-scale. The scales are close enough to each other to make it work. The Legend figure (pilot) is actually slightly smaller than the usual 1/35 figures. On the other hand I have read that many of the Finnish pilots were not that tall.

Here is a few more pics.


Emeritus
_VISITCOMMUNITY
Uusimaa, Finland
Joined: March 30, 2004
KitMaker: 2,845 posts
AeroScale: 1,564 posts
Posted: Sunday, September 12, 2010 - 11:45 PM UTC
That photographer and pilot figures sure worked out nice!
Until told so, I couldn't have said those to be 1:35, thanks to natural length variation both in figures and actual people coupled with the closeness of the two scales.

SGTJKJ
#041
_VISITCOMMUNITY
Kobenhavn, Denmark
Joined: July 20, 2006
KitMaker: 10,069 posts
AeroScale: 3,788 posts
Posted: Monday, September 13, 2010 - 02:54 AM UTC
Looks great. Very well laid out scene and great modelling work!

Thanks for sharing
Watimena
_VISITCOMMUNITY
South Australia, Australia
Joined: May 09, 2010
KitMaker: 39 posts
AeroScale: 33 posts
Posted: Monday, September 13, 2010 - 02:06 PM UTC
That looks magnificent. Great subject.
AussieReg
Staff MemberAssociate Editor
AUTOMODELER
#007
_VISITCOMMUNITY
Victoria, Australia
Joined: June 09, 2009
KitMaker: 8,156 posts
AeroScale: 3,756 posts
Posted: Tuesday, September 14, 2010 - 12:43 AM UTC
Superb job Fred, I love it !!

Cheers, D
CanDid
_VISITCOMMUNITY
Stockholm, Sweden
Joined: May 03, 2010
KitMaker: 123 posts
AeroScale: 98 posts
Posted: Tuesday, September 14, 2010 - 02:30 AM UTC
Thank you all of you for the kind comments!

But there is plenty of room for improvement. in my opinion. For example looking at the build I'm quite disappointed in how the wires for the radio came out. They look a bit saggy and way to thick in the pictures. Usually I use stretched spruces for this, but here I used wire instead because I found it hard to stretch them long enough and equally thick How do you folks do when you need to make them long?

I also need to improve the figures a bit, not really happy with the faces and the uniforms are a bit shiny. It was my first attempt using MiG washes on figures, have only used Valejjo earlier. I used Valejjo on the faces and then MiG on the uniforms. I sprayed the figures glossy prior to the MiG-washing to make the surface smooth. I then sprayed the figures with flat clear afterwards but they came out glossy anyway, especially in the flash light from the camera.

Any hints and tips out there
NickZour
_VISITCOMMUNITY
Attica, Greece / Ελλάδα
Joined: May 01, 2008
KitMaker: 1,437 posts
AeroScale: 1,241 posts
Posted: Thursday, September 16, 2010 - 11:35 PM UTC
I think it's a great dio', I like it

But i don't like the wiring, you must not use wire. Use streched sprue


Cheers Nick
AussieReg
Staff MemberAssociate Editor
AUTOMODELER
#007
_VISITCOMMUNITY
Victoria, Australia
Joined: June 09, 2009
KitMaker: 8,156 posts
AeroScale: 3,756 posts
Posted: Thursday, September 16, 2010 - 11:56 PM UTC
Fred, I have used braid fishing line for my last couple of builds. It is very fine, zero stretch, you can get it in a metallic colour, and it will not react with any solvents so it sets with CA very well. I fix one end with a short over-length to be trimmed off later, then once that is set I put a small drop of CA on the receiving point of the other end, with a longer over length, and us either a clothes peg or a small clamp to hold pressure on it while the CA sets. You can trim the excess with fine scissors.

Here's a pic of my 1/2 Bf 109 recently done


Give it a try, you can get a small spool of line from your local outdoor store for a few dollars and it will last for years, just make sure you ask for "braid" fishing line, a good example is "Berkeley Fireline"

Hope this helps, Damian
CanDid
_VISITCOMMUNITY
Stockholm, Sweden
Joined: May 03, 2010
KitMaker: 123 posts
AeroScale: 98 posts
Posted: Saturday, September 18, 2010 - 02:21 AM UTC

Quoted Text

Fred, I have used braid fishing line for my last couple of builds. It is very fine, zero stretch, you can get it in a metallic colour, and it will not react with any solvents so it sets with CA very well. I fix one end with a short over-length to be trimmed off later, then once that is set I put a small drop of CA on the receiving point of the other end, with a longer over length, and us either a clothes peg or a small clamp to hold pressure on it while the CA sets. You can trim the excess with fine scissors.


Damian, thank's a lot for that tip!

Stretched sprue just did not work for me on this one. I tried and failed several times.
CanDid
_VISITCOMMUNITY
Stockholm, Sweden
Joined: May 03, 2010
KitMaker: 123 posts
AeroScale: 98 posts
Posted: Tuesday, September 21, 2010 - 05:08 AM UTC
New wiring added. Used Berkeley Fireline 0,17mm. Damian, thank you for the tip

doppelganger
_VISITCOMMUNITY
Idaho, United States
Joined: March 09, 2010
KitMaker: 557 posts
AeroScale: 193 posts
Posted: Thursday, September 23, 2010 - 04:03 PM UTC
looks very good I use Maxima chameleon 2 lb leader material and zap a gap medium ca with good results.Did you shoot your own photos? if so good job on that too.I hope to post on here soon after my pro photographer nephew helps me out, I am discovering good photography is quite a challenge for me
AussieReg
Staff MemberAssociate Editor
AUTOMODELER
#007
_VISITCOMMUNITY
Victoria, Australia
Joined: June 09, 2009
KitMaker: 8,156 posts
AeroScale: 3,756 posts
Posted: Thursday, September 23, 2010 - 04:13 PM UTC

Quoted Text

New wiring added. Used Berkeley Fireline 0,17mm. Damian, thank you for the tip


You're very welcome, looks great !!
NickZour
_VISITCOMMUNITY
Attica, Greece / Ελλάδα
Joined: May 01, 2008
KitMaker: 1,437 posts
AeroScale: 1,241 posts
Posted: Friday, September 24, 2010 - 03:53 AM UTC
That's Far Better Mr. Fredrik


Cheers Nick
CanDid
_VISITCOMMUNITY
Stockholm, Sweden
Joined: May 03, 2010
KitMaker: 123 posts
AeroScale: 98 posts
Posted: Saturday, September 25, 2010 - 07:20 AM UTC
Nick and Damien, thanks you for your feedback and tips, That is what makes this site so great

Doppelganger, I use my old Konica Dimage Z6 and and shoot my pics with the camera hand held. Objects placed on my kitchen table. Nothing fancy at all.
 _GOTOTOP