Hi
I've just received newest Kagero's book- Topcolors 'Messerschmitt Bf 109 F'. So it is a great time to start to built of famous and excellent Zvezda's kit.
This book comes with two big decal sheets with 1:72, 1:48 and 1:32 individual markings for 16 various Bf 109 Fs, each depicted on beautifully drawn 4-view colour profiles and thoroughly described in the booklet included with the decals. The selection contains the following aircraft:
Bf 109 F-2; 'White 1', flown by Oblt. Kurt Sochatzy, Staffelkapitän of 7./JG 3, France, May-June 1941,
Bf 109 F-4; W.Nr. 8334, 'White 1', flown by Oblt. Wolfdieter Huy, Staffelkapitän of 7./JG 77, Jassy, 5 July 1941,
Bf 109 F-2; 'White 9', flown by Oblt. Hans Phillip, Staffelkapitän of 4./JG 54, Mal. Owsischtschi, 10 August 1941,
Bf 109 F-4/Z; W.Nr. 7308, 'Black 1', flown by Oblt. Günther Rall, Staffelkapitän of 8./JG 52, Stschastliwaja, 30 August 1941,
Bf 109 F-2; W.Nr. 8165, 'Black chevron 4', flown by Uffz. Fritz Geissler of Stab I./JG 52, Katwijk, September 1941,
Bf 109 F-2; W.Nr. 9588, 'Yellow 3', flown by Hptm. Franz Eckerle, Staffelkapitän of 6./JG 54, Staraja Russa, October 1941,
Bf 109 F-4; W.Nr. 7194, 'Yellow 6', flown by Uffz. Karl Willius of 3./JG 26, St. Omer, Autumn 1941,
Bf 109 F-2; 'Black 8', flown by Fw. Herbert Brönnle of 2./JG 54, Krasnogvardeisk, 16 March 1942,
Bf 109 F-2; 'Black chevron', flown by Hptm. Hans Phillip, Gruppenkommandeur of I./JG 54, Krasnogvardeisk, 22 March 1942,
Bf 109 F-4/Z; W.Nr. 7391, 'Black 5', flown by Fw. Gerhard Köppen of 8./JG 52, Kharkov, Spring 1942,
Bf 109 F-4; 'White 1', flown by Oblt. Werner Pichon-Kalau vom Hofe, Staffelkapitän of 7./JG 54, Utti, 23 or 24 June 1942,
Bf 109 F-4; 'Black 5', flown by Oblt. Anton Hackl, Staffelkapitän of 5./JG 77, Kastornoje, 26 July 1942,
Bf 109 F-4/Z; W.Nr. 10132, flown by Hptm. Horst Carganico, Gruppenkommandeur of II./JG 5, Petsamo, July-August 1942,
Bf 109 F-2; flown by Obfw. Franz-Josef Beerenbrock of Stab IV./JG 51, Dugino, 1 August 1942,
Bf 109 F-2; W.Nr. 6661, ‘Black 12’, flown by Obfw. Heinz Klöpper of 11./JG 51, Dugino, late August 1942,
Bf 109 F-4; flown by Hptm. Franz Hahn, Gruppenkommandeur of I./JG 4, Mizil, Autumn 1942.
My choose of painting scheme is Hans Phillip's II> with white temporary winter camouflage. Strongly weathered :>
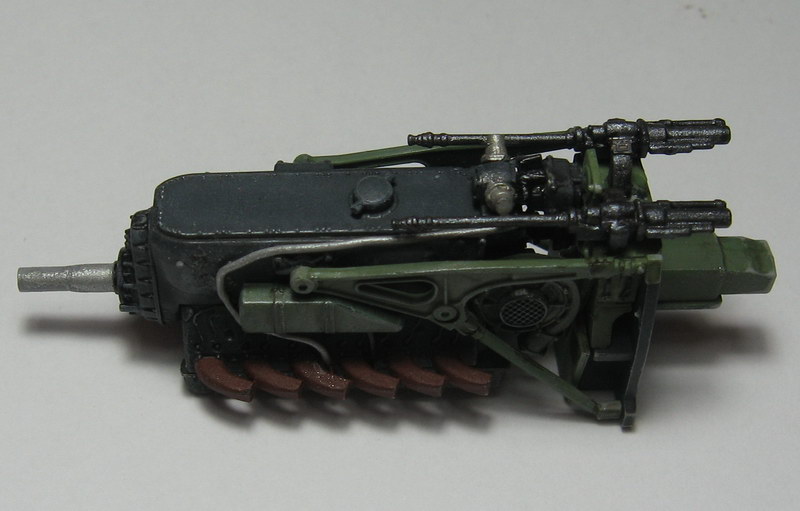
I've started with engine (I'm going to expose it a little). It was necessary to add some details (but only visible one)
Hosted by Rowan Baylis
Messerschmitt Bf 109 F-2 1/48
KamilS
Krakow, Poland
Joined: March 08, 2008
KitMaker: 225 posts
AeroScale: 77 posts
Joined: March 08, 2008
KitMaker: 225 posts
AeroScale: 77 posts
Posted: Monday, December 06, 2010 - 01:22 AM UTC
NickZour
Attica, Greece / Ελλάδα
Joined: May 01, 2008
KitMaker: 1,437 posts
AeroScale: 1,241 posts
Joined: May 01, 2008
KitMaker: 1,437 posts
AeroScale: 1,241 posts
Posted: Monday, December 06, 2010 - 02:22 AM UTC
That is VERY interesting
I'll be watching it closely
Cheers Nick
I'll be watching it closely
Cheers Nick
ShawnM
Missouri, United States
Joined: November 24, 2008
KitMaker: 564 posts
AeroScale: 510 posts
Joined: November 24, 2008
KitMaker: 564 posts
AeroScale: 510 posts
Posted: Monday, December 06, 2010 - 06:07 AM UTC
wonderful work on the DB so far!
Kornbeef
England - South East, United Kingdom
Joined: November 06, 2005
KitMaker: 1,667 posts
AeroScale: 1,551 posts
Joined: November 06, 2005
KitMaker: 1,667 posts
AeroScale: 1,551 posts
Posted: Monday, December 06, 2010 - 07:02 AM UTC
Yes certainly lovely work. I also didnt realise how good this kit was...till I saw that. Thanks
Keith
Keith
KamilS
Krakow, Poland
Joined: March 08, 2008
KitMaker: 225 posts
AeroScale: 77 posts
Joined: March 08, 2008
KitMaker: 225 posts
AeroScale: 77 posts
Posted: Monday, December 06, 2010 - 07:18 AM UTC
Thank you very much.
Little update
At first some painting schemes that have lost with winter one:
..but let's back to the model. I've add some more details on the engine (it's still not finished) and mount all details of the cockpit. Originally i wanted to mount ethed seatbelts on the pilot's seat, but i really like pilot's figure from that kit..
I also started work on the wing
..and i have to say it: working on this kit is really a pleasure!
Jurjen
Groningen, Netherlands
Joined: September 21, 2003
KitMaker: 3,040 posts
AeroScale: 30 posts
Joined: September 21, 2003
KitMaker: 3,040 posts
AeroScale: 30 posts
Posted: Monday, December 06, 2010 - 07:28 AM UTC
This is going to be a very interesting build. Keep it up!
Siarzewski
England - East Anglia, United Kingdom
Joined: May 09, 2009
KitMaker: 2 posts
AeroScale: 1 posts
Joined: May 09, 2009
KitMaker: 2 posts
AeroScale: 1 posts
Posted: Monday, December 06, 2010 - 10:03 AM UTC
Go Kamil Go.
Ill be watching your progress- it may just spark me up to do some work on my Emil.
thehannaman
New York, United States
Joined: April 04, 2006
KitMaker: 279 posts
AeroScale: 194 posts
Joined: April 04, 2006
KitMaker: 279 posts
AeroScale: 194 posts
Posted: Monday, December 06, 2010 - 12:23 PM UTC
Looks great so far. I love the added engine detail.
doppelganger
Idaho, United States
Joined: March 09, 2010
KitMaker: 557 posts
AeroScale: 193 posts
Joined: March 09, 2010
KitMaker: 557 posts
AeroScale: 193 posts
Posted: Monday, December 06, 2010 - 02:24 PM UTC
looks great, you have a lot of patience and skill this piques my interest in the 109
KrisMax
Queensland, Australia
Joined: January 23, 2010
KitMaker: 156 posts
AeroScale: 139 posts
Joined: January 23, 2010
KitMaker: 156 posts
AeroScale: 139 posts
Posted: Monday, December 06, 2010 - 11:54 PM UTC
Kamil,
Some great detail work on the engine. Looks like there's already some good detail in the plastic. I'm on the look out for this kit, and I'll be following your build.
Thanks
Simon
Some great detail work on the engine. Looks like there's already some good detail in the plastic. I'm on the look out for this kit, and I'll be following your build.
Thanks
Simon
rafjum
France
Joined: December 17, 2008
KitMaker: 12 posts
AeroScale: 8 posts
Joined: December 17, 2008
KitMaker: 12 posts
AeroScale: 8 posts
Posted: Tuesday, December 07, 2010 - 04:31 AM UTC
Wow, great pictures Kamil!
I'll watch at this one, my favorite!
Thanks for sharing!
raf
I'll watch at this one, my favorite!
Thanks for sharing!
raf
KamilS
Krakow, Poland
Joined: March 08, 2008
KitMaker: 225 posts
AeroScale: 77 posts
Joined: March 08, 2008
KitMaker: 225 posts
AeroScale: 77 posts
Posted: Wednesday, December 08, 2010 - 03:37 AM UTC
thanks a lot
engine complete
I also finished the wing. there was the only place tat needed some putty till now- wing's end
in Phillip's Bf tail wheel was blocked in open position and its bay was covered. It was necessary to rework kit's part. I've used magic sculp
engine complete
I also finished the wing. there was the only place tat needed some putty till now- wing's end
in Phillip's Bf tail wheel was blocked in open position and its bay was covered. It was necessary to rework kit's part. I've used magic sculp
erwin_rommel
Brest, Belarus
Joined: July 20, 2009
KitMaker: 105 posts
AeroScale: 76 posts
Joined: July 20, 2009
KitMaker: 105 posts
AeroScale: 76 posts
Posted: Wednesday, December 08, 2010 - 06:16 AM UTC
Kornbeef
England - South East, United Kingdom
Joined: November 06, 2005
KitMaker: 1,667 posts
AeroScale: 1,551 posts
Joined: November 06, 2005
KitMaker: 1,667 posts
AeroScale: 1,551 posts
Posted: Wednesday, December 08, 2010 - 07:33 AM UTC
Coming along very nicely indeed..very nicely
KamilS
Krakow, Poland
Joined: March 08, 2008
KitMaker: 225 posts
AeroScale: 77 posts
Joined: March 08, 2008
KitMaker: 225 posts
AeroScale: 77 posts
Posted: Wednesday, December 08, 2010 - 07:41 AM UTC
Thank you for your kind words!
Some minor modifications of figure; as I've said I'm going to made winter painting. That is the reason I had to add some fur collar to the uniform. Second one upgrade is head. That from the kit is not best, so I replaced it with CMK's one
Please note that cockpit is basecoated with silver- for further paint chips
KamilS
Krakow, Poland
Joined: March 08, 2008
KitMaker: 225 posts
AeroScale: 77 posts
Joined: March 08, 2008
KitMaker: 225 posts
AeroScale: 77 posts
Posted: Wednesday, December 08, 2010 - 08:03 AM UTC
erwin_rommel
Brest, Belarus
Joined: July 20, 2009
KitMaker: 105 posts
AeroScale: 76 posts
Joined: July 20, 2009
KitMaker: 105 posts
AeroScale: 76 posts
Posted: Wednesday, December 08, 2010 - 08:34 AM UTC
KamilS
Krakow, Poland
Joined: March 08, 2008
KitMaker: 225 posts
AeroScale: 77 posts
Joined: March 08, 2008
KitMaker: 225 posts
AeroScale: 77 posts
Posted: Wednesday, December 08, 2010 - 08:49 AM UTC
Well, i know that RLM02 has many different tones, but mostly little bit lighter. In my opinion it is represented by Gunze best.
--
mieszkam w krakowie
--
mieszkam w krakowie
Roxter
Rigas, Latvia
Joined: July 04, 2007
KitMaker: 268 posts
AeroScale: 245 posts
Joined: July 04, 2007
KitMaker: 268 posts
AeroScale: 245 posts
Posted: Thursday, December 09, 2010 - 12:13 AM UTC
Overall a great progress! Kamil, figure's neck seems to a little oversized - I guess the head should sit little bit deeper. At least seems so on the 1st picture. Don't you think?
KamilS
Krakow, Poland
Joined: March 08, 2008
KitMaker: 225 posts
AeroScale: 77 posts
Joined: March 08, 2008
KitMaker: 225 posts
AeroScale: 77 posts
Posted: Thursday, December 09, 2010 - 08:11 AM UTC
yes, you have right. I've cut it a little..
..and also engine and engine's mount are finished
KamilS
Krakow, Poland
Joined: March 08, 2008
KitMaker: 225 posts
AeroScale: 77 posts
Joined: March 08, 2008
KitMaker: 225 posts
AeroScale: 77 posts
Posted: Friday, December 10, 2010 - 01:49 AM UTC
Because I have to paint immediately some russian tracked behemoth as a boxart for Tankmania's new release, I had to slow down with this project. But little update. I've finished cockpit and figure, and now fuselage is closed
KamilS
Krakow, Poland
Joined: March 08, 2008
KitMaker: 225 posts
AeroScale: 77 posts
Joined: March 08, 2008
KitMaker: 225 posts
AeroScale: 77 posts
Posted: Sunday, December 12, 2010 - 04:57 AM UTC
a small progress.
It was necessary to change air intake's shape. I reworked it with magic sculp.
I've started work on engine covers- I'm going to paint them separately.
And one more figure.. I think it will be a good idea to place that plane on a small vignette
It was necessary to change air intake's shape. I reworked it with magic sculp.
I've started work on engine covers- I'm going to paint them separately.
And one more figure.. I think it will be a good idea to place that plane on a small vignette
NickZour
Attica, Greece / Ελλάδα
Joined: May 01, 2008
KitMaker: 1,437 posts
AeroScale: 1,241 posts
Joined: May 01, 2008
KitMaker: 1,437 posts
AeroScale: 1,241 posts
Posted: Sunday, December 12, 2010 - 07:27 AM UTC
That's REALLY nice
Mr. Kamil, paint it with the Winter camo of I/JG-54 PLEASE
Cheers Nick
Mr. Kamil, paint it with the Winter camo of I/JG-54 PLEASE
Cheers Nick
FalkeEins
England - South East, United Kingdom
Joined: March 07, 2005
KitMaker: 868 posts
AeroScale: 690 posts
Joined: March 07, 2005
KitMaker: 868 posts
AeroScale: 690 posts
Posted: Sunday, December 12, 2010 - 09:35 AM UTC
..very nice thread Kamil ....
KamilS
Krakow, Poland
Joined: March 08, 2008
KitMaker: 225 posts
AeroScale: 77 posts
Joined: March 08, 2008
KitMaker: 225 posts
AeroScale: 77 posts
Posted: Monday, December 13, 2010 - 01:55 AM UTC
Paintwork started:
Masking with tamiya's masking tape and plasticine. Simple preshadeing on lower surfaces and white basecoat for yellow markings